Introduction
This manual provides essential information for the proper installation, operation, and maintenance of the Generic Raytools BW101-GS Laser Welding Head Accessory, specifically the switch button component. Adhering to these instructions will ensure safe and efficient use of the product and help prolong its lifespan.
Please read this manual thoroughly before attempting any installation or operation.
Product Overview
The switch button is a critical component designed for integration with the Raytools BW101-GS Laser Welding Head. It facilitates the control of specific functions, typically power activation or mode selection, within the laser welding system. This accessory is engineered for durability and reliable performance in industrial metalworking environments.
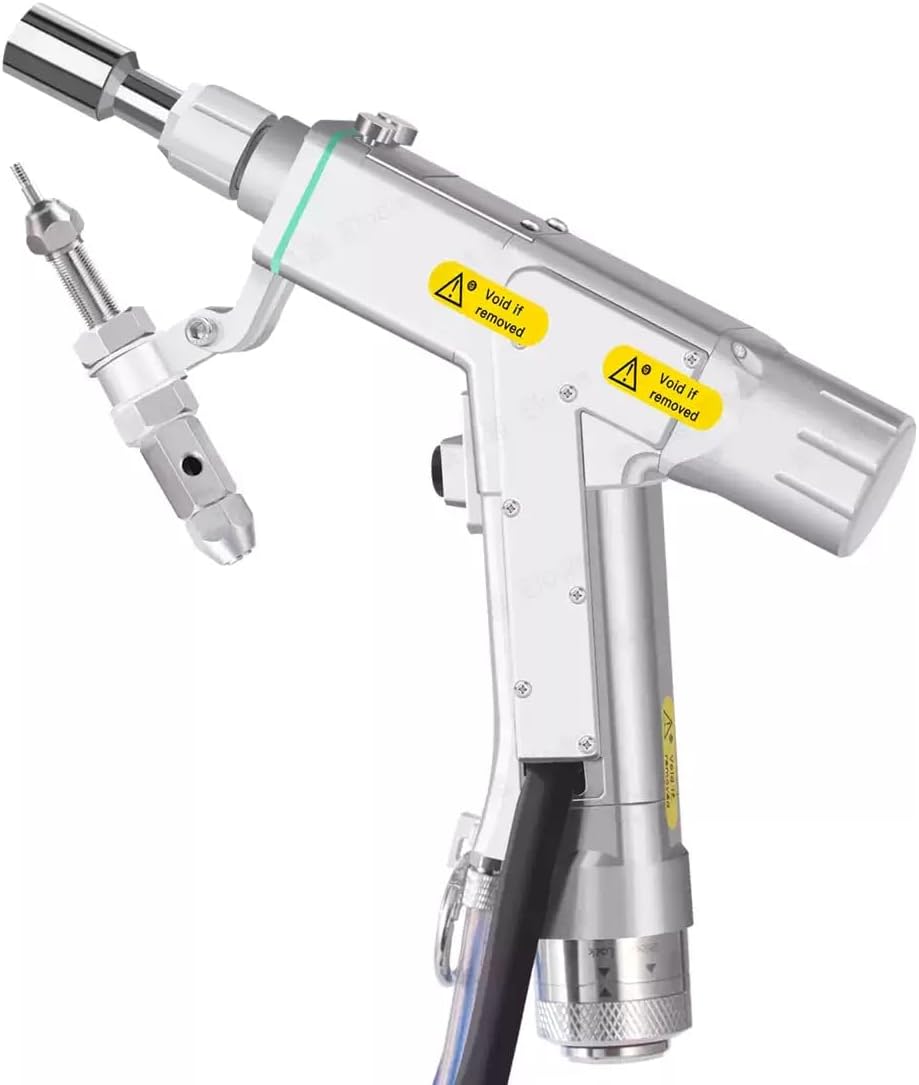
Image: Raytools BW101-GS Laser Welding Head. This image shows the complete laser welding head, illustrating the context in which the switch button accessory is used.
Key features of the switch button include:
- Precise Control: Designed for accurate activation and deactivation of functions.
- Durable Construction: Built to withstand the demands of industrial use.
- Compatibility: Specifically designed for the Raytools BW101-GS series.
Setup and Installation
Proper installation of the switch button is crucial for its functionality and the overall safety of the laser welding system. Consult the main Raytools BW101-GS Laser Welding Head manual for specific wiring diagrams and mounting locations.
Installation Steps:
- Power Disconnection: Ensure the entire laser welding system is powered off and disconnected from the main power supply before beginning installation.
- Identify Mounting Location: Locate the designated mounting point for the switch button on the Raytools BW101-GS Laser Welding Head or control panel.
- Connect Wiring: Carefully connect the wires from the switch button to the corresponding terminals on the welding head's control board. Refer to the wiring diagram provided with your main welding head unit. Typically, red indicates positive (+) and black indicates negative (-) or ground.
- Secure Mounting: Mount the switch button securely using appropriate fasteners (not included, typically part of the main unit's design). Ensure it is firmly in place to prevent accidental dislodgement during operation.
- Verify Connections: Double-check all wiring connections for correctness and ensure no loose wires are present.
- System Reassembly: Reassemble any covers or panels removed during installation.
- Initial Power-Up: Reconnect the main power supply and power on the system. Observe for any unusual behavior or error indicators.
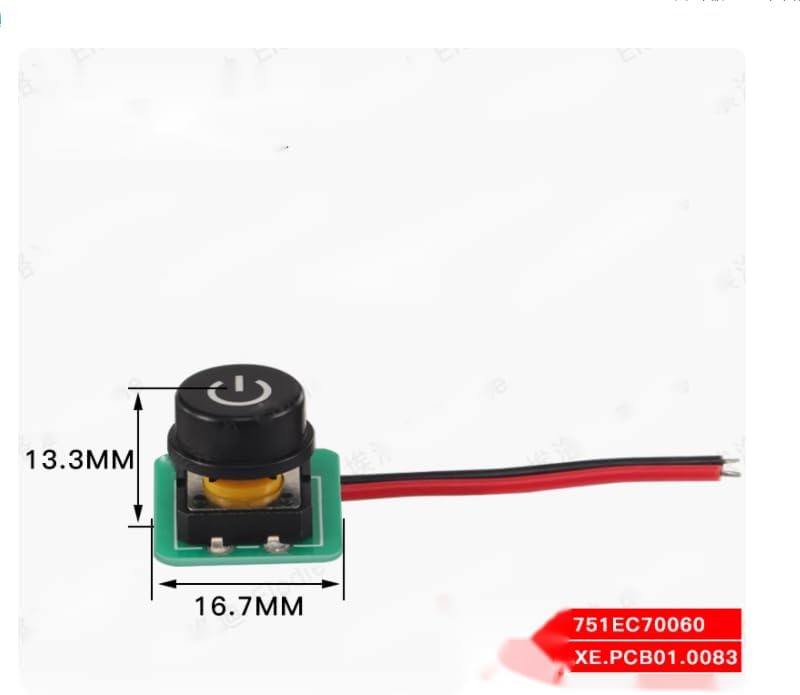
Image: Switch button component with dimensions (13.3mm height, 16.7mm width). This image provides a visual reference for the physical size and appearance of the switch button.
Operating Instructions
The switch button provides a straightforward interface for controlling specific functions of the Raytools BW101-GS Laser Welding Head. Its operation is typically intuitive.
Basic Operation:
- Power On/Off: If configured as a power switch, press the button once to activate the system or a specific function. Press it again to deactivate.
- Mode Selection: If configured for mode selection, pressing the button may cycle through different operating modes (e.g., continuous weld, pulse weld). Refer to your main welding head manual for specific mode functionalities.
- Indicator Light: Some switch buttons may include an integrated LED indicator. Observe its behavior (e.g., solid light for active, blinking for standby) as per your system's documentation.
Always refer to the comprehensive operating manual for the Raytools BW101-GS Laser Welding Head for detailed instructions on system-specific functions controlled by this switch.
Maintenance
The switch button requires minimal maintenance. Regular inspection and cleaning will help ensure its longevity and reliable performance.
Maintenance Guidelines:
- Cleaning: Periodically clean the surface of the switch button with a soft, dry cloth. If necessary, a slightly damp cloth with mild soap can be used, ensuring no liquid enters the internal components. Avoid abrasive cleaners or solvents.
- Inspection: Regularly inspect the button for any signs of physical damage, wear, or loose connections. Check the wiring for fraying or damage.
- Environmental Conditions: Ensure the operating environment is free from excessive dust, moisture, and corrosive substances, which can degrade the switch's performance over time.
- Storage: When not in use for extended periods, store the welding head and its accessories in a clean, dry environment.
Do not attempt to disassemble the switch button. Internal repairs should only be performed by qualified technicians.
Troubleshooting
If you encounter issues with the switch button, perform the following basic troubleshooting steps before seeking professional assistance.
| Problem | Possible Cause | Solution |
|---|---|---|
| Switch button unresponsive. | Loose or disconnected wiring. Faulty switch button. Power supply issue to the main unit. | Check all wiring connections to ensure they are secure. Test the switch button with a multimeter if possible (only by qualified personnel). Verify the main laser welding head is receiving power. |
| Indicator light not working. | Faulty LED. Incorrect wiring. System not powered on. | Confirm the switch button's function is active. Re-check wiring according to the main unit's diagram. Ensure the main laser welding head is powered on. |
| Intermittent functionality. | Loose internal connection. Contamination. | Ensure the button is securely mounted. Clean the button surface and surrounding area. |
If these steps do not resolve the issue, contact your supplier or a qualified service technician.
Specifications
The following specifications apply to the Raytools BW101-GS Laser Welding Head Accessory - Switch Button:
| Feature | Detail |
|---|---|
| Model Number | BW101-GS (Accessory Component) |
| Component Type | Switch Button |
| Compatibility | Raytools BW101-GS Laser Welding Head |
| Dimensions (Approx.) | Height: 13.3 mm, Width: 16.7 mm (Refer to image for visual representation) |
| Manufacturer | CHINA (as per product data) |
Warranty and Support
For warranty information and technical support regarding this Raytools BW101-GS Laser Welding Head Accessory (switch button), please contact the original seller or distributor from whom the product was purchased. Keep your purchase receipt or proof of purchase for warranty claims.
Specific warranty terms and conditions may vary depending on the region and seller policies.