1. Product Overview
The Generic Two-Way Articulating Borescope is a professional visual inspection tool designed for navigating tight spaces and providing clear visuals. It is an indispensable device for mechanics, engineers, plumbers, and DIY enthusiasts, offering advanced features for detailed inspections.
This borescope features a 4.5-inch IPS LCD screen for vivid clarity, a 1080P HD camera with adjustable LED lights, and a flexible 8.5mm diameter IP67 waterproof probe. Its two-way 210° articulation allows for comprehensive inspection of hard-to-reach areas.

Figure 1.1: The Two-Way Articulating Borescope, showing the main unit, flexible probe, and included carrying case.
2. Key Features
- 1080P HD Camera: Equipped with a high-definition camera and adjustable LED lights, offering a focus range from 2cm to infinity and up to 3X digital zoom.
- Ergonomic One-handed Operation: Features a centrally placed articulation joystick for smooth one-handed control and a conveniently located photo/video button.
- 210° Dual-direction Articulation: Advanced two-way steering technology allows flexible adjustment of the viewing angle to inspect hard-to-reach areas without blind spots.
- Vivid Clarity on a 4.5" IPS Display: Bright 4.5-inch IPS LCD screen provides sharp, high-resolution visuals in various lighting conditions.
- Built for Tough & Narrow Spaces: Features a 1.5-meter waterproof, bendable lens tube that maintains its shape for precise inspections. The camera is IP67-rated for harsh, wet, or dusty environments.
- Dual Lens Capability: Some models may feature a dual-lens system, offering switchable front and side views for comprehensive inspection.

Figure 2.1: The 4.5-inch IPS screen provides clear visualization during inspections, as shown here examining an engine.
3. What's in the Box
Upon opening your package, please verify that all the following items are included:
- 1 x Two-way Articulating Borescope Unit
- 1 x Type-C Cable (for charging and data transfer)
- 1 x Professional Carrying Case
- 1 x User’s Manual (this document)
- 1 x Memory Card (may be pre-installed or included separately)

Figure 3.1: All components included in the product package, neatly arranged with the carrying case.
4. Applications
This multifunctional inspection camera is suitable for a wide range of tasks, including but not limited to:
- Automotive engine and cylinder inspection
- HVAC system checks
- Plumbing and drain camera diagnostics
- Sewer snake camera for pipe inspection
- Industrial machinery and equipment maintenance
- Home renovation and DIY projects
5. Setup
5.1 Charging the Device
- Locate the Type-C charging port on the main unit (refer to Figure 6.1 for control panel layout).
- Connect the provided Type-C cable to the device and a suitable USB power adapter (not included) or a computer USB port.
- The charging indicator light will illuminate during charging and turn off or change color when fully charged.
- Allow approximately 3-4 hours for a full charge before first use.
5.2 Inserting the Memory Card
- Locate the memory card slot on the main unit (refer to Figure 6.1).
- Gently insert the provided memory card into the slot until it clicks into place. Ensure the card is oriented correctly.
- To remove, push the card gently inward until it springs out.
5.3 Attaching the Probe
The probe is typically pre-attached. If not, align the connector of the flexible probe with the port on the main unit and secure it firmly.
6. Operating Instructions
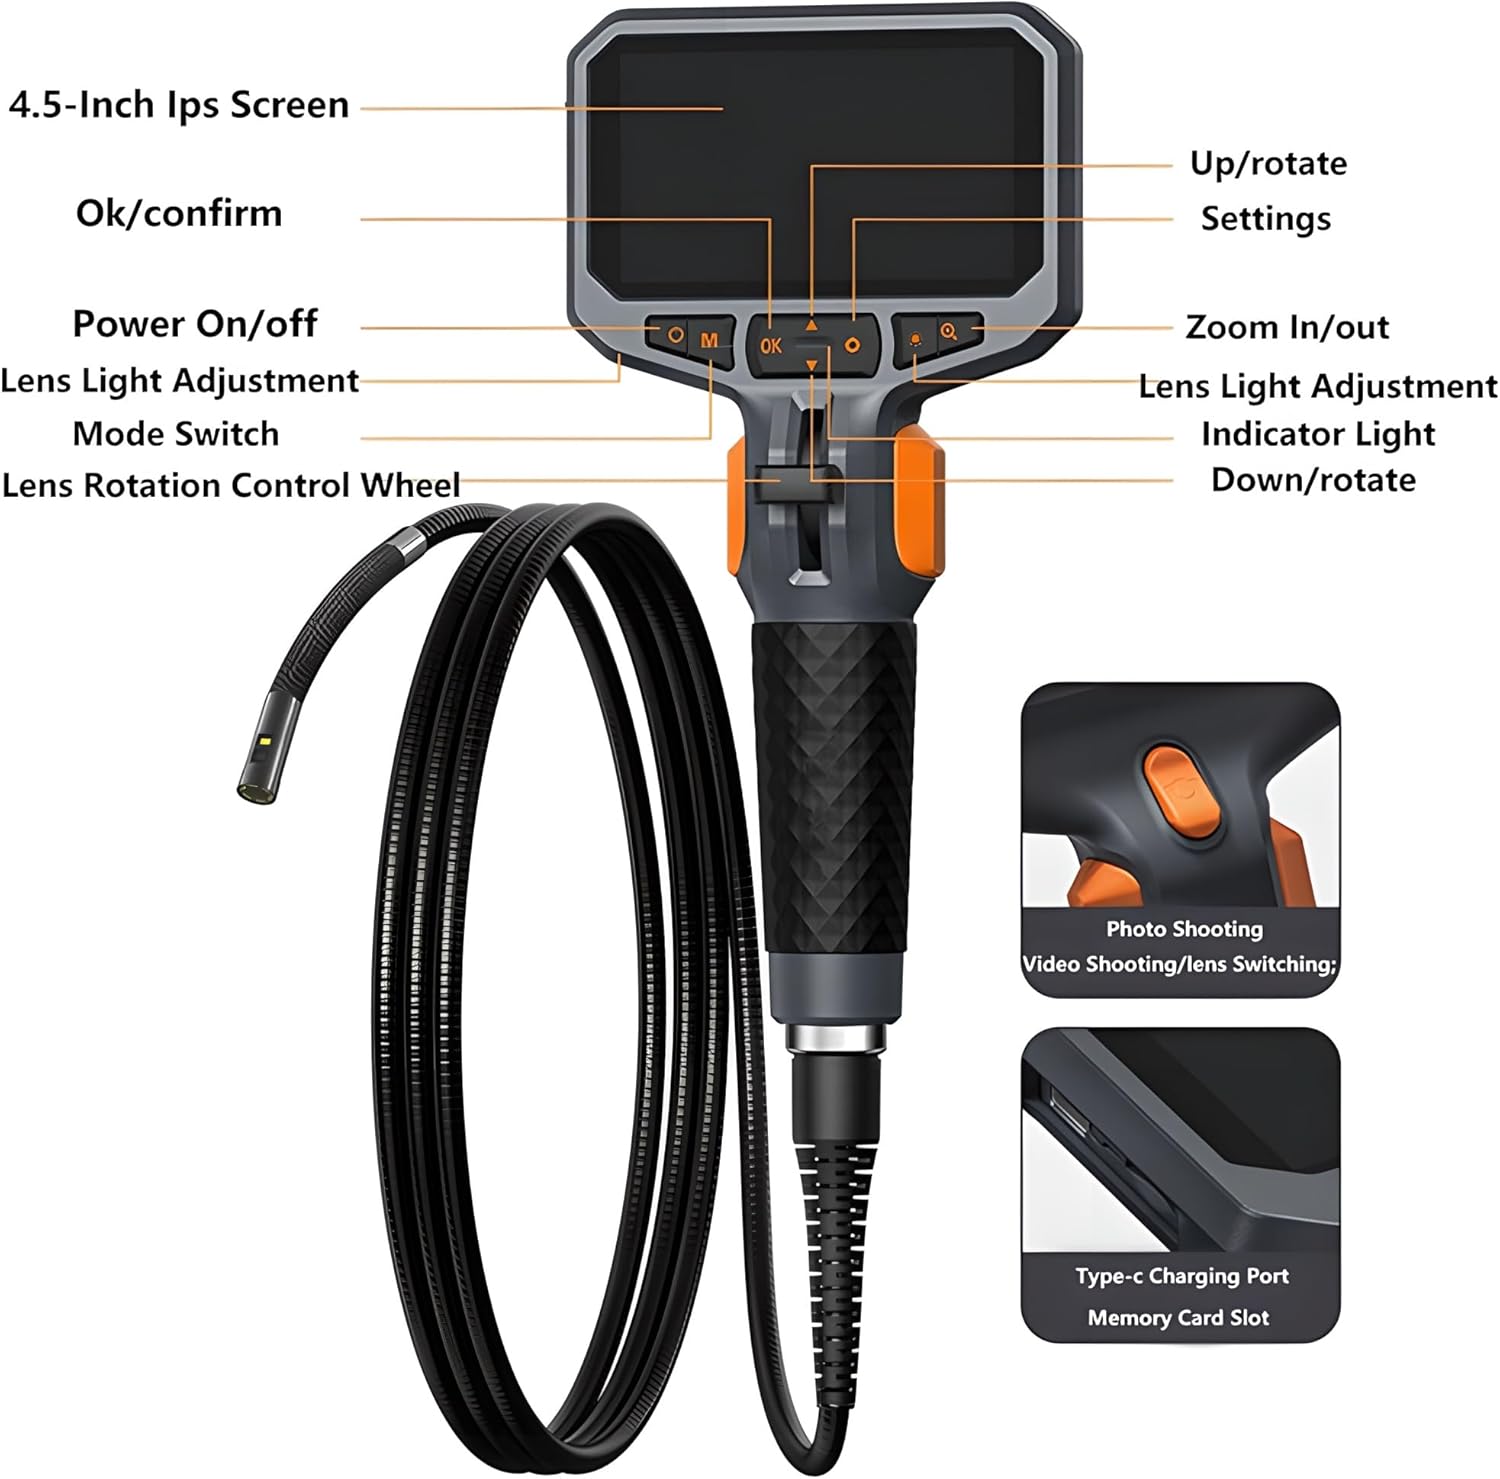
Figure 6.1: Control panel layout and key components of the borescope.
6.1 Power On/Off
- To power on, press and hold the Power On/Off button (labeled 'M' or power symbol) for a few seconds until the screen illuminates.
- To power off, press and hold the Power On/Off button again until the screen shuts down.
6.2 Articulation Control
The borescope features a 210° two-way articulation mechanism for precise probe steering.
- Use the Lens Rotation Control Wheel (joystick) located on the handle to bend the probe tip.
- Push the joystick up or down to articulate the probe tip in the desired direction.
- The probe can bend up to 210° in each direction, allowing for a wide field of view.

Figure 6.2: The flexible probe demonstrating its bending capability, reaching up to 210° in one direction.
6.3 LED Light Adjustment
- Press the Lens Light Adjustment button (often marked with a light bulb icon or 'Q') to cycle through different brightness levels for the LED lights on the probe tip.
- Adjust the brightness to achieve optimal illumination for your inspection area.
6.4 Digital Zoom
- Press the Zoom In/Out button (often marked with a magnifying glass icon or 'OK') to digitally zoom in or out on the live image.
- The device supports up to 3X digital zoom.
6.5 Photo/Video Capture
- To take a photo, briefly press the Photo Shooting/Video Shooting button (often located on the rear of the handle or marked with a camera icon).
- To start video recording, press and hold the Photo Shooting/Video Shooting button for a few seconds. Press again to stop recording.
- Captured photos and videos are saved to the inserted memory card.
6.6 Mode Switch and Settings
- Press the Mode Switch button (often marked 'M') to switch between photo mode, video mode, and playback mode.
- In playback mode, use the navigation buttons (Up/Down/OK) to browse and view captured media.
- Press the Settings button (often marked with a gear icon) to access the device menu for adjusting language, date/time, resolution, and other system settings.
6.7 Dual Lens Switching (if applicable)
If your model features a dual-lens system, you can switch between the front and side cameras.
- Press the Lens Switching button (often integrated with the photo/video button or a dedicated button) to toggle between the front-view camera and the side-view camera.
- This allows for a more comprehensive 360° field of view without repositioning the probe.

Figure 6.3: Explanation of the 1080P dual lens system, showing separate front and side cameras for versatile viewing.
7. Maintenance
7.1 Cleaning the Probe and Lens
- After each use, especially in dirty or wet environments, gently wipe the probe and camera lens with a soft, damp cloth.
- For stubborn grime, use a small amount of mild soap or lens cleaner on the cloth. Avoid abrasive materials or harsh chemicals.
- Ensure the lens is dry before storage.
7.2 Device Storage
- Store the borescope and all accessories in the provided professional carrying case when not in use.
- Keep the device in a cool, dry place, away from direct sunlight and extreme temperatures.
- Avoid bending the probe excessively during storage to prevent damage.
7.3 Battery Care
- To prolong battery life, avoid fully discharging the device frequently.
- If storing for an extended period, charge the battery to approximately 50-70% every few months.
8. Troubleshooting
| Problem | Possible Cause | Solution |
|---|---|---|
| Device does not power on. | Low battery; device not charged. | Charge the device fully using the provided Type-C cable. |
| No image on screen. | Probe not connected properly; camera lens obstructed. | Ensure the probe is securely connected. Check and clean the camera lens. |
| Image is blurry or unclear. | Lens is dirty; insufficient lighting; object out of focus range. | Clean the camera lens. Adjust LED light brightness. Reposition the probe to be within the 2cm-infinity focus range. |
| Cannot save photos/videos. | Memory card full; memory card not inserted or faulty. | Check memory card storage and delete unnecessary files. Reinsert or replace the memory card. |
| Probe articulation is stiff or unresponsive. | Mechanism obstructed; internal damage. | Ensure no debris is obstructing the articulation mechanism. If the issue persists, contact customer support. |
9. Specifications
- Screen: 4.5-inch IPS LCD
- Camera Resolution: 1080P HD
- Probe Diameter: 8.5mm
- Probe Length: 1.5 meters
- Articulation: 210° Two-way
- Waterproof Rating: IP67 (for camera probe)
- LED Lights: Adjustable brightness
- Digital Zoom: Up to 3X
- Focus Range: 2cm to infinity
- Power Source: Rechargeable battery (Type-C charging)

Figure 9.1: The IP67 waterproof rating ensures reliable performance in wet and harsh environments.
10. Important Notes
- Always ensure the device is fully charged before critical inspections.
- Do not attempt to disassemble or modify the device, as this will void the warranty and may cause damage.
- Keep the device and its accessories out of reach of children.
- Dispose of the battery according to local regulations.
11. Warranty and Support
This product comes with a standard manufacturer's warranty. For specific warranty terms and conditions, please refer to the documentation provided with your purchase or contact the retailer.
If you encounter any issues or have questions regarding the operation, maintenance, or troubleshooting of your borescope, please contact our customer support team. Provide your product model and purchase details for efficient assistance.