Introduction
This manual provides detailed instructions for the installation, operation, and maintenance of your MSI MEG X870E ACE MAX Motherboard. This high-performance ATX motherboard is designed to support AMD Ryzen 9000, 8000, and 7000 series processors on the AM5 socket, featuring the AMD X870E chipset.
Please read this manual thoroughly before beginning installation to ensure proper setup and to maximize the performance and longevity of your system.
Setup and Installation
1. Motherboard Overview
Familiarize yourself with the layout of the MSI MEG X870E ACE MAX motherboard before proceeding with component installation.

Figure 1: MSI MEG X870E ACE MAX Motherboard layout. This image displays the overall design of the motherboard, including the CPU socket, DIMM slots, PCIe slots, and various heatsinks.
2. Processor Installation (Socket AM5)
This motherboard supports AMD Ryzen 9000, 8000, and 7000 series processors. Ensure the CPU is correctly oriented with the triangular marker aligned with the socket's marker before gently lowering it into the AM5 socket. Secure the retention arm.
3. Memory Installation (DDR5)
The motherboard features four DDR5 DIMM SMT slots. Install DDR5 memory modules by aligning the notch on the module with the key in the DIMM slot. Press down firmly on both ends until the clips lock into place. For optimal performance, refer to the motherboard's QVL (Qualified Vendor List) and install modules in the recommended slots for dual-channel operation.
- Supports DDR5 memory up to 8400+ MT/s (OC).
- Maximum memory capacity: 256 GB.
4. Storage Device Installation (M.2 & SATA)
The MEG X870E ACE MAX offers extensive storage options:
- M.2 Slots: Two M.2 Gen5 x4 128Gbps slots and three M.2 Gen4 x4 64Gbps slots. These slots are equipped with EZ M.2 Shield Frozr II heatsinks to prevent thermal throttling.
- SATA Ports: Four SATA 6Gbps ports for traditional hard drives and SSDs.
To install an M.2 SSD, remove the Shield Frozr heatsink, insert the SSD into the slot, and secure it with the provided screw or tool-less mechanism. Reattach the heatsink.

Figure 2: Close-up of an M.2 slot with the EZ M.2 Shield Frozr II heatsink. This image illustrates the cooling solution for M.2 SSDs, designed to maintain optimal performance.

Figure 3: Diagram illustrating the PCIe and M.2 slot configurations, highlighting Lightning Gen4 and Gen5 capabilities for high-speed components.
5. Graphics Card Installation (PCIe 5.0)
The motherboard features one PCIe 5.0 x16 SMT slot with Steel Armor II for graphics cards, and additional PCIe 4.0 x16 slots. Insert your graphics card firmly into the primary PCIe 5.0 x16 slot until it clicks into place. Secure it with a screw to the chassis.
6. Power Connections
Connect the 24-pin ATX main power connector and the dual 8-pin CPU power connectors from your power supply unit (PSU) to the corresponding ports on the motherboard. Ensure all connections are secure.
7. Cooling System
The MEG X870E ACE MAX incorporates advanced cooling features:
- Frozr Guard: Includes Wavy fin design, Direct-touch Cross Heat-pipe, 9W/mK MOSFET thermal pads, and extra choke thermal pads.
- EZ M.2 Shield Frozr II: Double-sided heatsinks for M.2 SSDs.
- Combo-fan Header: A 3A header for connecting both pump and system fans.

Figure 4: Exploded view of the motherboard, showcasing various components and cooling solutions like heatsinks and thermal pads.
8. Rear I/O Panel Connections
Connect your peripherals to the rear I/O panel. Key ports include:
- USB4 Type-C (40Gbps) with 4K@120Hz display support.
- Multiple USB 10Gbps and 5Gbps ports.
- Marvell 10G LAN and Realtek 5G LAN ports.
- Wi-Fi 7 and Bluetooth 5.4 antenna connectors.
- HDMI port.
- Audio jacks (7.1 USB High Performance Audio with Audio Boost 5 HD, S/PDIF output).
- Flash BIOS Button and Clear CMOS Button.
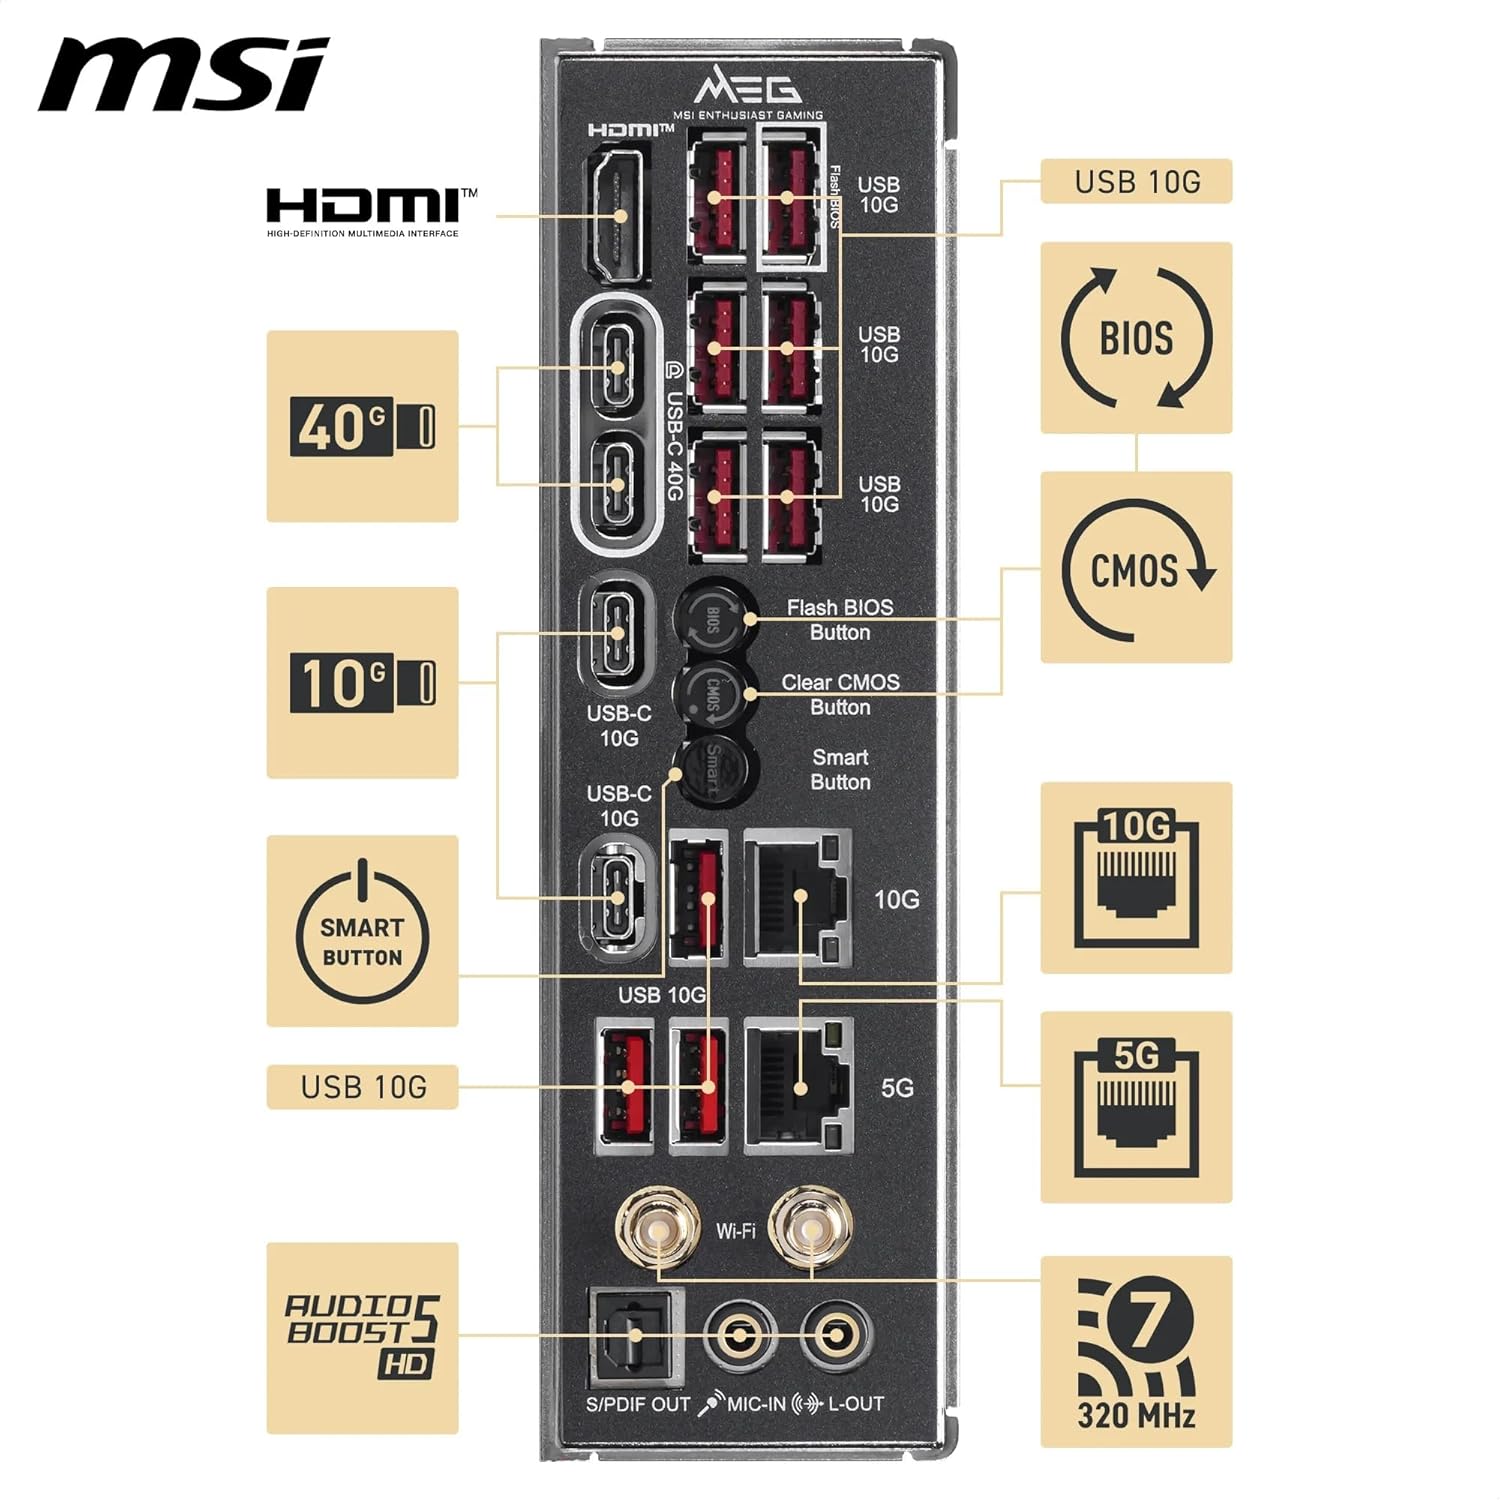
Figure 5: Detailed view of the rear I/O panel, indicating the various connectivity options and their functions.
9. Included Accessories
Verify that all accessories are present in the package. These typically include SATA cables, M.2 screws/standoffs, Wi-Fi antenna, and documentation.

Figure 6: Image displaying the various accessories included with the MSI MEG X870E ACE MAX Motherboard, such as cables, antennas, and mounting hardware.
Operating Instructions
1. Initial Boot-up and BIOS Access
After completing hardware installation, power on your system. Press the Delete key during startup to enter the BIOS/UEFI setup utility. Here you can configure system settings, boot order, and monitor hardware status.
2. BIOS/UEFI Features
- 64MB BIOS ROM: Provides ample capacity for firmware and features.
- OC Engine: Utilize this feature within the BIOS for advanced overclocking of your CPU and memory.
- Flash BIOS Button: Allows updating the BIOS without a CPU, memory, or graphics card installed. Refer to the detailed instructions in the full manual for this procedure.
- Clear CMOS Button: Resets BIOS settings to default. Useful for troubleshooting boot issues after configuration changes.
3. Network Connectivity
The motherboard supports high-speed network connections:
- Wired LAN: Connect to the internet using the Marvell 10G LAN or Realtek 5G LAN ports for high-bandwidth applications.
- Wireless: Utilize the integrated Wi-Fi 7 and Bluetooth 5.4 for wireless connectivity. Ensure antennas are properly connected for optimal signal strength.
4. USB4 and Display Output
The USB4 Type-C port on the rear I/O panel supports data transfer speeds of up to 40Gbps and can also provide 4K@120Hz display output when connected to a compatible monitor and an integrated GPU (if your CPU has one).
5. Audio System
The Audio Boost 5 HD system provides 7.1 USB High Performance Audio with S/PDIF output for high-fidelity sound. Connect your speakers or headphones to the appropriate audio jacks on the rear I/O panel.
Maintenance
1. Keeping Your System Cool
Regularly check and clean your system's cooling components to ensure optimal thermal performance. Dust accumulation can impede airflow and lead to higher operating temperatures.
- Ensure case fans are clean and functioning.
- Periodically clean the CPU cooler and GPU heatsinks.
- The EZ M.2 Shield Frozr II heatsinks on M.2 drives are designed to dissipate heat, but ensure they are free from dust.
2. BIOS Updates
Check the official MSI website periodically for BIOS updates. BIOS updates can improve system stability, compatibility, and performance. Follow the instructions provided by MSI carefully when performing a BIOS update.
3. Driver Updates
Keep your motherboard drivers (chipset, LAN, audio, etc.) updated to ensure compatibility and optimal performance. Drivers can be downloaded from the official MSI support website.
Troubleshooting
1. System Does Not Power On
- Ensure the PSU is connected to the motherboard (24-pin ATX and dual 8-pin CPU power) and the wall outlet.
- Verify the front panel power button connector is correctly attached to the motherboard.
- Check if the PSU switch is in the 'ON' position.
2. No Display Output
- Confirm the monitor is connected to the graphics card (or motherboard HDMI if using integrated graphics).
- Reseat the graphics card and memory modules.
- Try using a single memory stick in the recommended slot.
- If your CPU has integrated graphics, try removing the dedicated GPU and connecting the monitor to the motherboard's HDMI port.
3. System Instability or Crashes
- Clear CMOS: Use the Clear CMOS button on the rear I/O panel to reset BIOS settings to default. This can resolve issues caused by incorrect BIOS configurations, especially after overclocking.
- Ensure all components (CPU, RAM, GPU, storage) are properly seated.
- Check for overheating. Monitor CPU and GPU temperatures.
- Update BIOS and drivers to the latest versions from the MSI website.
- Test memory modules individually or with a memory diagnostic tool.
4. BIOS Update Failure
If a BIOS update fails, you can use the Flash BIOS Button feature. This allows you to flash the BIOS using a USB drive without needing a CPU, memory, or graphics card installed. Refer to the detailed instructions on the MSI support page for the correct procedure.
Specifications
| Feature | Detail |
|---|---|
| Brand | MSI |
| Model Name | MEG X870E ACE MAX |
| CPU Socket | Socket AM5 |
| Compatible Processors | AMD Ryzen 9000, 8000, 7000 Series |
| Chipset Type | AMD X870E |
| RAM Memory Technology | DDR5 |
| Memory Clock Speed (OC) | Up to 8400+ MHz |
| RAM Memory Maximum Size | 256 GB |
| Memory Slots Available | 4 |
| Graphics Card Interface | PCI Express (1x PCIe 5.0 x16, 2x PCIe 4.0 x16) |
| M.2 Connectors | 2x M.2 Gen5 x4, 3x M.2 Gen4 x4 |
| Total SATA Ports | 4 |
| Main Power Connector | 24-Pin ATX + Dual 8-Pin CPU |
| Network | Wi-Fi 7, Bluetooth 5.4, Marvell 10G LAN, Realtek 5G LAN |
| USB Ports (Rear I/O) | 1x USB4 Type-C (40Gbps), Multiple USB 10G/5G |
| HDMI Ports | 1 |
| Audio | 7.1 USB High Performance Audio, Audio Boost 5 HD, S/PDIF |
| BIOS ROM | 64MB |
| VRM | 18 Duet Rail Power Phase (110A SPS) |
| PCB | 8-layer server-grade with 2oz thickened copper |
| Form Factor | ATX |
| Operating System | Windows 11 |
Warranty Information
Specific warranty terms and conditions for the MSI MEG X870E ACE MAX Motherboard are provided with your product documentation or can be found on the official MSI website. Please retain your proof of purchase for warranty claims.
The warranty typically covers manufacturing defects under normal use. Damage resulting from improper installation, misuse, unauthorized modifications, or accidents is generally not covered.
Support and Contact
For technical assistance, driver downloads, BIOS updates, or further information regarding your MSI MEG X870E ACE MAX Motherboard, please visit the official MSI support website:
You may also find helpful resources, FAQs, and community forums on the MSI website.