1. Introduction
Thank you for choosing the CypBed Queen Size Bed Frame. This manual provides detailed instructions for assembly, operation, maintenance, and safety to ensure proper use and longevity of your product. Please read all instructions carefully before beginning assembly and retain this manual for future reference.
2. Safety Information
- Do not exceed the weight capacity of 1000 lbs.
- Be cautious of sharp edges and metal components during assembly and use.
- Follow all assembly instructions carefully to prevent instability or collapse.
- Ensure all screws and fasteners are securely tightened before use. Periodically check and re-tighten as necessary.
- Keep small parts out of reach of children during assembly.
3. Package Contents
Before assembly, verify that all components are present and undamaged. Refer to the parts list provided in your packaging. An overview of the bed frame components is shown below:

Figure 3.1: Overall dimensions and labeled components of the CypBed Queen Size Bed Frame.
4. Assembly Instructions
Assembly typically requires two adults. Please follow the steps below. For a visual guide, refer to the official installation video.
Video 4.1: Step-by-Step Installation Guide for CypBed F-Q Size Bed Frame. This video demonstrates the complete assembly process.
4.1. Headboard Assembly
- Attach the headboard panels and supports using the provided screws. Ensure the side with holes faces upwards for LED light installation.
- Secure the headboard side posts to the main headboard structure.
- Install the LED light strip into the designated channel on the headboard.

Figure 4.1: The two-tier headboard design with integrated charging ports.
4.2. Frame Assembly
- Connect the side rails to the assembled headboard using the appropriate bolts.
- Assemble the central support beams and attach them to the side rails.
- Attach the footboard to the side rails.
4.3. Slat Installation
- Place the metal slats across the bed frame, ensuring they are evenly spaced and securely fastened to the side rails.
- Confirm all slats are firmly in place to provide stable mattress support.

Figure 4.2: Reinforced metal and wood support structure for durability and noise reduction.
4.4. Charging Port & LED Light Installation
- Install the power outlet module into the designated slot on the headboard.
- Connect the LED light strip and power outlet to a power source.
4.5. Storage Drawer Assembly
- Assemble the wire baskets for the storage drawers.
- Attach the wooden drawer fronts to the assembled baskets.
- Slide the completed drawers under the bed frame. Note: The drawers are not permanently attached to the frame.
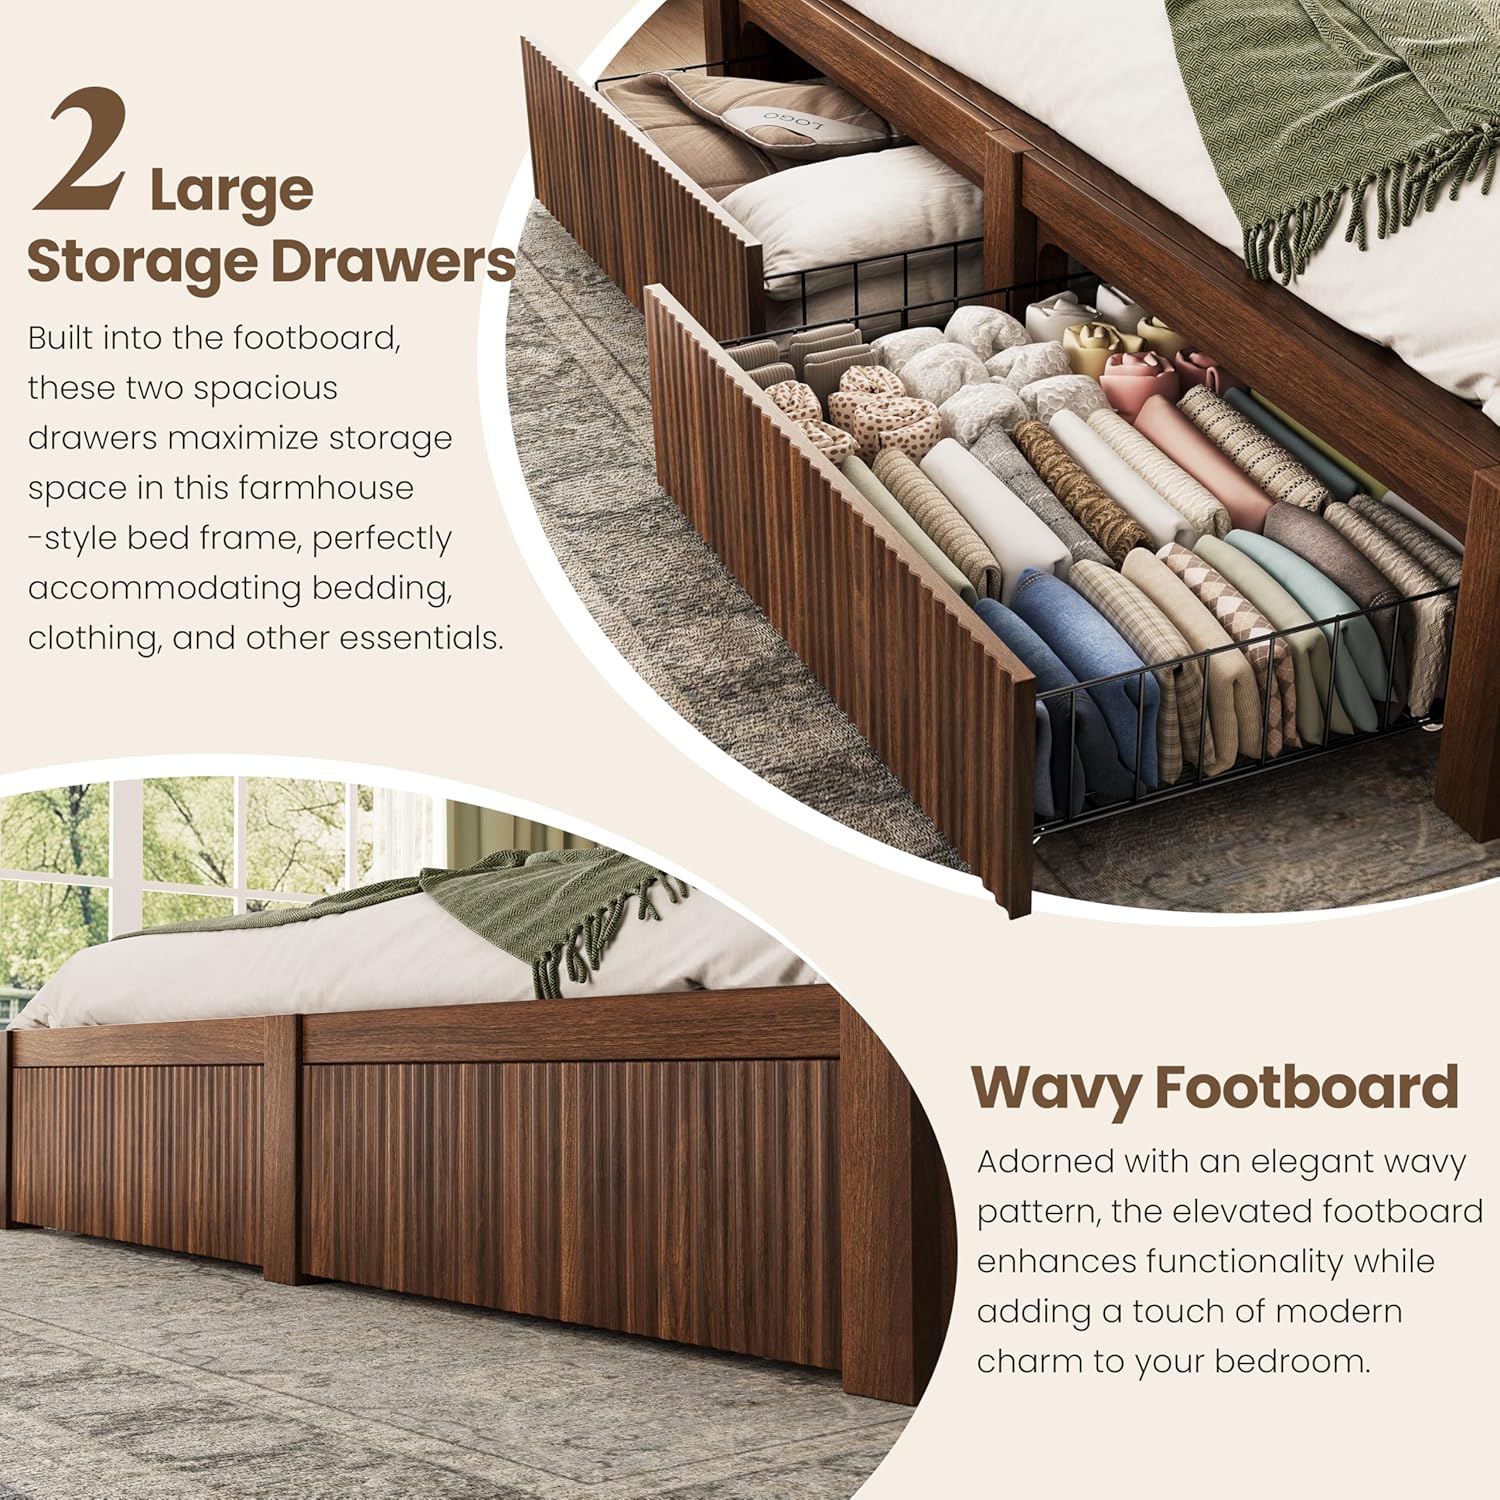
Figure 4.3: Under-bed storage drawers with wavy wood design.
5. Operating Instructions
5.1. LED Lighting System
The integrated RGB LED strip lights can be controlled via a remote or a mobile application. They offer 5 modes and over 60,000 colors, with adjustable brightness and music sync features.
- Remote Control: Use the provided remote to change colors, modes, and brightness.
- Mobile App: Download the compatible app (iOS/Android) to access advanced features like music synchronization and timing modes.

Figure 5.1: Smart RGB LED lights with various control options.
5.2. Charging Ports
The headboard includes 2 power outlets (USB and Type-C) for convenient device charging. Simply plug your devices into the ports located on the headboard shelf.
6. Maintenance
- Cleaning: Wipe down wood and metal surfaces with a soft, damp cloth. Avoid harsh chemicals that may damage the finish.
- Fasteners: Periodically check all screws and bolts to ensure they remain tight. Re-tighten as needed to maintain stability.
- Noise Reduction: The bed frame features soundproof foam strips on the center beam to prevent squeaking. If noise occurs, inspect these strips and ensure all connections are secure.
7. Troubleshooting
- Bed Frame is Wobbly: Ensure all bolts and screws are fully tightened. Check that the center support legs are properly adjusted and making firm contact with the floor.
- Squeaking Noise: Verify that all slats are correctly seated and secured. Check the soundproof foam strips on the center beam for proper placement. Re-tighten any loose connections.
- LED Lights Not Working: Check the power connection to the LED strip and the wall outlet. Ensure the remote control batteries are functional.
- Charging Ports Not Working: Confirm the power outlet module is correctly installed and connected to a power source. Test with a different device or cable.
8. Specifications
| Size | Queen |
| Product Dimensions | 87"L x 62"W x 45.8"H |
| Color | Walnut |
| Material | Metal, Wood |
| Special Features | 2 Tier Headboard, Storage Drawer, Wave Pattern Design, LED Light, Charging Port |
| Weight Capacity | 1000 lbs |
| Assembly Required | Yes |
| Box Spring Needed | No |
| Model Number | SYTBF018WAQ |
9. Warranty and Support
For specific warranty information or to request support, please refer to the documentation included with your purchase or contact CypBed customer service directly. Ensure you have your model number (SYTBF018WAQ) and proof of purchase available.