
1. Introduction
The PASNMKvn MIC-1000 is a portable aluminum sound amplifier preamplifier board designed to enhance microphone audio for mobile phones and other compatible devices. It features high-sensitivity microphone amplification, Automatic Level Control (ALC), and the ability to directly drive headphones. This manual provides essential information for the safe and effective use of your MIC-1000 amplifier.

Image 1.1: The MIC-1000 amplifier shown with its connection cables, set against a professional audio mixing console.
2. Safety Information
Please read and understand all safety instructions before using the device. Keep this manual for future reference.
- Do not expose the device to water, moisture, or extreme temperatures.
- Avoid dropping or subjecting the device to strong impacts.
- Do not attempt to disassemble or modify the device. This will void the warranty and may cause damage or injury.
- Use only the provided USB charging cord or a compatible DC5V power source (3.5x1.35mm) for charging.
- Keep out of reach of children.
- Prolonged listening at high volumes can cause hearing damage. Adjust volume to a comfortable level.
3. Package Contents
Verify that all items are present in your package:
- 1 x MIC-1000 Microphone Amplifier
- 1 x Phone Connection Cable (3.5mm to 3.5mm)
- 1 x USB Charging Cord

Image 3.1: The MIC-1000 amplifier and its included accessories: a 3.5mm phone connection cable and a USB charging cable.
4. Product Overview
Familiarize yourself with the components and ports of your MIC-1000 amplifier.

Image 4.1: Front view of the MIC-1000 amplifier, highlighting the MIC input port and the Volume control knob.
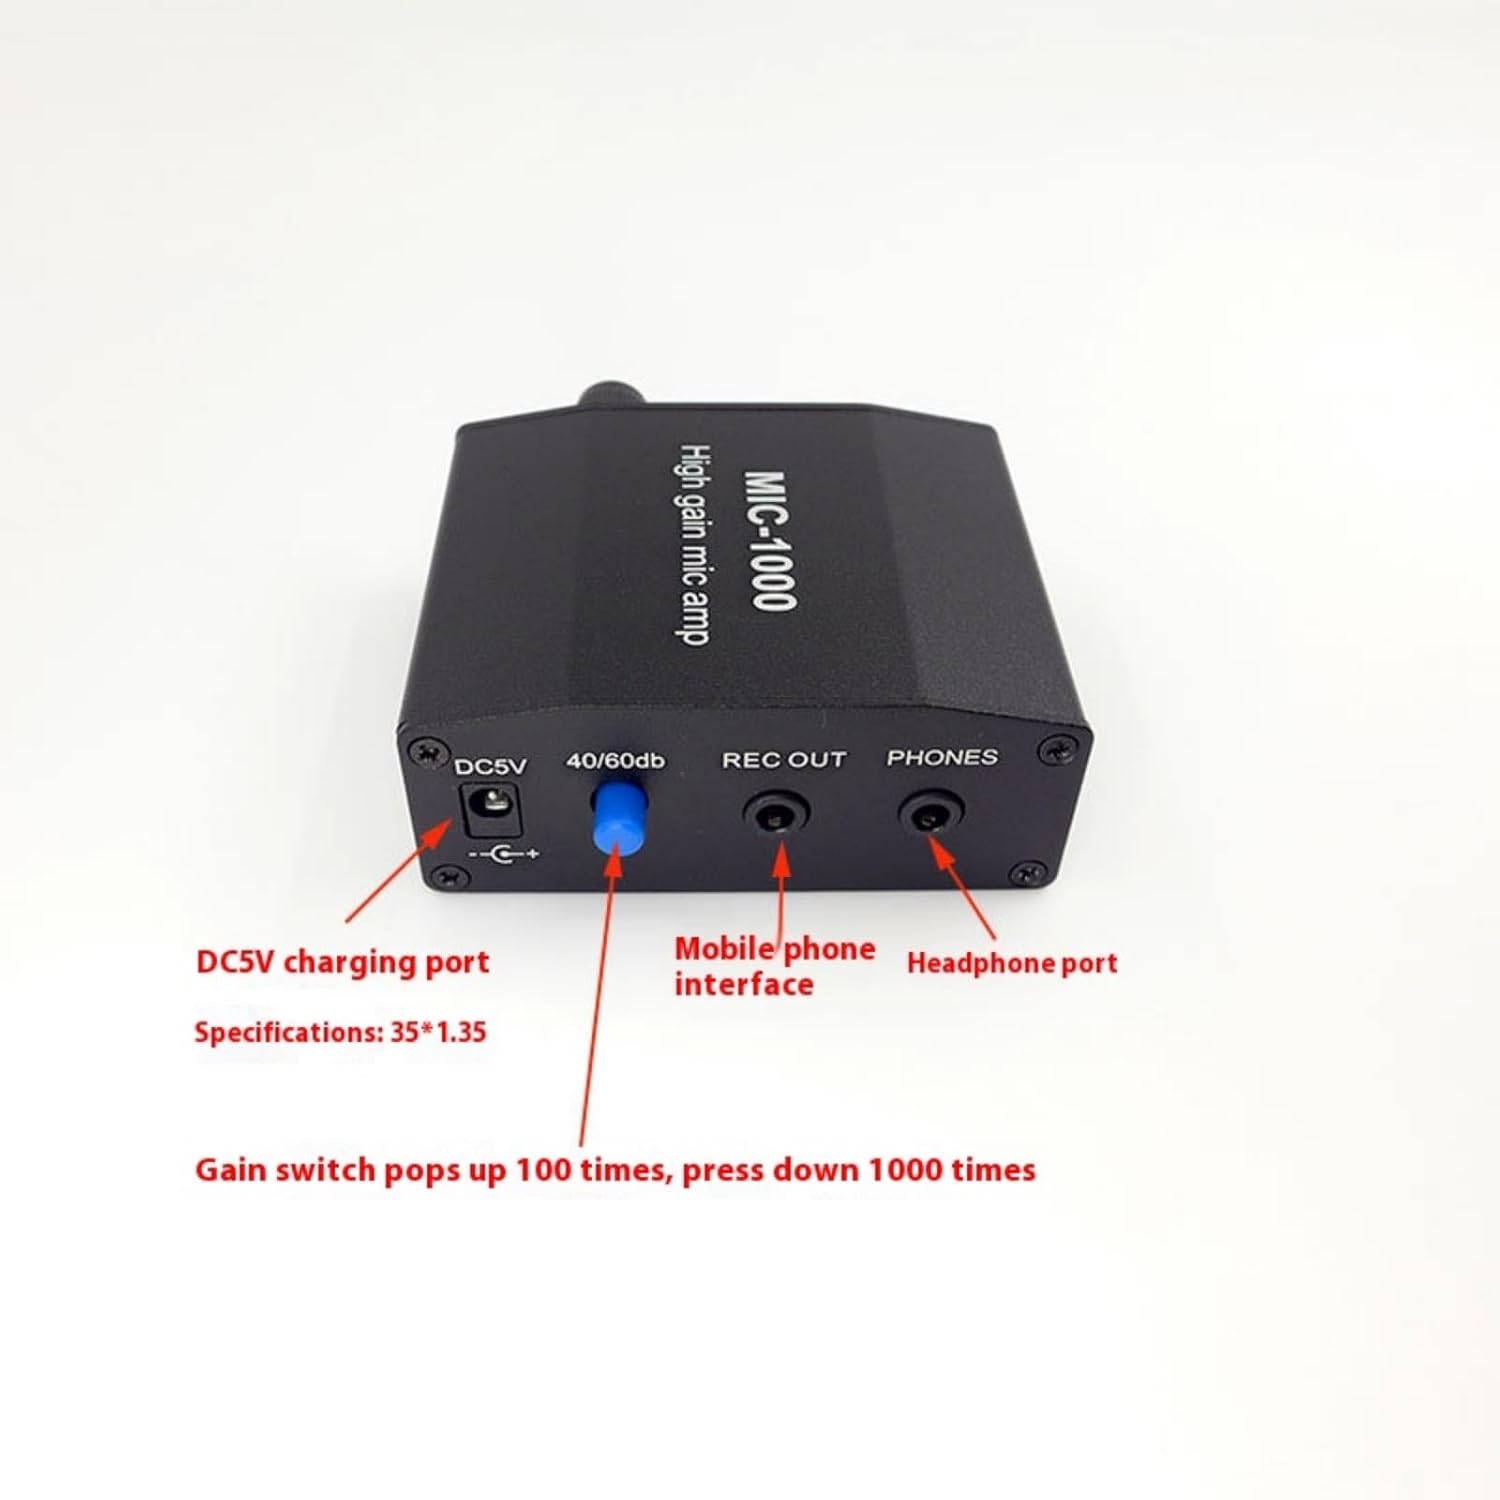
Image 4.2: Rear panel of the MIC-1000 amplifier, showing the DC5V charging port, the 40dB/60dB gain switch, the REC OUT (mobile phone interface), and the PHONES (headphone port).
- MIC Input: 3.5mm jack for connecting an external microphone.
- Volume Knob: Adjusts the output volume to headphones.
- DC5V Charging Port: Power input for charging the internal battery (3.5x1.35mm).
- Gain Switch (40dB/60dB): Toggles between two amplification levels. Push down for 1000x (60dB) amplification, pop up for 100x (40dB) amplification.
- REC OUT (Mobile Phone Interface): 3.5mm 4-section port for connecting to a mobile phone for recording.
- PHONES (Headphone Port): 3.5mm output for connecting headphones.
5. Setup
5.1 Charging the Amplifier
- Connect the small end of the USB Charging Cord to the DC5V Charging Port on the amplifier.
- Connect the standard USB end of the cord to a USB power adapter (not included) or a computer USB port.
- The amplifier has a built-in 300mAh battery. A full charge allows for approximately 20-30 hours of continuous use.
5.2 Connecting a Microphone
- Ensure your microphone has a 3.5mm connector.
- Insert the microphone's 3.5mm connector into the MIC Input port on the amplifier.
- The amplifier is compatible with electret condenser microphones using two-pole or three-pole 3.5mm interfaces. Four-pole interfaces are generally not compatible for microphone input.

Image 5.1: Illustration of compatible 3.5mm microphone jack types (two-pole and three-pole) and an incompatible four-pole type for microphone input.
5.3 Connecting to a Mobile Phone (for Recording)
- Use the provided Phone Connection Cable.
- Connect one end of the cable to the REC OUT (Mobile Phone Interface) port on the amplifier.
- Connect the other end of the cable to the 3.5mm headphone/microphone jack on your mobile phone.
5.4 Connecting Headphones
- Insert your 3.5mm headphones into the PHONES (Headphone Port) on the amplifier.
6. Operating Instructions
6.1 Powering On/Off
The device powers on automatically when a microphone and/or headphones are connected and powers off when disconnected or after a period of inactivity to conserve battery.
6.2 Adjusting Volume
Rotate the Volume Knob on the front of the amplifier clockwise to increase volume and counter-clockwise to decrease volume for connected headphones.
6.3 Using the Gain Switch
The gain switch on the rear panel allows you to select the microphone amplification level:
- Switch Up (40dB): Provides 100 times amplification. Suitable for louder sound sources or when less sensitivity is required.
- Switch Down (60dB): Provides 1000 times amplification. Ideal for very weak sound sources or when maximum sensitivity is needed.
Adjust the gain according to the microphone's sensitivity and the sound source's volume to achieve optimal audio quality without distortion.
6.4 Automatic Level Control (ALC)
The MIC-1000 features ALC, which automatically adjusts the input level to prevent clipping and ensure a consistent output volume, even with varying input sound levels. This helps maintain clear audio quality during recording or monitoring.
7. Maintenance
- Cleaning: Use a soft, dry cloth to clean the exterior of the amplifier. Do not use liquid cleaners or solvents.
- Storage: Store the device in a cool, dry place away from direct sunlight when not in use.
- Battery Care: For optimal battery life, avoid fully discharging the battery frequently. Charge the device regularly, even if not in constant use.
8. Troubleshooting
| Problem | Possible Cause | Solution |
|---|---|---|
| No sound from headphones. |
|
|
| Distorted or unclear sound. |
|
|
| Device not charging. |
|
|
9. Specifications
| Feature | Detail |
|---|---|
| Input and Output Port | 3.5mm |
| Phone Port (REC OUT) | 3.5mm 4-section |
| Microphone Gain | 40dB / 60dB switching (100x / 1000x amplification) |
| Ear Amplifier Power | 105mW x 2 / 16 ohms |
| Built-in Battery Capacity | 300mAh |
| Power Input | DC5V (3.5x1.35mm) |
| Continuous Use (fully charged) | 20-30 hours |
| Dimensions (approx.) | 6.3cm x 5.3cm x 2.2cm (2.48in x 2.08in x 0.86in) |

Image 9.1: Visual representation of the MIC-1000 amplifier's dimensions.
10. Warranty & Support
10.1 Warranty Information
This product comes with a manufacturer warranty for 90 days from the date of purchase. Please retain your proof of purchase for warranty claims.
The warranty covers defects in materials and workmanship under normal use. It does not cover damage caused by misuse, accident, unauthorized modification, or external causes.
10.2 Customer Support
For technical assistance, troubleshooting beyond this manual, or warranty inquiries, please contact your retailer or the manufacturer directly through their official support channels.