Introduction
This manual provides detailed instructions for the safe and effective operation, maintenance, and troubleshooting of your qimedo RD-101 Cordless Stick Vacuum Cleaner. Please read this manual thoroughly before first use and keep it for future reference.
Product Components
Your qimedo RD-101 Cordless Stick Vacuum Cleaner comes with several components designed for versatile cleaning. Familiarize yourself with each part before assembly.

Figure 1: All components of the qimedo RD-101 Cordless Stick Vacuum Cleaner.
- Main Vacuum Unit: Contains the motor, dust cup, and battery slot.
- Extension Tubes (2x): Connects the main unit to the floor nozzle or other attachments, allowing for extended reach up to 90 inches.
- Floor Nozzle: Equipped with LED lights and a rotating brush for effective cleaning on various floor types.
- Crevice Nozzle: Ideal for narrow spaces and corners.
- 2-in-1 Brush Head: Combines a brush and a wide nozzle for upholstery and delicate surfaces.
- 8000mAh Batteries (2x): Detachable and rechargeable power sources.
- Charging Adapter: For recharging the batteries.
- Wall Hook: For convenient storage.
- User Manual: This document.
Setup
Follow these steps to assemble your qimedo RD-101 Cordless Stick Vacuum Cleaner:
- Charge the Batteries: Fully charge both 8000mAh batteries using the provided charging adapter. The smart display on the main unit will indicate battery status. A full charge takes approximately 5 hours.
- Attach Extension Tube: Connect one or both extension tubes to the main vacuum unit until it clicks securely into place. For maximum reach, use both tubes for a total of 90 inches.
- Attach Floor Nozzle: Connect the floor nozzle to the end of the extension tube. Ensure it clicks firmly.
- Install Battery: Slide a fully charged battery into the battery slot on the main unit until it locks.
Video: Unboxing and initial assembly of the qimedo RD-101 Cordless Stick Vacuum Cleaner.
Operating Instructions
Your qimedo RD-101 offers multiple modes and features for efficient cleaning.
Power On/Off and Suction Modes
The vacuum features a smart display for easy control:
- Power On/Off: Press the power button on the handle to turn the vacuum on or off.
- Suction Adjustment: Use the mode switch button to cycle through three suction modes: Low (30KPA), Mid (50KPA), and Max (60KPA). The smart display will show the current mode and remaining working time.
- Note: For Max suction mode, it is recommended to grasp the handle firmly due to the powerful motor (120K/RPM).

Figure 2: Smart display showing power and suction controls.
Floor Nozzle Features
- LED Lights: The floor nozzle is equipped with LED lights to illuminate dark areas, making dust and debris more visible.
- Maneuverability: The floor nozzle can pivot up to 90° vertically and 180° horizontally, allowing easy cleaning under furniture and around obstacles.
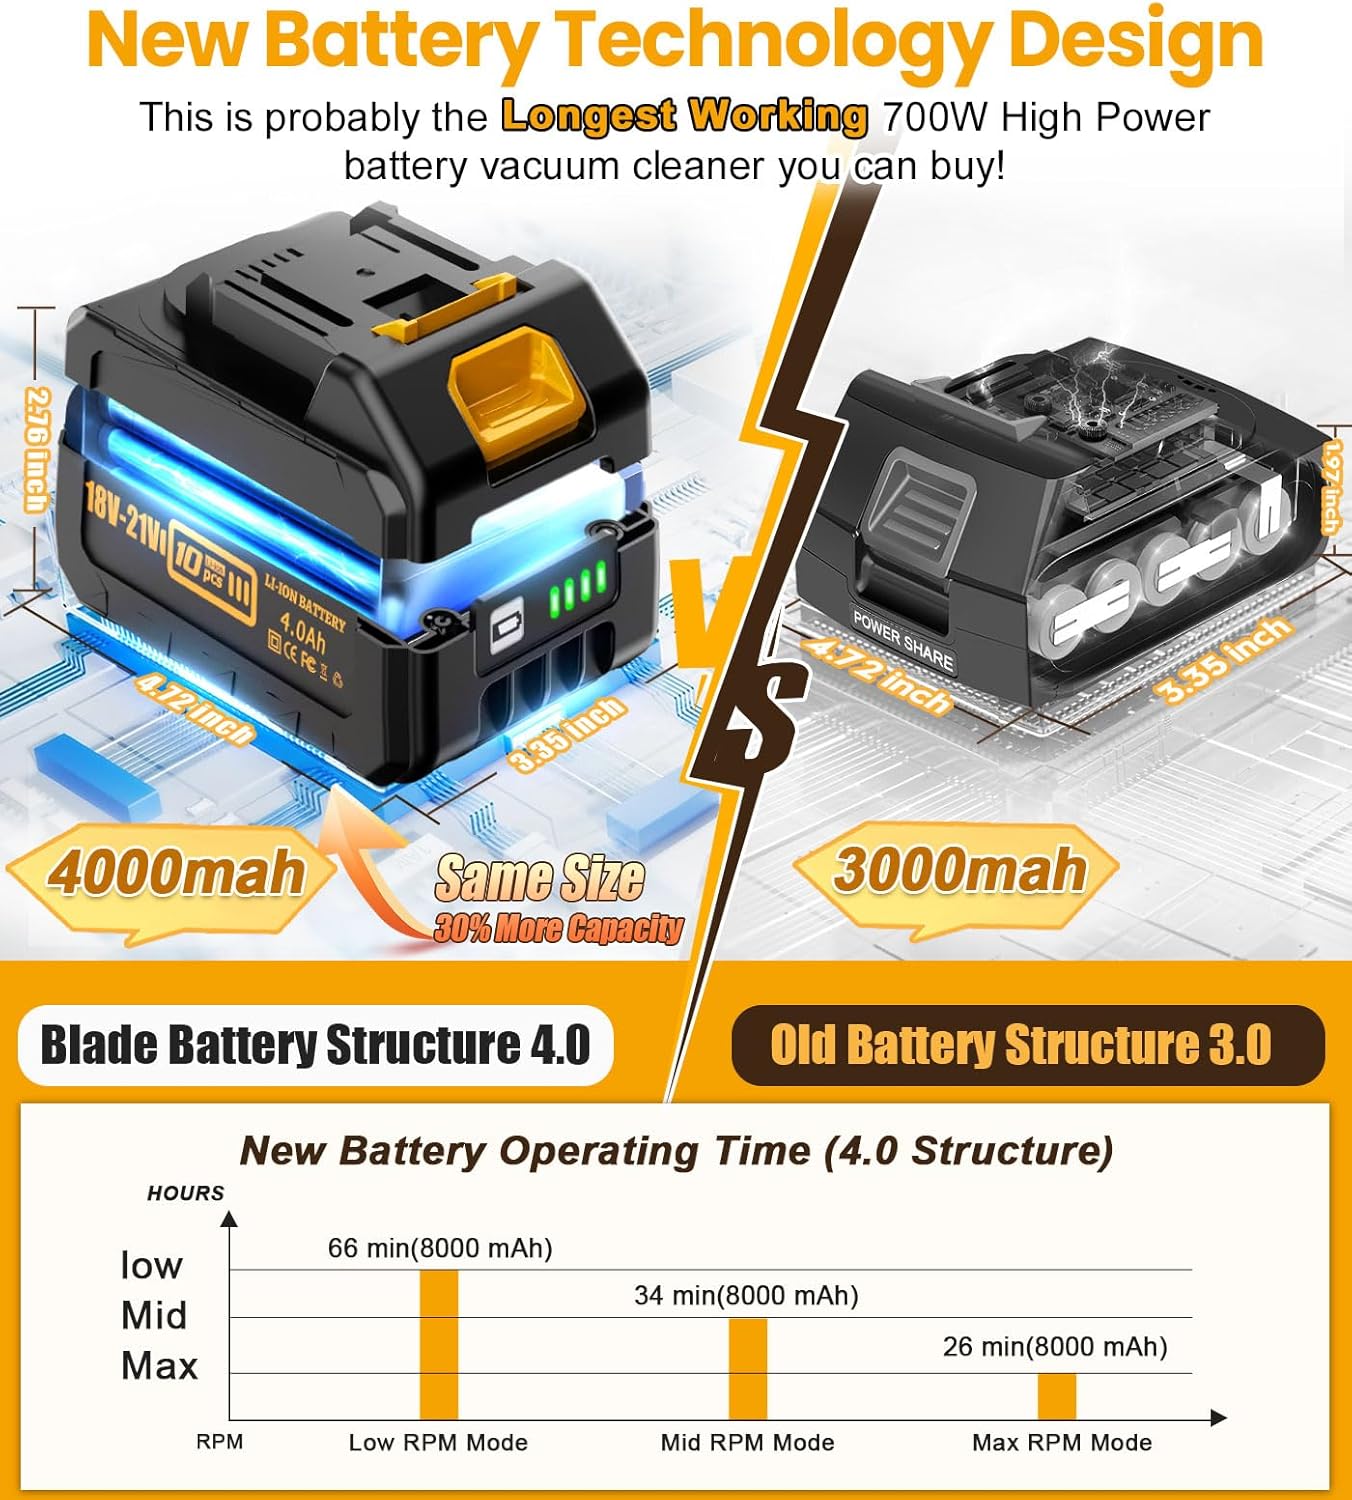
Figure 3: Floor nozzle with LED lights and flexible movement.
Using Attachments
The qimedo RD-101 is a 7-in-1 vacuum, adaptable for various cleaning scenarios:
- Floor Nozzle: For general floor cleaning (hardwood, carpet).
- Crevice Nozzle: Attach directly to the main unit or extension tube for tight spaces like sofa crevices, car interiors, and corners.
- 2-in-1 Brush Head: Use for dusting surfaces, cleaning upholstery, or removing pet hair from fabrics.
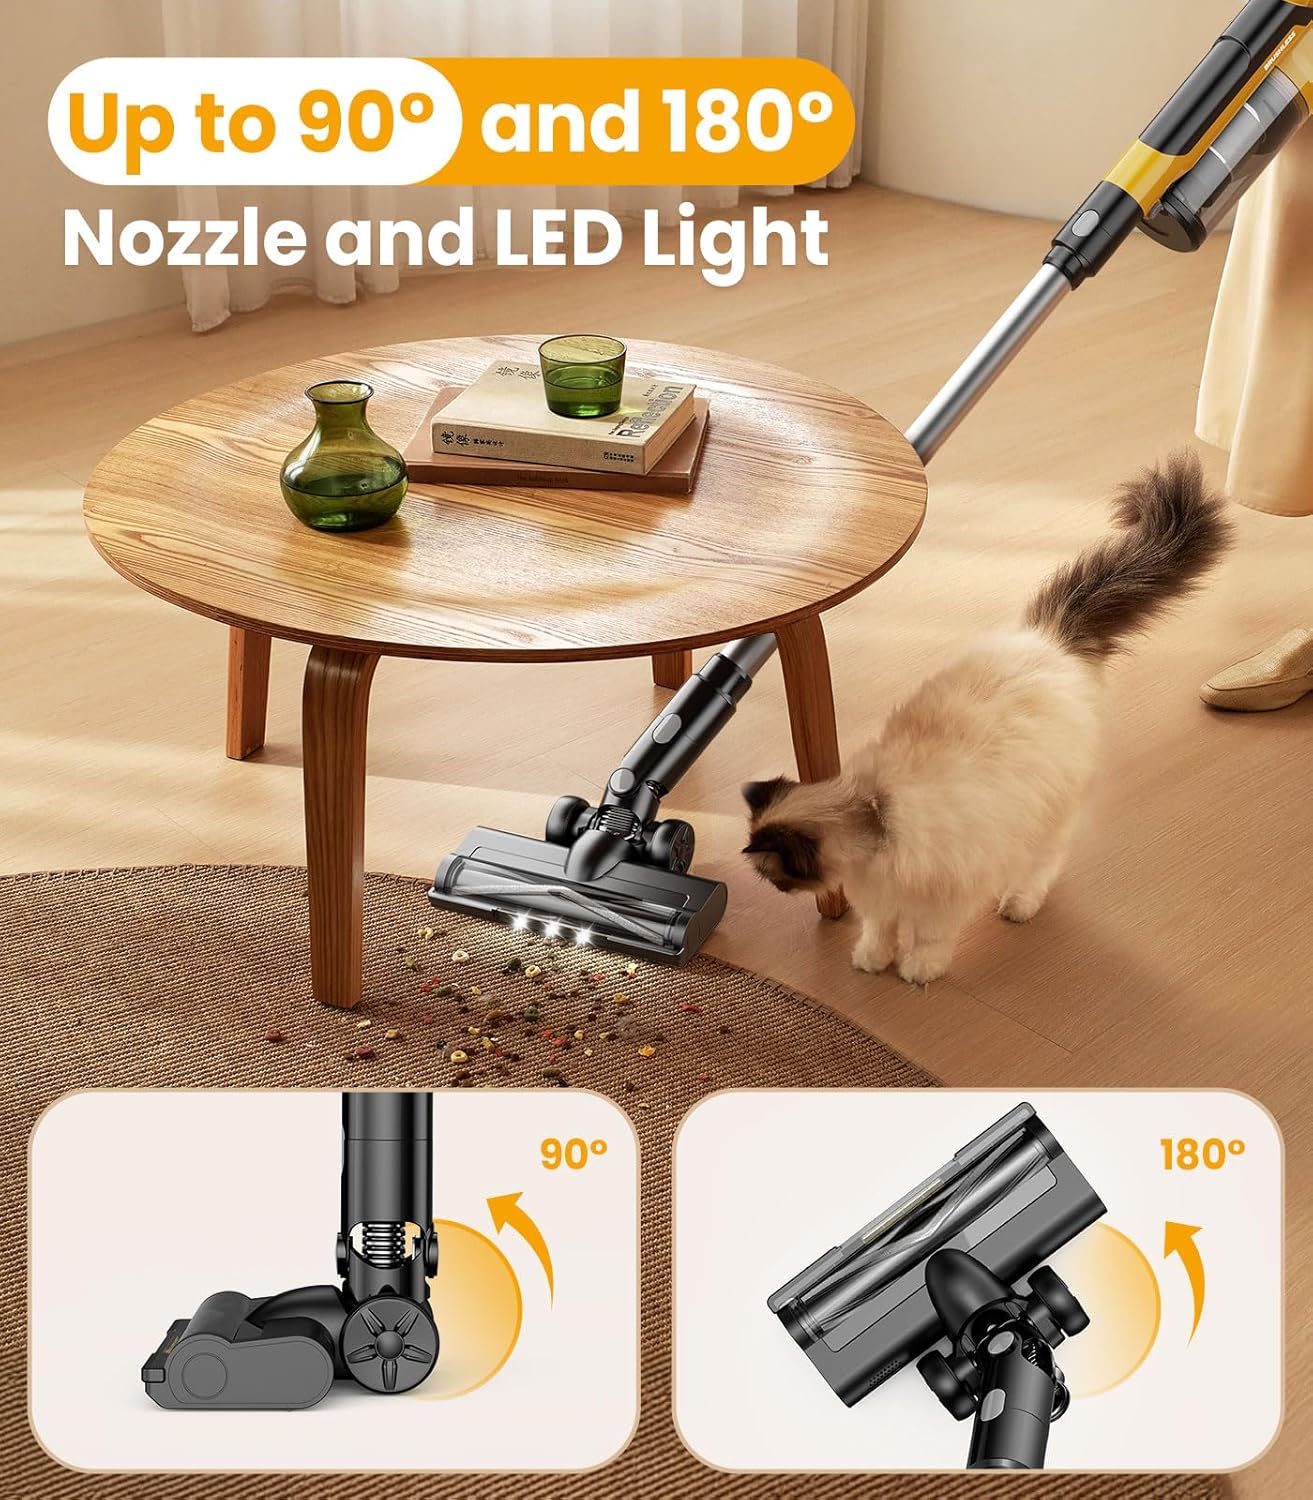
Figure 4: Demonstrating the versatility of the vacuum with different attachments.
Battery Information
Your vacuum comes with two 8000mAh detachable batteries for extended cleaning time.
- Battery Type: Latest technology 4.0 blade compression construction battery.
- Charging Time: Approximately 5 hours for a full charge.
- Runtime: Up to 66 minutes in Low mode with two batteries. Runtime varies based on suction mode (e.g., Max mode will have shorter runtime).
- Battery Indicator: The smart display on the main unit and LED indicators on the battery itself show the remaining charge.

Figure 5: New battery technology and estimated operating times.
Maintenance
Regular maintenance ensures optimal performance and extends the lifespan of your vacuum cleaner.
Dust Cup Emptying
The 2L dust cup is designed for easy emptying:
- Press the release button to detach the dust cup from the main unit.
- Hold the dust cup over a trash bin and press the bottom release latch to open and empty debris.

Figure 6: Dust cup capacity and emptying process.
Filter Cleaning
The HEPA filter and the metal screening filter are washable:
- Remove the dust cup.
- Twist and pull out the HEPA filter and the metal screen filter.
- Rinse both filters under running water until clean.
- Important: Allow filters to air dry completely for at least 24 hours before reinstalling. Do not use the vacuum with wet filters.

Figure 7: Steps for removing and cleaning the dust cup and filter.
Roller Brush Cleaning
The roller brush in the floor nozzle can be removed for cleaning hair and debris:
- Turn off the vacuum and remove the battery.
- Locate the release tab on the side of the floor nozzle.
- Pull the tab to release and remove the roller brush.
- Clean any tangled hair or debris from the brush.
- Reinsert the roller brush and secure the tab.
Troubleshooting
- Vacuum Not Turning On: Ensure the battery is fully charged and correctly installed.
- Reduced Suction: Check if the dust cup is full and empty it. Clean the HEPA and metal screen filters. Ensure there are no blockages in the extension tube or nozzle.
- "E3 Error" Displayed: If the vacuum gets stuck (e.g., while picking up hair) and displays an "E3 error," wait for 3 seconds of flashing, then turn the switch on again.
- Short Battery Life: Ensure batteries are fully charged. Using higher suction modes (Mid or Max) will consume battery faster. Consider purchasing additional batteries for extended cleaning sessions.
Specifications
| Feature | Specification |
|---|---|
| Brand | qimedo |
| Model Name | RD-101 |
| Power Source | Battery Powered (2x 8000mAh) |
| Wattage | 700W |
| Suction Modes | 3 (Low: 30KPA, Mid: 50KPA, Max: 60KPA) |
| Motor Speed | Upgraded 120K/RPM |
| Extension Tube Length | Up to 90 inches (with 2 tubes) |
| Dust Cup Capacity | 2 Liters |
| Filter Type | Washable HEPA Filter |
| Noise Level | 68 Decibels |
| Special Features | Cordless, Detachable Battery, Headlight, High Power, Low Noise, Smart Display |
| Recommended Uses | All floors, Bed, Car, Pet Hair |
| Item Weight | 16 ounces (main unit) |
Warranty and Support
qimedo offers comprehensive support for your product:
- Warranty: 2-year warranty.
- Customer Service: 24-hour full-time after-sales service.
- For any issues with the product, order, or logistics, please contact the qimedo support team for assistance.