1. Introduction
Thank you for choosing the FEDOUR 18cm Submersible Aquarium Light. This LED light is designed to provide optimal illumination for your aquarium, featuring a 24/7 timer, multiple lighting modes, and adjustable brightness. Its IP68 waterproof rating ensures safe and reliable operation within your aquatic environment. Please read this manual carefully before installation and use to ensure proper function and longevity of your product.
2. Safety Instructions
- Always disconnect the power supply before performing any maintenance or installation.
- Ensure your hands are dry when handling the power adapter and plug.
- This product is designed for indoor aquarium use only.
- Do not attempt to disassemble or modify the light. This will void the warranty and may cause damage or injury.
- Ensure the power cable is not damaged or pinched.
- Keep out of reach of children.
- The light is IP68 waterproof and can be fully submerged. Ensure all connections are secure before submerging.
3. Package Contents
Please check the package for the following items:
- FEDOUR 18cm Submersible Aquarium Light (Model RD10-BW)
- 12V DC Power Adapter
- Mode Setting Controller
- Strong Suction Cups (2 pieces)
- User Manual (this document)
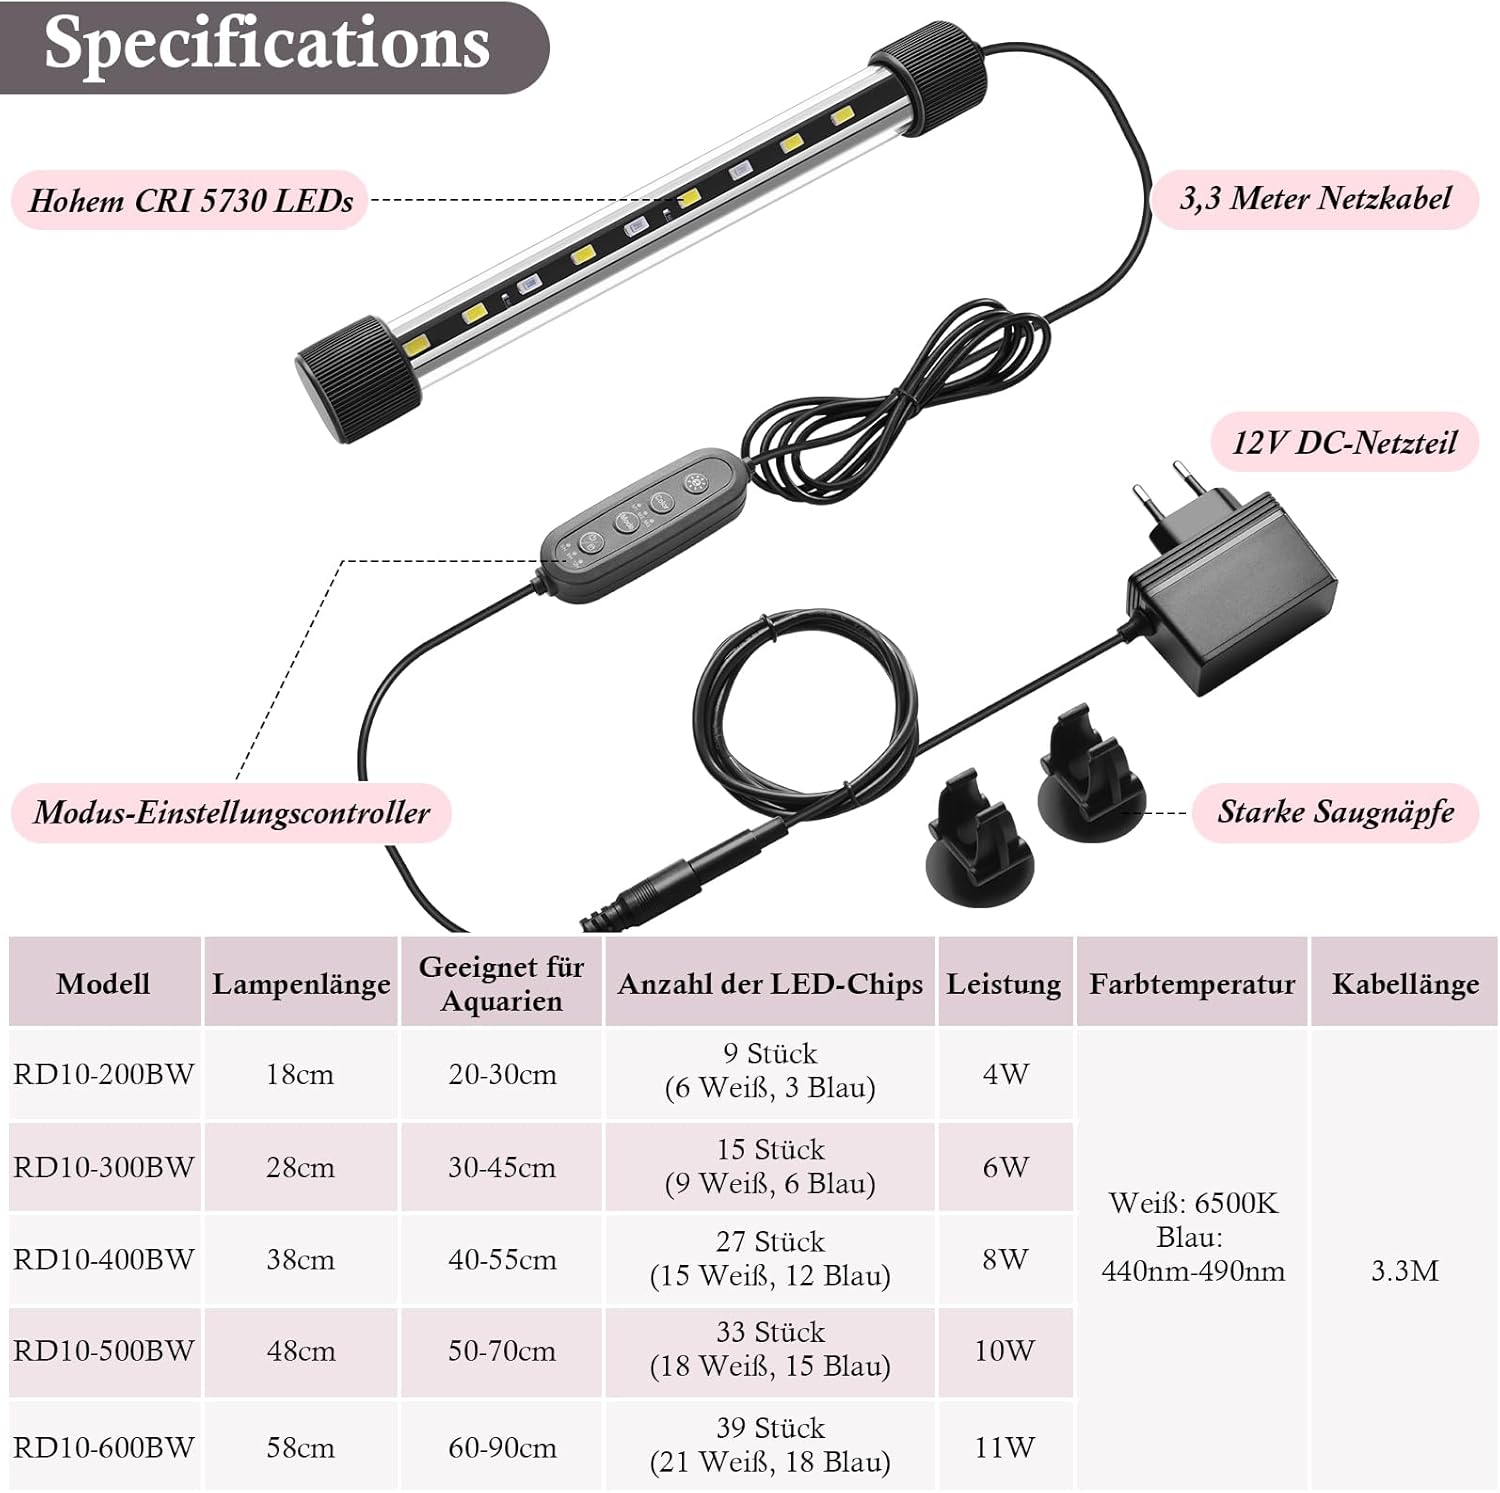
Figure 1: Components of the FEDOUR Aquarium Light. This image illustrates the main parts included: the LED light bar with 5730 LEDs, the 3.3-meter power cable, the 12V DC power adapter, the inline mode setting controller, and two strong suction cups for mounting.
4. Product Features
- 24/7 Lighting Modes with Timer: Automatic daily cycle mode simulates natural sunrise and sunset by adjusting light color and brightness.
- IP68 Waterproof Design: Fully submersible for uniform illumination. Equipped with strong suction cups for stable installation.
- 3 Colors & 3 Lighting Modes: Features high-quality 5730 LED chips offering white, blue, and white+blue color options. Modes include M1 (Day), M2 (Night), and M3 (24/7 automatic cycle).
- Adjustable Brightness Levels: 10 freely adjustable brightness levels to suit various aquatic plants and fish.
- Compact Size: 18cm length, suitable for aquariums 20 to 30 cm long.

Figure 2: The FEDOUR Aquarium Light in use, providing illumination for an aquatic environment. This image demonstrates the visual impact of the light on an aquarium setup.
5. Setup Instructions
- Unpack: Carefully remove all components from the packaging.
- Attach Suction Cups: Securely attach the strong suction cups to the ends of the LED light bar.
- Position the Light:
- Submerged Installation: Press the suction cups firmly against the inside glass of your aquarium, ensuring the light is fully submerged.
- External Installation: Attach the suction cups to the outside glass of your aquarium, or place the light on top of a covered aquarium.
- Connect Power: Connect the LED light bar to the mode setting controller, and then connect the controller to the 12V DC power adapter.
- Plug In: Plug the power adapter into a suitable electrical outlet. Ensure a drip loop is formed with the power cable to prevent water from running down to the outlet.
6. Operating Instructions
The FEDOUR aquarium light features an inline controller for easy operation. Familiarize yourself with the buttons:

Figure 3: The inline controller with buttons for color selection, mode selection (M1, M2, M3), power, and timer settings (6H, 9H, 12H, 24H).
6.1 Power On/Off
- Press the Power button to turn the light on or off.
6.2 Adjusting Brightness
- When the light is on, press the Brightness Up/Down buttons (often indicated by sun icons) to cycle through 10 brightness levels (10% to 100%).
6.3 Selecting Lighting Modes
Press the Mode button to cycle through the available lighting modes:
- M1: Day Mode - Blue & White light at 100% brightness. Ideal for daytime viewing and plant growth.
- M2: Night Mode - Blue light at 30% brightness. Simulates moonlight for nighttime viewing.
- M3: 24/7 Automatic Cycle Mode - Simulates natural sunrise, daylight, and sunset.

Figure 4: Examples of the three attractive light modes: Blue Light, White Light, and Blue & White Light combination.
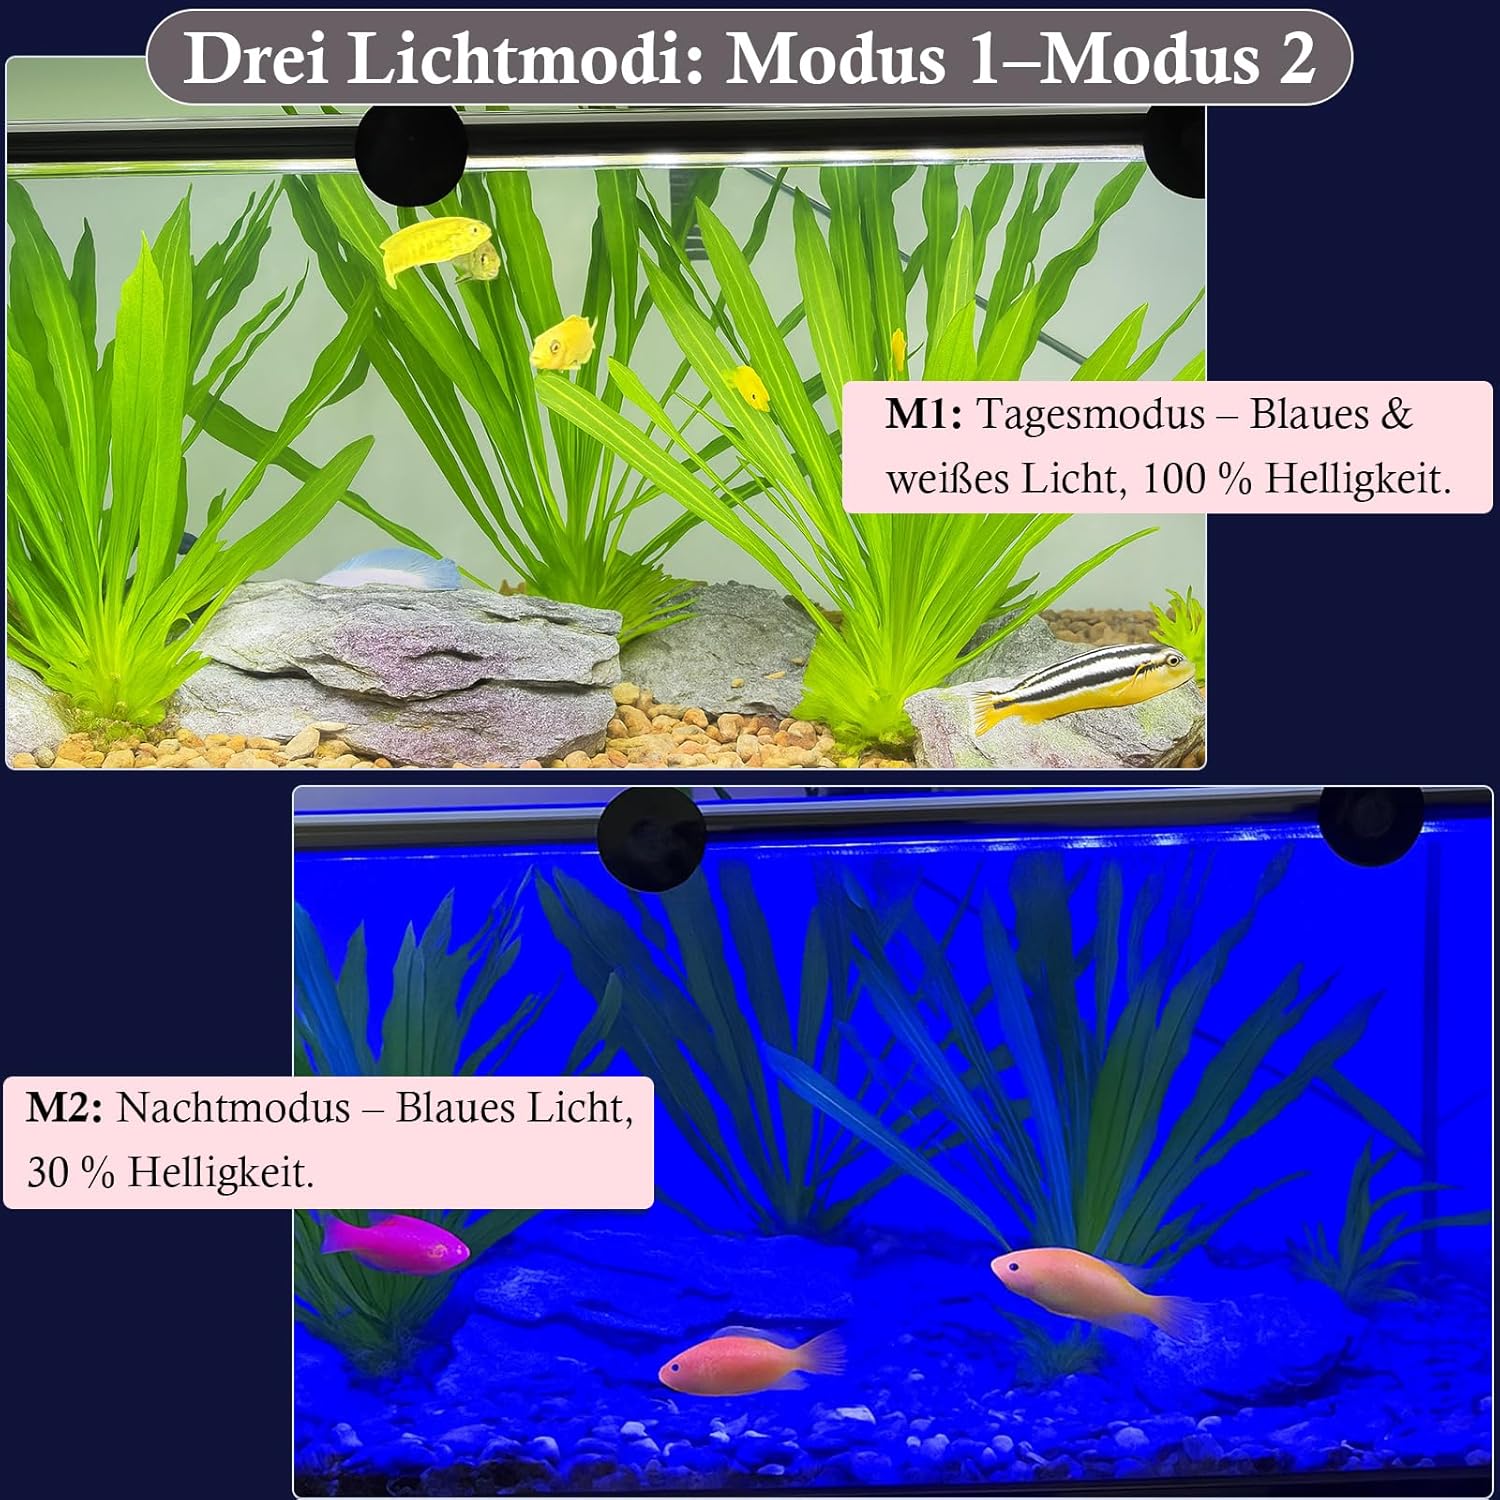
Figure 5: Comparison of M1 Day Mode (full brightness, blue & white) and M2 Night Mode (30% blue light).

Figure 6: Detailed illustration of the M3 24/7 Automatic Daylight Simulation Mode, depicting the gradual changes in light intensity and color (white, blue & white, blue) over a 24-hour period to mimic natural light cycles.
6.4 Setting the Timer
The timer function allows you to set the light to turn off automatically after a specified duration.
- Press the Timer button (often labeled with a clock icon or "6H/9H/12H/24H").
- Each press will cycle through the available timer settings: 6 hours, 9 hours, 12 hours, 24 hours, or OFF.
- The light will automatically turn off after the selected duration.
7. Maintenance
- Cleaning: Regularly clean the light bar with a soft, damp cloth to remove algae or mineral buildup. Ensure the power is disconnected before cleaning. Do not use harsh chemicals or abrasive materials.
- Cable Inspection: Periodically check the power cable and adapter for any signs of damage. If damage is found, discontinue use immediately and replace the component.
- Suction Cups: Over time, suction cups may lose their grip. Clean them and the glass surface thoroughly, or replace them if necessary, to ensure the light remains securely in place.
8. Troubleshooting
| Problem | Possible Cause | Solution |
|---|---|---|
| Light does not turn on. | No power supply; faulty connection; power button not pressed. | Check if the power adapter is securely plugged into the outlet and the light. Press the power button on the controller. Test the outlet with another device. |
| Light flickers or is dim. | Loose connection; low power; light bar or adapter fault. | Ensure all connections are secure. Check brightness settings. If problem persists, contact customer support. |
| Timer function not working. | Incorrect timer setting. | Press the timer button repeatedly to select the desired duration (6H, 9H, 12H, 24H). Ensure it's not set to OFF. |
| Suction cups lose grip. | Dirty surface; worn out suction cups. | Clean the suction cups and the aquarium glass thoroughly. If they are old or damaged, replace them. |
9. Specifications
| Parameter | Value |
|---|---|
| Model Number | RD10-BW |
| Product Dimensions (L x W x H) | 18 x 3 x 3 cm |
| Weight | 260 grams |
| Suitable Aquarium Length | 20 - 30 cm |
| Power | 4 Watts |
| Input Voltage | 220 Volts |
| Output Voltage | 12V DC |
| Number of LEDs | 9 (6 White, 3 Blue) |
| Light Color Temperature (White) | 6500 Kelvin |
| Blue Light Wavelength | 440nm - 490nm |
| Maximum Luminous Flux | 180 Lumens |
| Color Rendering Index (CRI) | 80 |
| Waterproof Rating | IP68 |
| Power Cable Length | 3.3 meters |
| Material | Glass |
| Compliant Specifications | CE, EMC |
| Manufacturer | Ibay |
| UPC | 658362017350 |
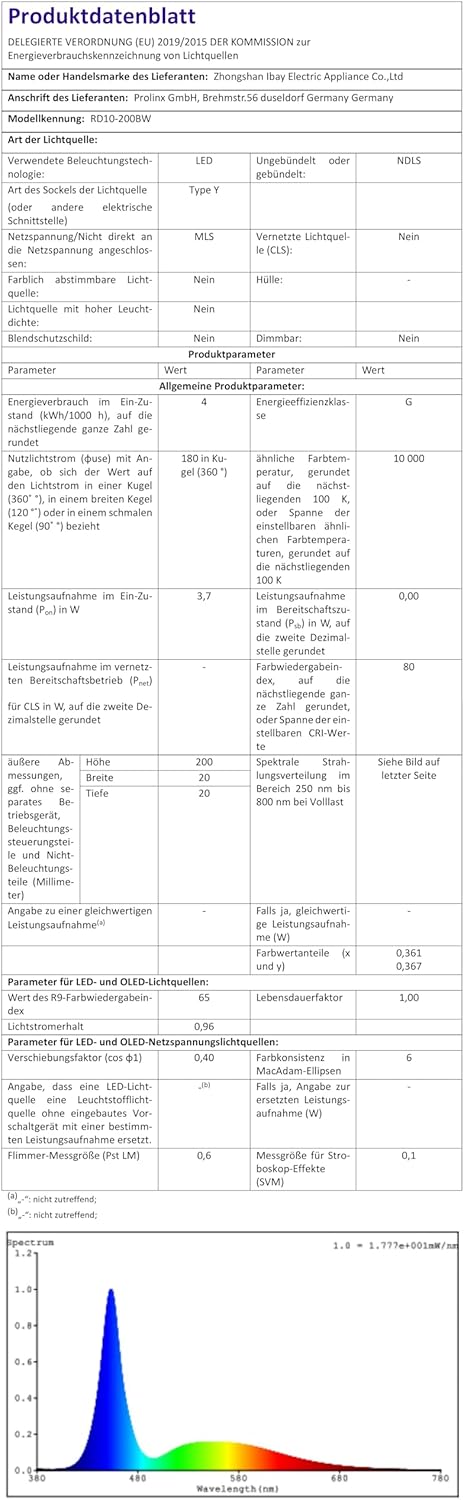
Figure 7: Product data sheet providing comprehensive technical specifications for the FEDOUR aquarium light.
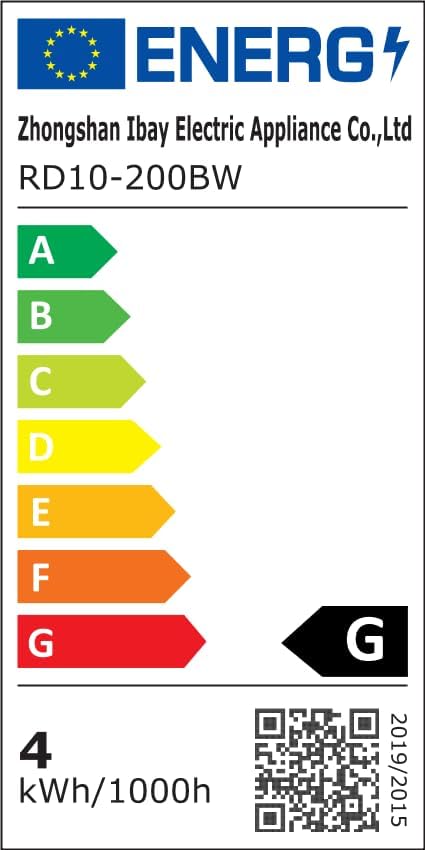
Figure 8: EU Energy Label for the FEDOUR aquarium light, indicating an energy efficiency class of G. For more details, refer to the official EPREL database: https://eprel.ec.europa.eu/qr/2525065
10. Warranty and Support
FEDOUR products are manufactured with quality and reliability in mind. While specific warranty details are not provided in this manual, please retain your proof of purchase for any warranty claims.
For technical support, troubleshooting assistance, or warranty inquiries, please contact your retailer or the manufacturer directly. Contact information can usually be found on the product packaging or the retailer's website.