1. Introduction
Thank you for choosing the GOCHIFIX Auto Hat Heat Press Machine. This manual provides essential information for the safe and efficient operation of your new heat press. Please read all instructions carefully before use and retain this manual for future reference.
Key Features:
- Automatic Operation: Features automatic open/release and pressure adjustment for hands-free operation.
- Precise Temperature & Timer Control: Digital panel for setting temperature (46-400℉/8-200℃) and time (0-999 seconds).
- 4 Memory Modes: Save frequently used settings for efficient workflow.
- 2-in-1 Versatility: Equipped with a 6.54"x3.84" curved heat plate and two interchangeable hat pads for various hat styles and small items.
- Wrinkle-Free Results: Adjustable hat stretcher and molded silicone lower platen ensure smooth transfers.
- Enhanced Safety: Includes a 'Stop' button, anti-slip pads, built-in fuse with spares, and high-temperature gloves.
2. Safety Instructions
Always follow basic safety precautions when using electrical appliances to reduce the risk of fire, electric shock, and personal injury.
- Read all instructions before operating the machine.
- Keep the machine away from water or wet environments.
- Do not touch the heating plate during or immediately after operation as it will be hot. Use the provided high-temperature gloves.
- Ensure the machine is placed on a stable, heat-resistant surface.
- Unplug the machine when not in use or before cleaning.
- Do not operate the machine with a damaged cord or plug.
- Keep children and pets away from the machine during operation.
- Use the emergency 'STOP' button to interrupt operation if necessary.
3. Package Contents
Verify that all items are present in the package:
- GOCHIFIX Auto Hat Heat Press Machine
- Power Cord (Wire length 59.06")
- 1 Pair Silicone Heat-Resistant Gloves
- Children's Hat Pad (4.94" x 2.95")
- Adult Hat Pad (5.59" x 3.78")
- Spare Fuses (2 included)
- Instruction Manual

Figure 3.1: Included accessories with the heat press machine.
4. Setup Guide
Follow these steps to prepare your heat press machine for first use:
- Unpack: Carefully remove all components from the packaging.
- Placement: Place the heat press machine on a stable, flat, and heat-resistant surface. Ensure adequate ventilation around the machine.
- Power Connection: Connect the power cord to the machine's power interface and then plug it into a standard 110V electrical outlet.
- Hat Pad Installation: The machine comes with two interchangeable hat pads. Select the appropriate size for your project. To install, align the pad with the lower platen and secure it.
- Power On: Flip the power switch to the 'ON' position. The digital display will illuminate.

Figure 4.1: Initial setup showing power connection and hat placement.
5. Operating Instructions
This section details how to operate your GOCHIFIX Auto Hat Heat Press Machine.
5.1. Setting Temperature and Time
- Power On: Turn on the machine using the power switch.
- Access Settings: Press the 'SET' button once. The temperature display will flash.
- Adjust Temperature: Use the '+' and '-' buttons to set the desired temperature (range: 46-400℉ / 8-200℃).
- Confirm Temperature: Press 'SET' again. The time display will flash.
- Adjust Time: Use the '+' and '-' buttons to set the desired time (range: 0-999 seconds).
- Confirm Time: Press 'SET' one more time to save the settings and exit the setting mode.
- Temperature Unit Conversion: To switch between Fahrenheit (℉) and Celsius (℃), press and hold the 'SET' button to enter the password screen. Press and hold the '+' button to adjust the display value to 88, then click 'SET' to enter 'CF' mode. Continuously click 'SET' until you exit the setup page to complete the settings.

Figure 5.1: Detailed view of the control panel for setting temperature and time.
5.2. Using Memory Modes
The machine features 4 memory modes to store your preferred temperature and time settings for different materials or projects.
- Select Mode: Press the 'MODE' button to cycle through the 4 available memory modes (P1, P2, P3, P4).
- Save Settings: After setting your desired temperature and time (as described in 5.1), the machine will automatically save these settings to the currently selected mode.
- Recall Settings: Simply select the desired mode using the 'MODE' button to recall its saved temperature and time settings.
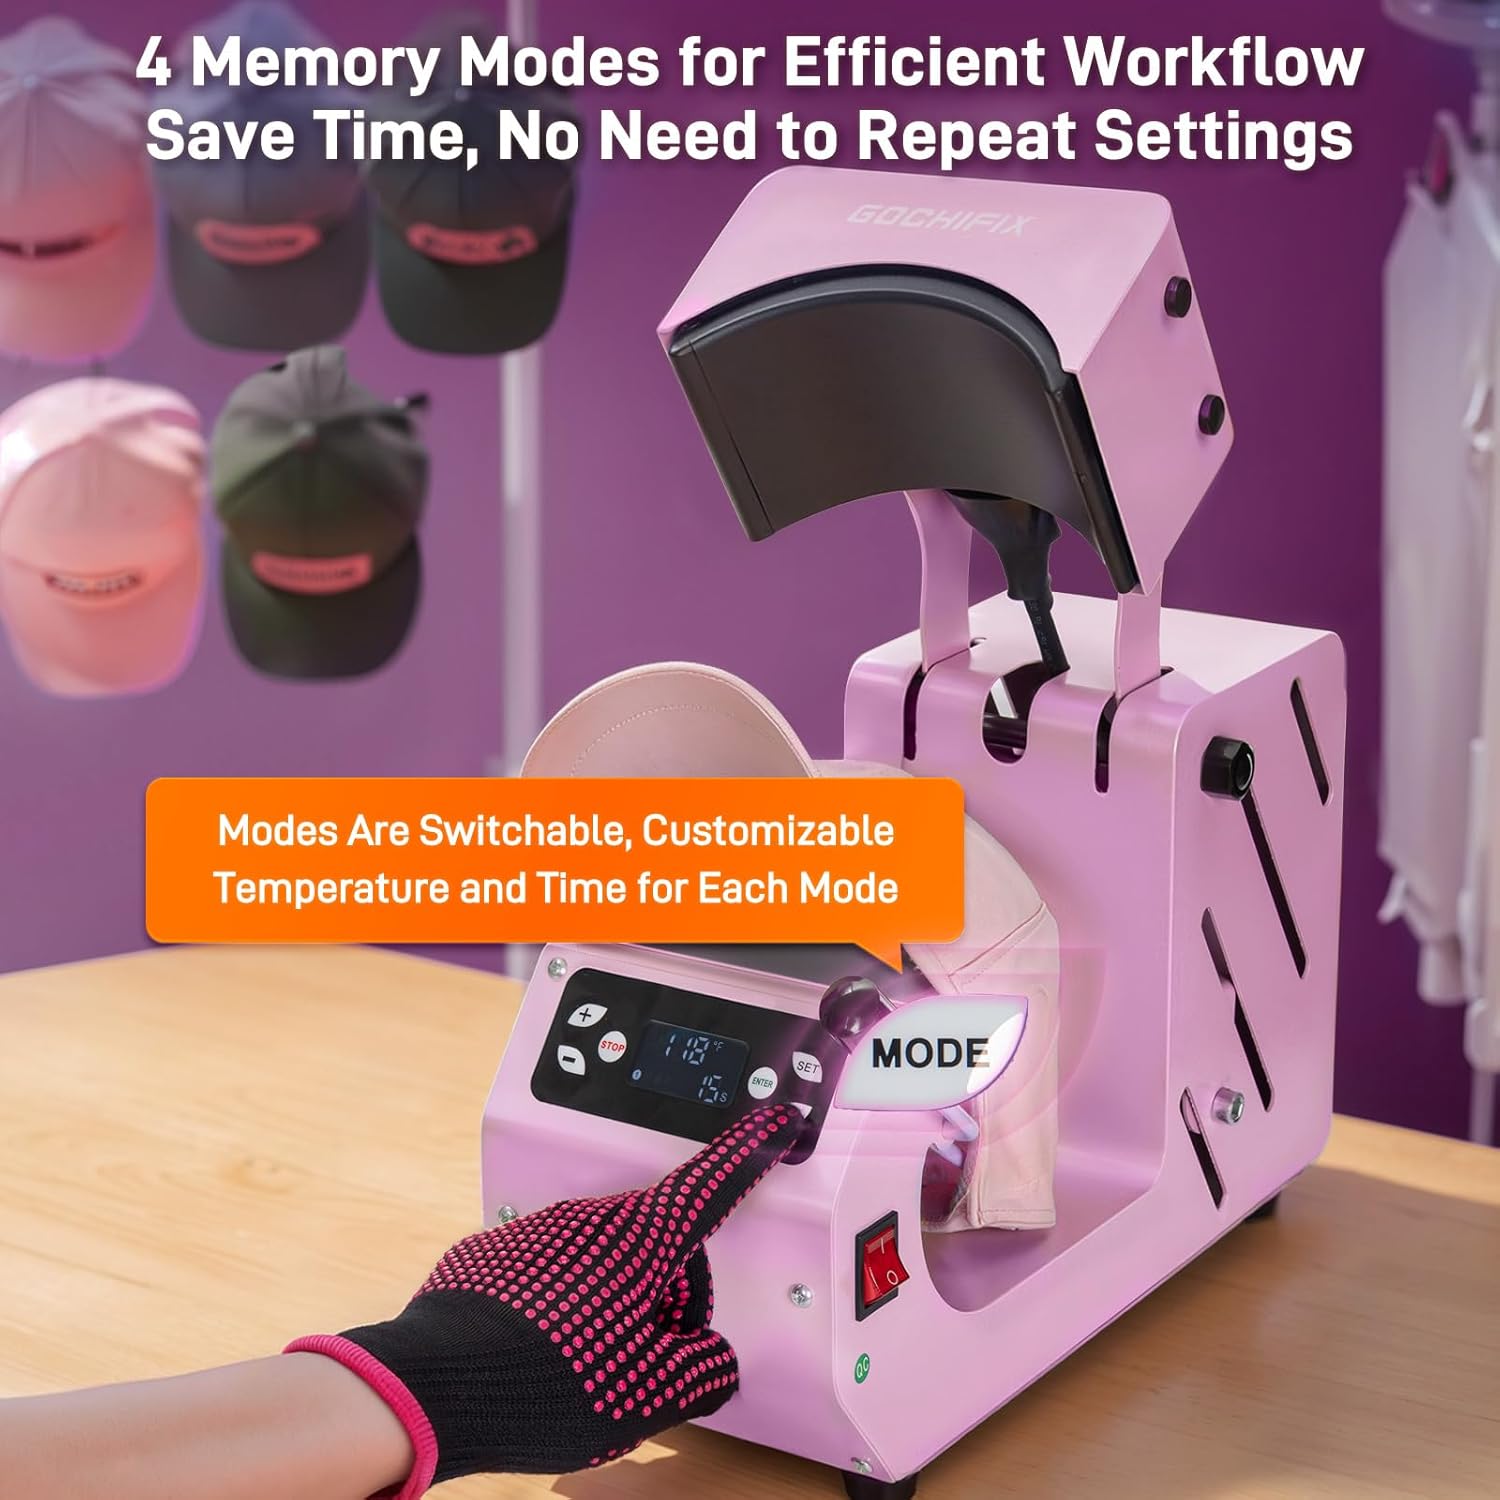
Figure 5.2: The control panel with memory mode selection.
5.3. Performing a Heat Transfer
- Prepare Item: Place the hat or item onto the lower platen, ensuring it is smooth and centered. Use the adjustable hat stretcher to secure the cap and prevent wrinkles.
- Position Transfer: Place your transfer material (sublimation paper, vinyl, etc.) onto the hat in the desired position.
- Wait for Temperature: Allow the machine to reach the set temperature. The display will show the current temperature.
- Start Pressing: Once the set temperature is reached, press the 'ENTER' button. The heating plate will automatically lower and apply pressure. The timer will begin counting down.
- Automatic Release: When the countdown finishes, a buzzer will sound, and the heating plate will automatically rise, releasing the pressure.
- Remove Item: Carefully remove the transferred item using the heat-resistant gloves.

Figure 5.3: Starting the heat press operation.

Figure 5.4: Automatic opening and buzzer alert after transfer.
5.4. Versatile Applications
The GOCHIFIX Auto Hat Heat Press Machine is suitable for various heat transfer processes and items:
- Hat Styles: Ideal for basketball caps, trucker hats, bucket hats, children's hats, adult size hats, and berets.
- Other Small Items: Can also be used for designs on canvas bags, shirt sleeves, neck tags, wrist straps, handkerchiefs, and pet clothing.

Figure 5.5: Examples of items that can be customized with the heat press.
Official Product Video: Operation Overview
This video demonstrates the general operation and features of the GOCHIFIX Auto Hat Heat Press Machine, including setup, temperature/time settings, and the automatic pressing process.
Official Product Video: Hands-Free Operation
This video highlights the hands-free capabilities of the GOCHIFIX heat press, showcasing its automatic open/release function and how it streamlines the heat transfer process.
6. Maintenance
Proper maintenance ensures the longevity and optimal performance of your heat press machine.
- Cleaning: After each use, ensure the machine is unplugged and completely cooled. Wipe the heating plate and other surfaces with a soft, dry cloth. For stubborn residue, use a mild cleaner specifically designed for non-stick surfaces. Avoid abrasive cleaners or harsh chemicals.
- Storage: Store the machine in a dry, dust-free environment when not in use.
- Fuse Replacement: If the machine overheats and the built-in fuse blows, replace it with one of the provided spare fuses. Refer to the fuse compartment for instructions on replacement.
7. Troubleshooting
If you encounter issues with your heat press, refer to the following common problems and solutions:
| Problem | Possible Cause | Solution |
|---|---|---|
| Machine does not power on | Power cord not properly connected; Power switch off; Blown fuse. | Check power cord connection; Ensure power switch is ON; Replace fuse if blown. |
| Heating plate not heating | Incorrect temperature setting; Heating element malfunction. | Verify temperature settings; Contact customer support if issue persists. |
| Transfer results are poor (fading, incomplete) | Incorrect temperature or time settings; Uneven pressure; Material incompatibility. | Adjust temperature/time according to transfer material guidelines; Ensure hat is securely placed; Use appropriate materials. |
| Machine does not open automatically | Mechanism obstruction; Sensor issue. | Check for any obstructions; Contact customer support. |
8. Specifications
| Feature | Detail |
|---|---|
| Brand | GOCHIFIX |
| Model | B0G4FGPZ9P |
| Material | Aluminum, Metal, Silicone |
| Color | Pink |
| Product Dimensions (L x W x H) | 15.35" x 7.13" x 11.1" |
| Recommended Uses | Hat |
| Upper Temperature Rating | 400 Degrees Fahrenheit (200 Degrees Celsius) |
| Voltage | 110 Volts |
| Wattage | 500 watts |
| Curved Heat Plate Size | 6.54" x 3.84" |
| Interchangeable Hat Pad Sizes | 5.59" x 3.78" (Adult), 4.94" x 2.95" (Children) |
9. Warranty & Support
The GOCHIFIX Auto Hat Heat Press Machine comes with a 1-Year Warranty. For warranty claims, technical support, or any inquiries, please contact GOCHIFIX customer service through the retailer where the product was purchased. Please have your model number (B0G4FGPZ9P) and purchase date available when contacting support.
