1. Introduction
Thank you for choosing the Gallant Portable Air Conditioner. This appliance is designed to provide efficient cooling, dehumidification, and fan functions for your indoor spaces. To ensure safe operation, optimal performance, and longevity of your unit, please read this instruction manual thoroughly before installation, operation, or maintenance. Keep this manual for future reference.

Figure 1.1: Front view of the Gallant Portable Air Conditioner.
2. Safety Instructions
Your safety and the safety of others are paramount. Please observe all safety warnings and precautions outlined in this manual.
- Electrical Safety: Ensure the power supply matches the unit's requirements (127V). Do not use extension cords or adapters. Always plug the unit into a grounded outlet.
- Refrigerant (R32): This unit contains R32 refrigerant, which is mildly flammable. Do not puncture the refrigerant circuit. Only qualified personnel should service the unit.
- Placement: Place the unit on a flat, stable surface. Maintain at least 30 cm (12 inches) clearance from walls and other objects to ensure proper airflow.
- Children and Pets: Keep children and pets away from the unit during operation. Do not allow them to play with the appliance.
- Cleaning and Maintenance: Always unplug the unit before cleaning or performing any maintenance.
- Damage: Do not operate the unit if the power cord or plug is damaged, or if the unit has been dropped or damaged in any way. Contact customer support for assistance.
3. Package Contents
Carefully unpack your portable air conditioner and check that all items are present and in good condition. If any items are missing or damaged, contact your retailer.
- Gallant Portable Air Conditioner Unit
- Exhaust Hose
- Window Sealing Kit (Adjustable Window Slider Kit)
- Hose Adapter (for unit and window kit)
- Remote Control
- Drain Hose
- User Manual
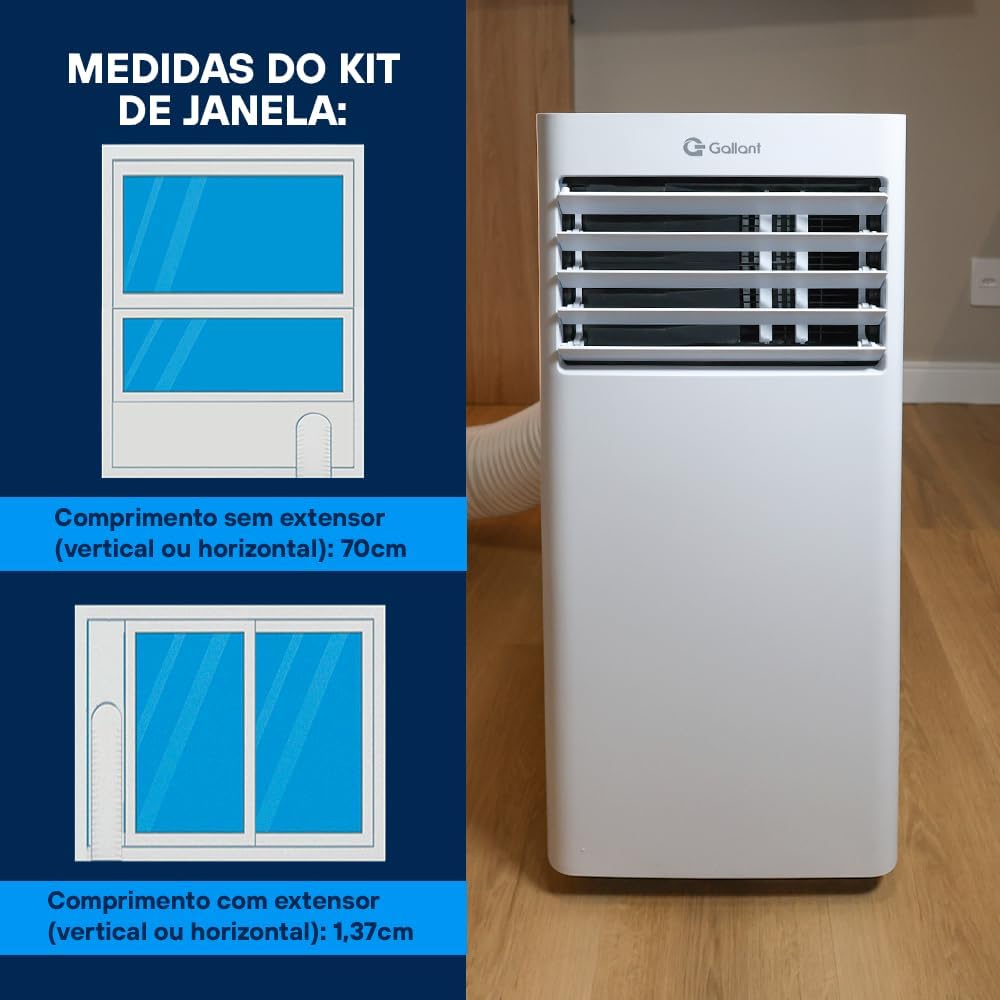
Figure 3.1: Included accessories and components.
4. Setup and Installation
Proper installation is crucial for the efficient operation of your portable air conditioner. This unit requires an exhaust hose to vent hot air outside.
4.1 Unit Placement
- Place the unit near a window or opening where the exhaust hose can be vented outdoors.
- Ensure the unit is on a level surface.
- Maintain adequate clearance around the unit for proper air circulation (at least 30 cm from walls).
4.2 Window Kit Installation
- Assemble the adjustable window slider kit to fit your window opening. The kit can be used vertically or horizontally.
- Secure the window kit in the open window, ensuring a tight seal to prevent outside air from entering.
- Attach the exhaust hose adapter to one end of the exhaust hose.
- Connect the other end of the exhaust hose to the exhaust outlet on the back of the air conditioner unit.
- Insert the hose adapter into the opening of the window kit, ensuring it is securely fastened.

Figure 4.1: Portable air conditioner with exhaust hose properly installed in a window.

Figure 4.2: Window kit dimensions for vertical or horizontal installation. Length without extender: 70cm. Length with extender: 1.37m.
4.3 Power Connection
Plug the power cord into a dedicated 127V, 60Hz grounded electrical outlet. Do not share the outlet with other high-power appliances.
5. Operating Instructions
Your Gallant Portable Air Conditioner can be operated using the control panel on the unit or the included remote control.
5.1 Control Panel Overview

Figure 5.1: Control panel layout and functions.
- Power Button (⏻): Turns the unit ON or OFF.
- Mode Button (MODO): Cycles through operating modes: Cool (FRIO), Dehumidify (SECO), Fan (VENT).
- Temperature Buttons (▲ / ▼): Adjusts the desired temperature in Cool mode.
- Fan Speed Button (VENTIL): Selects fan speed: High (ALTO), Medium (MED), Low (BAIXO).
- Timer Button (TEMPO): Sets the auto-on or auto-off timer.
- Sleep Button (DORMIR): Activates Sleep mode for quiet operation and gradual temperature adjustment.
5.2 Operating Modes
- Cool Mode (FRIO): Provides cooling. Set desired temperature and fan speed.
- Dehumidify Mode (SECO): Reduces humidity in the room. Fan speed is automatically set to low.
- Fan Mode (VENT): Circulates air without cooling. Select desired fan speed.
6. Maintenance
Regular maintenance ensures the efficiency and extends the lifespan of your air conditioner. Always unplug the unit before performing any maintenance.
6.1 Air Filter Cleaning
The air filter should be cleaned every two weeks or more frequently depending on usage and air quality.
- Turn off and unplug the unit.
- Locate and remove the air filter from the back or side of the unit.
- Wash the filter under running water (preferably warm, soapy water) to remove dust and debris.
- Allow the filter to air dry completely before reinstalling it. Do not expose to direct sunlight.

Figure 6.1: Cleaning the washable air filter.
6.2 Condensate Drainage
The unit has a self-evaporative system, but in high humidity conditions, the internal water tank may fill up. When this happens, the unit will stop operating and display an error code (refer to troubleshooting). Drain the water using the drain plug at the bottom of the unit.
6.3 Storage
If storing the unit for an extended period, ensure it is completely drained, clean the air filter, and cover it to protect from dust. Store in a dry, cool place.
7. Troubleshooting
Before contacting customer support, please refer to the following table for common issues and solutions.
| Problem | Possible Cause | Solution |
|---|---|---|
| Unit does not turn on | No power; Power cord unplugged; Fuse blown; Water tank full | Check power connection; Plug in securely; Check circuit breaker; Drain water tank |
| Unit cools insufficiently | Window kit not sealed; Room too large; Air filter dirty; Exhaust hose blocked/bent; Door/window open | Ensure proper window seal; Use in appropriate room size (up to 15m²); Clean air filter; Straighten exhaust hose; Close doors/windows |
| Unit is noisy | Unit not level; Fan speed too high; Obstruction in fan | Place on a flat surface; Reduce fan speed; Check for obstructions |
| Water leakage | Drain plug loose; Unit tilted; Water tank full | Secure drain plug; Ensure unit is level; Drain water tank |
8. Specifications
Detailed technical specifications for the Gallant Portable Air Conditioner Model GAP12PCCA-BR127.
| Feature | Specification |
|---|---|
| Brand | Gallant |
| Model | GAP12PCCA-BR127 |
| Cooling Capacity | 12000 BTUs |
| Refrigerant | R32 |
| Voltage | 127V |
| Noise Level | 55 Decibels |
| Installation Type | Portable |
| Power Source | Electric Powered |
| Unit Dimensions (H x W x D) | 69.4 cm x 30 cm x 32 cm (approx.) |
| Package Dimensions | 87 cm x 38 cm x 34 cm |
| Weight | 24 kg |

Figure 8.1: Unit dimensions.
9. Warranty and Support
For warranty information regarding your Gallant Portable Air Conditioner, please refer to the warranty card included with your product or contact your retailer. Standard warranty terms typically cover manufacturing defects for a specified period from the date of purchase.
Extended warranty options may be available for purchase separately. For technical support or service inquiries, please contact Gallant customer service or your authorized dealer.