1. Important Safeguards
Please read all instructions carefully before using your ECOSELF Cold Press Juicer Machine. Keep this manual for future reference.
- Ensure the appliance is properly assembled before operation. The safety lock mechanism prevents operation if not correctly assembled.
- Do not immerse the motor base in water or other liquids. Clean only with a damp cloth.
- Keep hands and utensils out of the feed chute during operation to prevent injury. Always use the food pusher provided.
- Unplug the juicer from the outlet when not in use, before assembling or disassembling parts, and before cleaning.
- Do not use the appliance if the power cord or plug is damaged, or if the appliance malfunctions or is dropped.
- This appliance is for household use only. Do not use outdoors.
- Do not process frozen fruits, ice cubes, or hard seeds/pits as this may damage the auger and motor.
2. Product Overview
Familiarize yourself with the components of your ECOSELF Cold Press Juicer Machine for optimal use and maintenance.

Figure 2.1: Exploded view showing all detachable parts of the juicer.

Figure 2.2: Fully assembled ECOSELF Cold Press Juicer Machine.
Components:
- Motor Base: The main unit containing the motor and control knob.
- Juicing Chamber: The transparent upper section where fruits and vegetables are processed.
- Auger: The spiral-shaped component that crushes and presses produce.
- Filter Basket: Separates juice from pulp.
- Hopper Lid with Feed Chute: The top cover with a wide opening for feeding ingredients.
- Food Pusher: Used to guide ingredients into the auger.
- Juice Outlet with Anti-Drip Cap: Dispenses extracted juice.
- Pulp Outlet: Discharges dry pulp.
- Juice Cup: Collects the extracted juice.
- Pulp Cup: Collects the discarded pulp.
- Cleaning Brush: For easy cleaning of the filter and other parts.
3. Setup
Follow these steps to correctly assemble your juicer before first use.

Figure 3.1: Step-by-step assembly of the juicer components onto the motor base.
- Place the motor base on a stable, flat surface.
- Insert the filter basket into the juicing chamber.
- Place the auger into the center of the filter basket.
- Align the juicing chamber assembly with the motor base and rotate clockwise until it locks securely into place.
- Attach the hopper lid to the juicing chamber, ensuring it clicks into place. The juicer will not operate if the lid is not securely closed.
- Position the juice cup under the juice outlet and the pulp cup under the pulp outlet.

Figure 3.2: Important safety reminder for proper lid alignment.

Figure 3.3: Operational tip regarding hopper rotation.

Figure 3.4: The juicer features an automatic safety sensor for user protection.
4. Operating Instructions
Prepare your ingredients and begin juicing with ease.
4.1 Ingredient Preparation
- Wash all fruits and vegetables thoroughly.
- For most fruits and vegetables, pre-cutting is not necessary due to the wide feed chute. Simply drop whole items into the chute.
- Remove hard pits from fruits like peaches, plums, or cherries.
- For fibrous vegetables like celery, it is recommended to cut them into 1-2 inch pieces to prevent clogging.

Figure 4.1: The wide feed chute allows for whole fruits and vegetables, minimizing prep time.
4.2 Juicing Process
- Ensure the juicer is properly assembled and the juice and pulp cups are in place.
- Plug the power cord into a grounded electrical outlet.
- Turn the control knob to the 'ON' position. The motor will start operating quietly.

Figure 4.2: The simple one-touch control knob for easy operation.
- Slowly feed ingredients into the wide feed chute. Use the food pusher to gently guide them down. Do not force ingredients.
- Observe the juice flowing into the juice cup and pulp being expelled into the pulp cup.
- Once all ingredients are processed, turn the control knob to the 'OFF' position.
4.3 Reverse Function
If ingredients become jammed or the juicer stops during operation, use the reverse function to clear the blockage.
- Turn the control knob to the 'REV' (Reverse) position and hold for a few seconds. This will rotate the auger in the opposite direction to dislodge any stuck ingredients.
- Release the knob to return to the 'OFF' position, then switch back to 'ON' to resume juicing. Repeat if necessary.

Figure 4.3: Utilizing the reverse function to clear blockages and ensure continuous juicing.
4.4 High Juice Yield & Low Noise
The ECOSELF juicer is designed for maximum juice extraction and quiet operation.

Figure 4.4: The juicer extracts up to 99% of juice, minimizing waste and preserving nutrients.

Figure 4.5: The powerful yet quiet motor ensures efficient and pleasant juicing.
4.5 Instructional Videos
Video 4.1: Demonstrates the wide mouth feed chute and hands-free juicing capabilities.
Video 4.2: Guide on easy installation and assembly of the ECOSELF Cold Press Juicer.
Video 4.3: Detailed instructions on how to set up and use the juicer effectively.
5. Cleaning and Maintenance
Regular cleaning ensures the longevity and hygienic operation of your juicer.
5.1 Disassembly for Cleaning

Figure 5.1: Steps to disassemble the juicer for thorough cleaning.
- Turn the juicer OFF and unplug it from the power outlet.
- Open the hopper lid.
- Rotate the juicing chamber counter-clockwise to unlock it from the motor base, then lift it off.
- Remove the auger, filter basket, and juicing chamber from the motor base.
5.2 Cleaning Instructions
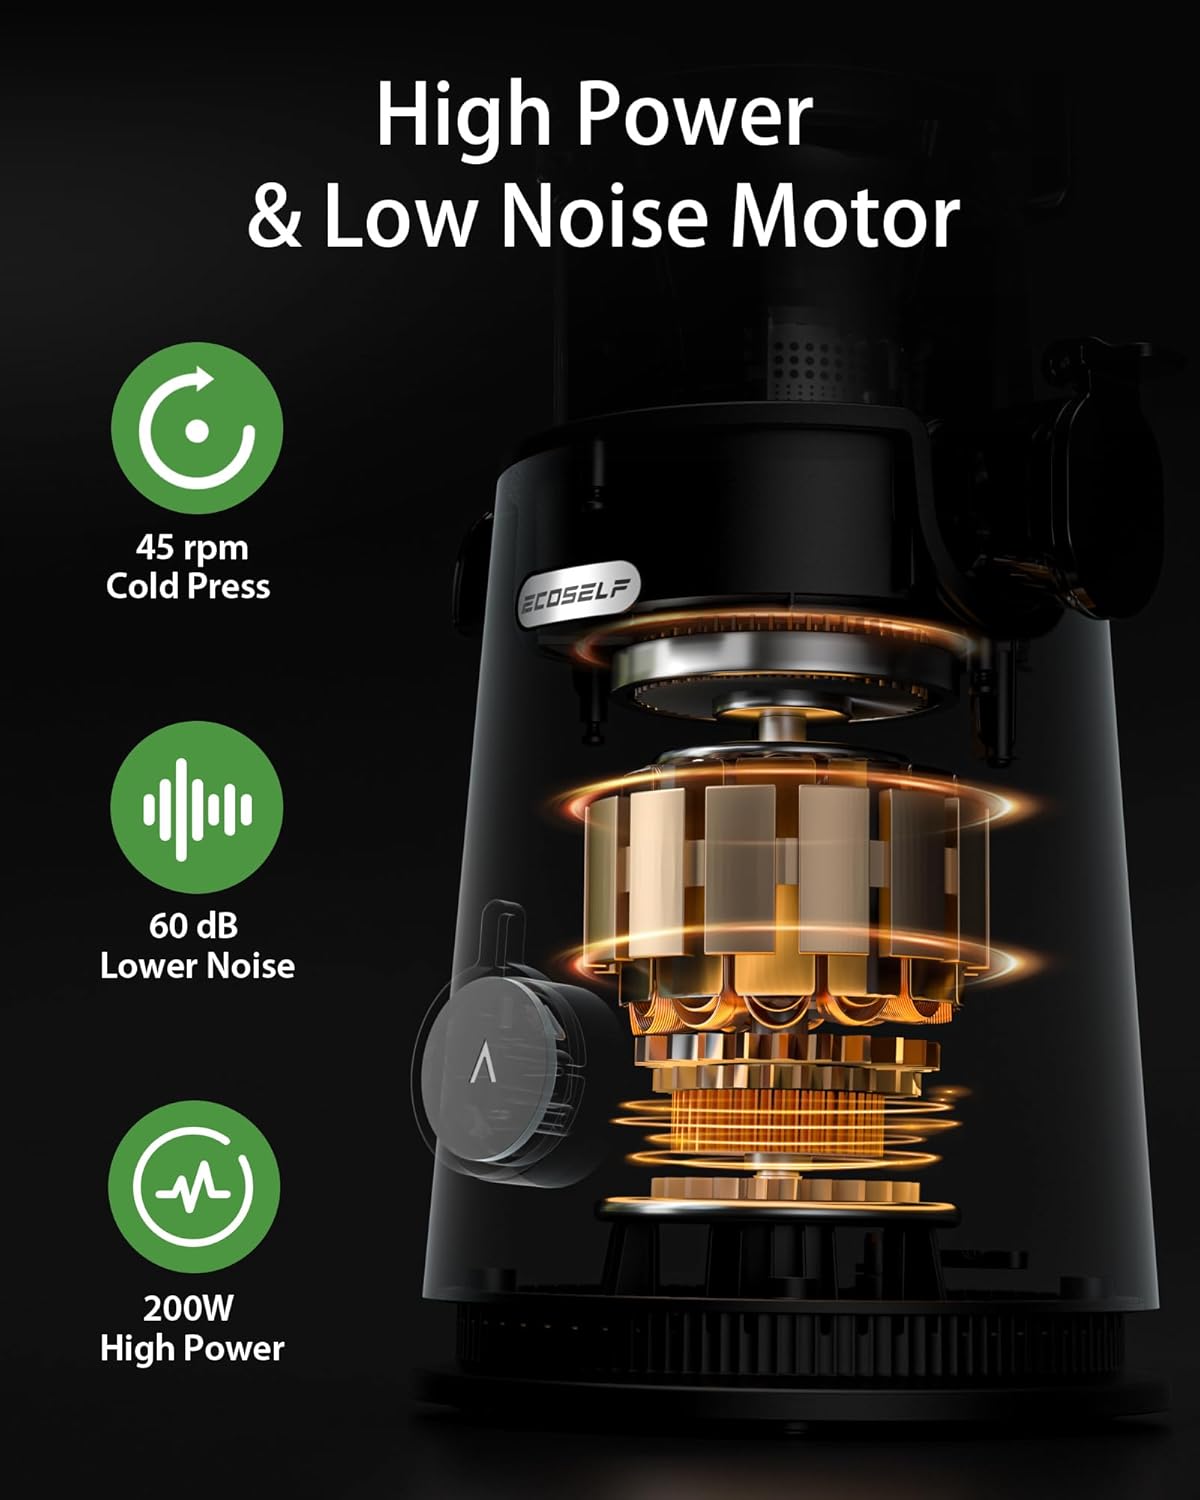
Figure 5.2: Rinsing juicer components under running water for quick cleaning.
- Rinse all detachable parts (juicing chamber, auger, filter basket, hopper lid, juice cup, pulp cup) under running water immediately after use.
- Use the provided cleaning brush to remove any stubborn pulp residue from the filter basket and other crevices.
- Wipe the motor base with a damp cloth. Never immerse the motor base in water.
- All detachable parts are dishwasher-safe for convenience.
- Allow all parts to air dry completely before reassembling or storing.

Figure 5.3: The juicer produces drier pulp, making cleanup easier and reducing waste.
6. Troubleshooting
If you encounter any issues with your juicer, refer to the following common problems and solutions.
| Problem | Possible Cause | Solution |
|---|---|---|
| Juicer does not turn on. | Not properly assembled; power cord not plugged in; safety lock not engaged. | Ensure all parts are correctly assembled and locked. Check power cord connection. |
| Ingredients are stuck/clogged. | Overfeeding; hard ingredients; fibrous ingredients not cut. | Use the 'REV' function to clear. If persistent, disassemble and clean. Cut fibrous ingredients into smaller pieces. |
| Low juice yield / Wet pulp. | Ingredients processed too quickly; certain types of produce. | Feed ingredients slowly. Some soft fruits naturally produce wetter pulp. |
| Excessive vibration or noise. | Improper assembly; hard ingredients. | Check assembly. Ensure no hard objects like pits are being processed. |
7. Specifications
- Brand: ECOSELF
- Model: B0G4DDTP5B
- Color: Premium Black
- Product Dimensions: 7.68"D x 13.66"W x 14.96"H
- Recommended Uses: Fruits, Vegetables, Leafy Greens
- Capacity: 1.2 Liters
- Blade Material: PMMA
- Voltage: 120 Volts
- Item Weight: 7.81 pounds
- Special Features: Easy to Clean & Assemble, High Juice Yield, High Power & Low Noise Motor, Large Feed Chute, Reverse Function & Safety Design, Self Feeding & Hands-Free Design.
8. Warranty and Support
ECOSELF is committed to providing excellent customer service and support.
- Warranty: We provide 24 months (after activation) of Repair and Replacement Service.
- Customer Support: For any inquiries or assistance, please contact us. We aim to reply within 24 hours.
- Please refer to your purchase documentation for specific contact details or visit the official ECOSELF website.
