1. Product Overview
The PUWU MIG-160 PRO is a versatile 4-in-1 multiprocess welding machine designed for various welding applications. It supports Gas MIG, Flux Core Gasless MIG, Lift TIG, and MMA/Stick welding modes. This welder features dual voltage compatibility (110V/220V), an IGBT inverter, and a smart synergic control system for optimized performance and ease of use.
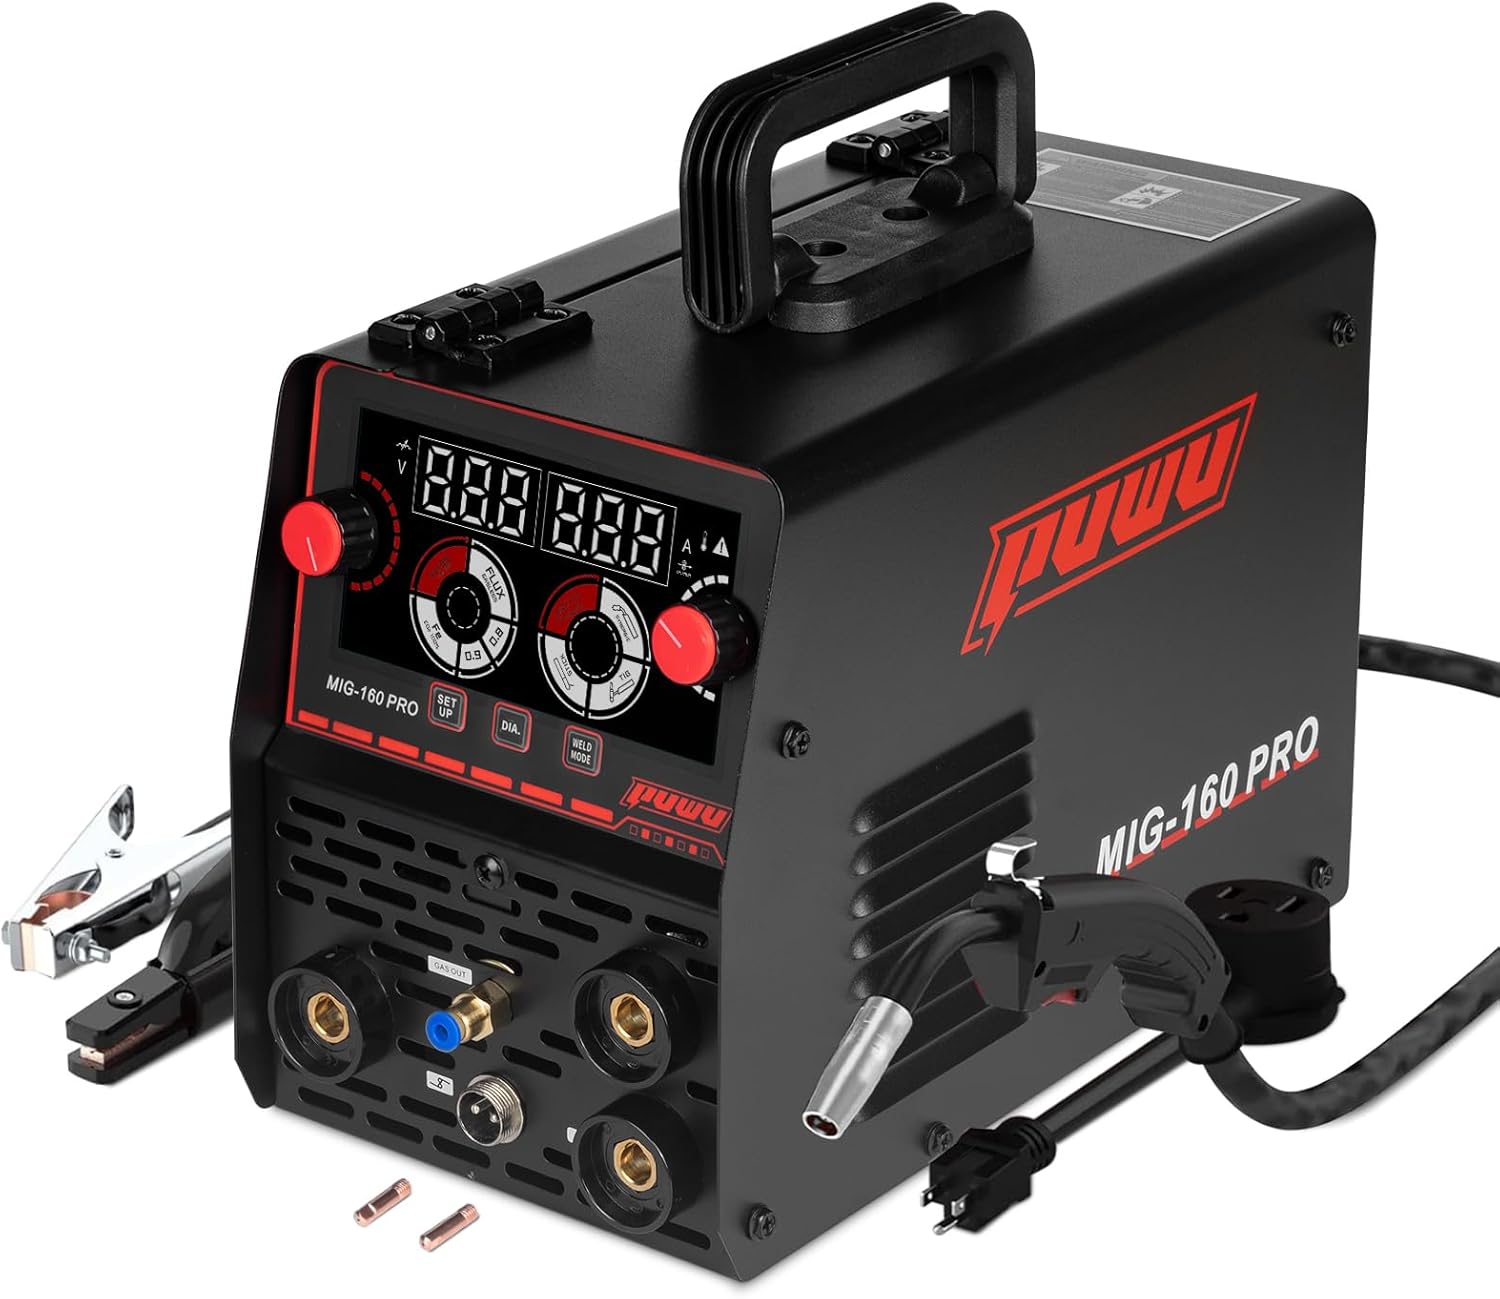
Image 1.1: Front view of the PUWU MIG-160 PRO welder with included MIG torch, electrode holder, and ground clamp.
Key Features:
- 4-in-1 Multifunctional Welding System: Capable of Gas MIG, Flux Core Gasless MIG, Lift TIG, and MMA/Stick welding.
- Smart Synergic Control System: Automatically matches voltage and wire feeding speed to selected wire diameter (.030"/.035"/.040"). Manual adjustment is also available.
- Portable & Compact Design: Weighs 10.25lb, with dual-voltage (110V/220V) operation for portability.
- Advanced LED Display & Safety Protection: Features an upgraded LED digital display and protections against over-current, over-load, over-heating, and voltage fluctuations.
2. Safety Information
Read and understand all safety precautions before operating this welding machine. Failure to follow safety guidelines can result in serious injury or death.
General Safety Precautions:
- Electric Shock: Welding current can cause fatal electric shock. Ensure proper grounding and insulation. Never touch live electrical parts.
- Fumes and Gases: Welding produces fumes and gases that can be hazardous to health. Work in a well-ventilated area or use local exhaust ventilation.
- Arc Rays: Arc rays can burn eyes and skin. Always wear a welding helmet with appropriate shade and protective clothing.
- Fire and Explosion: Welding sparks and hot metal can cause fires. Keep flammable materials away from the welding area. Have a fire extinguisher readily available.
- Burns: Hot metal and sparks can cause severe burns. Wear protective gloves, long sleeves, and other appropriate clothing.
- Work Area: Keep the work area clean, dry, and free of clutter. Ensure adequate lighting.
3. Package Contents
Upon opening the package, verify that all components are present and undamaged. If any items are missing or damaged, contact customer support.

Image 3.1: The PUWU MIG-160 PRO welder shown with its complete accessory package, including the MIG gun, electrode holder, work clamp, contact tips, and power plug.
Included Items:
- PUWU MIG-160 PRO Welder Unit
- 1.5m Electrode Holder with red 10-25 connector
- 1.5m Ground Clamp with black 10-25 connector
- 1.5m MB-11 MIG Torch
- U.S. Power Cord with conversion cable
- Instruction Manual
- Contact Tips (various sizes)
- Gas Hose (for Gas MIG welding)
4. Product Components and Controls
Familiarize yourself with the front panel controls and rear panel connections of the MIG-160 PRO welder.

Image 4.1: Detailed view of the MIG-160 PRO control panel, highlighting the digital display, voltage knob, current knob, setup button, wire diameter selection, and weld mode selection.
Front Panel:
- Digital Display: Shows welding voltage and current.
- Voltage Knob: Adjusts welding voltage.
- Current Knob: Adjusts welding current.
- Setup Button: For advanced settings or synergic adjustments.
- Wire Diameter (DIA) Button: Selects wire diameter for synergic control.
- Weld Mode Button: Selects between MIG (Gas/Flux Core), Lift TIG, and Stick welding modes.
- Output Terminals: Connections for electrode holder, ground clamp, and MIG torch.
Rear Panel:
- Power Input: Connection for the power cord (110V/220V).
- Gas Inlet: Connection for shielding gas hose (for Gas MIG).
- Power Switch: Turns the machine ON/OFF.
- Cooling Fan: Provides ventilation for internal components.
5. Setup
Follow these steps to set up your PUWU MIG-160 PRO welder for operation.
Video 5.1: This video demonstrates the unboxing, connection of welding cables and gas hose, and a brief welding demonstration for the PUWU MIG-160 PRO welder.
5.1 Power Connection
- Ensure the welder's power switch is in the OFF position.
- Connect the appropriate power cord to the welder's power input on the rear panel.
- Plug the power cord into a suitable 110V or 220V power outlet. The machine automatically detects the voltage.
5.2 Connecting Welding Cables
- Ground Clamp: Connect the ground clamp cable to the appropriate output terminal on the front panel. Secure the ground clamp to the workpiece.
- Electrode Holder (for Stick/MMA): Connect the electrode holder cable to the designated terminal.
- MIG Torch: Connect the MIG torch cable to the corresponding connector on the front panel. Ensure it is securely fastened.
5.3 Gas Connection (for Gas MIG)
- Attach one end of the gas hose to the gas inlet on the rear panel of the welder.
- Connect the other end of the gas hose to your shielding gas cylinder regulator.
- Ensure all connections are tight to prevent gas leaks.
5.4 Wire Spool Installation (for MIG/Flux Core)
- Open the wire feed compartment.
- Place the wire spool onto the spool holder, ensuring it rotates freely.
- Feed the welding wire through the guide tube and into the drive roller mechanism.
- Adjust the drive roller tension to prevent slipping or crushing the wire.
- Close the compartment.
6. Operating Instructions
This section details the operation of the PUWU MIG-160 PRO in its various welding modes.

Image 6.1: Visual representation of the four welding processes supported by the machine: Flux MIG, MIG, Lift TIG, and Stick welding.
6.1 Selecting Welding Mode
Turn on the welder using the power switch on the rear panel. Use the Weld Mode button on the front panel to cycle through the available welding processes: Gas MIG, Flux Core MIG, Lift TIG, and Stick (MMA).
6.2 Synergic Control and Parameter Adjustment
The synergic control system simplifies parameter setup. After selecting the welding mode:
- Press the DIA button to select the appropriate wire diameter (e.g., .030", .035", .040") for MIG/Flux Core welding.
- The machine will automatically suggest optimal voltage and wire feed speed settings.
- For fine-tuning, use the Voltage Knob and Current Knob to adjust parameters manually. The digital display will show the current settings.
6.3 MIG Welding (Gas and Flux Core)
- Gas MIG: Requires shielding gas (e.g., Argon/CO2 mix) connected via the gas inlet. Use solid welding wire.
- Flux Core MIG: Does not require external shielding gas. Use flux-cored welding wire.
- Ensure the correct wire type and diameter are selected and installed.
- Adjust parameters using synergic control or manually.
- Press the MIG torch trigger to initiate the arc and feed wire.
6.4 Lift TIG Welding
- Requires a TIG torch (not included in standard package) and shielding gas (e.g., Argon).
- Select Lift TIG mode.
- Touch the tungsten electrode to the workpiece and then lift it slightly to initiate the arc.
- Adjust current using the control knob.
6.5 Stick Welding (MMA)
The MIG-160 PRO includes intelligent features for Stick welding:

Image 6.2: Diagram illustrating the intelligent features of the MMA welder: Hot Start, Anti-Stick, Arc Force, and IGBT Technology.
- Hot Start: Provides an initial boost of current to make arc starting easier.
- Anti-Stick: Reduces the current if the electrode sticks to the workpiece, preventing overheating and allowing easy removal.
- Arc Force: Automatically increases current when the arc length shortens, preventing the arc from extinguishing.
- Select Stick (MMA) mode.
- Insert the welding electrode into the electrode holder.
- Adjust the current using the control knob according to the electrode type and size.
- Strike the arc by lightly touching and quickly withdrawing the electrode from the workpiece.
7. Welding Parameters
Refer to the following table for general welding parameters for the MIG-160 PRO. These values are a guide and may need adjustment based on material, thickness, and specific welding conditions.

Image 7.1: A table displaying recommended welding parameters for MIG, Arc (Stick), and Lift TIG functions across different power supply voltages.
| Parameter | MIG Function | ARC Function | Lift TIG Function |
|---|---|---|---|
| Power Supply Voltage (V) | AC110 / AC220 | AC110 / AC220 | AC110 / AC220 |
| Effective Current (A) | 29.4 / 19 | 32.5 / 23.9 | 16.2 / 16.2 |
| Rated Input Power (KW) | 4.1 / 5.5 | 4.6 / 6.3 | 3.4 / 4.4 |
| Rated Input Current (A) | 38 / 25 | 42 / 29 | 31 / 21 |
| Duty Cycle (40°C 10min) | 20% | ||
| No-Load Voltage (V) | 60 | ||
| Welding Current Range (A) | 40-120 / 20-160 | 20-120 / 20-160 | 20-120 / 20-160 |
| Welding Voltage Range (V) | 16-20 / 16-22 | 20.8-24.8 / 20.8-26.4 | 10.4-14.8 / 10.8-16 |
| Electrode Size Range | 0.8-0.9 | 2.5-3.2 / 2.5-4.0 | 1.0-2.0 / 1.0-2.0 |
| Operating Temp | -20°C - +45°C | ||
| Welding Wire Size | 2-13 m/min | ||
8. Maintenance
Regular maintenance ensures the longevity and safe operation of your welding machine.
General Maintenance:
- Cleaning: Regularly clean the machine's exterior and ventilation openings to prevent dust and debris buildup. Use compressed air to clear internal components if necessary, ensuring the machine is unplugged.
- Cable Inspection: Periodically inspect all welding cables, connections, and the power cord for damage, fraying, or loose connections. Replace damaged components immediately.
- Consumables: Check and replace MIG torch nozzles, contact tips, and TIG tungsten electrodes as they wear out. Ensure the wire feed rollers are clean and free of debris.
- Storage: Store the welder in a clean, dry environment, away from excessive dust, moisture, and extreme temperatures.
9. Troubleshooting
This section provides solutions to common issues you might encounter with your MIG-160 PRO welder.
Common Issues and Solutions:
- No Arc / Weak Arc:
- Check power supply and connections.
- Ensure ground clamp is securely attached to a clean metal surface.
- Verify correct welding parameters (current/voltage) for the material and electrode/wire.
- For Stick welding, ensure the electrode is not damp or expired.
- Poor Weld Quality (Porosity, Spatter):
- For Gas MIG, check gas flow rate and ensure gas cylinder is not empty.
- Ensure workpiece is clean and free of rust, paint, or oil.
- Adjust welding parameters (voltage, wire feed speed) for optimal arc stability.
- Check contact tip and nozzle for wear or blockage.
- Overheating Protection Activated:
- The machine has thermal protection. Allow it to cool down.
- Ensure ventilation openings are not blocked.
- Reduce duty cycle or welding current if continuously overheating.
- Wire Feeding Issues (MIG/Flux Core):
- Check wire spool installation and ensure it rotates freely.
- Adjust drive roller tension.
- Inspect the MIG torch liner for kinks or blockages.
- Ensure the contact tip is the correct size for the wire diameter.
If problems persist after attempting these solutions, contact PUWU customer support.
10. Specifications
The following table outlines the technical specifications for the PUWU MIG-160 PRO welder.

Image 10.1: The PUWU MIG-160 PRO welder with its dimensions (5.91" x 10.98" x 7.99") and weight (10.25 lbs) indicated.
| Specification | Value |
|---|---|
| Model | TK-MIG-160PRO |
| Manufacturer | PUWU |
| Input Voltage | Dual Voltage 110V/220V |
| Welding Processes | Gas MIG, Flux Core MIG, Lift TIG, MMA/Stick |
| Max Output Current | 160A |
| Weight | 10.25 lb |
| Color | Black |
| Part Number | TK-MIG160PRO |
11. Warranty and Support
For warranty information and technical support, please refer to the documentation included with your product or contact PUWU customer service directly. Details regarding warranty periods and claims procedures are typically provided at the point of purchase or on the manufacturer's official website.