1. Introduction
Thank you for choosing the Magicshine RN600 V2.0 Bike Light. This manual provides essential information for the safe and effective use of your new bike light. Please read it thoroughly before installation and operation, and retain it for future reference.
2. Safety Information
- Do not look directly into the light beam when the light is on, as it may cause temporary vision impairment.
- Ensure the light is securely mounted to your bicycle to prevent it from falling during rides.
- Keep the light away from children.
- Do not disassemble the light or attempt to repair it yourself. Contact customer support for assistance.
- Always ensure the USB-C port cover is tightly sealed to maintain waterproof integrity, especially in wet conditions.
3. Package Contents
The Magicshine RN600 V2.0 Bike Light package includes the following items:
- RN600 V2 Bike Light
- MJ 6280 Handlebar Mount
- Various Straps (for different handlebar sizes)
- Hex Key
- User Manual
- USB-C Cable
- Garmin to GoPro Adapter

Image: All components included in the Magicshine RN600 V2.0 Bike Light package.
4. Product Features
- 600 Lumen Brightness: Delivers powerful illumination for clear nighttime visibility.
- Anti-Glare Lens: Features a distinct cut-off line to prevent dazzling oncoming traffic or pedestrians, enhancing safety.
- Long Runtime: Equipped with a 1600mAh battery, providing up to approximately 9 hours of runtime in day flash mode.
- USB Type-C Charging: Offers convenient and fast charging.
- Durable Construction: All-metal housing for superior heat dissipation and a premium feel.
- IPX7 Waterproof Rating: Designed to withstand heavy rain and harsh weather conditions.
- Lock Function: Prevents accidental activation, preserving battery life.
- Mode Memory: Automatically resumes the last used setting for ease of use.
- Universal Mount: Compatible with Garmin mounts for versatile installation.

Image: The Magicshine RN600 V2.0 Bike Light, showcasing its compact design and powerful LED.

Image: Diagram illustrating the anti-glare lens technology with a distinct cut-off line for safe illumination.
5. Installation
The RN600 V2.0 features a universal mount compatible with Garmin mounts, allowing for flexible installation on your handlebars.
5.1 Attaching the Handlebar Mount
- Select the appropriate rubber strap for your handlebar diameter.
- Place the MJ 6280 Handlebar Mount on your handlebar.
- Secure the mount using the provided hex key to tighten the screw, ensuring a snug fit without over-tightening.
5.2 Attaching the Light
- Align the light with the mount's quarter-turn interface.
- Push down gently and twist the light clockwise until it clicks securely into place.
- To remove, push down and twist counter-clockwise.
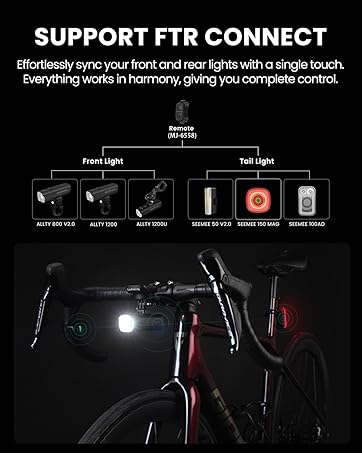
Image: Example of the Magicshine RN600 V2.0 mounted on a bicycle handlebar.
Video: A demonstration of the Magicshine RN600 Bike Light's features and installation process, including mounting on the handlebar.
6. Operation
6.1 Power On/Off
- To turn on: Press and hold the power button for approximately 1 second.
- To turn off: Press and hold the power button for approximately 1 second.
6.2 Mode Switching
Once powered on, short press the power button to cycle through the following modes:
- Constant Modes: Low (150LM), Medium (300LM), High (600LM)
- Flash Modes: Night Flash (150-600LM), Day Flash (0-600LM)
The light features mode memory, automatically returning to the last used mode when turned on.
6.3 Lock Function
To prevent accidental activation and save battery, the light includes a lock function:
- To lock: When the light is off, press and hold the power button for 5 seconds until the indicator flashes.
- To unlock: When the light is locked, press and hold the power button for 5 seconds until the indicator flashes.
7. Charging
The RN600 V2.0 is equipped with a USB Type-C charging port.
- Open the rubber cover on the USB-C port.
- Connect the provided USB-C cable to the light and a compatible USB power source (e.g., computer, wall adapter).
- The indicator light will show charging status.
- A full charge takes approximately 2.5 hours.
- Ensure the rubber cover is securely closed after charging to maintain IPX7 waterproof rating.

Image: Close-up of the USB-C charging port with the protective cover open.
8. FTR LightSync Control (Optional)
The Magicshine RN600 V2.0 is compatible with the FTR LightSync Control system, allowing simultaneous control of front and rear lights with a single remote.
8.1 Pairing Instructions
- Turn on both the front light (RN600 V2.0) and the compatible FTR tail light.
- On the FTR remote, press and hold both the circle and square buttons for approximately 5 seconds until the remote's indicator flashes blue to enter pairing mode.
- Hold the remote close to the front light and tail light until the indicator on the remote and the two light units show a consistent blue light for 2 seconds, confirming successful pairing.
8.2 Using the FTR Remote
- After pairing, press and hold any button on the remote or the front light for 1 second to turn both the front and rear lights on or off simultaneously.
- Use the circle button on the remote to cycle through the brightness levels of the front light.
- Double-click the square button on the remote to switch between flashing modes.
Video: Instructions on how to set up and use the FTR LightSync Control system for synchronized bike lights.
9. Maintenance
- Clean the light regularly with a soft, damp cloth. Avoid abrasive cleaners.
- Ensure the USB-C port cover is always sealed when not charging to prevent water ingress.
- Store the light in a cool, dry place when not in use.
- Charge the battery at least once every three months to maintain battery health if stored for extended periods.
10. Troubleshooting
- Light not turning on: Ensure the battery is charged and the lock function is not activated.
- Light not charging: Check the USB-C cable and power source. Ensure the cable is properly connected.
- Remote not pairing: Ensure both lights are on and the remote is in pairing mode (flashing blue). Hold the remote close to the lights during pairing.
- Reduced runtime: Battery performance may decrease over time with extensive use. Ensure the light is fully charged before each ride.
11. Specifications
| Feature | Value |
|---|---|
| Max Output | 600 Lumens |
| Max Run Time | 9 hours (Day Flash Mode) |
| Visibility | 135 meters |
| Beam Intensity | 4600 CD |
| Waterproof Rating | IPX7 |
| Drop Test | 1 meter |
| Weight | 110g |
| Dimensions | 87*29.9*37.2 mm |
| Material | Aluminum, Plastic |

Image: Visual representation of the Magicshine RN600 V2.0 specifications.
11.1 Runtime Chart
| Mode | Constant Mode | Flash Mode | |||
|---|---|---|---|---|---|
| Low | Medium | High | Night Flash | Day Flash | |
| Lumens | 150LM | 300LM | 600LM | 150/600LM | 0/600LM |
| Runtime (h:min) | 09:00 | 04:00 | 01:30 | 04:30 | 09:00 |

Image: Detailed runtime chart for various light modes and brightness levels.
12. Warranty and Support
The Magicshine RN600 V2.0 Bike Light comes with a 2-year warranty, ensuring reliable performance and customer satisfaction. For any inquiries or support, please contact Magicshine customer service.
- Warranty Period: 2 Years from the date of purchase.
- Customer Support: Contact us at aftersales@magicshine.com