1. Introduction
This manual provides comprehensive instructions for the AirheadStorm GPS Digital Speedometer. This heads-up display (HUD) is designed to enhance driving safety by presenting essential vehicle information directly in the driver's line of sight. Featuring a 10Hz high refresh rate and Beidou dual-mode chip, it offers broad compatibility with various vehicles, including new energy cars, hybrids, motorcycles, buses, and trucks. Its automatic brightness adjustment ensures optimal visibility in diverse lighting conditions.
2. Package Contents
Verify that all items listed below are included in your package:
- 1 x Heads-Up Display (HUD) GPS Digital Speed Meter
- 1 x Type-C USB Cable
- 1 x Reflective Film
- 1 x User Manual
- 1 x Anti-Slip Double-Sided Tape

Figure 2.1: Included Product Accessories
3. Product Features
- Clear Driving Data Display: Provides essential driving information in a clear format.
- Automatic Brightness Adjustment: Built-in light sensor automatically adjusts display brightness for optimal visibility in any lighting condition (day or night).
- Versatile Compatibility: Equipped with a 10Hz high refresh rate and Beidou dual-mode chip, compatible with new energy cars, HYBRIDs, motorcycles, buses, and trucks.
- Multi-Function Speedometer: Allows switching between speed units (KMh and MPH) and includes an overspeed warning feature.
- Precision Engineering: Features seamless assembly technology and a dual-core processor for smooth and consistent RPM displays.
- Effortless Installation: Designed for user convenience, installs easily without vehicle damage. Powers on and off automatically with your car via USB.
- Visual Overspeed Alerts: Three-level flash alarm visually warns when preset speed thresholds are exceeded. This alarm is silent to minimize distraction.

Figure 3.1: Intelligent Light Sensing for Optimal Visibility
4. Setup
Follow these steps to set up your AirheadStorm GPS Digital Speedometer:
- Unpack: Carefully remove all components from the packaging.
- Attach Mount: Secure the suction cup mount to the bottom of the HUD unit. Ensure it clicks into place firmly.
- Positioning: Choose a suitable location on your dashboard that does not obstruct your view of the road. Use the anti-slip double-sided tape for a secure placement if needed.
- Power Connection: Connect the Type-C USB cable to the HUD unit and plug the other end into a USB power source in your vehicle (e.g., USB port, cigarette lighter adapter). The unit will power on automatically with your vehicle.
- Reflective Film (Optional): If the display is not clear due to reflections, apply the reflective film to your windshield directly above the HUD unit. Clean the windshield thoroughly before application.

Figure 4.1: Speedometer positioned on a dashboard
Video 4.1: Unboxing and Assembly of the GPS Digital Speedometer. This video demonstrates how to unpack the device, attach the mount, and connect the power cable.
5. Operating Instructions
The GPS Digital Speedometer is designed for simple operation. Once connected to power, it will automatically turn on and begin acquiring GPS signals to display your speed.
5.1 Power On/Off
The device powers on automatically when your vehicle starts and powers off when your vehicle is turned off, provided it is connected to a switched USB power source.
5.2 Brightness Adjustment
The built-in light sensor automatically adjusts the display brightness to suit ambient light conditions, ensuring readability during both day and night driving.
5.3 Speed Unit Switching (KMh/MPH)
Refer to the user manual for specific button presses to switch between Kilometers per hour (KMh) and Miles per hour (MPH) display units. This is typically done via a short press of a designated button on the device.
5.4 Overspeed Alarm
The device features a three-stage visual overspeed alarm. When your speed exceeds a preset limit, the display will flash to alert you. This alarm is visual only and does not produce sound.
Video 5.1: Demonstration of the GPS Digital Speedometer's operation, including power-on sequence, display modes, and unit switching.
6. Display Modes
The device offers multiple display modes, allowing you to customize the information shown. You can switch between interfaces to meet different needs, typically by pressing a button on the unit.
- Speed + Unit + Compass: Displays current speed, speed unit (MPH/KMh), and cardinal direction.
- Speed + Unit: Displays current speed and speed unit.
- Speed + Compass: Displays current speed and cardinal direction.
- Speed Only: Displays only the current speed.

Figure 6.1: Multiple Display Modes
7. Specifications
| Specification | Detail |
|---|---|
| Part Name | Heads-Up Display |
| Material | Acrylonitrile Butadiene Styrene (ABS), Polycarbonate (PC) |
| Size | 86 x 54 x 14 mm (3.4 x 2.1 x 0.5 inches) |
| Color | Black |
| Voltage | 5V (via USB) |
| Light Display | Green |
| Screen Size | 3 inches |
| Functions | Speed, Automatic Light Sensing, Speed Unit Switching (KMH/MPH) |
| Alarm | Three-stage speed alarm settings (flashing alarm, no sound) |
| Item Weight | 4.8 ounces (135 Grams) |
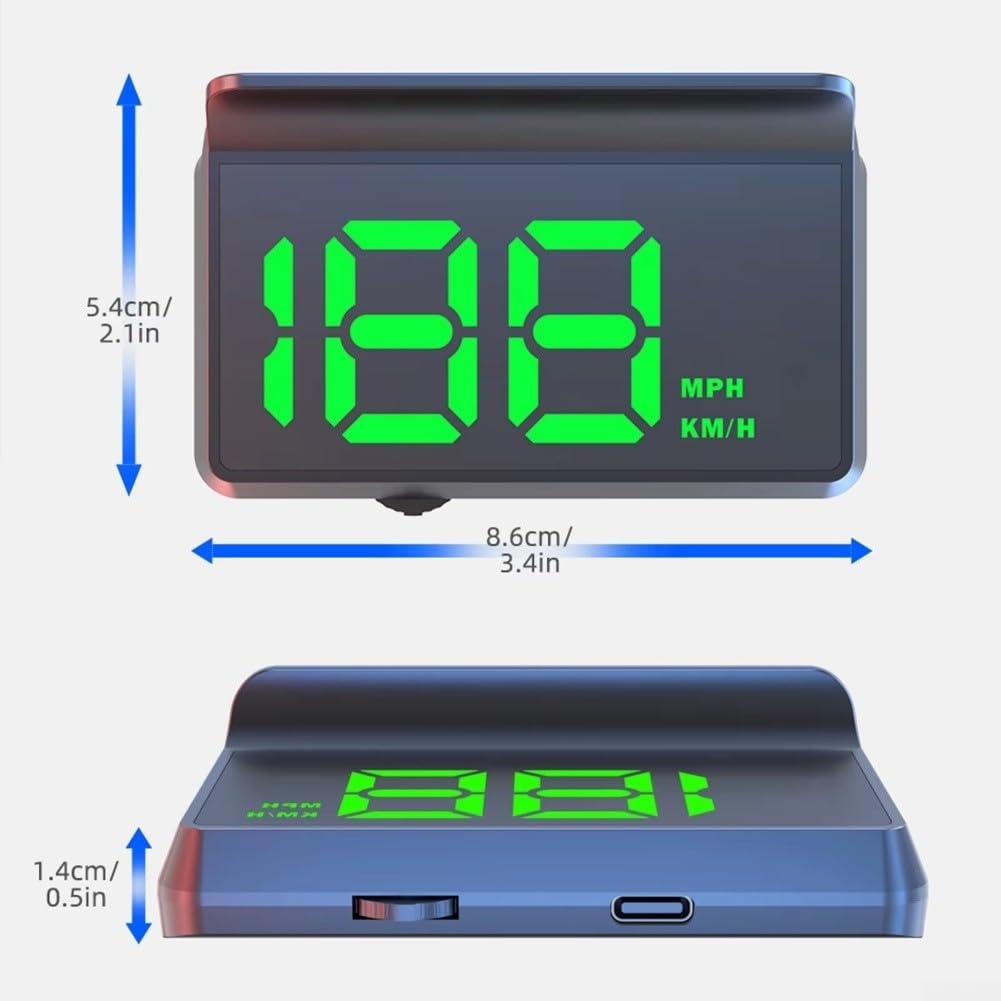
Figure 7.1: Product Dimensions
8. Troubleshooting
- No Display: Ensure the USB cable is securely connected to both the device and a working USB power source. Check if the vehicle's ignition is on.
- Inaccurate Speed Reading: Ensure the device has a clear view of the sky for optimal GPS signal reception. Speed accuracy may vary slightly based on GPS signal strength.
- Display Too Dim/Bright: The device features automatic brightness adjustment. Ensure the light sensor is not obstructed.
- No GPS Signal: The device requires an unobstructed view of the sky to acquire GPS signals. This may take a few minutes upon initial startup or in areas with poor satellite coverage (e.g., tunnels, dense urban areas).
9. Warranty and Support
For warranty information, technical support, or service inquiries, please refer to the contact details provided with your purchase documentation or visit the manufacturer's official website. Keep your proof of purchase for warranty claims.