1. Product Overview
This document provides instructions for the installation, operation, and maintenance of the Hawkley Full Width Steel Rock Crawler Rear Bumper, designed for Jeep Gladiator JT Pickup Trucks manufactured between 2019 and 2025. This bumper features integrated LED lights and is constructed for durability and off-road use.
2. Compatibility
This rear bumper is specifically designed for the following vehicle models:
- Jeep Gladiator JT Pickup Truck (2019-2025)
- Compatible with both 2-door and 4-door models.
Please verify your vehicle's make, model, and year to ensure proper fitment before proceeding with installation.
3. Package Contents
The package includes the following components:
- 1 x Hawkley Rear Bumper
- 2 x LED Position Lights
- 2 x Wiring Harnesses for LED Lights
- Full set of mounting accessories (bolts, nuts, washers, brackets)

Figure 3.1: Product dimensions and included mounting hardware. The bumper measures approximately 70.23 inches in length, 10.75 inches in width, and 8.11 inches in height. All necessary mounting hardware is provided.
4. Specifications
| Brand | Hawkley |
| Model Number | RIA-01-NJT01B101-BX |
| Material | Carbon Steel |
| Exterior Finish | Textured Black Powder Coating (E-Coat pre-coating) |
| Product Dimensions (L x W x H) | 70.2" x 10.7" x 8.1" |
| Auto Part Position | Rear |
| Included Components | Bumper, 2 LED Lights, Wiring Harnesses, Mounting Hardware |
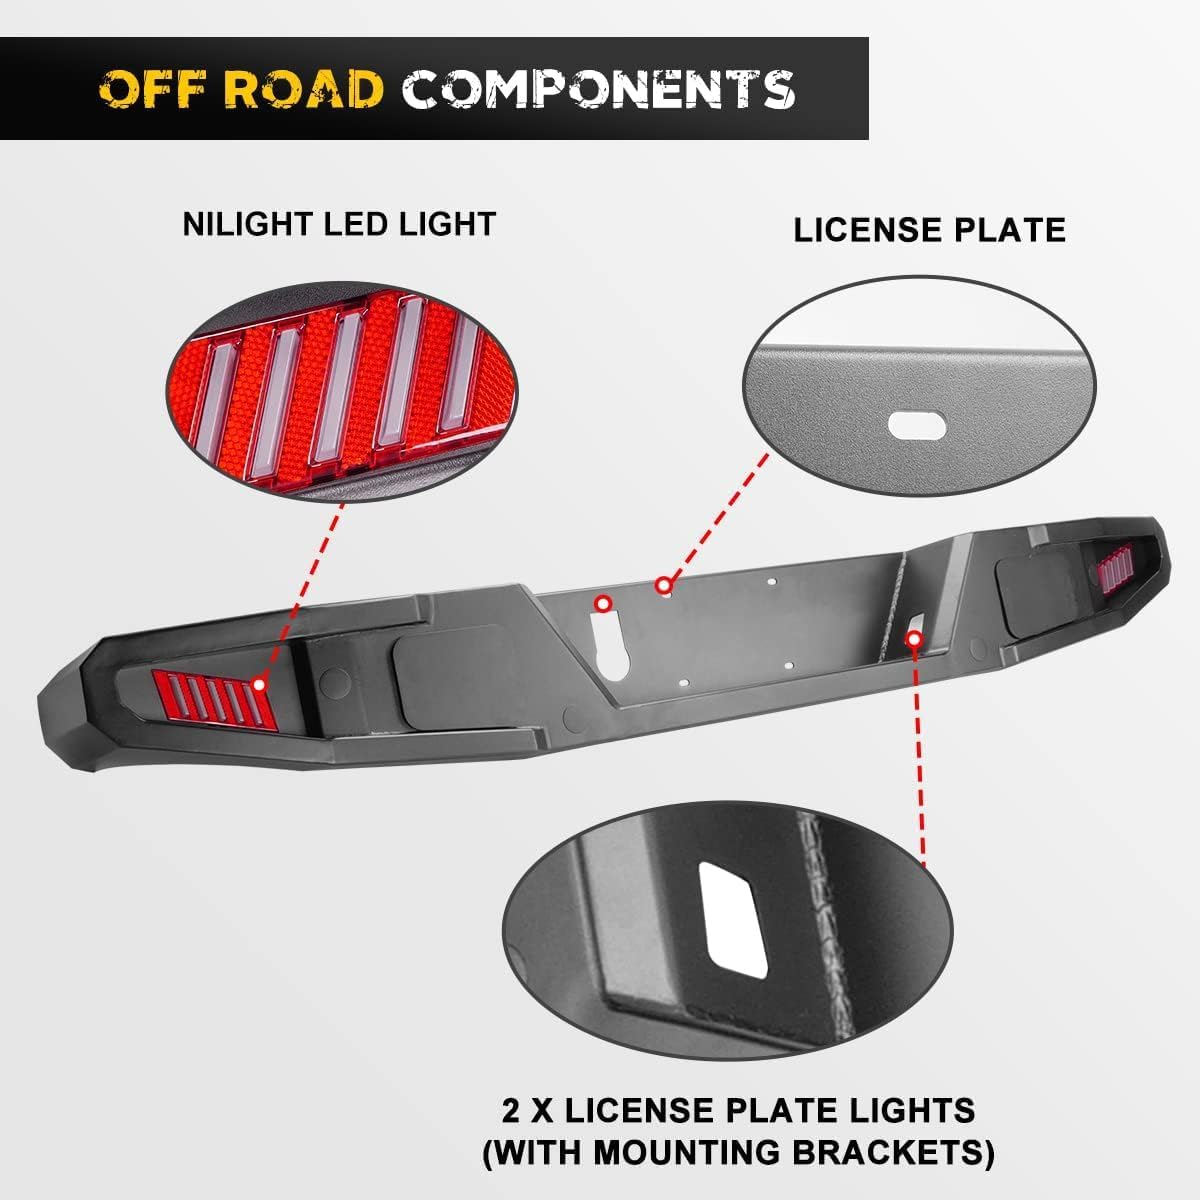
Figure 4.1: Detail of the integrated NILIGHT LED light and the provision for license plate mounting, including two license plate lights with mounting brackets.

Figure 4.2: The bumper is constructed from carbon steel with a two-stage finish, including E-Coat pre-coating and a high-grade textured black powder coating for enhanced corrosion resistance.
5. Installation Instructions
This bumper is designed for direct bolt-on installation, requiring no additional cutting, welding, or drilling. Professional installation is recommended, but the following steps outline the general process.
5.1. Tools Required (Not Included)
- Socket Wrench Set
- Torque Wrench
- Pry Tool (for plastic clips, if applicable)
- Safety Glasses and Gloves
5.2. Pre-Installation Steps
- Park the vehicle on a level surface and engage the parking brake.
- Disconnect the negative terminal of the vehicle's battery to prevent electrical shorts during wiring.
- Carefully remove the existing factory rear bumper. This typically involves unbolting it from the frame and disconnecting any wiring for lights or sensors. Refer to your vehicle's service manual for specific removal procedures.
5.3. Bumper Installation
- Position the new Hawkley rear bumper onto the vehicle's frame mounting points. It may be helpful to have assistance to hold the bumper in place.
- Align the mounting holes on the bumper with the corresponding holes on the vehicle's frame.
- Insert the provided mounting bolts, washers, and nuts. Hand-tighten all hardware first to ensure proper alignment.
- Once all bolts are in place, progressively tighten them using a socket wrench. Refer to your vehicle's specifications or a general automotive torque chart for appropriate torque values. Do not overtighten.
5.4. Wiring the LED Lights
- Connect the wiring harnesses from the bumper's LED lights to the vehicle's tail light wiring system. This typically involves tapping into the vehicle's running lights or brake lights, depending on desired functionality.
- Ensure all electrical connections are secure and properly insulated to prevent corrosion and short circuits.
- Route the wiring safely, away from moving parts or hot surfaces, using zip ties or clips to secure it.

Figure 5.1: Visual guide for the direct bolt-on installation. The process involves removing existing bolts, detaching the factory bumper, positioning the new bumper, and securing it with the provided hardware. No drilling or cutting is required.

Figure 5.2: The installed Hawkley rear bumper on a Jeep Gladiator JT, showcasing the functionality and appearance of the integrated LED floodlights.
5.5. Post-Installation Check
- Reconnect the vehicle's battery.
- Test all vehicle lights, including the newly installed LED lights on the bumper, to ensure they function correctly.
- Verify that all mounting hardware is securely tightened.
- Check for any loose wires or components.
6. Operation and Features
The Hawkley Rear Bumper enhances your vehicle's rear protection and utility. Its full-width design provides comprehensive coverage, while the carbon steel construction offers robust defense against impacts and off-road hazards.
- Integrated LED Lights: The two integrated LED position lights improve visibility and safety, especially in low-light conditions or off-road environments. These lights are designed to function as auxiliary lighting.
- License Plate Mounting: The bumper includes provisions for mounting your vehicle's license plate, complete with two dedicated license plate lights.
- Recovery Points: The robust design often includes reinforced points suitable for D-rings or other recovery equipment (check specific bumper design for D-ring shackle mounts, not explicitly mentioned in provided data but common for rock crawler bumpers).
7. Maintenance
To ensure the longevity and appearance of your Hawkley Rear Bumper, follow these maintenance guidelines:
- Regular Cleaning: Wash the bumper regularly with mild automotive soap and water to remove dirt, mud, and road grime. Avoid abrasive cleaners or harsh chemicals that could damage the powder coating.
- Inspect for Damage: Periodically inspect the bumper for any signs of damage, such as scratches, dents, or rust. Address any minor damage promptly to prevent further deterioration.
- Check Hardware: Every few months, or after significant off-road use, check all mounting bolts and nuts to ensure they remain tight. Retighten as necessary.
- Electrical Connections: Inspect the wiring for the LED lights for any signs of wear, corrosion, or loose connections. Ensure all connections remain waterproof.
8. Troubleshooting
If you encounter issues with your Hawkley Rear Bumper, consider the following common troubleshooting steps:
- LED Lights Not Working:
- Check all wiring connections for looseness or corrosion.
- Verify that the vehicle's battery is properly connected and charged.
- Inspect fuses related to the vehicle's lighting system.
- Ensure the lights are correctly wired to the appropriate power source (e.g., running lights).
- Bumper Appears Loose:
- Re-check all mounting bolts and nuts for proper tightness.
- Ensure the bumper is correctly seated on the vehicle's frame mounting points.
- Unusual Noises After Installation:
- Inspect for any components that might be rubbing against the bumper or vehicle frame.
- Verify all hardware is tightened to specification.
If problems persist, contact Hawkley customer support for further assistance.
9. Warranty and Support
This Hawkley Rear Bumper comes with a 365-day warranty from the date of purchase. This warranty covers manufacturing defects and material failures under normal use.
For warranty claims, technical support, or any questions regarding your product, please contact Hawkley customer service. Refer to your purchase documentation for specific contact information or visit the official Hawkley store on Amazon.
Note: The warranty does not cover damage resulting from improper installation, misuse, accidents, or normal wear and tear.