Introduction
This manual provides detailed instructions for the proper use and maintenance of your Radtel RT-7D DMR Radio. The RT-7D is a dual-band digital and analog walkie-talkie designed for reliable communication across various environments. Please read this manual thoroughly before operating the device to ensure optimal performance and safety.
What's in the Box
Verify that all items are present in the package. If any items are missing or damaged, please contact your retailer.
- 1x RT-7D Main unit
- 1x Clip
- 2x Battery (1x 1800mAh, 1x 2600mAh)
- 1x Base Charger
- 1x Belt
- 1x USB-C Charging Cable
- 2x Antenna (Standard and 38CM)

Image: Package contents of the Radtel RT-7D radio.
Product Overview
Familiarize yourself with the physical components and controls of your RT-7D radio.
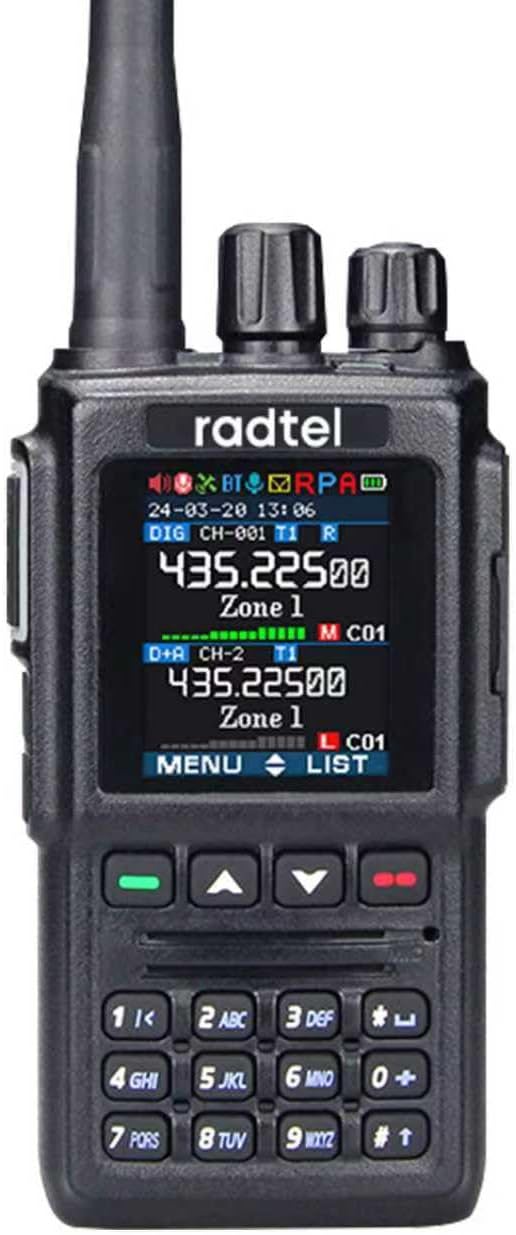
Image: Front view of the RT-7D radio.
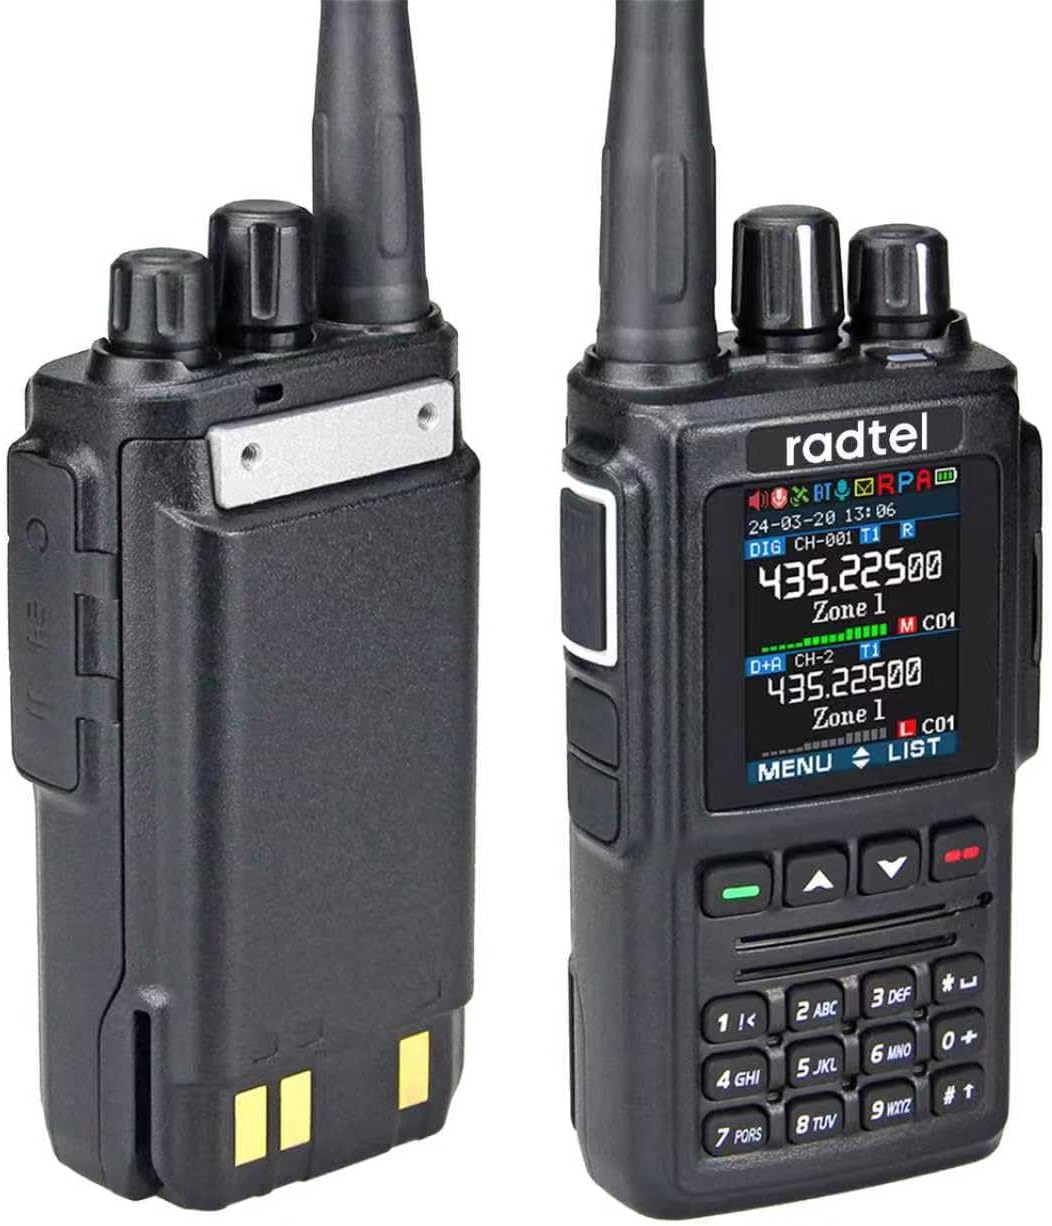
Image: Side view of the RT-7D radio with battery.

Image: Back view of the RT-7D radio with battery.
Key Components:
- Antenna: For transmitting and receiving signals.
- Channel Switch: Rotary knob for selecting channels.
- LCD Display: 1.77" Color TFT screen showing operational status, channel information, and menu options.
- PTT Button: Push-To-Talk button for transmitting voice.
- PF1/PF2 Keys: Programmable function keys.
- Keypad: Numeric and function keys for input and navigation.
- Speaker/Mic Jacks: Ports for external audio accessories.
- Type-C Port: For programming and charging.
Setup
1. Battery Installation
The RT-7D comes with two batteries: one 1800mAh and one 2600mAh.
- Align the battery with the grooves on the back of the radio.
- Slide the battery upwards until it clicks into place.
- To remove, press the battery release latch and slide the battery downwards.

Image: The RT-7D radio with its two included batteries.
2. Antenna Attachment
The radio includes two antennas: a standard 12.45cm antenna and an upgraded 38.4cm high-gain antenna. Choose the appropriate antenna for your communication needs.
- Screw the desired antenna clockwise into the connector on top of the radio until it is finger-tight. Do not overtighten.
- Ensure the antenna is securely attached before operation.

Image: Comparison of the two included antennas for the RT-7D.
3. Charging the Battery
Before initial use, fully charge the battery. The RT-7D supports two charging methods: direct USB-C charging and desktop charger.
- USB-C Charging: Connect the provided USB-C cable to the Type-C port on the side of the radio and to a compatible USB power adapter or computer.
- Desktop Charger: Place the radio with the battery installed into the desktop charging cradle. Ensure the charging contacts align. Connect the base charger to a power outlet.

Image: Type-C direct charging and desktop charging methods.
Operating Instructions
Basic Operation
- Power On/Off: Rotate the power/volume knob clockwise to turn on the radio. Rotate counter-clockwise until it clicks to turn off.
- Adjust Volume: Rotate the power/volume knob to adjust the audio level.
- Select Channel: Use the channel switch knob or the keypad to select the desired channel.
- Transmit (PTT): Press and hold the PTT button on the side of the radio to transmit. Speak clearly into the microphone. Release the PTT button to receive.
Digital and Analog Modes
The RT-7D supports both Digital Mobile Radio (DMR) and traditional Analog modes, allowing for versatile communication. It can store up to 4000 channels, 10000 talk groups, and 500,000 contacts.

Image: RT-7D's dual-mode (Digital/Analog) capability and contact capacity.
Advanced Features
- UHF/VHF Dual Band: Operates on both Ultra High Frequency (UHF) and Very High Frequency (VHF) bands.
- AES256 & ARC4 Encryption: Provides secure communication.
- Dual Time Slot: Allows for two simultaneous conversations on a single frequency in DMR mode.
- VOX Function: Voice-activated transmission, allowing hands-free operation.
- SMS Function: Send and receive short text messages. This function is useful in noisy environments where voice communication may be difficult.
- FM Radio: Built-in FM radio receiver.
- Weather Alarm: Provides alerts for weather conditions.
- Recording: Capable of recording up to 4 hours of audio.

Image: Overview of RT-7D's key functions.

Image: RT-7D SMS function and 1.77" Color TFT Screen.
Maintenance
- Cleaning: Use a soft, damp cloth to clean the radio's exterior. Do not use harsh chemicals or solvents.
- Battery Care: Avoid overcharging or completely discharging the battery. Store batteries in a cool, dry place when not in use.
- Storage: Store the radio in a dry, dust-free environment away from direct sunlight and extreme temperatures.
- Water Resistance: This device is Not Water Resistant. Avoid exposure to water or high humidity.
Troubleshooting
| Problem | Possible Cause | Solution |
|---|---|---|
| Radio does not power on. | Battery is dead or not properly installed. | Charge the battery or re-install it correctly. |
| Cannot transmit or receive. | Incorrect channel/frequency, antenna not attached, or out of range. | Verify channel settings, ensure antenna is secure, move closer to other radios. |
| Poor audio quality. | Low battery, weak signal, or incorrect volume. | Charge battery, check signal strength, adjust volume. |
For further assistance, please refer to the support information provided with your purchase.
Specifications
| Feature | Detail |
|---|---|
| Model Number | RT-7D |
| Brand | Radtel |
| Frequency Range | 144-148MHz / 420-450MHz |
| Number of Channels | 4000 (as per product title) |
| Talk Groups | 10000 |
| Contacts | 500,000 |
| Encryption | AES256 & ARC4 |
| Special Feature | Type-C Charging/Programming |
| Voltage | 7.4 Volts |
| Talking Range Maximum | 6 Kilometers |
| Water Resistance Level | Not Water Resistant |
| Product Dimensions | 1.57 x 2.05 x 10.63 inches |
| Item Weight | 1.5 pounds |
Note: Specifications are subject to change without notice.
Warranty and Support
The Radtel RT-7D DMR Radio comes with a 1-Year Warranty from the date of purchase. This warranty covers manufacturing defects and malfunctions under normal use. It does not cover damage caused by misuse, accidents, unauthorized modifications, or exposure to water.
For warranty claims, technical support, or any inquiries regarding your product, please contact Radtel customer service through the retailer where you purchased the device or visit the official Radtel website. Please have your purchase receipt and product model number ready.
Important: Retain your proof of purchase for warranty purposes.


