1. Introduction
Thank you for purchasing the Vtopek P307 All-Metal Car Camera. This manual provides detailed instructions for the installation, operation, and maintenance of your new camera. Please read this manual thoroughly before use to ensure proper functionality and safety. This camera is designed for use as a rear, front, or side view camera in 12V-24V vehicles, offering high-resolution imaging and enhanced night vision capabilities.
2. Safety Information
- Ensure the vehicle's power is off before installation to prevent electrical shock or damage to the camera or vehicle.
- Professional installation is recommended if you are unfamiliar with car electrical systems.
- Do not attempt to disassemble or modify the camera. This will void the warranty and may cause damage.
- Keep the camera lens clean for optimal image quality. Use a soft, dry cloth for cleaning.
- Ensure all cables are securely connected and routed away from moving parts or heat sources.
3. Package Contents
Please check the package for the following items:
- Vtopek P307 All-Metal Car Camera
- 6-meter (19.7 ft) 4-pin Extension Cable
- 1.5-meter (4.9 ft) Camera Power Cable with RCA Connector
- Mounting Screws (Stainless Steel)
- Instruction Manual (Japanese)
4. Product Features
- All-Metal Construction & OEM Bracket: Features a durable all-metal body and stainless steel screws for enhanced longevity and corrosion resistance. The compact OEM-style bracket allows for a flush mount installation (0mm protrusion), integrating seamlessly with your vehicle.
- High-Resolution & Super Night Vision: Equipped with a Japanese 1/2.7-inch sensor chip, F1.8 large aperture, and a 6-layer optical system. 3D noise reduction technology provides clear and detailed images in various lighting conditions, including ultra-low light.
- Wide Compatibility: Supports both NTSC and PAL video signal outputs via RCA connection, making it compatible with most monitors and navigation systems. (Note: Most Android navigation systems support AHD video output; please switch your navigation's video input to NTSC or PAL if using with this camera).
- IP69K Waterproof & Durable: The camera boasts an IP69K waterproof rating with a full metal shell and full-seal potting process. It undergoes high-pressure waterproof tests and 12-hour power-aging tests before shipment, ensuring resistance to extreme temperatures and water ingress.
- 170° Ultra Wide Angle: An upgraded 1.4mm fisheye lens provides a 170° ultra-wide field of view, covering a broader area and capturing more details for comprehensive protection and safer maneuvering.
- Easy Installation: Utilizes a slim 4-pin connector instead of a bulky RCA connector, minimizing damage to vehicle wiring during installation. The integrated cable design simplifies the connection process. Compact size of 22(W) x 22(H) x 23(D) mm.
5. Setup and Installation
5.1. Wiring Diagram
Follow the diagram below for proper connection. This camera connects to a monitor via RCA. It is not compatible with car recorders, backup cameras, or CarPlay monitors that use a 4-pin connector for direct video input, as the pin definitions may differ.
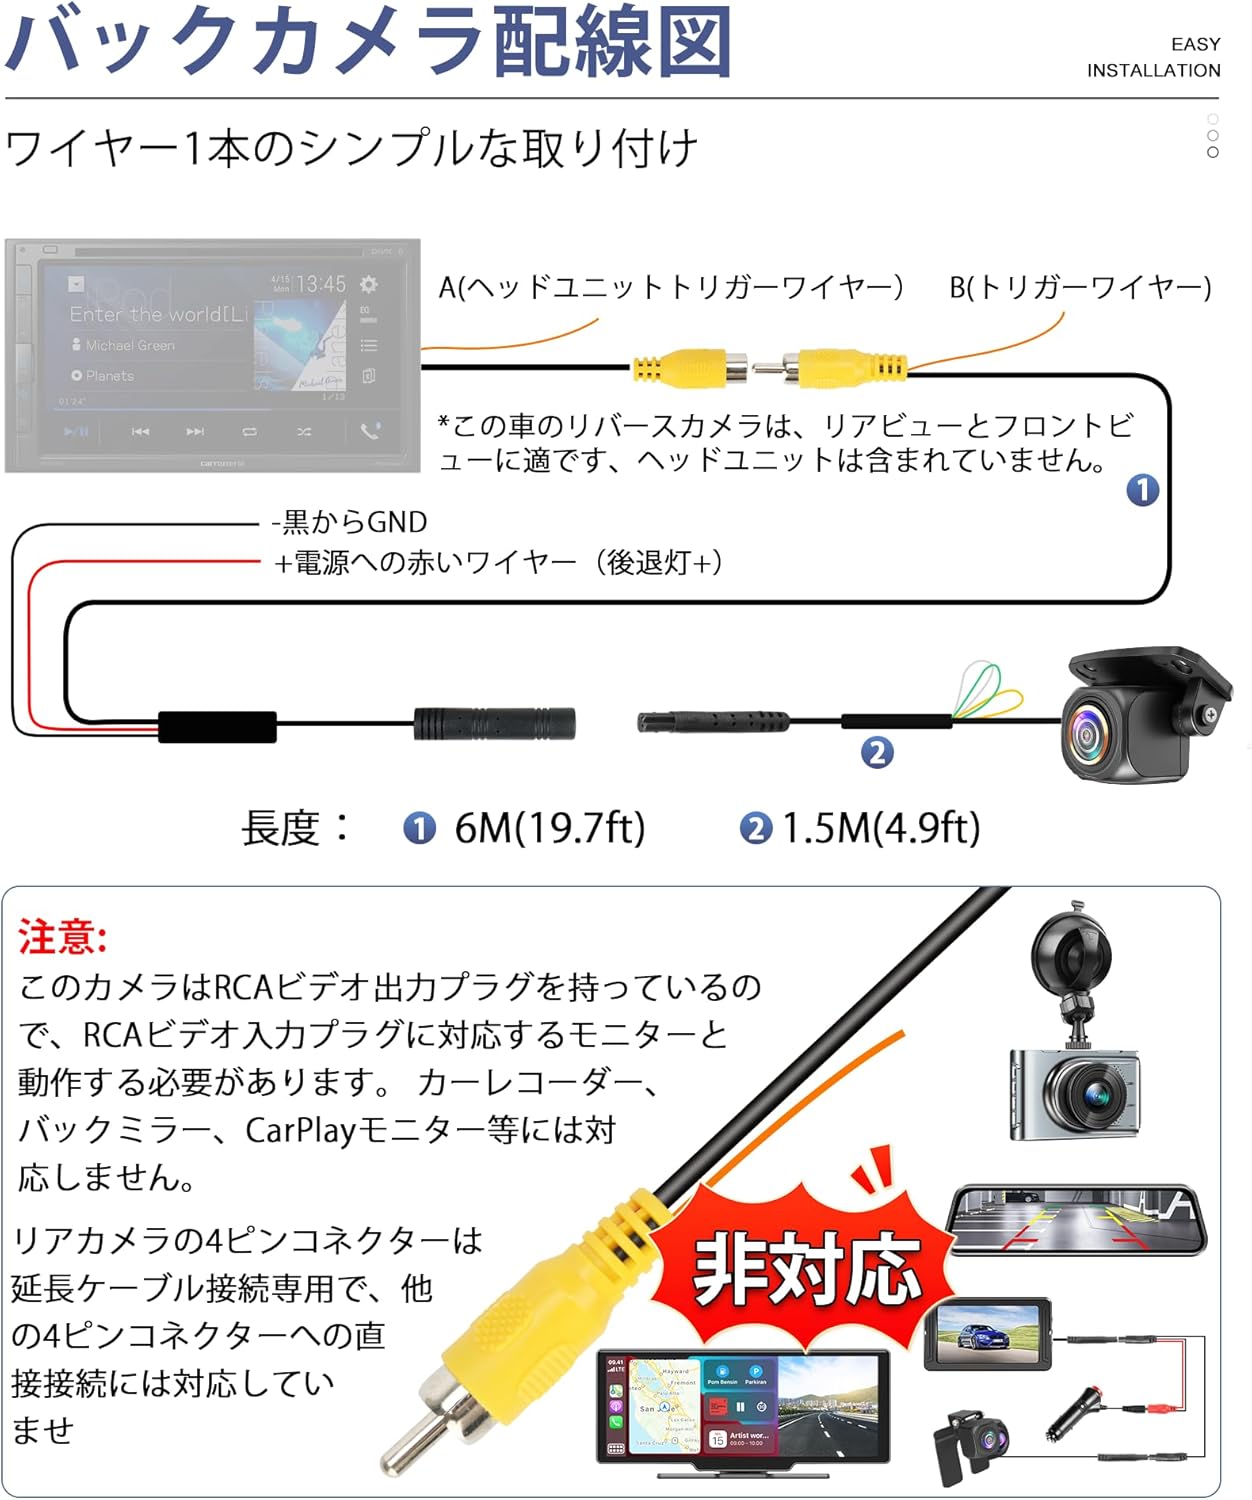
Image: Wiring diagram for the Vtopek P307 car camera. Connect the black wire to GND (ground) and the red wire to the power source (e.g., reverse light +). The 4-pin cable connects the camera to the extension cable, which then connects to the monitor via RCA.
5.2. Physical Installation
The camera's compact design and adjustable bracket allow for flexible mounting. Choose a location that provides the desired field of view (rear, front, or side). Secure the camera using the provided stainless steel screws.

Image: Comparison illustrating the flush-mount OEM style bracket (left) versus a standard bracket (right), highlighting the minimal protrusion of the Vtopek P307. Also shows the stainless steel screws and components for secure mounting.
5.3. Mode Switching (Cutting Loops)
The camera features adjustable settings by cutting specific wire loops. After cutting a loop, you must reconnect the camera to power for the change to take effect.

Image: Instructions for modifying camera output. The orange loop switches between NTSC (default) and PAL video formats. The green loop enables (cut) or disables (keep) reverse guide lines. The white loop switches between mirror image (default, for rear view) and normal image (cut, for front view).
- Orange Loop: Cut the orange loop to change the video signal output from NTSC (default) to PAL.
- Green Loop: Cut the green loop to display reverse guide lines. Keep it intact for no guide lines (default).
- White Loop: Cut the white loop to switch the image from mirror view (default, for rear camera) to normal view (for front camera).
6. Operating Instructions
Once installed and powered, the camera will automatically activate when the connected power source is engaged (e.g., when the vehicle is put into reverse for a rear camera setup). The image will be displayed on your connected monitor or navigation system.
- Rear View Camera: When connected to the reverse light power, the camera will display the rear view with mirror image (default) and optional guide lines when the vehicle is in reverse.
- Front/Side View Camera: For front or side view applications, cut the white loop to switch to normal image. Connect the camera to a constant 12V power source or a switchable power source as desired.
7. Maintenance
- Cleaning the Lens: Regularly clean the camera lens with a soft, lint-free cloth to ensure clear images. Avoid abrasive cleaners or materials that could scratch the lens.
- Checking Connections: Periodically inspect all cable connections to ensure they are secure and free from corrosion or damage.
- Waterproof Integrity: The camera is IP69K rated. While highly durable, avoid directing high-pressure water jets directly at the lens for extended periods during car washes.

Image: Visual representation of the camera's IP69K waterproof capabilities, including submersion in water and resistance to high-pressure car washes. The internal potting process ensures electronic components are fully protected.
8. Troubleshooting
If you encounter any issues with your Vtopek P307 camera, please refer to the following common problems and solutions:
- No Image Displayed:
- Check all power connections to ensure they are secure and receiving power.
- Verify the RCA video cable is correctly connected to the monitor's video input.
- Ensure the monitor is set to the correct video input channel.
- Confirm the camera's video format (NTSC/PAL) matches your monitor's supported format. Adjust by cutting the orange loop if necessary, then re-power the camera.
- Poor Image Quality / Blurry Image:
- Clean the camera lens.
- Check for any obstructions in the camera's field of view.
- Ensure the camera is securely mounted and not vibrating.
- Incorrect Image Orientation (Mirror/Normal):
- Adjust by cutting the white loop as described in Section 5.3, then re-power the camera.
- Guide Lines Not Appearing/Disappearing:
- Adjust by cutting the green loop as described in Section 5.3, then re-power the camera.
If these steps do not resolve the issue, please contact customer support.
9. Specifications
| Feature | Specification |
|---|---|
| Brand | Vtopek |
| Model | P307 |
| Dimensions (L x W x H) | 22 x 26 x 22 mm |
| Optical Sensor Technology | CMOS (1/2.7 inch) |
| Actual Angle of View | 170 degrees |
| Connector Type | RCA |
| Waterproof Rating | IP69K |
| Voltage Compatibility | 12V-24V |
| Video Output | NTSC/PAL (switchable) |
10. Warranty and Support
This product comes with a 1-year manufacturer's warranty.
In the unlikely event of unexpected waterproof issues, defects in appearance or function, or if the image is not displayed, please contact us directly. We may offer a refund or send a suitable replacement device upon receiving photos and parameters of your monitor.
For any questions or support needs, please refer to the contact information provided with your purchase or visit the Vtopek official website.