VSDISPLAY VS0686SJ01
VSDISPLAY 6.86 Inch Computer Temp LCD Monitor (Model VS0686SJ01-W) User Manual
Model: VS0686SJ01-W
1. Introduction
This manual provides detailed instructions for the installation, operation, and maintenance of your VSDISPLAY 6.86 Inch Computer Temp LCD Monitor. This monitor features a 1280x480 IPS display, designed for use as a secondary display within a PC case to monitor CPU, GPU, and RAM data, or as a standalone auxiliary display. It supports both horizontal and vertical display modes and includes theme editor software for customization.
2. Packing List
Please verify that all items listed below are included in your package:
- 1 × 6.86 inch 1280x480 VS0686SJ01-W LCD Monitor (White Case)
- 1 × 9Pin Signal Cable
- 1 × USB Cable
- 1 × USB Memory Card With Software
- 1 × User Manual

Figure 2.1: Contents of the packing list, including the monitor, cables, and brackets.
3. Installation
The VSDISPLAY monitor offers flexible installation options, either mounted inside a PC case or used as an auxiliary display with a stand.
3.1 Mounting with Brackets (Inside PC Case)
- Identify the fixed hole positions on the back of the monitor and the mounting brackets.
- Unscrew the existing screws on the monitor's back panel.
- Align the brackets with the screw holes and secure them using appropriate screws. Caution: Ensure screws are not too long to avoid damaging internal circuits.
- Mount the monitor with attached brackets inside your PC chassis.

Figure 3.1: Bracket installation steps for mounting the monitor inside a PC case.

Figure 3.2: Example of the monitor integrated within a PC chassis.
3.2 Power and Signal Connection
The monitor requires a single USB connection for both power and signal. Two connection methods are available:
- USB-C to USB-A Cable: Connect the USB-C port on the monitor to a standard USB-A port on your computer.
- 9-Pin Signal Cable: Connect the 9-pin interface on the monitor to a 9-pin header on your motherboard.

Figure 3.3: USB and USB-C input ports on the monitor.

Figure 3.4: Connecting the monitor using a USB-C to USB-A cable.
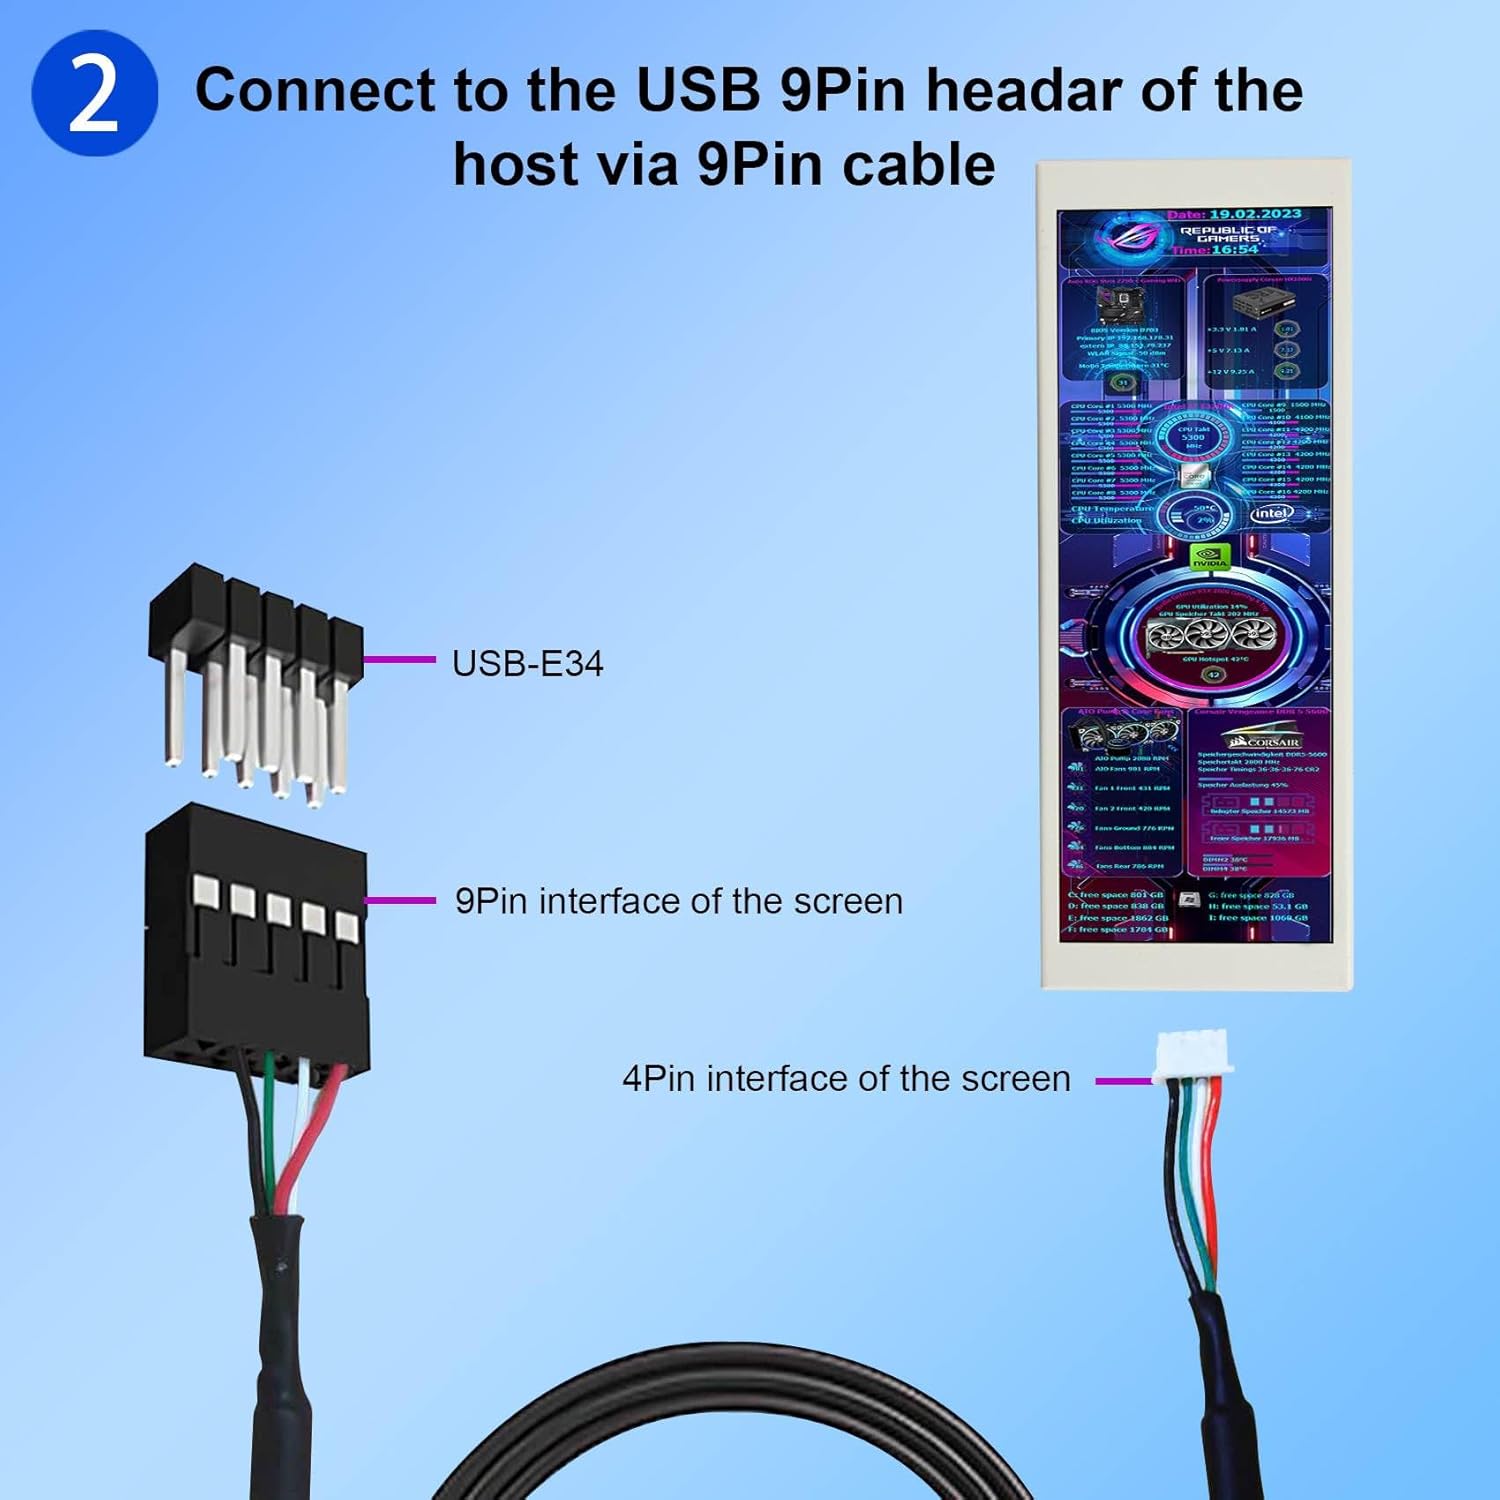
Figure 3.5: Connecting the monitor using a 9-pin signal cable to the motherboard.
4. Operation
Once connected, the monitor will display system information using pre-installed themes. For full customization and to display real-time CPU, GPU, and RAM data, the dedicated theme editor software is required.
4.1 Software Installation
The necessary software is provided on the included USB memory card. Alternatively, you can download the latest version from the official VSDISPLAY website: www.vslcd.com/download.html. Ensure you download the correct software version for your monitor size (e.g., "Smart Monitor Software For 7inch 8inch 10.1inch.exe" for this 6.86-inch model, as it covers similar sizes).
- Insert the provided USB memory card into your computer or download the software from the website.
- Open the USB drive or the downloaded file and run the installer.
- Follow the on-screen prompts to complete the software installation. It is recommended to install it in the default directory.
- Launch the VSDISPLAY software after installation.
Video 4.1: This video demonstrates the process of downloading and installing the theme software for the VSDISPLAY monitor from the official website.
4.2 Using the Theme Editor Software
The VSDISPLAY software allows you to customize the display themes, monitor system data, and adjust the screen orientation.
- Upon launching the software, ensure your monitor is detected (e.g., "DISPLAY_COM4" or similar).
- Browse through the "Official Theme" or "Personal Theme" sections to select a desired display layout.
- The software displays real-time CPU, GPU, and RAM data. You can customize elements within the themes.
- To change the display orientation, use the "Angle" dropdown menu (0, 90, 180, 270 degrees) to match your physical monitor setup.
- You can import custom images or videos to create personalized themes.
Video 4.2: This video demonstrates how to use the theme software editor to change display themes and monitor system parameters on the VSDISPLAY monitor.
Video 4.3: This video showcases various custom themes and data displays possible with the VSDISPLAY monitor and its theme editor.
Video 4.4: This video illustrates how two VSDISPLAY monitors can share the same software for theme management and data display, demonstrating synchronization and individual customization.
5. Specifications
Detailed technical specifications for the VSDISPLAY 6.86 Inch Computer Temp LCD Monitor:
| Feature | Description |
|---|---|
| Brand | VSDISPLAY |
| Model No. | VS0686SJ01-W |
| Screen Size | 6.86 Inches |
| Resolution | 1280x480 Pixels |
| Aspect Ratio | 21:9 |
| Display Area | 161x60(H×V)mm |
| Outline Size | 67×181×4.5(H×V×D)mm |
| Screen Brightness | 350cd/m2 |
| Screen Contrast | 700:1 |
| View Angle | 89/89/89/89 (Typ.)(CR≥10) [Left / Right / Up / Down] |
| Response Time | <8ms |
| Refresh Rate | 60 Hz |
| Input | USB / 9Pin PH2.54 USB |
| Workable System | Windows 7 (driver needed), Windows 8-11. Not compatible with Mac. |
| Operating Temperature | 0°C to 45°C |
| -20°C to 60°C | Storage Temperature |
| Net Weight | 0.27kg / 0.60lb |

Figure 5.1: Dimensional drawing of the VSDISPLAY 6.86 inch monitor.
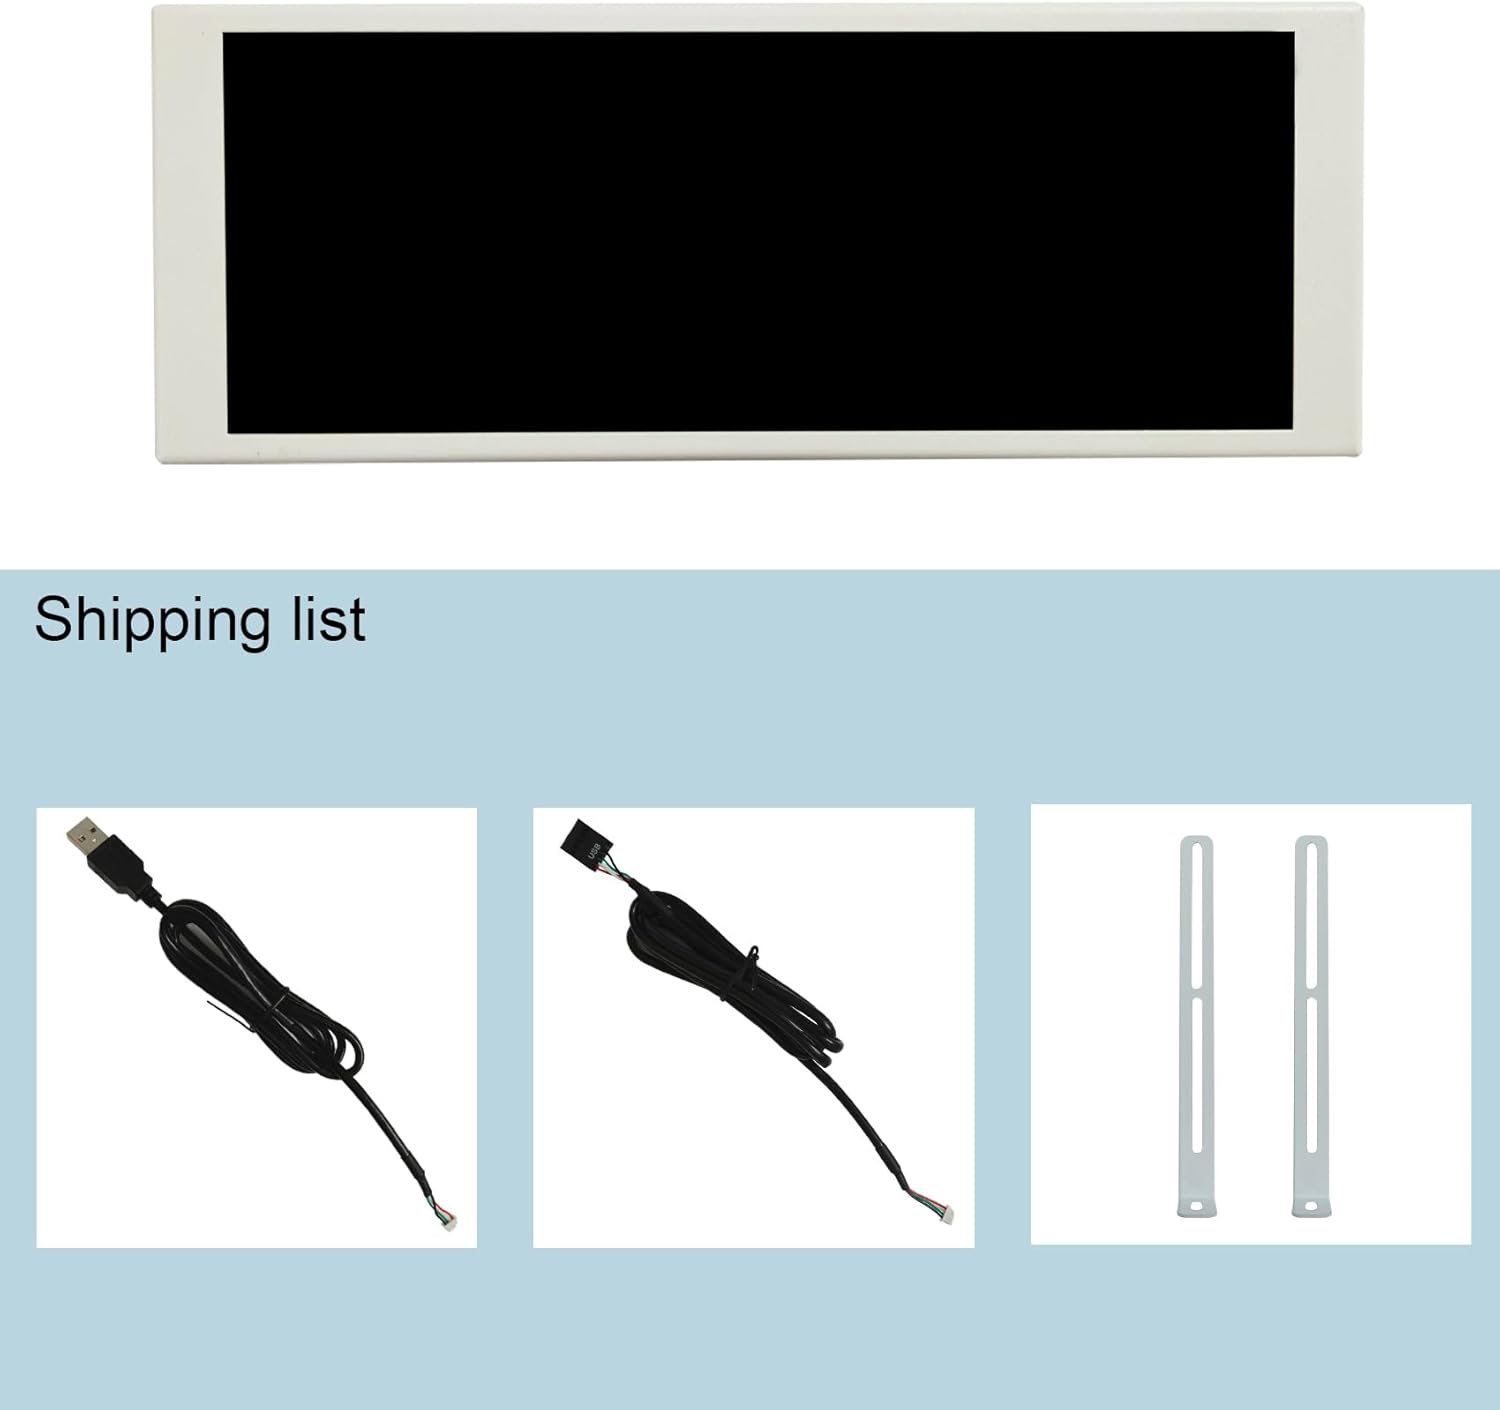
Figure 5.2: Comprehensive specifications table for VSDISPLAY monitors, including the 6.86-inch model.
6. Troubleshooting
- Monitor Not Displaying:
- Ensure the USB cable is securely connected to both the monitor and the computer.
- Verify that the correct software is installed and running.
- For Windows 7, ensure necessary drivers are installed.
- Check if the monitor is detected in your computer's display settings.
- Software Issues (Crashes, Incorrect Data):
- Download the latest software version from the official VSDISPLAY website (www.vslcd.com/download.html).
- Run the software as an administrator.
- Ensure your operating system is Windows 8 or higher for optimal compatibility. Mac OS is not supported.
- If issues persist, try reinstalling the software.
- Incorrect Display Orientation:
- Adjust the "Angle" setting within the VSDISPLAY theme editor software to match your desired physical orientation (0, 90, 180, or 270 degrees).
- Physical Damage During Installation:
- When using mounting screws, ensure they are of appropriate length to prevent damage to the internal components of the monitor.
7. Maintenance
- Cleaning: Use a soft, dry cloth to clean the screen and casing. Avoid abrasive cleaners or solvents.
- Storage: Store the monitor in a cool, dry place away from direct sunlight and extreme temperatures.
- Software Updates: Periodically check the VSDISPLAY website for software updates to ensure optimal performance and access to new features.
8. Warranty and Support
For warranty information, technical support, or any inquiries regarding your VSDISPLAY monitor, please contact the manufacturer directly. Refer to the contact information provided on the official VSDISPLAY website or the documentation included with your product.
Official Website: www.vslcd.com
Ask a question about this manual
Ask about setup, troubleshooting, compatibility, parts, safety, or missing instructions. Manuals+ will review the question and use this page’s manual context to help answer it.