1. Introduction
This manual provides essential information for the safe and effective operation of your Beleeb Multi-Voltage Battery Charger, Model BLB-C40. This versatile charger is designed to work with a wide range of battery types and voltages, from 12V to 72V, including Lead-Acid (Standard, AGM, GEL) and Lithium (LiFePO4) batteries. Please read this manual thoroughly before use and retain it for future reference.
2. Safety Information
WARNING: Always prioritize safety when working with batteries and electrical equipment.
- Ensure proper ventilation when charging, especially for Lead-Acid batteries.
- Do not leave the charger unattended during operation.
- If a battery becomes hot (>50°C / 122°F) during charging, immediately pause the process and allow it to cool before resuming.
- Do not attempt to desulfate severely sulfated batteries, as they may have high internal resistance and attempting repair can pose safety risks. Replacement is the safest solution.
- Always connect the charger to the battery terminals correctly (positive to positive, negative to negative) before plugging into AC power.
- Disconnect AC power before disconnecting the charger from the battery.
- Keep out of reach of children.
- This charger is designed for indoor use in a dry environment.
3. Product Overview and Components
Familiarize yourself with the main components and controls of your Beleeb BLB-C40 Battery Charger.
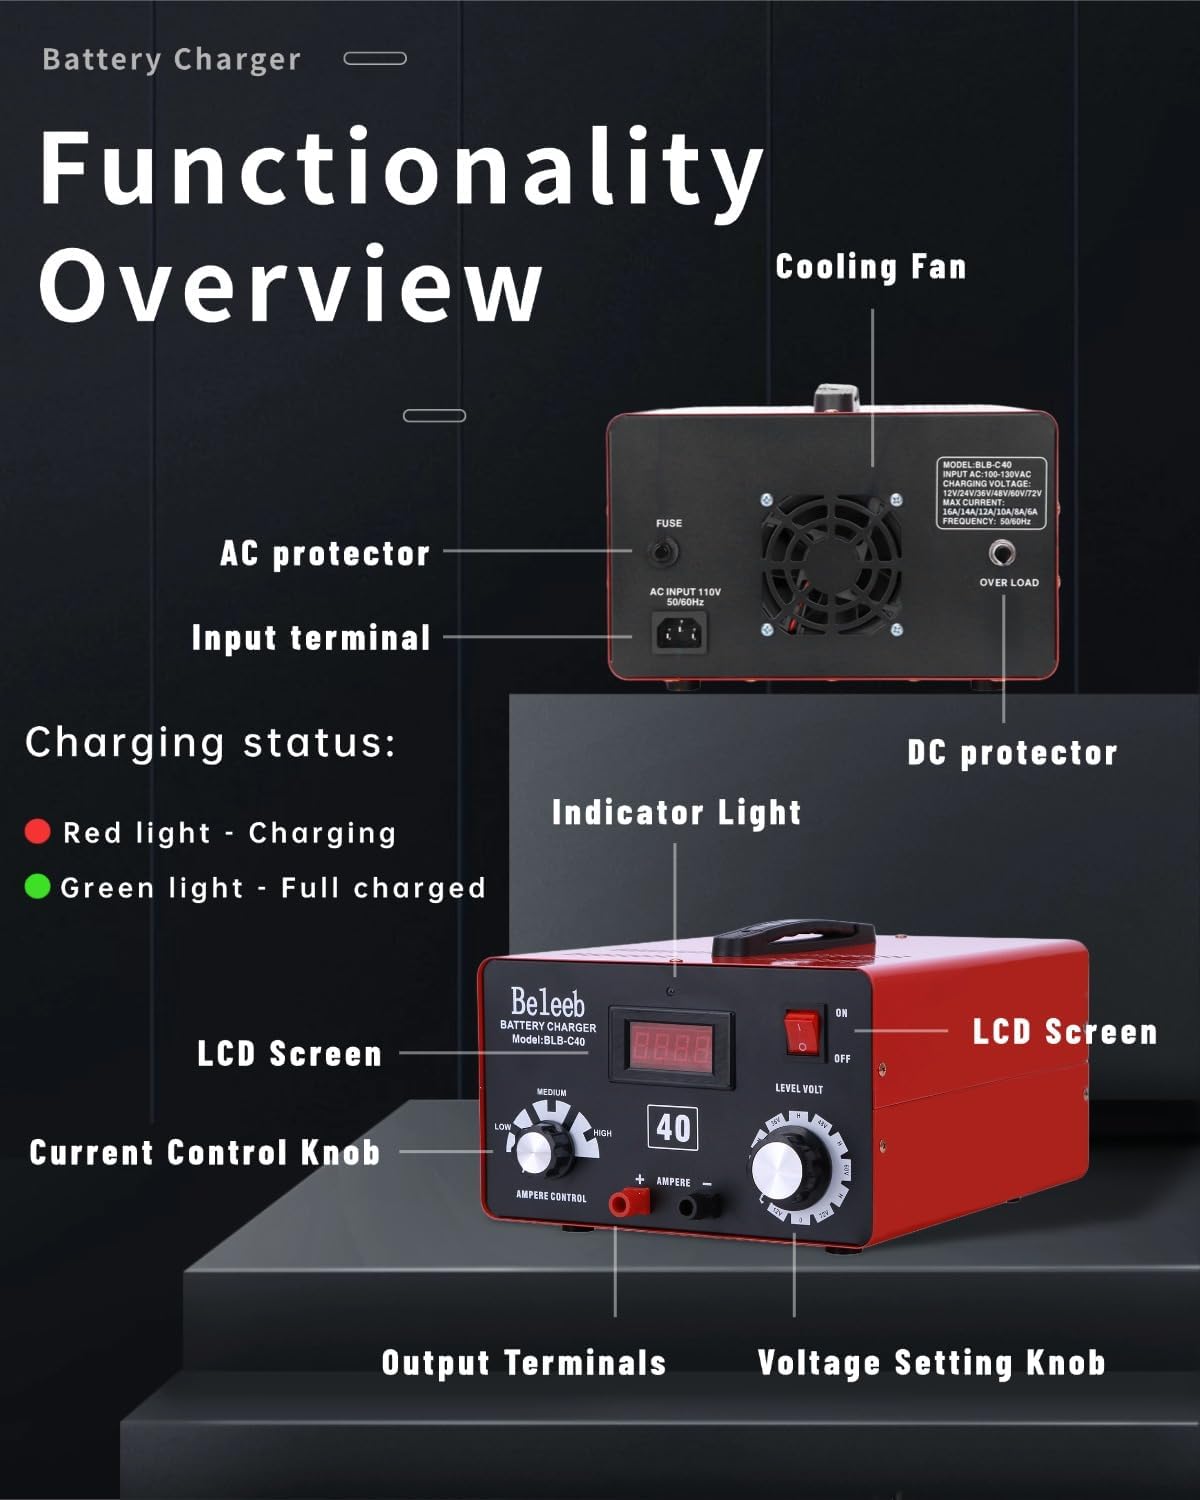
Figure 1: Front and Rear View of the Beleeb BLB-C40 Battery Charger, highlighting the AC protector, input terminal, cooling fan, DC protector, indicator light, LCD screen, current control knob, voltage setting knob, and output terminals.
- LCD Screen: Displays current voltage and amperage.
- Indicator Light: Red indicates charging, Green indicates full charge.
- Voltage Setting Knob (Level Volt): Used to select the target voltage (12V, 24V, 36V, 48V, 60V, 72V) or "H" mode for desulfation.
- Current Control Knob (Ampere Control): Adjusts charging intensity (Low, Medium, or High).
- AC Protector: Overcurrent protection for AC input.
- DC Protector: Overcurrent protection for DC output.
- Cooling Fan: Dissipates heat during operation.
- Input Terminal: Connects to AC power source.
- Output Terminals: Connects to battery via charger cables.
4. Setup and Connection
- Prepare the Battery: Ensure the battery terminals are clean and free of corrosion. If charging a Lead-Acid battery, check electrolyte levels if applicable and ensure vent caps are properly seated.
- Connect Charger Cables:
- Connect the red (+) charger clamp to the positive (+) battery terminal.
- Connect the black (-) charger clamp to the negative (-) battery terminal.
- Ensure connections are secure.
- Select Voltage: Turn the Voltage Setting Knob to match your battery's voltage (e.g., 12V for a 12-volt battery).
- Select Current: Turn the Current Control Knob to your desired charging intensity (Low, Medium, or High). "Low" is recommended for maintenance or smaller batteries, "High" for faster charging of larger batteries. The charger's smart chip will automatically manage the precise electrical output.
- Connect to AC Power: Plug the charger's AC power cord into a standard 120V AC outlet.
- Power On: Flip the ON/OFF switch to the "ON" position. The LCD screen will illuminate, and the red indicator light will show charging is in progress.

Figure 2: The Beleeb BLB-C40 charger demonstrating its universal application across different battery chemistries and vehicle types.
5. Operating Instructions
5.1 General Charging
The Beleeb BLB-C40 features an intelligent charging system that automatically detects battery status and selects the optimal charging curve (Constant Current / Constant Voltage). Once connected and powered on, the charger will begin charging. The red indicator light will be on during charging, and it will turn green when the battery is fully charged.

Figure 3: Diagram illustrating the intelligent 3-stage charging process (Fast Charge, Absorption Charge, Float Charge) and safety features like auto voltage match and full charge auto-termination.
- Automatic Voltage Match & Safety Lock: The charger detects mismatched voltage settings (e.g., 24V setting for a 12V battery) and halts charging instantly to prevent damage.
- Programmed Charging: You can manually select the voltage (12V-72V) and adjust the current via the knob for customized charging speed.
- Full Charge Auto-Termination: Charging stops automatically at 100% to prevent overcharging, extending battery lifespan by up to 30%.
5.2 "H" Mode (High-Voltage Pulse Desulfator) for Lead-Acid Batteries
The "H" Mode is designed to revive and extend the life of sulfated Lead-Acid batteries by breaking down harmful sulfate crystal buildup. Do not use "H" Mode for Lithium batteries.
- Connect the Charger: Connect the charger to the Lead-Acid battery as described in Section 4.
- Set Voltage: Turn the Voltage Setting Knob to the "H" position corresponding to your battery's voltage (e.g., "48V-H" for a 48-volt Lead-Acid battery).
- Set Current: Turn the Current Control Knob to the "LOW" position. This is recommended for optimal desulfation performance.
- Start Desulfation: Power on the charger. The desulfation process will run automatically.

Figure 4: Instructions for setting the charger to "H" Mode for Lead-Acid battery desulfation, showing the voltage knob set to an "H" position and current knob set to LOW.
Important Safety Notes for "H" Mode:
- Monitor battery temperature every 1-2 hours. Never leave unattended.
- Pause if the battery becomes hot (>50°C / 122°F). Resume after cooling.
- Do not desulfate severely sulfated batteries.
5.3 Charging Lithium Batteries (LiFePO4)
When charging Lithium batteries, it is important to understand the role of the Battery Management System (BMS).

Figure 5: Comparison diagram showing how the charger controls Lead-Acid charging versus how the BMS controls Lithium battery charging.
Important Notes for Charging Lithium Batteries:
- The BMS monitors battery conditions like temperature, cell balance, and overall health.
- The charger supplies power, but the BMS ultimately controls the charging process and may stop charging for safety or when the battery is full.
- Ensure the correct voltage setting is used to avoid damaging the BMS with excessive voltage. For example, for a 12V Lithium battery, set the charger voltage to 14.7V. The BMS typically accepts up to 14.4V, so the charger output would be regulated accordingly.
- If the BMS detects an issue (e.g., overheating or aging), it may reduce or stop charging to protect the battery.
6. Maintenance
- Cleaning: Keep the charger clean and free of dust and debris. Use a dry cloth to wipe the exterior.
- Storage: Store the charger in a dry, cool place when not in use.
- Cable Inspection: Regularly inspect charger cables and clamps for any signs of damage, fraying, or corrosion. Replace damaged components immediately.
- Cooling Fan: Ensure the cooling fan vents are not obstructed to allow for proper airflow.
- Desulfation (Lead-Acid only): Utilize the "H" Mode periodically for Lead-Acid batteries to help maintain their capacity and extend their lifespan, following the safety guidelines in Section 5.2.
7. Troubleshooting
| Problem | Possible Cause | Solution |
|---|---|---|
| Charger not turning on / No display | No AC power; ON/OFF switch is off; Blown AC protector fuse. | Check AC power outlet; Ensure ON/OFF switch is in "ON" position; Check and replace AC protector fuse if necessary. |
| Charger not charging (Red light not on) | Incorrect battery connection; Battery voltage too low; Mismatched voltage setting; Blown DC protector fuse. | Verify positive and negative connections; Ensure battery has at least minimal voltage; Set correct voltage on the knob; Check and replace DC protector fuse if necessary. |
| Battery getting hot during charging | Overcharging; Internal battery fault; High ambient temperature. | Immediately pause charging and allow battery to cool. Check battery condition. Ensure proper ventilation. |
| Charger stops charging prematurely (Lithium batteries) | Battery Management System (BMS) intervention. | This is normal. The BMS may stop charging for safety or when the battery is full. Verify battery status with a multimeter. |
| "H" Mode not effective for Lead-Acid battery | Battery severely sulfated or damaged. | "H" Mode may not revive all batteries. Consider battery replacement if no improvement. |
8. Specifications
| Feature | Detail |
|---|---|
| Brand | Beleeb |
| Model Number | BLB-C40 |
| Product Dimensions (D x W x H) | 11.4" x 9.85" x 6.3" |
| Input Voltage | 120 Volts AC |
| Output Voltage Range | 12V, 24V, 36V, 48V, 60V, 72V |
| Max Output Current (Amperage) | 16 Amps (12V), 14 Amps (24V), 12 Amps (36V), 10 Amps (48V), 8 Amps (60V), 6 Amps (72V) |
| Supported Battery Types | Lead-Acid (Standard, AGM, GEL), Lithium (LiFePO4) |
| Safety Certifications | FCC, UL |
| Color | Red |
9. What's in the Box
The package for your Beleeb BLB-C40 Battery Charger includes the following items:

Figure 6: Image showing the Beleeb BLB-C40 Battery Charger, charger cables, power cord, and user manual.
- Beleeb BLB-C40 Battery Charger Unit
- Charger Cables with Clamps (4 FT / 1.2M)
- AC Power Cord (4 FT / 1.2M)
- User Manual (this document)
10. Warranty and Support
10.1 Warranty Information
The Beleeb BLB-C40 Battery Charger comes with a 1 Year Manufacturer Warranty. This warranty covers defects in materials and workmanship under normal use. Please retain your proof of purchase for warranty claims.
10.2 Customer Support
For technical assistance, troubleshooting, or warranty inquiries, please contact Beleeb customer support. Refer to the contact information provided on the product packaging or the official Beleeb website.
Online Resources: For additional information and FAQs, visit the Beleeb Store on Amazon.