1. Introduction
This manual provides essential information for the safe and effective operation of your Artilume U1 Laser Engraver 3000mW. Please read it thoroughly before using the device to ensure proper setup, usage, and maintenance. The Artilume U1 is designed for high-precision engraving and cutting on various materials, offering a large working area and flexible connectivity options.

Image 1.1: The Artilume U1 Laser Engraver with examples of engraved items.
2. Safety Information
WARNING: Laser radiation can cause eye damage and skin burns. Always wear protective eyewear and ensure proper ventilation during operation.
- Eye Protection: Always wear the provided laser safety goggles when the machine is operating. Never look directly at the laser beam.
- Ventilation: Operate the laser engraver in a well-ventilated area to dissipate fumes and smoke produced during engraving and cutting.
- Material Safety: Only engrave or cut materials specified as safe for laser processing. Avoid highly reflective, flammable, or unknown materials.
- Emergency Stop: Familiarize yourself with the emergency shutdown procedure. The machine includes an emergency stop button.
- Supervision: Never leave the laser engraver unattended while it is operating.
- Children and Pets: Keep children and pets away from the operating area.
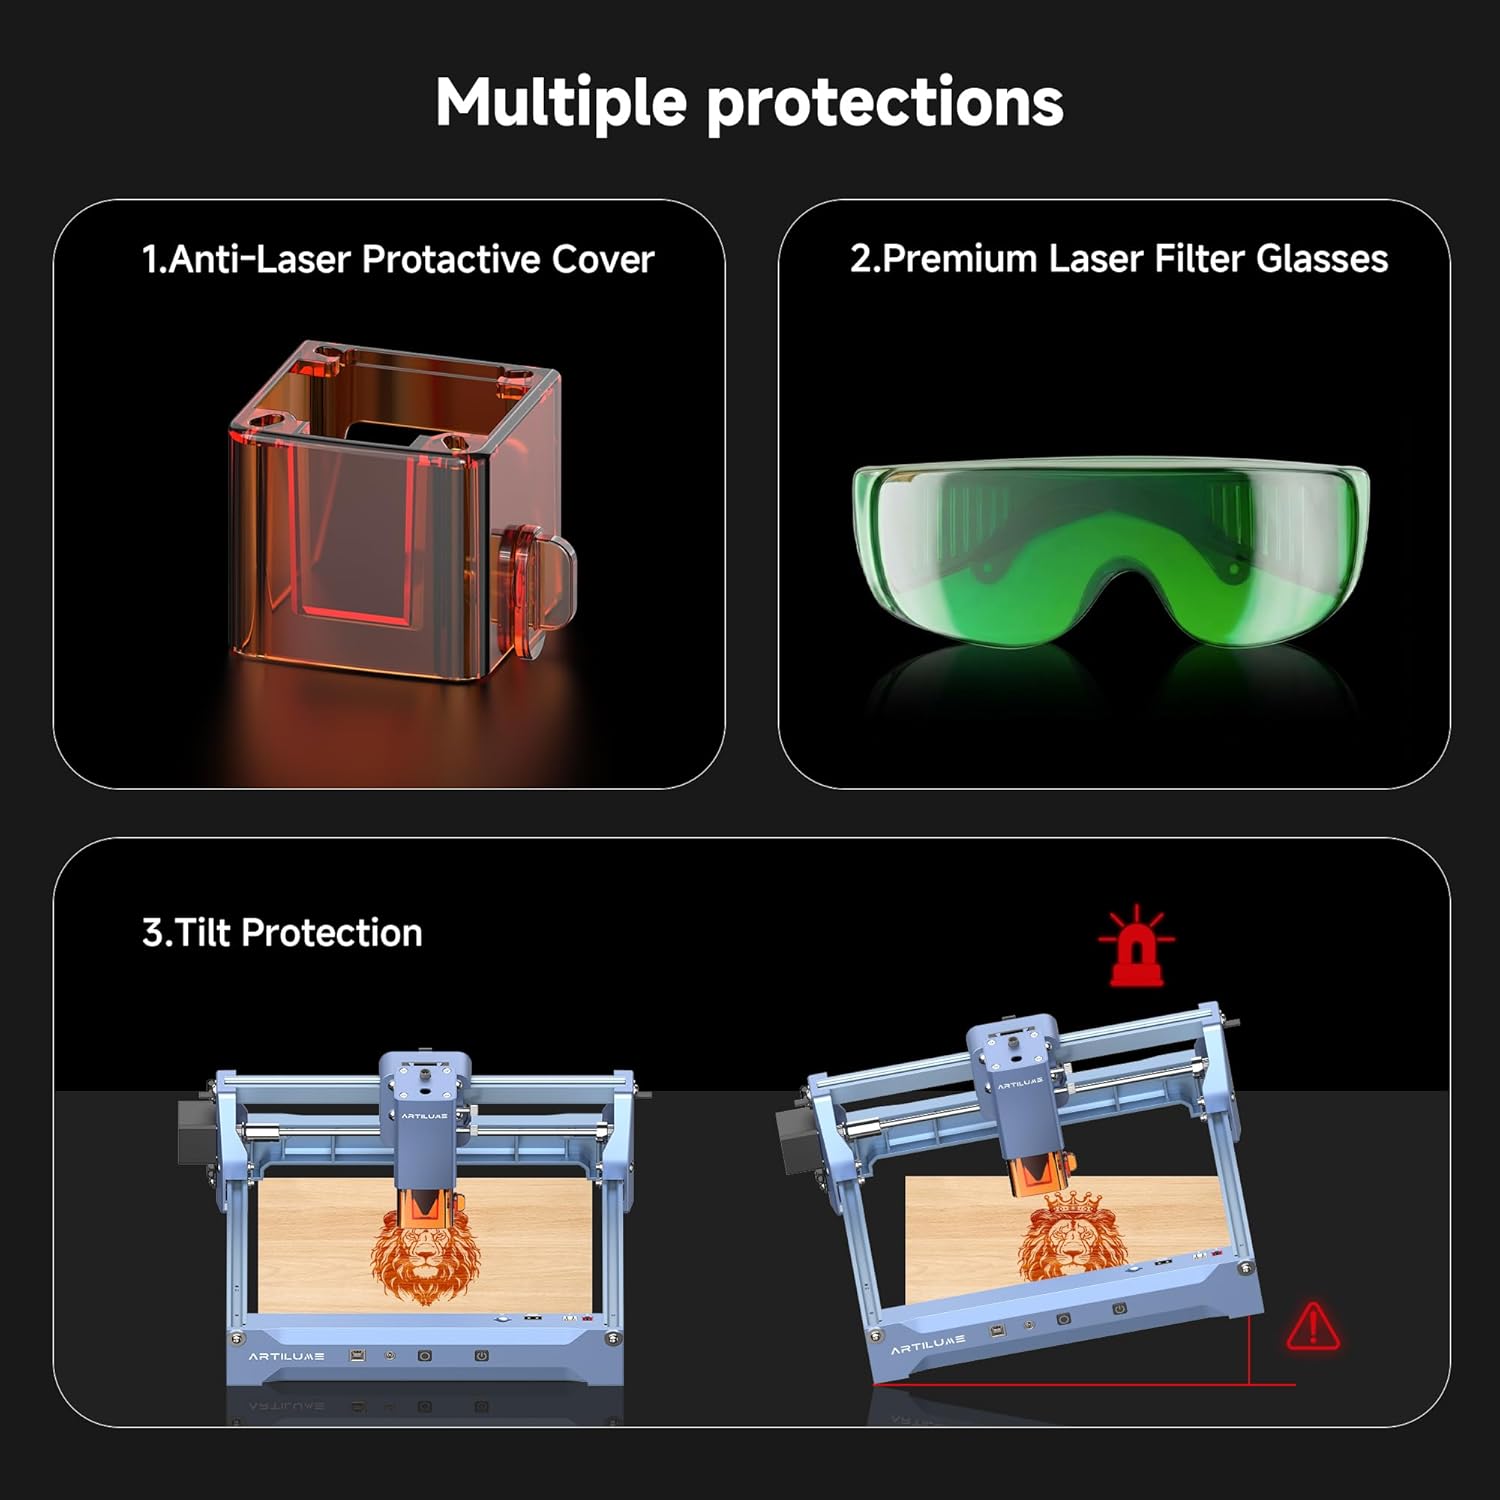
Image 2.1: Overview of safety features including the protective cover, laser glasses, and tilt protection.
3. Package Contents
Verify that all items listed below are included in your package. If any items are missing or damaged, please contact customer support.

Image 3.1: All components included in the Artilume U1 Laser Engraver package.
- Artilume U1 Laser Engraver Machine × 1
- User Manual × 1
- Marker Pen × 1
- Cleaning Brush × 1
- Black Card (80×81.3×0.3mm) × 1
- Kraft Paper (80×80×0.46mm) × 2
- Plywood (100×100×3mm) × 2
- Type-B (2.0) USB Cable × 1
- 4GB TF Card × 1
- Laser Safety Goggles (151×57×55mm) × 1 pair
4. Product Overview
The Artilume U1 Laser Engraver is a compact yet powerful tool for creative projects. It features a 3000mW laser module, offering high precision and a generous working area.
4.1 Key Features
- High Precision: 0.04*0.04mm ultra-fine compressed spot laser technology with an engraving precision of up to 0.01mm.
- Large Working Area: 150 × 200mm (approximately 6 × 8 inches).
- Pre-assembled Design: Arrives almost fully assembled and calibrated for quick setup.
- Versatile Material Compatibility: Engraves wood, leather, acrylic, ceramics, stone, and more.
- Flexible Connectivity: Supports USB, TF card, WiFi, and App connections for offline use.
- Software Compatibility: Works with LaserGRBL (Windows), LightBurn (Windows, macOS), and CutLabX (Windows, macOS, Android, iOS).
- Supported File Formats: NC, DXF, BMP, SVG, JPG, JPEG, PNG.
- Safety Features: Emergency shutdown, motion protection, overheating detection, protective covers, and safety goggles.

Image 4.1: The Artilume U1 features a 150x200mm working area, with overall dimensions of 340mm (13.4in) length, 290mm (11.4in) width, and 148mm (5.8in) height.
4.2 Interface and Ports
The Artilume U1 features several ports and controls for operation:
- TF Card Slot: For offline engraving using a pre-loaded TF card.
- Roller Port: For connecting an optional rotary roller attachment.
- Cover: Protective cover for the laser module.
- Fan: Integrated cooling fan.
- Type-B USB Port: For connecting to a computer.
- DC24V Power Input: For connecting the power adapter.
- Offline Engraving Button: Initiates engraving from the TF card.
- Power Button: Turns the device on/off.

Image 4.2: Compatible software (LaserGRBL, LightBurn, CutLabX) and communication methods (USB, WiFi) for the Artilume U1.
5. Setup
The Artilume U1 is largely pre-assembled, requiring minimal setup before first use.
5.1 Initial Assembly
- Carefully remove the laser engraver and all accessories from the packaging.
- Place the machine on a stable, level surface in a well-ventilated area.
- Ensure the laser module is securely attached. If not, follow the instructions in the included user manual for attachment.
5.2 Power Connection
- Connect the power adapter to the DC24V input port on the machine.
- Plug the power adapter into a suitable electrical outlet.
- Press the Power button to turn on the device. The power indicator light will illuminate.
5.3 Software Installation and Connection
The Artilume U1 is compatible with several engraving software options:
- LaserGRBL: (Windows) Free and open-source software.
- LightBurn: (Windows, macOS) Paid software with advanced features.
- CutLabX: (Windows, macOS, Android, iOS) Software supporting various platforms.
Download and install your preferred software from the official websites. Refer to the software's documentation for detailed installation and setup instructions.
To connect the engraver to your computer:
- Connect the Type-B USB cable from the engraver to your computer.
- Open the engraving software. The software should detect the engraver. If not, check device manager for proper driver installation or consult the software's connection guide.
- Alternatively, connect via WiFi or use the TF card for offline engraving as per software instructions.
6. Operation
This section outlines the general steps for performing an engraving or cutting task.
6.1 Preparing Your Material
- Select a suitable material for engraving or cutting (e.g., wood, leather, acrylic).
- Place the material flat on the working surface of the engraver. Ensure it is stable and does not move during operation.
6.2 Focusing the Laser
Accurate laser focus is crucial for optimal engraving and cutting results. Consult your software's specific instructions for focusing. Typically, this involves adjusting the laser module's height until the laser spot is at its smallest point on the material surface.
6.3 Software Workflow
- Import Design: Open your chosen engraving software (e.g., LightBurn). Import your design file (NC, DXF, BMP, SVG, JPG, JPEG, PNG).
- Adjust Settings: Configure engraving parameters such as laser power, speed, and passes based on your material and desired effect. The included user manual may contain recommended settings for common materials.
- Positioning: Use the software to preview and adjust the position of your design on the material.
- Start Engraving: Once all settings are confirmed and safety goggles are worn, initiate the engraving process from the software.
Video 6.1: An official video demonstrating the unboxing and initial review of the Artilume U1 Laser Engraver, showing the setup and first engraving process.
6.4 Material Compatibility and Power Settings (3W Model)
The 3W diode laser model is ideal for detailed engraving. For cutting, higher power models (7W, 12W) are recommended. The infrared laser (1W) is specifically designed for engraving metals.

Image 6.2: Examples of various materials suitable for engraving with the Artilume U1.
7. Maintenance
Regular maintenance ensures the longevity and optimal performance of your Artilume U1 Laser Engraver.
- Cleaning the Lens: Periodically clean the laser lens with a soft, lint-free cloth and lens cleaning solution to prevent residue buildup that can affect laser performance.
- Cleaning the Machine: Use the provided brush or a soft cloth to remove dust and debris from the machine's frame, rails, and working area.
- Lubrication: Occasionally apply a small amount of lubricant to the guide rails to ensure smooth movement of the laser module.
- Firmware Updates: Check the Artilume official website for any available firmware updates to improve performance or add new features.
8. Troubleshooting
If you encounter issues with your Artilume U1, refer to the following common problems and solutions:
| Problem | Possible Cause | Solution |
|---|---|---|
| Laser not firing or weak output | Loose cable connection, incorrect software settings, dirty lens, laser module malfunction. | Check all cable connections. Verify laser power and speed settings in software. Clean the laser lens. If problem persists, contact support. |
| Engraving is blurry or inconsistent | Incorrect laser focus, unstable material, incorrect speed/power settings. | Adjust laser focus. Ensure material is securely placed. Fine-tune speed and power settings. |
| Machine not connecting to computer/app | USB cable issue, driver not installed, incorrect WiFi settings, software not recognizing device. | Try a different USB port or cable. Install necessary drivers. Reconfigure WiFi connection. Restart software and machine. |
| Machine stops mid-operation | Power interruption, motion sensor triggered, overheating. | Check power supply. Ensure machine is on a stable surface. Allow machine to cool down if overheating. |
For issues not covered here, please refer to the comprehensive troubleshooting guide on the Artilume support website or contact customer service.
9. Specifications
| Feature | Detail |
|---|---|
| Model Number | U1 |
| Laser Power | 3000mW (3W) Diode Laser |
| Engraving Precision | 0.01mm |
| Spot Size | 0.04*0.04mm |
| Working Area | 150 x 200mm (6 x 8 inches) |
| Product Dimensions | 11 x 13 x 6 inches (approx. 279 x 330 x 152 mm) |
| Item Weight | 5.44 pounds (approx. 2.47 kg) |
| Connectivity | USB, TF Card, WiFi, App |
| Software Compatibility | LaserGRBL (Windows), LightBurn (Windows, macOS), CutLabX (Windows, macOS, Android, iOS) |
| Supported File Formats | NC, DXF, BMP, SVG, JPG, JPEG, PNG |
| Laser Module Lifespan | > 10,000 hours |
| Manufacturer | Artilume |
10. Warranty and Support
Artilume products are designed for quality and reliability. For specific warranty details, including coverage period and terms, please refer to the warranty card included with your product or visit the official Artilume website.
For technical support, troubleshooting assistance, or to inquire about replacement parts, please contact Artilume customer service through their official channels. Contact information can typically be found on the Artilume website or in the product packaging.