1. Introduction
Thank you for choosing the NINETOM 12.3-inch Ultra-Narrow Touchscreen Wireless CarPlay Android Auto Receiver. This manual provides essential information for the proper installation, operation, and maintenance of your new car display system. Please read it thoroughly before use.
Key Features:
- Upgraded 12.3" HD Touchscreen: Features a 1920×720 IPS display with ultra-narrow bezels and premium aluminum body. IN-CELL full lamination technology enhances clarity and an anti-reflection layer reduces glare by up to 75%.
- Built-in Wired & Wireless CarPlay/Android Auto: Access GPS, calls, messages, and music via Siri or touch controls for a safer, smarter, and hands-free driving experience. Supports screen mirroring.
- Supports Original Functions: Retains all original car functions including radio, amplifier, joystick controls, and reversing camera.
- Dual System Switching: Easily switch between the Linux system and your original car interface with one click.
- Stable Performance: Runs on a Linux system, providing stable performance without freezing or lag.
Text Description: This video provides an introduction to the 12.3-inch Ultra-Narrow Touchscreen, showcasing its design and key features.
2. Compatibility Check
This touchscreen is specifically designed for BMW X1 Series E84 (2009–2015) vehicles equipped with the CIC system. It is not compatible with other versions or cars without a factory display screen. Please verify your car's system before installation.
Important Notes:
- This unit is not compatible with vehicles without a factory display screen.
- Before purchasing, please ensure your factory radio system supports AUX or BT audio, as sound output from this screen is transmitted via the AUX or BT channel.

Text Description: Image showing a compatibility chart for BMW X1 Series E84 (2009-2015) with CIC system, highlighting compatible models and system types. It visually distinguishes between CIC and CCC systems.

Text Description: Visual guide on how to identify your original BMW system, showing the CIC system interface and its corresponding 4-pin LVDS plug, contrasting it with incompatible CCC and NBT systems.
3. Package Contents
The product package includes the following items:

Text Description: Image displaying the 12.3-inch touchscreen dimensions (330mm x 150mm) and a list of included accessories: Power cable, USB cable, AUX cable, Bracket, and User Manual.
4. Setup and Installation
Professional installation is recommended if you are unsure about the process. Ensure all functions are tested before reassembling the dashboard.
Installation Steps:
- Prepare for Disassembly: Wrap the center console, armrest box, car gear, and other positions with soft fabrics to prevent scratches.
- Remove Air-Conditioning Trim Panel: Pry out the air-conditioning trim panel with a rocker tool. Disconnect the connecting plug on the back and set the panel aside.
- Remove Host Panel: Remove the fixing screws of the host panel. Disconnect the connecting plug on the back and set the panel aside.
- Remove Original Display Screen: Remove the fixing screws of the original display screen. Press the LVDS plug button on the back, take out the LVDS cable plug, and then remove the original display screen.
- Remove Original Host: Pull the original host outward. Hold the ISO plug buckle of the main engine and pull it backward to take out the ISO plug.
- Relocate Optical Fiber Cable: Press the small buckle on the original ISO wire head with tweezers and take out the 2P green optical fiber cable. Connect this cable to the Android ISO female harness, ensuring it's inserted firmly and in the correct direction.
- Connect Android ISO Harness: Connect the ISO plug of the original host to the male of the Android ISO harness. Connect the Android ISO cable female to the back of the original host, insert the plug, and press the buckle to make it firmly installed.
- Install Antennas: Thread the plug ends of the 4G antenna and GPS antenna through the storage box to the base of the display screen. Tear off the double-sided adhesive tape behind the 4G antenna and GPS antenna and paste them on the dashboard. Plug the excess wire into the gap above the storage box and press the exposed harness into the gap with a rocker.
- Install USB Cable: Open the storage box and look for a pre-existing hole for the USB cable. If no hole exists, one needs to be drilled. Thread the plug end of the USB cable to the base of the display screen through the storage box, and place the female end of the USB cable into the co-driver's storage box.
- Connect Power Cords: Connect the 5V power cord on the Android ISO harness and the 5V power cord on the USB harness. Unplug the white USB cable of the original host and then connect it to the "USB FEMALE-A" interface on the USB harness. Finally, connect the "USB MALE-B" USB plug on the Android ISO harness to the USB interface of the original host. (Note: The "IDRIVE CONTROL" plug does not need to be connected).
- Manage Wiring: Place the excess exposed wire at the gap under or on the side of the host. The position space on the back of the host is too small to place wire.
- Reinstall Original Host: Install the original host back to its original position, confirm that it is installed in place, and then lock and fix the original host.
- Reinstall Panels: Restore the connection plug on the back of the host panel, and then install it back in place. Restore the connection plug on the back of the air conditioning trim panel, and then install it back to its original position.
- Initial Power On: Ignition on, power on the car. Check whether the Android device can be started normally and check whether all functions are normal.
Installation Videos:
Text Description: This video demonstrates the installation process for a BMW F30 NBT EVO Android screen. While the product is for BMW X1 E84 CIC, some general installation steps for BMW dashboards may be similar.
Text Description: This video illustrates how to relocate optic cables to the Linux harness for BMW vehicles, a crucial step for proper audio functionality after screen installation.
Text Description: This video demonstrates the process of transferring the 2P green fiber optic cable, which is essential for maintaining audio functionality in some BMW models after installing an aftermarket screen.
5. Operating Instructions
5.1 Dual System Switching
Easily switch between the Linux system and your original car interface with one click. All factory features—radio, amplifier, steering wheel buttons, mouse knob, and safety alerts—remain fully functional. The upgrade does not modify your car’s original software.
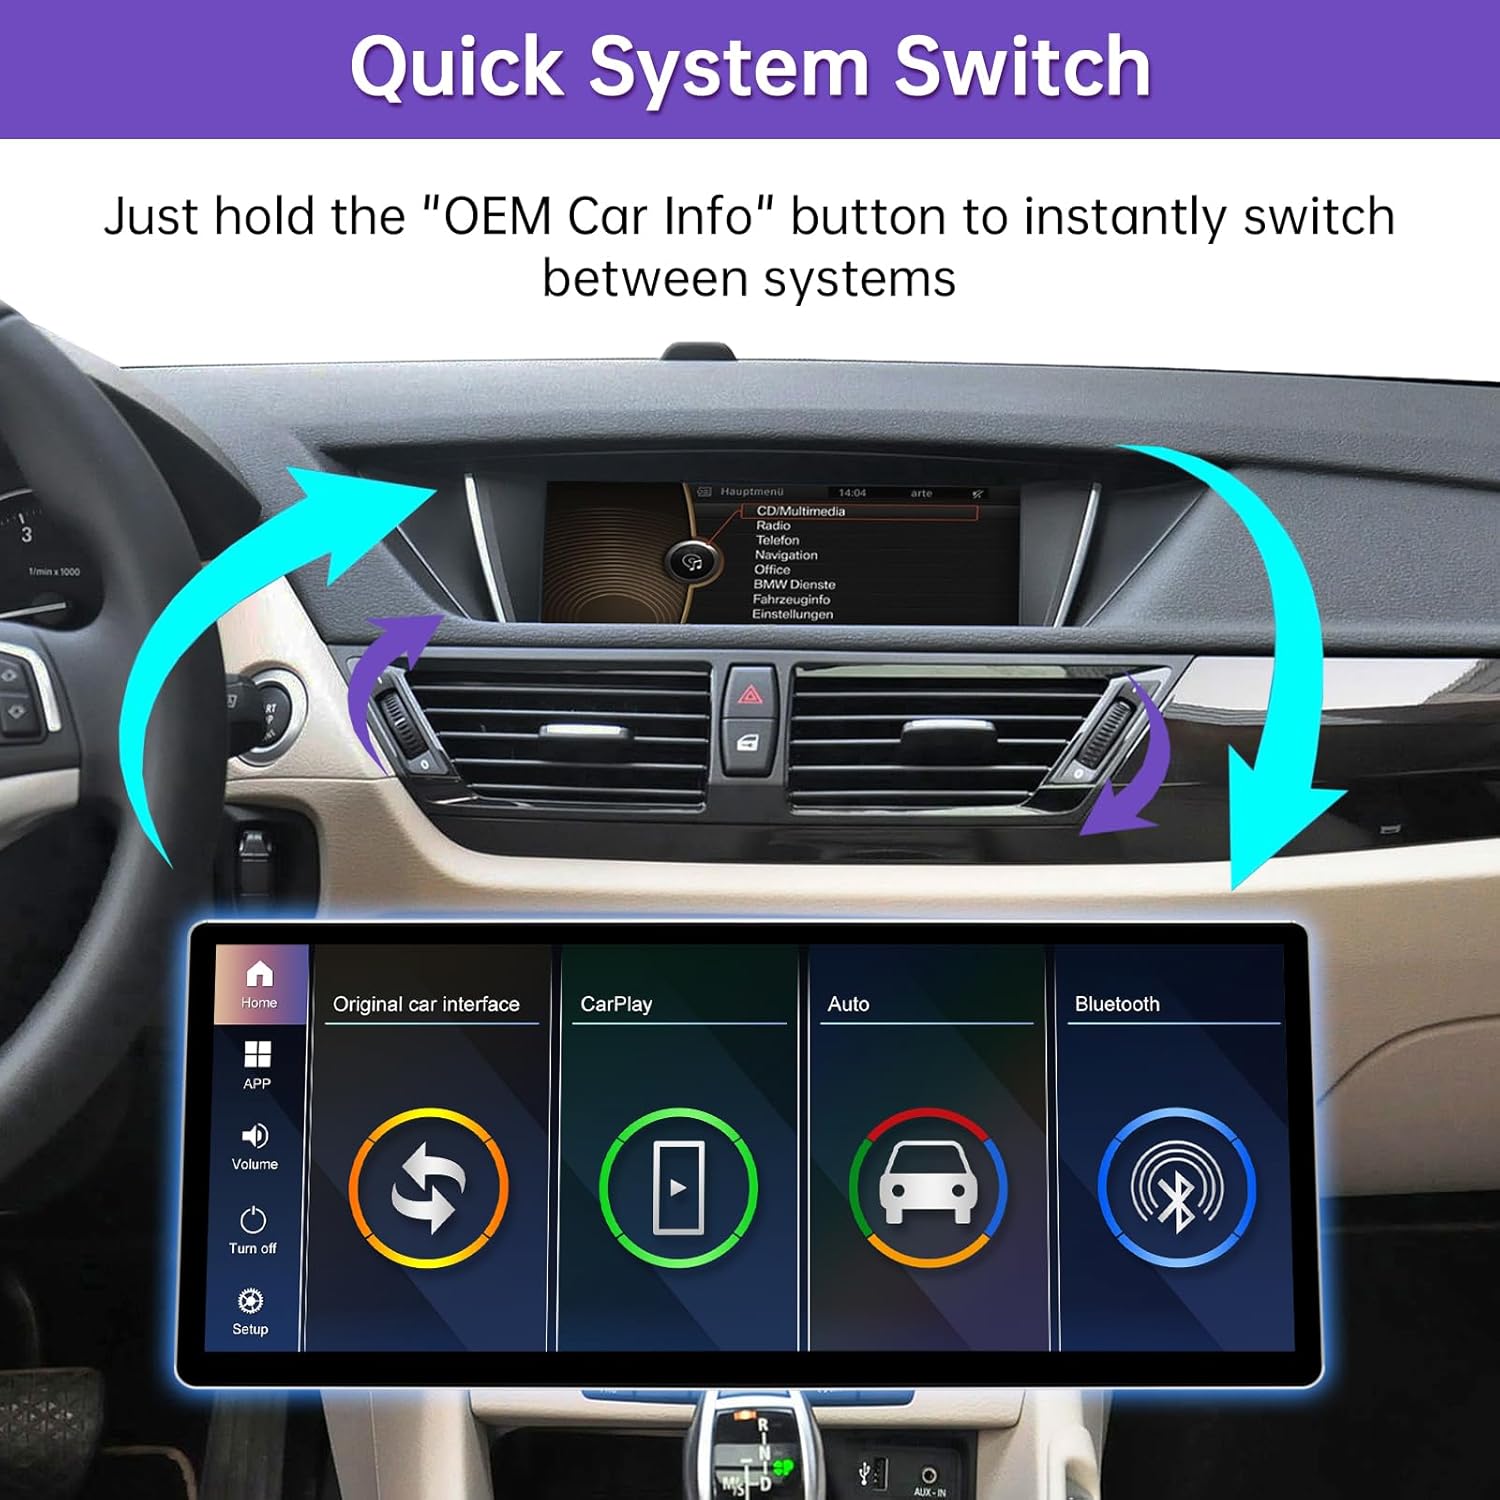
Text Description: Image illustrating the quick system switch function, showing the original car interface and the new Linux system interface, with arrows indicating seamless switching.

Text Description: Image demonstrating the one-touch switch from the OEM screen to the CarPlay interface, highlighting the ease of transition between systems.
5.2 Wireless CarPlay & Android Auto
Supports both wired and wireless CarPlay & Android Auto, giving you access to GPS, calls, messages, and music via Siri or touch controls. Use voice assistants like Siri or Google Assistant for navigation and communication, ensuring a safer, smarter, and hands-free driving experience.

Text Description: Image showing the CarPlay and Android Auto interfaces displayed on the screen, along with the MirrorLink function for AirPlay (iPhone) and AutoLink (Android).

Text Description: Image showcasing the CarPlay and Android Auto features, including phone, music, maps, and Siri voice control, integrated into the car display.
Text Description: This video demonstrates how to set up Wireless CarPlay on a BMW, guiding users through the connection process for seamless smartphone integration.
5.3 Screen Mirroring (AirPlay & AutoLink)
Supports screen mirroring to enjoy videos, maps, and more directly on the car display.

Text Description: Image illustrating the MirrorLink function, allowing users to display their phone's content directly on the car screen for navigation, media, and apps.
Text Description: This video guides users on how to set up AirPlay on a BMW, enabling screen mirroring from Apple devices to the car's display.
5.4 Day and Night Mode
The system features automatic light sensitivity adjustment, switching between day and night modes according to your car's original headlights for optimal visibility.

Text Description: Image illustrating the automatic day and night mode adjustment based on the car's headlights, ensuring clear visibility in varying light conditions.
5.5 Camera Function
The system supports various camera functions for enhanced safety and convenience:
- Support Factory and Aftermarket Cameras.
- Support Factory Original Reverse Camera and Parking Radar.
- Support Aftermarket Reverse Camera and 360 Camera.
- Support Front View Camera DVR (CVBS).

Text Description: Image showcasing the camera function, including support for factory and aftermarket cameras, original reverse camera, parking radar, and 360-degree cameras.
5.6 Custom Boot Logo
You can customize the boot logo of your system:
- Create a PNG image with a resolution of 1920×720P.
- Rename the file to `updatelogo.png`.
- Place the file in the root directory of a USB drive.
- Insert the USB drive into the system — a prompt will appear asking you to confirm the logo change.
- Restart the system for the new logo to take effect.

Text Description: Image illustrating the steps to change the boot logo, showing the USB drive connection and the custom logo displayed on the screen.
6. Sound Setup
For optimal audio experience, ensure your sound settings are correctly configured.
Text Description: This video provides instructions on audio settings for Linux screens in BMW CIC and NBT systems, ensuring proper sound output after installation.
7. Resolution Setup
Proper resolution settings are crucial for a clear display. Adjust the resolution to match your original BMW screen for the best visual experience.
Text Description: This video demonstrates how to configure original resolution settings for BMW displays, ensuring the new screen matches the factory display's clarity.

Text Description: Image comparing the 1920x720P resolution of the NINETOM screen with lower resolutions (720x480P, 1280x480P) from other products, highlighting superior clarity.
8. Split Screen Function
The split screen feature allows you to run two applications simultaneously on the display, enhancing multitasking capabilities while driving.
Text Description: This video demonstrates the split screen functionality on a Pemp Android 10 device, showing how two applications can be used simultaneously on the display.
9. Maintenance
To ensure the longevity and optimal performance of your NINETOM touchscreen, follow these maintenance guidelines:
- Cleaning: Use a soft, lint-free cloth to clean the screen. For stubborn smudges, lightly dampen the cloth with water or a screen-safe cleaner. Avoid harsh chemicals or abrasive materials.
- Temperature: Avoid exposing the device to extreme temperatures, both hot and cold, as this can affect performance and lifespan.
- Physical Damage: Protect the screen from direct impact or sharp objects. While the screen features durable materials, excessive force can cause damage.
- Software Updates: Periodically check for firmware updates from NINETOM to ensure you have the latest features and bug fixes.
10. Troubleshooting
If you encounter any issues with your NINETOM touchscreen, refer to the following common troubleshooting tips:
- No Power: Check all power connections to ensure they are securely plugged in. Verify that the car's ignition is on.
- No Sound: Ensure the AUX or BT audio channel is correctly selected on your original car radio. Disconnect any other Bluetooth devices from your phone. Check the sound settings within the Linux system.
- Display Issues: Verify that the resolution settings are compatible with your original car screen. If the screen is flickering or distorted, recheck the LVDS cable connection.
- CarPlay/Android Auto Not Connecting: Ensure Wi-Fi and Bluetooth are enabled on your phone. Disconnect and reconnect the Bluetooth connection. Check CarPlay/Android Auto settings within the device.
- Touchscreen Unresponsive: Restart the device and your car. Ensure the screen is clean and free from debris.
11. Specifications
- Brand: ninetom
- Model: 12.3" Ultra-Narrow Touchscreen Wireless CarPlay Android Auto Receiver for BMW X1 Series E84 (2009-2015) CIC System
- Display Size: 12.3 inches
- Resolution: 1920x720 IPS
- System: Linux
- Connectivity: Wireless CarPlay, Wireless Android Auto, Wired CarPlay, Wired Android Auto, Screen Mirroring (AirPlay, AutoLink)
- Compatibility: BMW X1 Series E84 (2009–2015) with CIC System
- Weight: 2.17 Kilograms
12. Warranty and Support
Your NINETOM touchscreen comes with a 1-year warranty. Installation will not affect your factory warranty or damage wiring. If unsure, professional installation is recommended.
Expert Support:
Our experienced support team is always available to assist with wiring and settings. Please test all functions before reassembling the dashboard.
For further assistance, please contact NINETOM customer support.