1. Introduction
This manual provides comprehensive instructions for the installation, operation, maintenance, and troubleshooting of your Duex DXMBH61G M.2 motherboard. Designed for Intel LGA 1155 processors and supporting DDR3 memory, this mATX motherboard offers a compact yet powerful foundation for your PC build. Please read this manual thoroughly before proceeding with installation to ensure proper setup and optimal performance.
2. Safety Information
Always observe the following safety precautions to prevent damage to the motherboard and injury to yourself:
- Power Off: Always disconnect the power supply from the wall outlet before installing or removing any components.
- Static Electricity: Motherboards and other components are sensitive to static electricity. Use an anti-static wrist strap or discharge static by touching a grounded metal object before handling components.
- Handling: Hold the motherboard by its edges. Avoid touching the components or connectors directly.
- Ventilation: Ensure adequate ventilation within your PC case to prevent overheating.
- Liquid and Moisture: Keep the motherboard away from liquids and moisture.
3. Package Contents
Verify that all items are present in your motherboard package. If any item is missing or damaged, contact your retailer.
- Duex DXMBH61G M.2 Motherboard
- I/O Shield
- SATA Data Cable(s)
- User Manual (this document)
- Driver CD/DVD (or link to download drivers)
4. Setup and Installation
This section guides you through the physical installation of the motherboard and its components.
4.1 Motherboard Layout
Familiarize yourself with the various components and connectors on your motherboard.
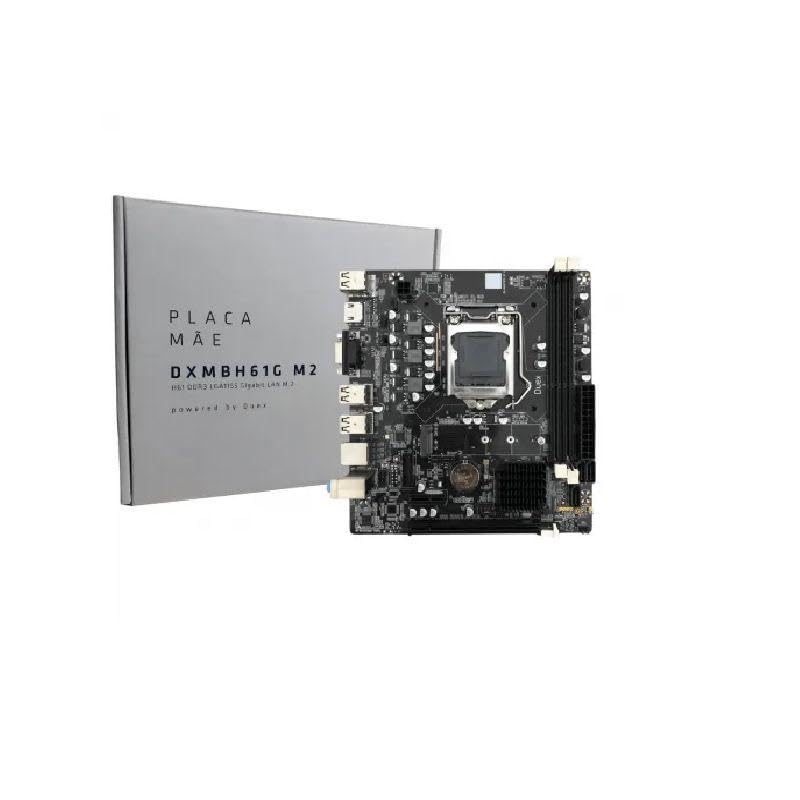
Image 1: Overview of the Duex DXMBH61G M.2 Motherboard. This image displays the general layout, including the CPU socket, DIMM slots, expansion slots, and various connectors.
4.2 CPU Installation
- Locate the LGA 1155 CPU socket on the motherboard.
- Gently push down the load lever and pull it out to open the socket cover.
- Align the triangular mark on the CPU with the corresponding mark on the socket. Carefully place the CPU into the socket without forcing it.
- Close the socket cover and push the load lever back into place until it clicks.
- Apply thermal paste and install the CPU cooler according to its manufacturer's instructions.
4.3 Memory (RAM) Installation
The motherboard supports DDR3 memory modules. It has two DIMM slots, supporting up to 16GB total.
- Open the clips at both ends of the DIMM slot.
- Align the notch on the DDR3 memory module with the key in the DIMM slot.
- Insert the memory module firmly into the slot until the clips snap into place. Ensure both clips are closed.
4.4 Storage Device Installation
The motherboard supports M.2 SATA SSDs and standard SATA 6Gb/s drives.
4.4.1 M.2 SATA SSD Installation
- Locate the M.2 slot on the motherboard.
- Remove the M.2 standoff screw.
- Insert the M.2 SSD into the slot at a 30-degree angle.
- Gently push down the M.2 SSD and secure it with the standoff screw.
4.4.2 SATA Drive Installation
- Connect one end of the SATA data cable to a SATA 6Gb/s port on the motherboard.
- Connect the other end of the SATA data cable to your hard drive or SSD.
- Connect a SATA power cable from your power supply to the drive.
4.5 Expansion Card Installation
The motherboard features one PCIe 2.0 x16 slot and one PCI x1 slot.
- Remove the metal bracket cover from your PC case corresponding to the desired expansion slot.
- Align your expansion card (e.g., graphics card) with the PCIe x16 or PCI x1 slot.
- Press the card firmly into the slot until it is fully seated.
- Secure the card with a screw to the PC case.
4.6 Front Panel and I/O Connections
Connect the various cables from your PC case to the motherboard headers:
- Front Panel Header: Connect power switch, reset switch, HDD LED, and power LED cables. Refer to your case manual for specific pin assignments.
- USB Headers: Connect front panel USB 2.0 ports.
- Audio Header: Connect front panel audio jacks.
4.7 Power Connections
Connect the power supply cables to the motherboard:
- 24-pin ATX Power Connector: Connect the main 24-pin power cable from your power supply.
- 4-pin ATX 12V Power Connector: Connect the 4-pin CPU power cable.
4.8 Mounting the Motherboard
Before mounting, install the I/O shield into the rear opening of your PC case.
- Ensure the standoffs in your PC case align with the screw holes on the mATX motherboard.
- Carefully place the motherboard into the case, aligning the screw holes with the standoffs and the I/O ports with the I/O shield.
- Secure the motherboard with screws. Do not overtighten.
5. Operating Instructions
Once all components are installed and connected, you can power on your system.
5.1 First Boot and BIOS/UEFI Setup
- Connect your monitor, keyboard, and mouse.
- Power on your system. During POST (Power-On Self-Test), press the DEL or F2 key (depending on BIOS version) to enter the BIOS/UEFI setup utility.
- Configure boot order, date/time, and other system settings as needed.
- Save changes and exit the BIOS/UEFI. The system will restart.
5.2 Operating System and Driver Installation
- Insert your operating system installation media (USB drive or DVD).
- Follow the on-screen instructions to install your operating system.
- After OS installation, install the necessary drivers for the motherboard chipset, LAN, audio, and any other integrated devices. These can be found on the provided driver CD/DVD or downloaded from the Duex website.
6. Maintenance
Proper maintenance ensures the longevity and stable performance of your motherboard.
6.1 Cleaning
- Regularly clean dust from inside your PC case, especially around the motherboard, CPU cooler, and expansion slots.
- Use compressed air to blow away dust. Hold the can upright to prevent liquid propellant discharge.
- Ensure the system is powered off and unplugged before cleaning.
6.2 BIOS/UEFI Updates
Periodically check the Duex website for updated BIOS/UEFI versions. Updates can improve compatibility, stability, and performance. Follow the specific update instructions provided by Duex carefully to avoid damaging the motherboard.
7. Troubleshooting
This section addresses common issues you might encounter.
- No Power:
- Check if the power supply is connected correctly to the motherboard (24-pin and 4-pin connectors).
- Ensure the power supply switch is in the 'ON' position.
- Verify the front panel power switch cable is correctly connected to the motherboard header.
- No Display:
- Ensure the monitor is connected to the correct video output (either integrated graphics or a dedicated graphics card).
- Reseat the graphics card and memory modules.
- Try booting with only one RAM stick.
- System Instability/Crashes:
- Check for proper CPU cooler installation and thermal paste application.
- Ensure all power connectors are securely seated.
- Update drivers and BIOS/UEFI to the latest versions.
- Run memory diagnostic tools to check for faulty RAM.
- Operating System Not Booting:
- Verify the boot order in BIOS/UEFI settings.
- Check SATA data and power connections to your storage drive.
- Ensure the operating system is installed correctly on the boot drive.
If you continue to experience issues, refer to the Duex support website or contact their technical support.
8. Specifications
| Feature | Description |
|---|---|
| Brand | Duex |
| Model | DXMBH61G M.2 (also referred to as DX-H61ZG M2) |
| CPU Socket | LGA 1155 |
| Supported Processors | Intel Core i3/i5/i7 series (LGA 1155) |
| Chipset | Intel H61 |
| Memory | 2 x DIMM slots, Max. 16GB, DDR3 1600/1333/1066 MHz, Dual Channel Architecture |
| Expansion Slots | 1 x PCIe 2.0 x16, 1 x PCI x1, 1 x M.2 SATA |
| Storage | 3 x SATA 6Gb/s ports, 1 x M.2 SATA slot |
| LAN | Realtek 10/100/1000 Mbps Ethernet |
| Audio | Realtek ALC 662 6-Channel High Definition Audio |
| Rear I/O Ports | 6 x USB 2.0 ports, 1 x HDMI port, 1 x VGA port, 1 x RJ-45 port, 1 x Audio Connector |
| Form Factor | Micro ATX |
| Item Weight | 610 Grams |
9. Warranty and Support
9.1 Warranty Information
This Duex motherboard comes with a warranty period of 365 days from the date of product receipt. This warranty covers manufacturing defects and ensures the product functions as intended under normal use. Please retain your proof of purchase for warranty claims.
9.2 Technical Support
For technical assistance, driver downloads, or further information, please visit the official Duex website. If you encounter issues that cannot be resolved using this manual, contact Duex customer support for expert assistance.