1. Introduction
The ASUS ROG Raikiri II is a versatile tri-mode gaming controller designed for use with Xbox Series X|S, PC, and the ROG Ally. It offers flexible connectivity options including wired USB-C, low-latency 2.4GHz RF, and Bluetooth. Key features include anti-drift TMR joysticks, dual-mode triggers, micro-switch buttons for tactile feedback, and a long-lasting battery. This manual provides essential information for setting up, operating, and maintaining your controller.

Image 1.1: The ASUS ROG Raikiri II Xbox Wireless Gaming Controller.
2. Package Contents
Verify that all items are present in your package:
- ROG Raikiri II Wireless Gaming Controller
- USB-C to USB-A Cable
- 2.4GHz RF Dongle
- Portable Protective Charging Case
- Charging Stand with Feet
- Extra High-Profile Joystick Caps (2)
- Quick Start Guide (this document)

Image 2.1: Included accessories: portable case, charging stand, and two detachable joystick caps.
3. Setup
3.1 Initial Charging
Before first use, fully charge the controller. Connect the USB-C cable to the controller and the USB-A end to a power source (e.g., PC, USB wall adapter). The LED indicator will show charging status.
3.2 Tri-Mode Connectivity
The ROG Raikiri II supports three connection modes:
- Wired USB-C: Connect the controller directly to your device using the provided USB-C cable. This mode is compatible with Xbox Series X|S, PC, and ROG Ally.
- 2.4GHz RF Wireless: Insert the 2.4GHz RF dongle into an available USB port on your PC, Xbox Series X|S, or ROG Ally. The controller will automatically pair. This mode offers ultra-low latency.
- Bluetooth: For Bluetooth connectivity, ensure your device has Bluetooth enabled. Put the controller into Bluetooth pairing mode (refer to the controller's specific button combination for pairing, usually a dedicated Bluetooth button or a combination of buttons). Select the controller from your device's Bluetooth settings to pair. This mode is compatible with PC and ROG Ally.
Note: Xbox consoles support USB-C and 2.4GHz RF connectivity only.

Image 3.1: Tri-mode connectivity options for the ROG Raikiri II controller.
4. Operating the Controller
4.1 TMR Joysticks
The controller features anti-drift TMR (Tunnel Magnetoresistance) joysticks, providing enhanced accuracy and reduced power consumption compared to traditional Hall Effect joysticks. These joysticks are designed for long-term reliability and precision.
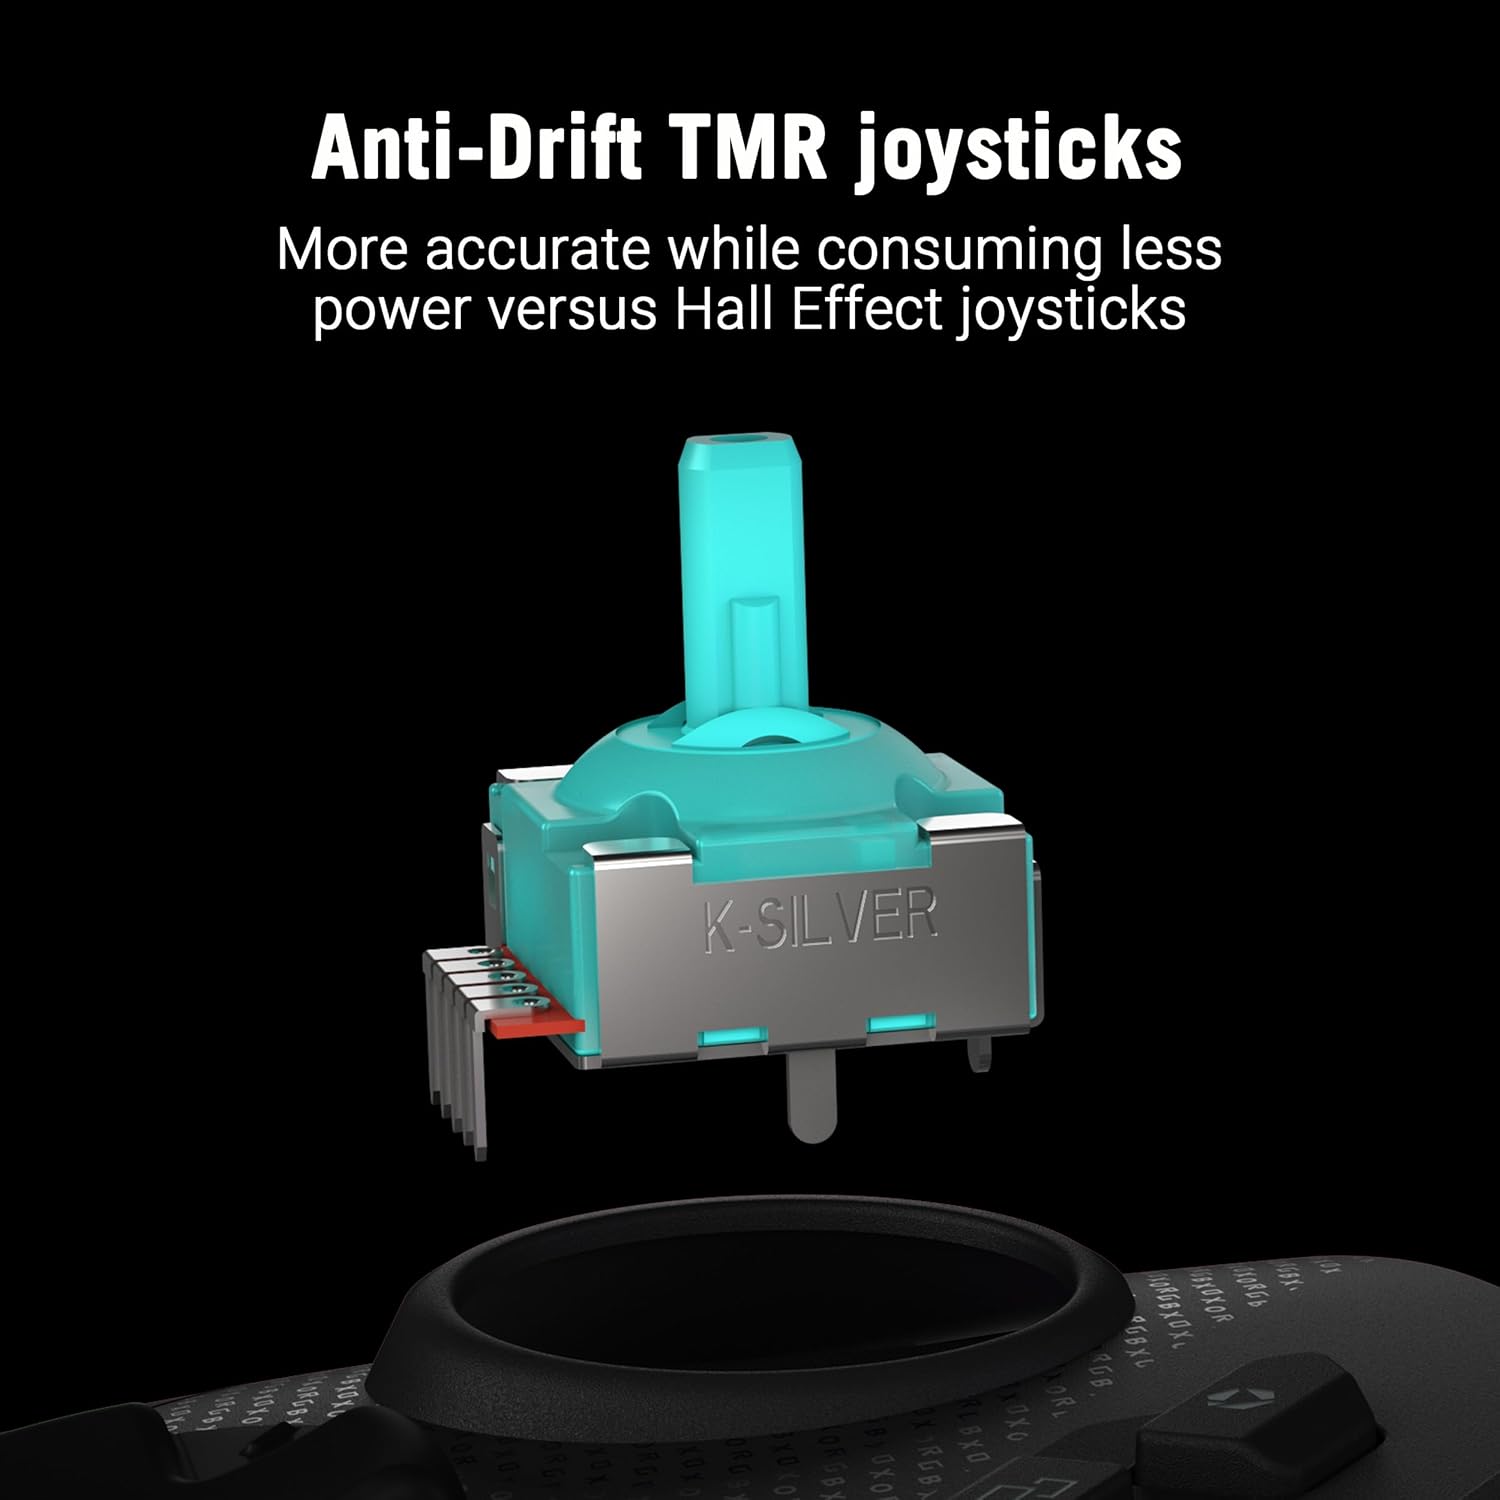
Image 4.1: Detailed view of an anti-drift TMR joystick module.
4.2 Dual-Mode Triggers
The triggers offer dual-mode functionality, allowing you to switch between short-travel micro-switch actuation and full-travel TMR sensor actuation. This provides flexibility for different game genres, such as quick shots in FPS games or precise acceleration control in racing games.

Image 4.2: The dual-mode triggers can be switched between short micro-switch and full TMR sensor modes.
4.3 Micro-Switch Buttons
The D-Pad, ABXY buttons, rear buttons, and bumpers utilize micro-switches for instant actuation and crisp, tactile feedback, ensuring every command is registered precisely.
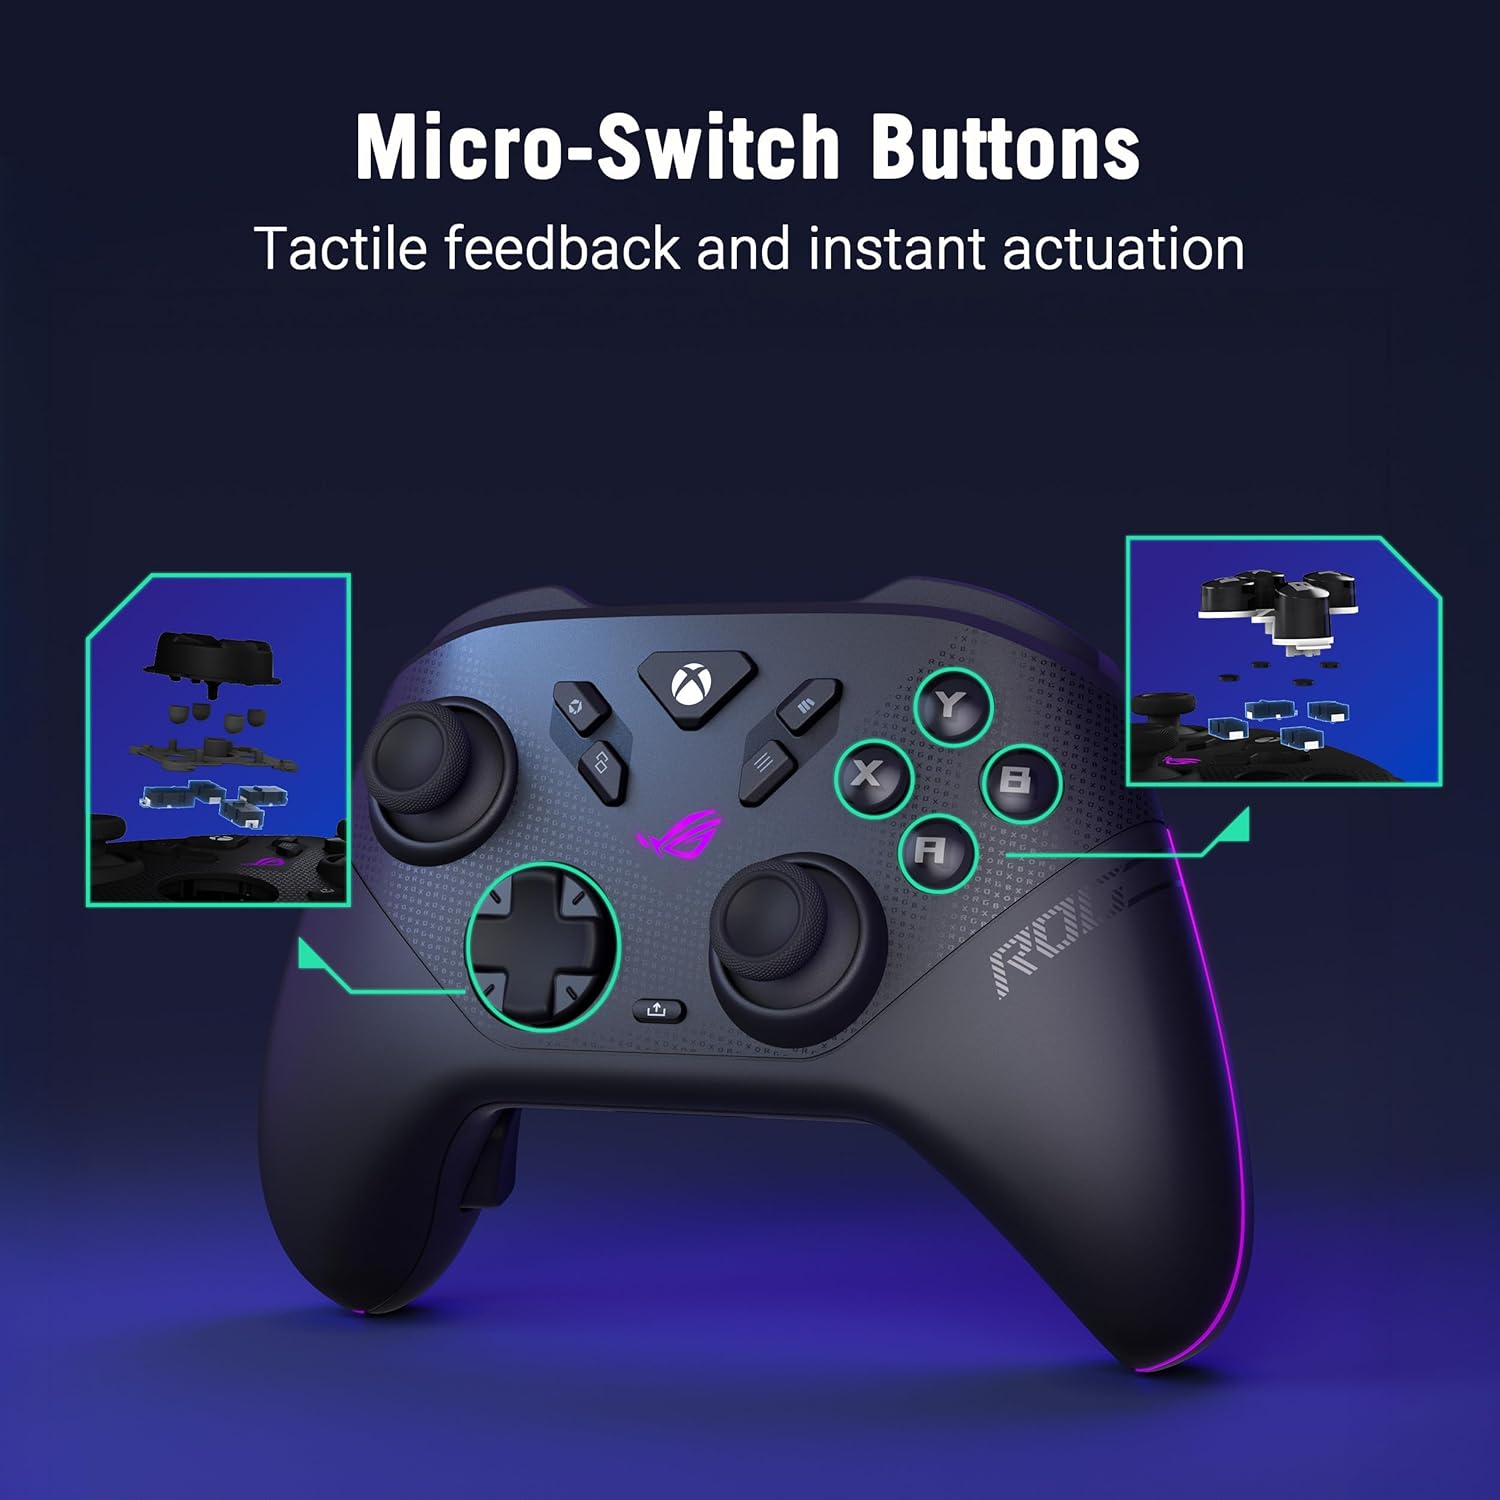
Image 4.3: Internal view highlighting the micro-switch buttons for tactile feedback.
4.4 Programmable Rear Buttons
The controller features four fully programmable rear buttons. These can be customized to perform various functions, allowing for advanced control and personalized gameplay. Refer to the web-based configuration tool for programming instructions.

Image 4.4: The four programmable rear buttons on the underside of the controller.
4.5 Web-Based Configuration (Gear Link)
Customize your controller settings, including button mapping, joystick dead zones, trigger sensitivity, and vibration intensity, using the web-based Gear Link configuration tool. Access this tool via a compatible web browser (e.g., Google Chrome, Microsoft Edge) on your PC. No software downloads are required.

Image 4.5: The web-based Gear Link interface for controller customization.
5. Maintenance
5.1 Cleaning
To clean the controller, use a soft, dry cloth. For stubborn dirt, slightly dampen the cloth with water. Avoid using harsh chemicals, solvents, or abrasive materials, as these can damage the controller's finish and internal components.
5.2 Battery Care
The controller features an integrated rechargeable battery providing up to 50 hours of wireless play (with RGB, audio, and vibration off). To prolong battery life:
- Avoid fully discharging the battery frequently.
- Store the controller in a cool, dry place when not in use.
- If storing for an extended period, charge the battery to approximately 50% capacity.

Image 5.1: The controller on its charging stand, highlighting its extended battery life.
5.3 Storage
Use the provided portable protective charging case to store the controller and its accessories when traveling or not in use. This protects the controller from dust, scratches, and impacts.

Image 5.2: The controller fits securely within its protective travel case.
6. Troubleshooting
6.1 Controller Not Connecting
- Wired: Ensure the USB-C cable is securely connected to both the controller and your device. Try a different USB port or cable.
- 2.4GHz RF: Verify the RF dongle is fully inserted into a USB port. Ensure the controller is powered on and within range. Re-pair if necessary by pressing the pairing button on the dongle and controller.
- Bluetooth: Confirm Bluetooth is enabled on your device. Put the controller into pairing mode and select it from your device's Bluetooth list. Ensure no other devices are interfering with the Bluetooth signal.
6.2 Web-Based Configuration (Gear Link) Issues
- Ensure you are using a compatible web browser such as Google Chrome or Microsoft Edge.
- Verify your internet connection is stable.
- Clear your browser's cache and cookies, or try accessing Gear Link in an incognito/private browsing window.
- Ensure JavaScript is enabled in your browser settings for the Gear Link website.
6.3 Stick Drift or Clicking Noise
- While TMR joysticks are designed to prevent drift, minor clicking noises can sometimes occur. If performance is affected, ensure the joystick caps are properly seated.
- If you experience significant stick drift or unresponsive movement, try recalibrating the joysticks through the Gear Link web interface.
6.4 Firmware Update Failures
- Ensure the controller is connected via USB-C to your PC during firmware updates.
- Maintain a stable internet connection.
- Temporarily disable any antivirus or firewall software that might interfere with the update process.
- If an update fails, restart your PC and the controller, then attempt the update again.
7. Specifications
| Feature | Detail |
|---|---|
| Brand | ASUS |
| Model | ROG Raikiri II |
| Connectivity | USB-C, 2.4GHz RF, Bluetooth |
| Compatibility | Xbox Series X|S, PC, ROG Ally |
| Joysticks | Anti-Drift TMR |
| Triggers | Dual-Mode (Micro-Switch / TMR Sensor) |
| Buttons | Micro-Switch D-Pad, ABXY, Rear Buttons, Bumpers |
| Programmable Buttons | 4 Rear Buttons |
| Polling Rate | 1000Hz (PC mode with ROG SpeedNova) |
| Battery Life | Up to 50 hours (2.4GHz wireless, RGB/audio/vibration off) |
| Color | Black |
| Item Weight | 9.6 ounces |
| Dimensions | 6.1 x 4.1 x 2.6 inches |
| UPC | 199291150201 |
8. Warranty Information
The ASUS ROG Raikiri II Wireless Gaming Controller comes with a 1-year limited warranty from the date of purchase. This warranty covers manufacturing defects and workmanship under normal use. It does not cover damage caused by misuse, accidents, unauthorized modifications, or natural disasters. Please retain your proof of purchase for warranty claims.
9. Support
For further assistance, technical support, or to download the latest drivers and firmware updates, please visit the official ASUS support website. You can find detailed FAQs and contact information for customer service there.
ASUS Support Website: www.asus.com/support/


