1. Introduction and Overview
The MELLCOM 3-in-1 Pizza Griddle Grill Combo is a versatile outdoor cooking appliance designed for grilling, griddling, and baking pizzas. It features a robust stainless steel construction with five main burners and one side burner, providing a total of 74,000 BTU for efficient and even heating. This unit offers a large cooking capacity and convenient storage solutions for your outdoor cooking needs.

Image: The MELLCOM 3-in-1 Pizza Griddle Grill Combo, showcasing its full assembly and various cooking zones.
- 3-in-1 Cooking Zone: The left side of the grill is a convertible zone, allowing easy switching between a grill, flat griddle, or pizza oven. All three accessories are included.
- High-Performance Power: Equipped with five 10,000 BTU main burners and a dedicated 9,000 BTU side burner, totaling 74,000 BTU for fast pre-heating and consistent cooking results.
- Large Cooking Capacity: Offers a primary grill area, a 3-in-1 zone, and a side burner, providing 652 square inches of cooking surface.
- Generous Storage Space: Features a convenient bottom shelf with push-pull dual doors for organizing grilling tools and a dedicated space for a propane tank.
- Durable Grates: Upgraded porcelain-enameled cast iron grates ensure even heating, durability, and easy cleanup.
2. Setup and Assembly
This appliance requires assembly. It is recommended that two people assist with the assembly process due to the size and weight of the components. Ensure all parts are present before beginning assembly. Refer to the detailed assembly instructions provided in the packaging for step-by-step guidance.
2.1 Propane Tank Connection
The grill is designed to securely hold a standard propane tank within its cabinet. A cutout at the bottom of the cabinet ensures the tank fits perfectly and remains stable. A screw on the opposite side helps secure the propane tank in place.

Image: The spacious storage cabinet with dual doors, designed to house a propane tank and other grilling accessories. Features lockable casters for mobility and stability.
- Open the cabinet doors located at the bottom of the grill.
- Carefully place the propane tank into the designated cutout at the bottom of the cabinet.
- Secure the propane tank using the provided screw mechanism on the side of the cabinet to prevent movement.
- Connect the gas hose from the grill to the propane tank, ensuring a tight and secure connection.
- Before operating, turn the gas valve on the propane tank to the open position.
2.2 Mobility and Stability
The grill is equipped with four casters for easy movement. Two of these casters are lockable to ensure stability during use.
- To move the grill, unlock the two lockable casters.
- Once the grill is in the desired position, engage the locks on the casters to prevent accidental movement.
3. Operating Instructions
3.1 Main Grill Operation
The main grilling area features porcelain-enameled cast iron grates and five main burners for direct and indirect cooking.

Image: The extensive primary cooking area, highlighting the grill grates and warming rack, suitable for various foods.
- Ensure the propane tank valve is open.
- Open the grill lid.
- Push in and turn a burner control knob to the 'MAX' position. The integrated igniter will light the burner.
- Repeat for additional burners as needed.
- Close the lid to preheat the grill. Monitor the built-in thermometer on the lid for desired temperature.
- Adjust burner knobs to control heat levels.
- After cooking, turn all burner knobs to 'OFF' and close the propane tank valve.
3.2 3-in-1 Convertible Zone (Pizza Oven, Griddle, Grill)
This versatile zone allows you to switch between a pizza oven, flat griddle, or a standard grill section by interchanging the included accessories.

Image: The 3-in-1 multi-function zone, illustrating its capability to transform into a pizza oven, griddle, or standard grill for diverse cooking methods.
- To change the cooking surface, lift and remove the current accessory (e.g., grill grate).
- Insert the desired accessory (pizza oven with stone, or flat griddle) into the designated slot.
- Ignite the burner beneath this zone using the control knob.
- For the pizza oven, allow it to preheat to the desired temperature, monitoring the integrated thermometer.
- For the griddle, ensure it is properly heated before placing food. The griddle includes a grease spout for drainage.
3.3 Side Burner Operation
The dedicated side burner is ideal for preparing sauces, boiling water, or frying foods without occupying the main grilling surface.

Image: A detailed view of the five main burners and the 9,000 BTU side burner, illustrating the powerful and even heat distribution.
- Lift the cover of the side burner.
- Push in and turn the side burner control knob to the 'MAX' position. The igniter will light the burner.
- Place cookware on the burner grate.
- Adjust the flame as needed.
- After use, turn the control knob to 'OFF' and close the side burner cover.
4. Maintenance and Cleaning
Regular maintenance ensures the longevity and optimal performance of your grill. Always allow the grill to cool completely before cleaning.
4.1 Grease Management
The grill features removable drip trays and grease cups to collect drippings, making cleanup easier.
- After the grill has cooled, pull out the drip trays located beneath the main cooking area.
- Remove the grease cups attached to the drip trays.
- Empty the collected grease and wash the drip trays and cups with warm, soapy water. Rinse thoroughly and dry before replacing.
4.2 Grate Cleaning
The porcelain-enameled cast iron grates should be cleaned after each use.
- While the grates are still warm (but not hot), use a grill brush to remove any food residue.
- For deeper cleaning, remove the grates and wash them with warm, soapy water. Avoid abrasive cleaners that can damage the enamel.
4.3 Exterior Cleaning
Wipe down the stainless steel surfaces and painted parts with a damp cloth and mild detergent. Dry thoroughly to prevent water spots and corrosion.
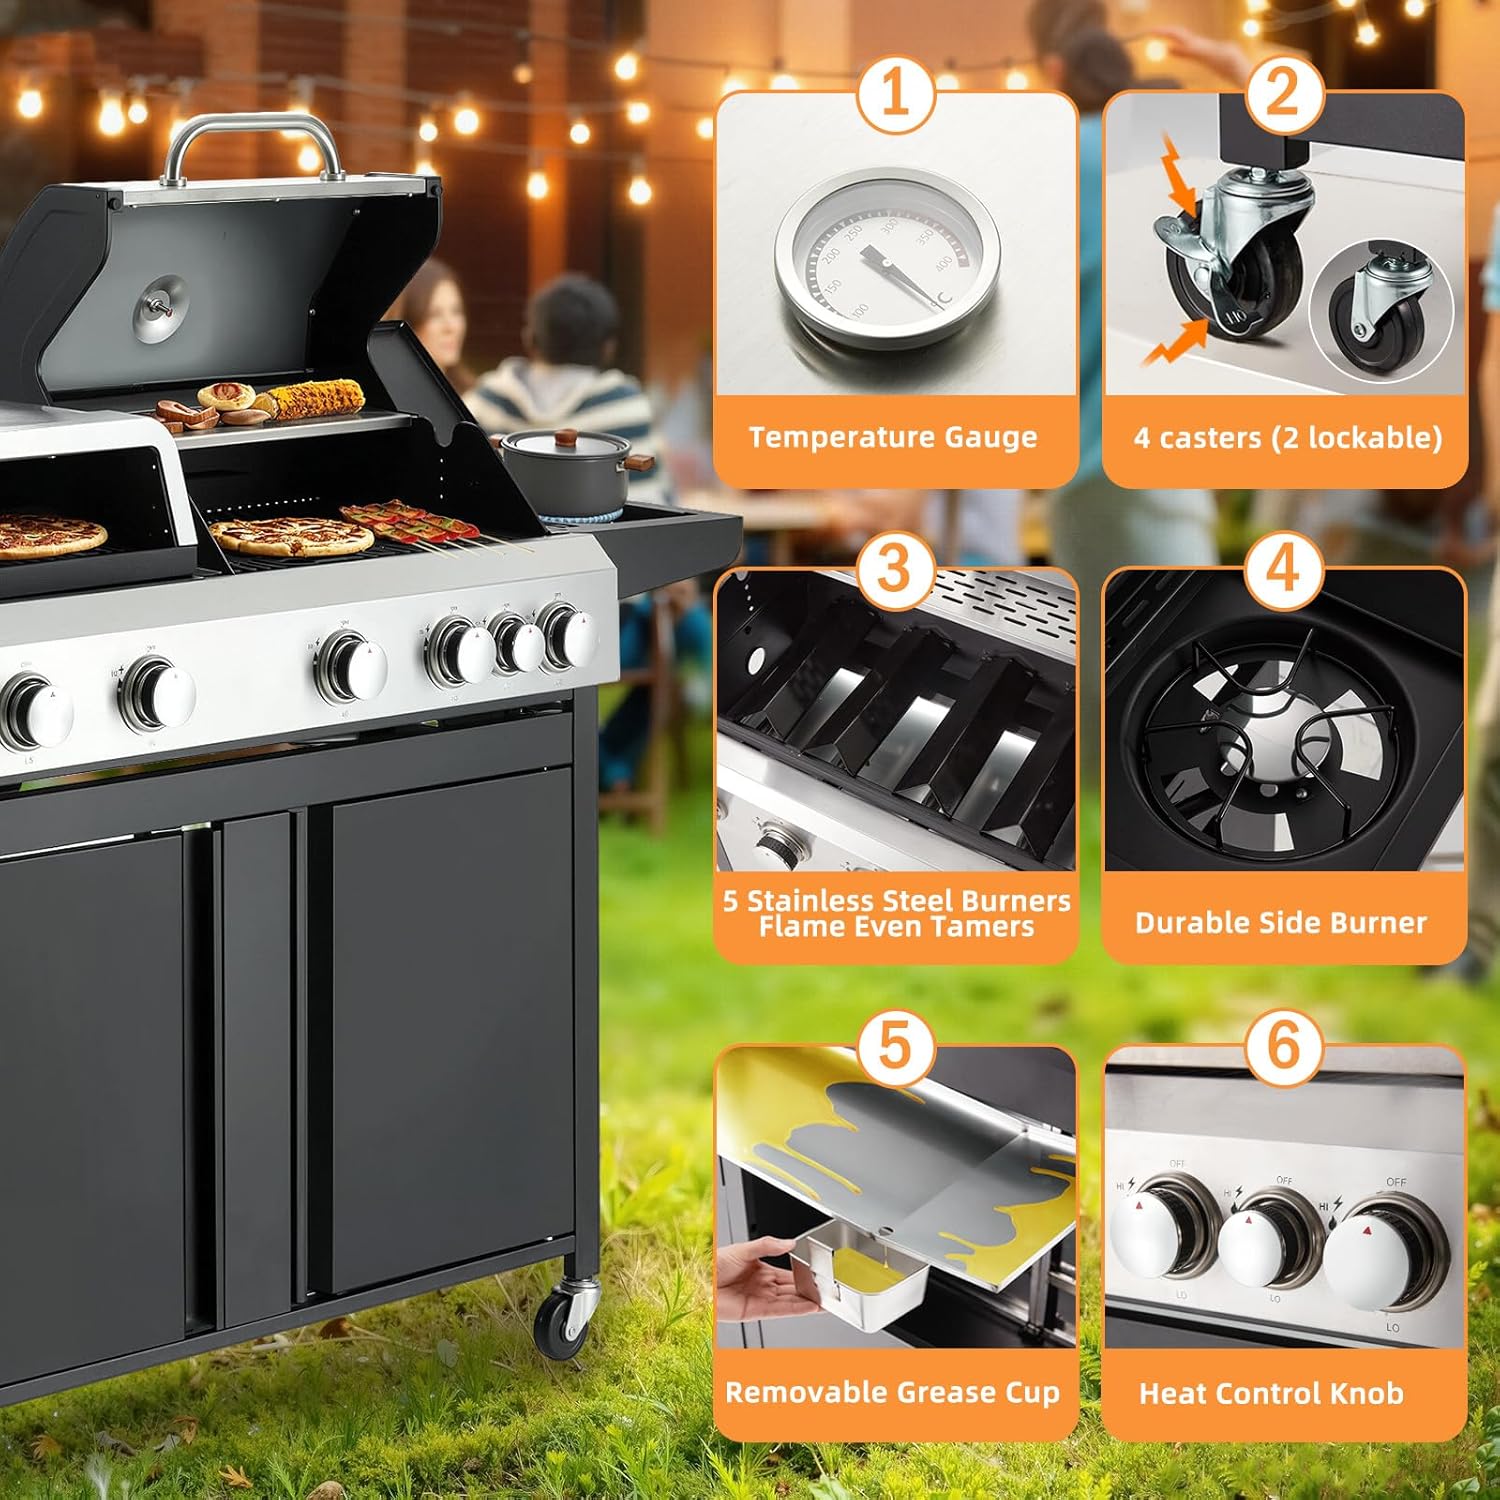
Image: Key components of the grill, including the temperature gauge, lockable casters, stainless steel burners, durable side burner, removable grease cup, and heat control knobs.
5. Troubleshooting
If you encounter issues with your grill, review the following common troubleshooting steps. For problems not listed here, contact customer support.
5.1 Burner Not Lighting
- Ensure the propane tank valve is fully open.
- Check for sufficient propane in the tank.
- Verify that the burner control knob is pushed in and turned to the 'MAX' position during ignition.
- Inspect the igniter electrode and burner ports for blockages or damage.
5.2 Uneven Heating
- Clean the burner ports to ensure even gas flow.
- Ensure the grill is level.
- Preheat the grill with the lid closed for at least 10-15 minutes to allow heat to distribute evenly.
6. Specifications
| Feature | Detail |
|---|---|
| Brand | MELLCOM |
| Model Number | B0G35293Q6 |
| Product Dimensions | 19.29"D x 45.28"W x 61.81"H |
| Fuel Type | Propane Gas |
| Total BTU | 74,000 BTU |
| Main Burner Count | 5 (10,000 BTU each) |
| Side Burner Count | 1 (9,000 BTU) |
| Cooking Surface Area | 652 Square Inches |
| Material Type | Cast Iron, Stainless Steel |
| Special Features | Built-In Thermometer, 3-in-1 Cooking System (Griddle, Grill, Pizza Oven), Casters |
| Installation Type | Free Standing |
| Included Components | Pizza Oven, Griddle, Grill, Built-In Thermometer, Grates, Handles |
7. Warranty and Support
For warranty information, please refer to the documentation included with your product at the time of purchase. If you require technical assistance, replacement parts, or have questions regarding your MELLCOM 3-in-1 Pizza Griddle Grill Combo, please contact MELLCOM customer support through their official website or the retailer where the product was purchased.