1. Product Overview
The IBKINXX DLN-48 Incubator is designed for efficient and successful hatching of various poultry eggs. It features advanced control technology to maintain stable temperature and humidity, automatic egg turning, and a clear viewing dome for easy observation of the incubation process.
- Automatic Humidity Control: Precise water-drip mechanism ensures stable humidity levels.
- 360° Clear Viewing: Transparent cover and built-in egg candler allow full observation of embryo development.
- Horizontal Egg-Turning: Mimics natural hen behavior, promoting healthy embryo development and preventing adhesion.
- Adjustable Card Strips: Accommodates various egg sizes, from chicken to quail.
- External Water Inlet: Allows water replenishment without disturbing the internal environment.
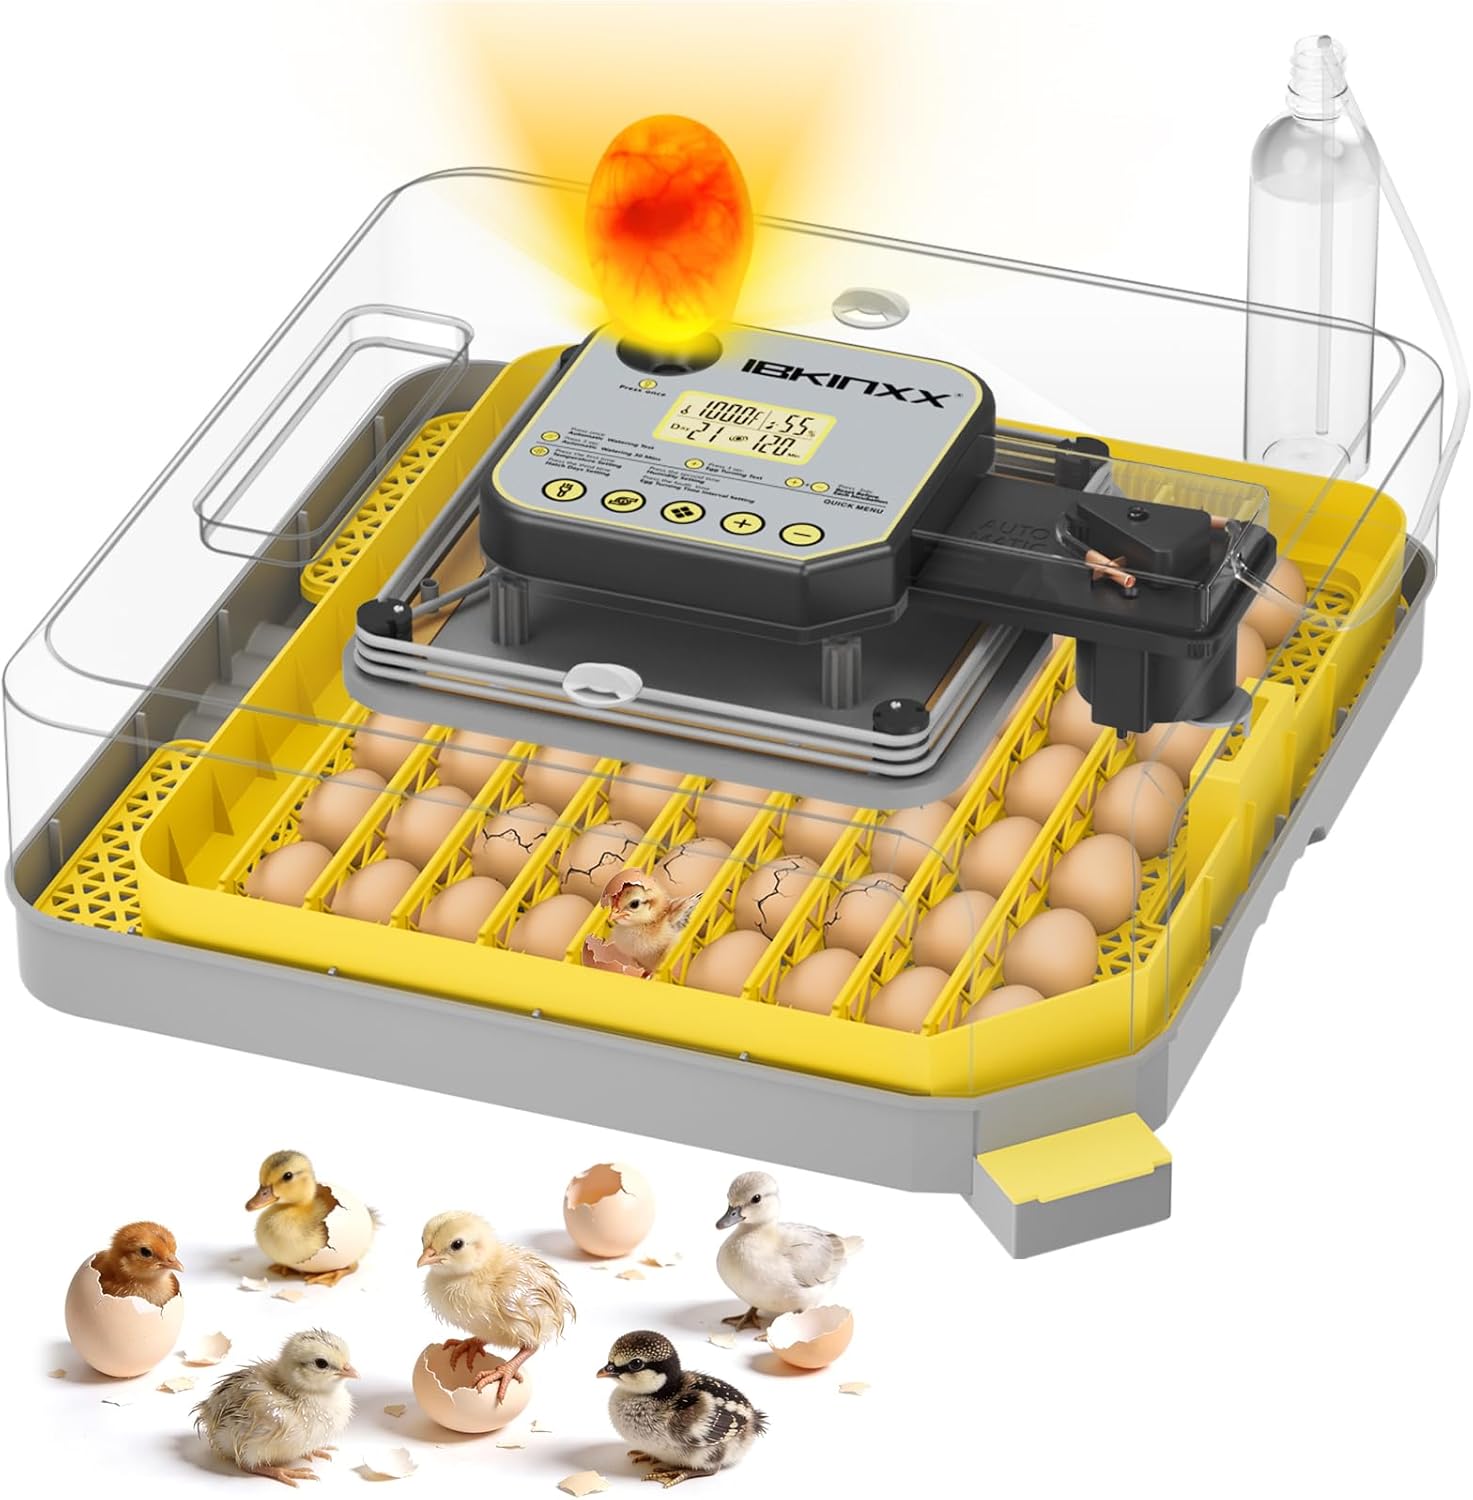
Figure 1: The IBKINXX DLN-48 Incubator with eggs, showcasing its transparent design.
2. Setup Instructions
2.1 Unboxing and Component Identification
Carefully remove all components from the packaging. Verify that all parts are present:
- Incubator Base
- Egg Frame with Adjustable Card Strips
- Transparent Upper Cover
- Control Unit (integrated)
- Water Bottle and Water Pipe
- Power Cord
- User Manual
- Foam Box (for insulation)

Figure 2: Exploded view of the incubator, showing all individual components for assembly.
2.2 Assembly
- Place the egg frame onto the incubator base.
- Insert the adjustable card strips into the egg frame slots, customizing the spacing based on egg size.
- Attach the transparent upper cover, ensuring it is securely fitted.
- Connect the water pipe from the external water bottle to the humidity control system.
2.3 Initial Power-On and Water Filling
- Connect the power cord to the incubator and a suitable power outlet. The control panel display will illuminate.
- Fill the external water bottle with distilled water and ensure the water pipe is properly connected to the incubator's humidity system. This allows for water replenishment without opening the lid.

Figure 3: The external water bottle connected to the incubator for convenient water refilling.
3. Operating Instructions
3.1 Control Panel Overview
The digital control panel allows for precise management of incubation parameters.

Figure 4: Detailed view of the control panel, showing temperature, humidity, and egg turning settings.
- Heating Indicator: Blinks when heating is active. Default temperature is 100°F, adjustable from 68-104°F.
- Humidity Indicator: Blinks when the humidity motor is running. Default humidity is 55%, adjustable from 20-75%.
- Hatching Day Display: Customizable, counts 24 hours as 1 day.
- Egg-Turning Countdown: Default interval is 120 minutes, adjustable from 60-210 minutes. Automatically stops turning in the last 3 days.
3.2 Setting Incubation Conditions
- Temperature Setting: Press the temperature setting button (first time) to adjust the desired temperature.
- Humidity Setting: Press the humidity setting button (second time) to adjust the desired humidity.
- Hatch Days Setting: Press the hatch days setting button (third time) to set the total incubation days.
- Egg Turning Time Interval Setting: Press the egg turning interval button (fourth time) to set the frequency of automatic egg rotation.
3.3 Egg Placement and Turning
Place fertilized eggs into the egg frame. The adjustable card strips allow for optimal spacing. The automatic egg turner will gently rotate the eggs at your set intervals.

Figure 5: Eggs positioned in the tray, demonstrating the 360° automatic egg turning feature.
Important: Remove the egg turner/egg frame in the last 3 days of incubation to stop spinning the eggs and allow chicks to settle for hatching.
3.4 Egg Candling
Use the built-in egg candler to observe embryo development without opening the incubator. Press the 'Press once' button on the control panel to activate the candler light.

Figure 6: The built-in egg candler illuminates eggs to check embryo viability and development.
3.5 Incubation Conditions for Different Eggs
The incubator can accommodate various egg types. Refer to the table below for recommended incubation conditions:
| Egg Type | Capacity | Incubation Days | Temperature (approx.) | Humidity (approx.) |
|---|---|---|---|---|
| Chicken Eggs | 48 | 21 | 100°F (37.8°C) | 55-70% |
| Duck Eggs | 45 | 28 | 100°F (37.8°C) | 60-75% |
| Goose Eggs | 20 | 30 | 99°F (37.1°C) | 65-80% |
| Quail Eggs | 90 | 18 | 101°F (38.5°C) | 55-70% |
| Pigeon Eggs | 90 | 19 | 100°F (37.8°C) | 55-70% |

Figure 7: Recommended incubation conditions and capacities for different poultry eggs.
3.6 Monitoring and Hatching
Regularly check the digital display for temperature and humidity readings. The clear dome allows for continuous observation of the hatching process. Ensure the environment remains stable for optimal results.
Video 1: An overview of the IBKINXX 48 Egg Incubator, demonstrating its features and operation.
Video 2: A detailed demonstration of the Incubator for Hatching Eggs-48 Egg Capacity, highlighting its ease of use and automatic functions.
4. Maintenance
4.1 Cleaning
After each incubation cycle, it is important to clean the incubator thoroughly to ensure hygiene and optimal performance for future use.
- Disconnect the power supply.
- Disassemble the egg frame, card strips, and base.
- Rinse the base, grid, egg frame, and card strips with clean water.
- Wipe down the transparent cover and control unit with a damp cloth. Do not immerse the control unit in water.
- Ensure all parts are completely dry before reassembly or storage.

Figure 8: Visual guide for disassembling and cleaning the incubator components.
4.2 Storage
Store the incubator in a clean, dry place away from direct sunlight and extreme temperatures when not in use.
5. Troubleshooting
If you encounter any issues with your IBKINXX DLN-48 Incubator, please refer to the following general troubleshooting tips:
- No Power: Check if the power cord is securely connected to both the incubator and the power outlet. Ensure the outlet is functional.
- Incorrect Temperature/Humidity Readings: Verify that the sensors are clean and unobstructed. Ensure the water reservoir has sufficient water.
- Egg Turning Malfunction: Check if the egg turning mechanism is properly installed and free from obstructions. Ensure the turning function is enabled in the settings.
- Poor Hatch Rate: Review your incubation settings (temperature, humidity, turning intervals) against the recommended values for your specific egg type. Ensure eggs are fresh and fertile.
For persistent issues, please contact customer support.
6. Specifications
- Model Number: DLN-48
- Brand: IBKINXX
- Egg Capacity: 48 Chicken Eggs (or equivalent for other species)
- Package Dimensions: 19 x 19 x 8 inches
- Item Weight: 10.48 pounds
- Manufacturer: IBKINXX
- Features: Automatic Egg Turner, Automatic Precision Humidity Control, 360° Clear Viewing, Built-in Egg Candler, External Water Inlet.
7. Warranty and Support
For warranty information, product support, or to purchase replacement parts, please visit the official IBKINXX website or contact their customer service department. Keep your purchase receipt for warranty claims.
IBKINXX Store: Visit the IBKINXX Store on Amazon