Introduction
This manual provides detailed instructions for the operation and maintenance of Singer Sewing Machine Models 127 and 128-3. These machines are designed to produce a reliable lock stitch and are suitable for general family use. Understanding the proper setup and care will ensure optimal performance and longevity of your sewing machine.
Please read all instructions carefully before operating the machine. Familiarize yourself with all parts and their functions to prevent injury and ensure correct usage.

Image: Cover of the instruction manual for Singer Sewing Machine Models 127 and 128-3. The cover displays the title and illustrations of the sewing machines.
Setup
Machine Placement
Place the sewing machine on a stable, level surface. Ensure adequate lighting for your work area. If your machine is treadle-operated, ensure the treadle mechanism is free from obstructions.
Winding the Bobbin
To wind the bobbin, first release the balance wheel (D, Fig. 3) to disengage the sewing mechanism. This allows the bobbin winder to operate independently. Follow the specific threading path for bobbin winding as indicated in your machine's design. Once the bobbin is full, re-engage the balance wheel.
Threading the Needle
Proper needle threading is crucial for stitch formation. Follow these steps:
- Place the spool of thread on the spool pin.
- Guide the thread through the upper tension discs.
- Pass the thread through the take-up lever.
- Thread the needle from front to back.

Image: Figure 11 from the manual, illustrating the path for threading the needle. Key points are numbered for clarity, showing the thread passing through various guides and tension points before reaching the needle.
Operating the Machine
Front View and Key Components
Familiarize yourself with the main components of your sewing machine:
- A: Presser Foot
- B: Presser Bar Lifter
- C: Feed Dogs
- D: Balance Wheel
- E: Spool Pin
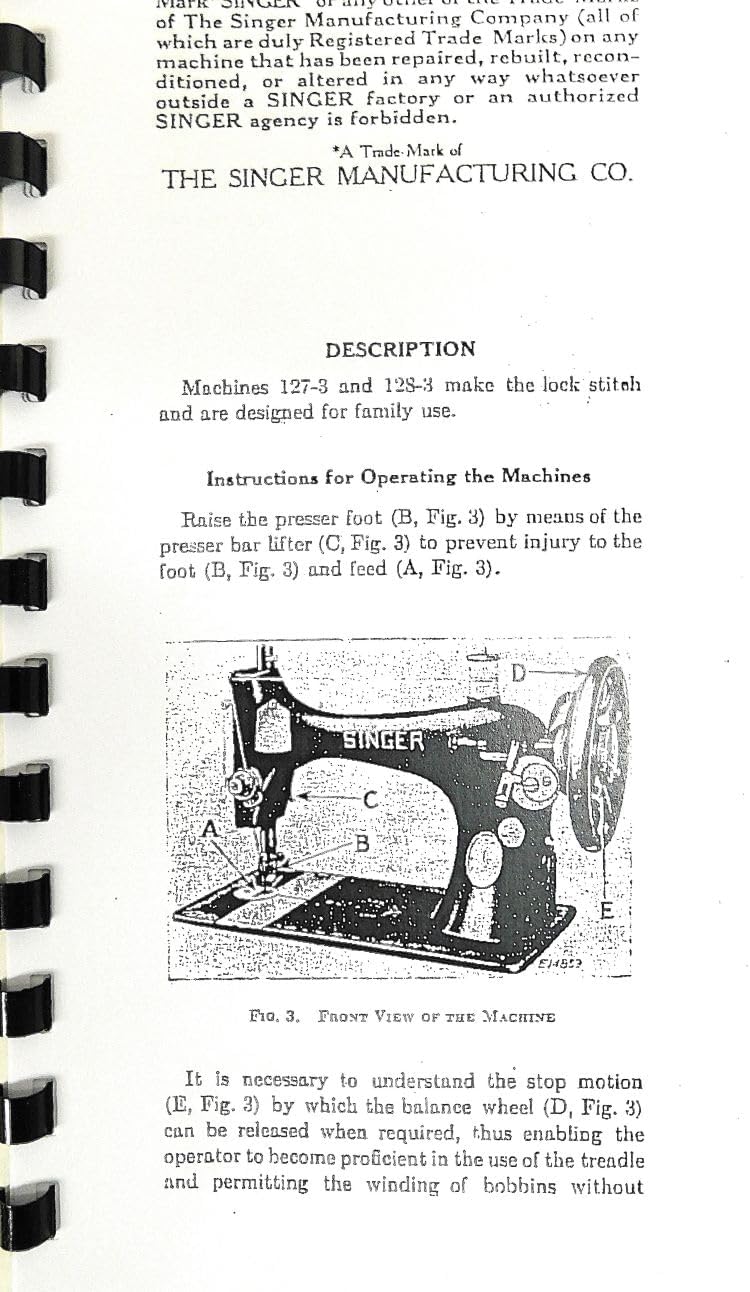
Image: Figure 3 from the manual, showing a front view of the Singer sewing machine with various parts labeled A through E, including the presser foot, presser bar lifter, feed, and balance wheel.
Starting to Sew
To begin sewing, raise the presser foot (B, Fig. 3) using the presser bar lifter. Place your fabric under the presser foot, aligning the edge with the desired seam allowance. Lower the presser foot onto the fabric. Begin operating the machine by turning the balance wheel towards you or by engaging the treadle/motor. Guide the fabric gently as the machine stitches.
Adjusting Stitch Length and Tension
Refer to your machine's specific controls for adjusting stitch length and thread tension. Proper tension is essential for a balanced stitch, where the upper and lower threads interlock evenly within the fabric layers.
Maintenance
Cleaning
Regular cleaning is vital for smooth operation. Use a small brush to remove lint and dust from the bobbin case, feed dogs, and other accessible areas. Avoid using harsh chemicals.
Oiling
Apply a small amount of good quality sewing machine oil to all moving parts as indicated in your machine's specific oiling points. Over-oiling can attract more lint, so use sparingly. Consult a detailed diagram for precise oiling locations.
Needle Replacement
Replace the needle regularly, especially if it becomes bent, dull, or if you experience skipped stitches. Always use the correct type and size of needle for your fabric and thread.
Troubleshooting
This section addresses common issues you might encounter:
- Skipped Stitches: Check if the needle is inserted correctly, if it's bent or dull, or if the thread is properly tensioned.
- Thread Breaking: Ensure the machine is threaded correctly, the tension is not too tight, and there are no burrs on the needle or thread guides.
- Uneven Stitches: Verify that the upper and lower thread tensions are balanced. Clean the feed dogs if they are clogged with lint.
- Machine Jamming: Stop immediately. Remove the fabric and check for tangled threads in the bobbin area or around the needle plate.
Specifications
- Models Covered: Singer 127, Singer 128-3
- Stitch Type: Lock Stitch
- Machine Type: Vibrating Shuttle
- Manufacturer: The Singer Manufacturing Co.
Support and Trademarks
The Singer Manufacturing Company holds registered trademarks for its products. Any repair, rebuild, recondition, or alteration of a Singer machine by unauthorized parties is strictly forbidden. For official support or inquiries, please contact The Singer Manufacturing Co.
This manual is a copy of the original instructions for the Singer 127 and 128-3 sewing machines.


