1. Introduction
Thank you for choosing the HOOBRO BK24UDJG01 Bar Cabinet. This manual provides essential information for the safe assembly, setup, operation, and maintenance of your new bar cabinet. Please read these instructions thoroughly before beginning assembly and retain them for future reference.
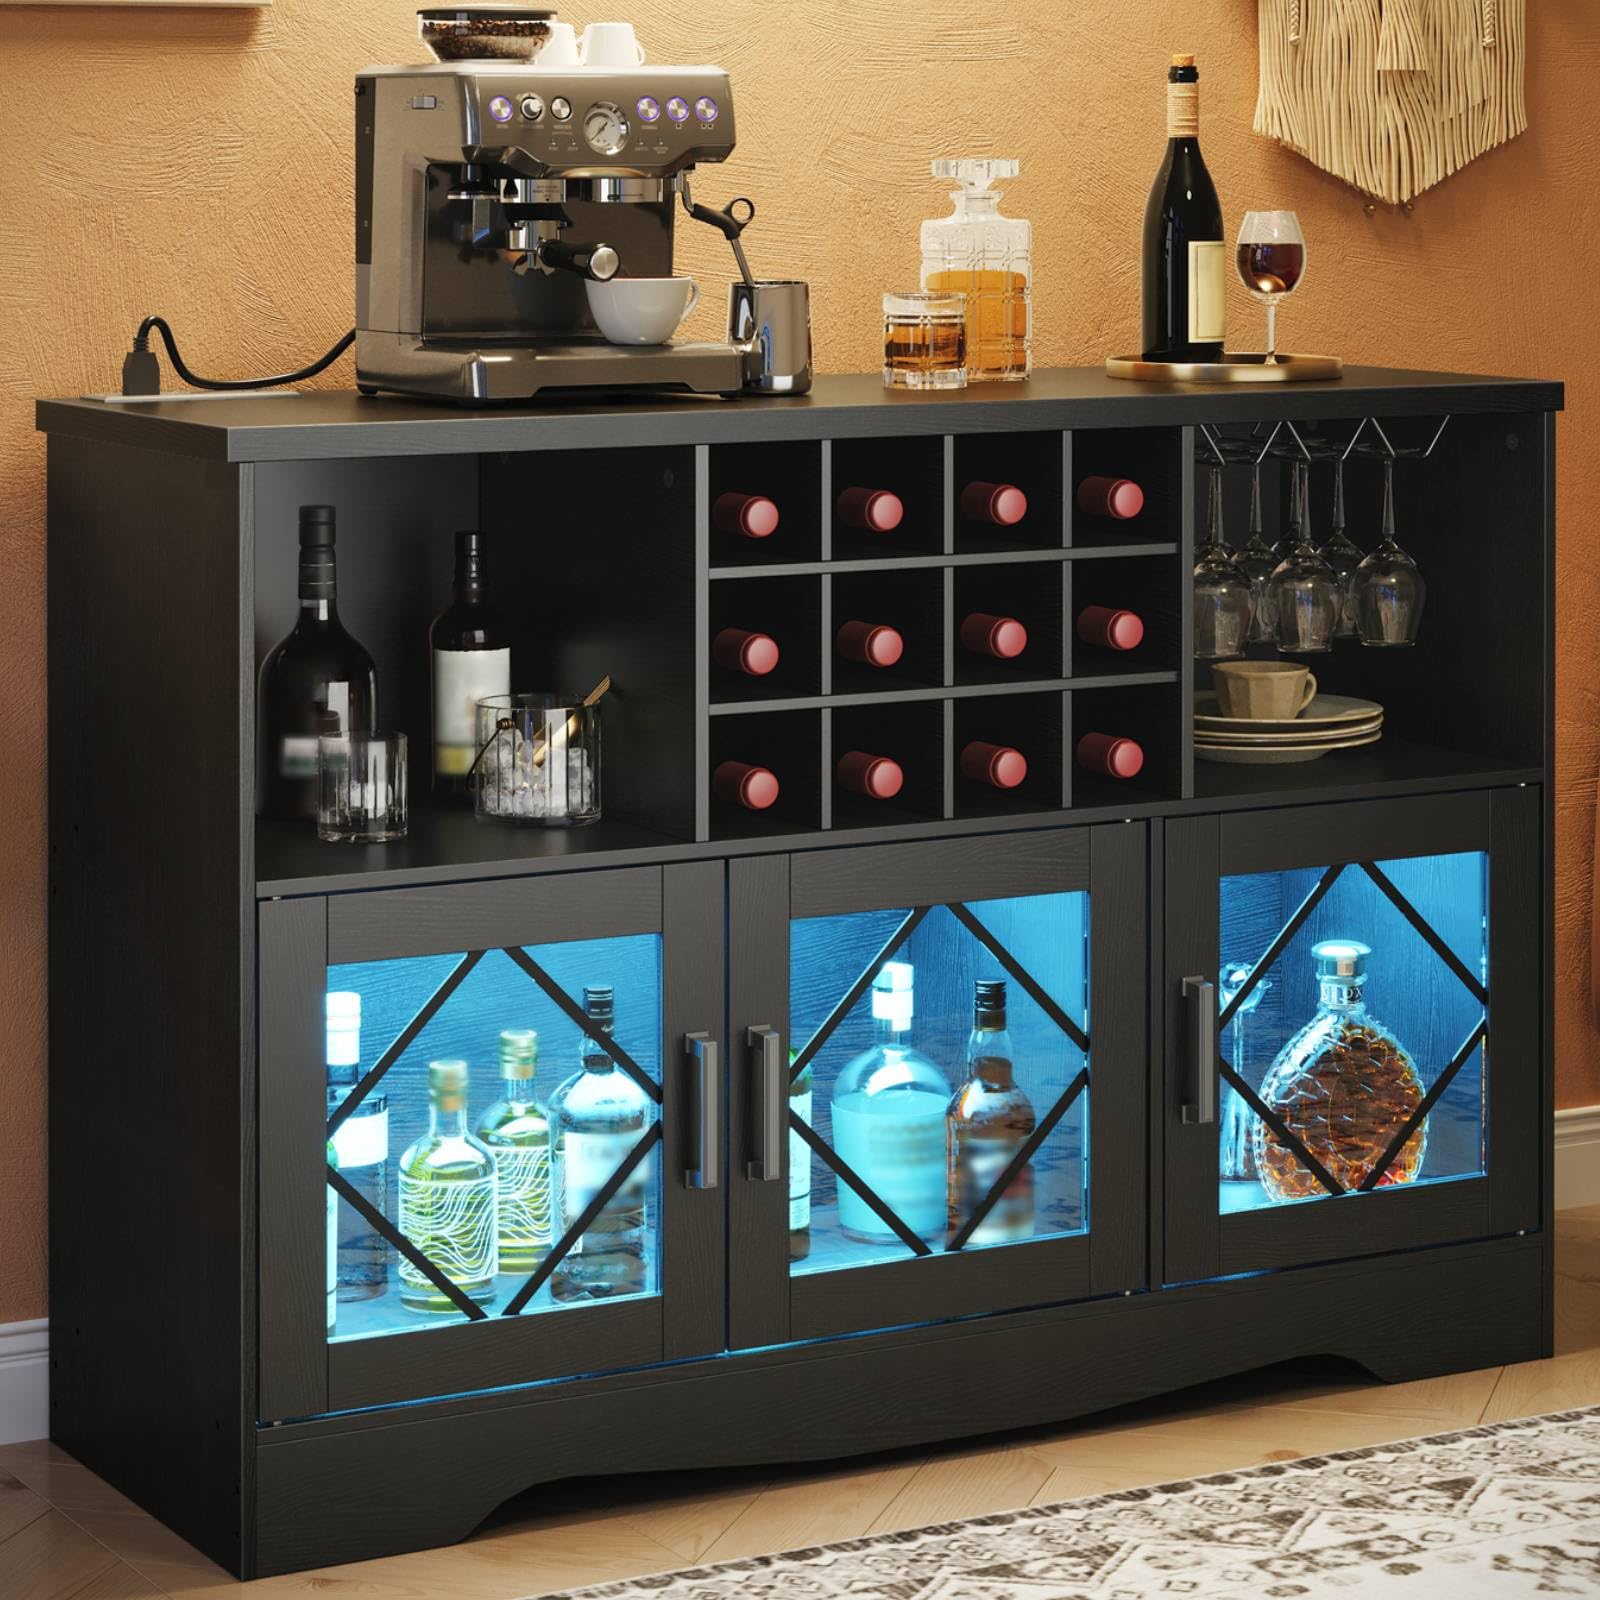
Image 1.1: The HOOBRO BK24UDJG01 Bar Cabinet, showcasing its design and storage capabilities.
2. Safety Information
To ensure safe use and prevent damage, please observe the following safety guidelines:
- Always follow the assembly instructions precisely.
- Position the cabinet away from direct water sources and open flames to prevent damage and fire hazards.
- Do not climb on or allow children to play on or around the cabinet.
- Secure the cabinet to the wall using the provided anti-tip kit to prevent accidental tipping, especially in households with children or pets.
- Do not exceed the maximum weight capacity of 77.2 pounds (35 kg) for the top surface.
- Ensure all electrical connections for the power outlet and LED lights are properly secured and meet local electrical codes.
3. Package Contents
Before assembly, verify that all components listed below are present and undamaged. If any parts are missing or damaged, contact customer support.
- Cabinet Panels (various sizes)
- Hardware and Fasteners (screws, dowels, cam locks, etc.)
- Accessory Kit
- Anti-Tip Kit
- Integrated Charging Station (with 2 AC outlets, 1 USB-A, 1 Type-C port)
- LED Light Strip
- Remote Control for LED Lights
- Assembly Instructions Manual
4. Assembly Instructions
Assembly of the HOOBRO BK24UDJG01 Bar Cabinet requires careful attention to detail. It is recommended that two adults perform the assembly.
- Preparation: Clear a spacious, clean, and level area for assembly. Lay out all components and hardware, comparing them against the parts list in the included assembly manual.
- Follow the Manual: Refer to the detailed, step-by-step assembly instructions provided in the separate manual included with your product. Each step is illustrated to guide you through the process.
- Secure Connections: Ensure all screws and fasteners are tightened securely, but do not overtighten, which could damage the engineered wood.
- Anti-Tip Kit Installation: Once the cabinet is fully assembled and in its final position, install the anti-tip kit as directed in the assembly manual. This is a critical safety step.

Image 4.1: Dimensional overview of the HOOBRO Bar Cabinet (15.7"D x 47.2"W x 32.3"H).
5. Setup
Proper placement and connection are essential for optimal functionality and safety.
- Placement: Place the assembled bar cabinet on a stable, level surface. Avoid areas with high humidity or direct sunlight, which can affect the material over time.
- Power Connection: Connect the power cord from the integrated charging station to a standard 120V AC wall outlet. Ensure the outlet is easily accessible.

Image 5.1: The integrated charging station, featuring 2 AC outlets, 1 USB-A, and 1 Type-C port.
6. Operating Instructions
6.1. Power Outlet Operation
The bar cabinet includes a built-in charging station for convenient power access.
- AC Outlets: Two 125V/12A AC outlets are available for small appliances like coffee makers or blenders.
- USB Ports: One 5V/2A USB-A port and one 5V/2A Type-C port are provided for charging mobile devices.
- Usage: Simply plug your devices into the appropriate ports. Ensure the cabinet's main power cord is connected to a wall outlet.

Image 6.1: Detailed view of the power outlet with AC, USB-A, and Type-C ports.
6.2. LED Light Operation
The integrated LED lights enhance the cabinet's aesthetic and illuminate its contents.
- Control: The LED lights can be controlled via the included remote control or a compatible smartphone application.
- Customization: Adjust colors, brightness, and flashing modes to suit your preference. Refer to the LED light strip's specific instructions for pairing with the app or using the remote.

Image 6.2: Adjustable LED lights with remote and app control for customizable ambiance.
6.3. Storage Features
The cabinet offers diverse storage options for your bar essentials.
- 12-Bottle Wine Rack: A dedicated section designed to securely hold up to 12 standard wine bottles.
- 3-Row Glass Holder: Located beneath the top shelf, this holder can accommodate up to 9 wine glasses for easy access and display.
- Enclosed Storage: Dual-door and single-door cabinets provide concealed storage for bottles, bar tools, or other items, protecting them from dust.
- Open Compartments: Additional open shelves offer space for decorative items or frequently used accessories.

Image 6.3: Detailed view of the 12-bottle wine rack and 3-row glass holder.
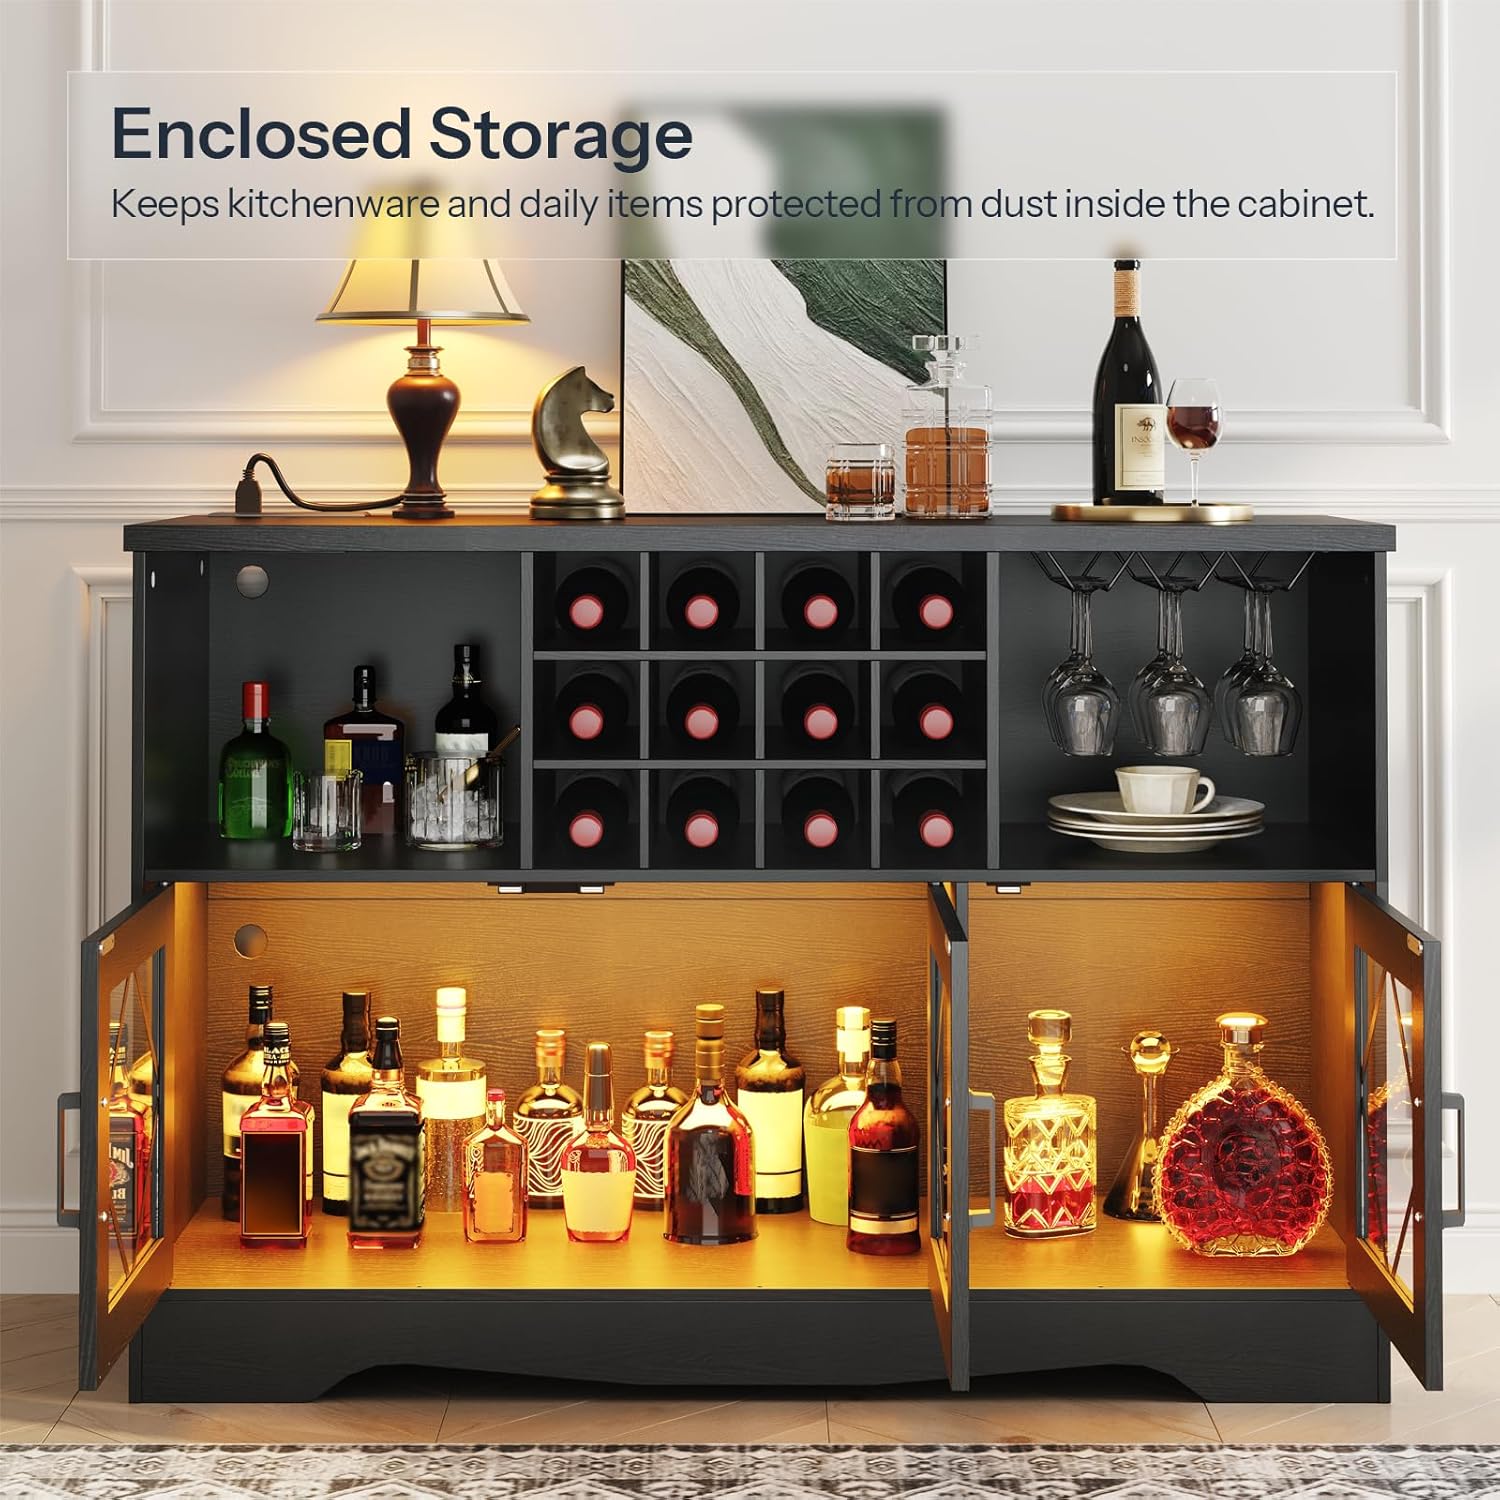
Image 6.4: Enclosed storage compartments with glass doors, ideal for protecting items from dust.
7. Maintenance
Regular maintenance will help preserve the appearance and longevity of your bar cabinet.
- Cleaning: Wipe surfaces with a soft, damp cloth. Avoid abrasive cleaners, harsh chemicals, or excessive moisture, which can damage the finish.
- Glass Care: Clean glass panels with a standard glass cleaner and a soft, lint-free cloth.
- Hardware: Periodically check and tighten all screws and fasteners to ensure stability.
- Electrical Components: Ensure the power cord and LED light connections are free from damage. Do not attempt to repair electrical components yourself.
8. Troubleshooting
If you encounter issues with your HOOBRO Bar Cabinet, refer to the following common solutions.
| Problem | Possible Cause | Solution |
|---|---|---|
| Cabinet is wobbly or unstable. | Loose fasteners; uneven floor; anti-tip kit not installed. | Check and tighten all screws. Ensure the cabinet is on a level surface. Install the anti-tip kit as per instructions. |
| LED lights are not turning on. | Power cord not connected; remote/app not paired; faulty light strip. | Ensure the cabinet's power cord is plugged in. Check the LED light strip's connection. Re-pair the remote/app if necessary. Contact support if the issue persists. |
| Power outlets are not working. | Cabinet power cord not connected; wall outlet issue. | Verify the cabinet's power cord is securely plugged into a functional wall outlet. Test the wall outlet with another device. |
9. Specifications
| Feature | Detail |
|---|---|
| Brand | HOOBRO |
| Model Number | BK24UDJG01 |
| Dimensions (D x W x H) | 15.7" x 47.2" x 32.3" (40cm x 120cm x 82cm) |
| Material | Engineered Wood, Glass |
| Color | Black |
| Weight Capacity (Top) | 77.2 lbs (35 kg) |
| Power Outlet | 2 AC Outlets (125V/12A), 1 USB-A Port (5V/2A), 1 Type-C Port (5V/2A) |
| Wine Bottle Capacity | 12 bottles |
| Glass Holder Capacity | 3 rows (up to 9 glasses) |
| Assembly Required | Yes |
10. Official Product Videos
Watch these official videos for a visual guide to the HOOBRO Bar Cabinet's features and functionality.
HOOBRO Wine Cabinet Overview
Video 10.1: This video provides a comprehensive overview of the HOOBRO Wine Cabinet, highlighting its design, storage solutions, and how it fits into various home environments like living rooms, bar areas, and dining rooms. It demonstrates the open shelves, enclosed storage, wine rack, and glass holders.
HOOBRO Bar Cabinet with Power Outlet Features
Video 10.2: This video focuses on the key features of the HOOBRO Bar Cabinet, including the integrated power outlet with AC and USB ports, the adjustable LED lighting system, and the various storage compartments like the wine rack and glass holders. It illustrates the convenience and versatility of the cabinet.
11. Warranty and Support
For warranty information, product support, or to report missing/damaged parts, please contact HOOBRO customer service directly. Refer to your purchase documentation or the HOOBRO official website for contact details.
HOOBRO US Customer Service: Visit the HOOBRO Store on Amazon


