1. Introduction
The TELESTAR FM-T2 is a versatile Bluetooth FM transmitter designed to enhance your in-car audio experience. It allows for wireless music streaming, hands-free calling, and fast charging of your mobile devices. This manual provides detailed instructions for setup, operation, and maintenance to ensure optimal performance and safety.
Please read this manual thoroughly before using the device and keep it for future reference.
2. Product Overview
2.1 Package Contents
- TELESTAR FM-T2 FM Transmitter
- User Manual
2.2 Key Features
- Bluetooth FM Transmitter for wireless audio streaming (87.5 – 108.0 MHz)
- Integrated microphone for hands-free calling
- Voice control compatibility (Siri, Google Assistant, Bixby)
- USB-A Quick Charge 3.0 port (18W)
- USB-C Power Delivery port (30W)
- Adjustable multi-color LED ambient lighting (Rainbow, Breathing modes)
- LED display for FM frequency and vehicle voltage
- Compact design (44 × 78 × 43 mm, 37 g)
- Input voltage: 12V – 24V (suitable for cars, vans, trucks)
2.3 Device Layout
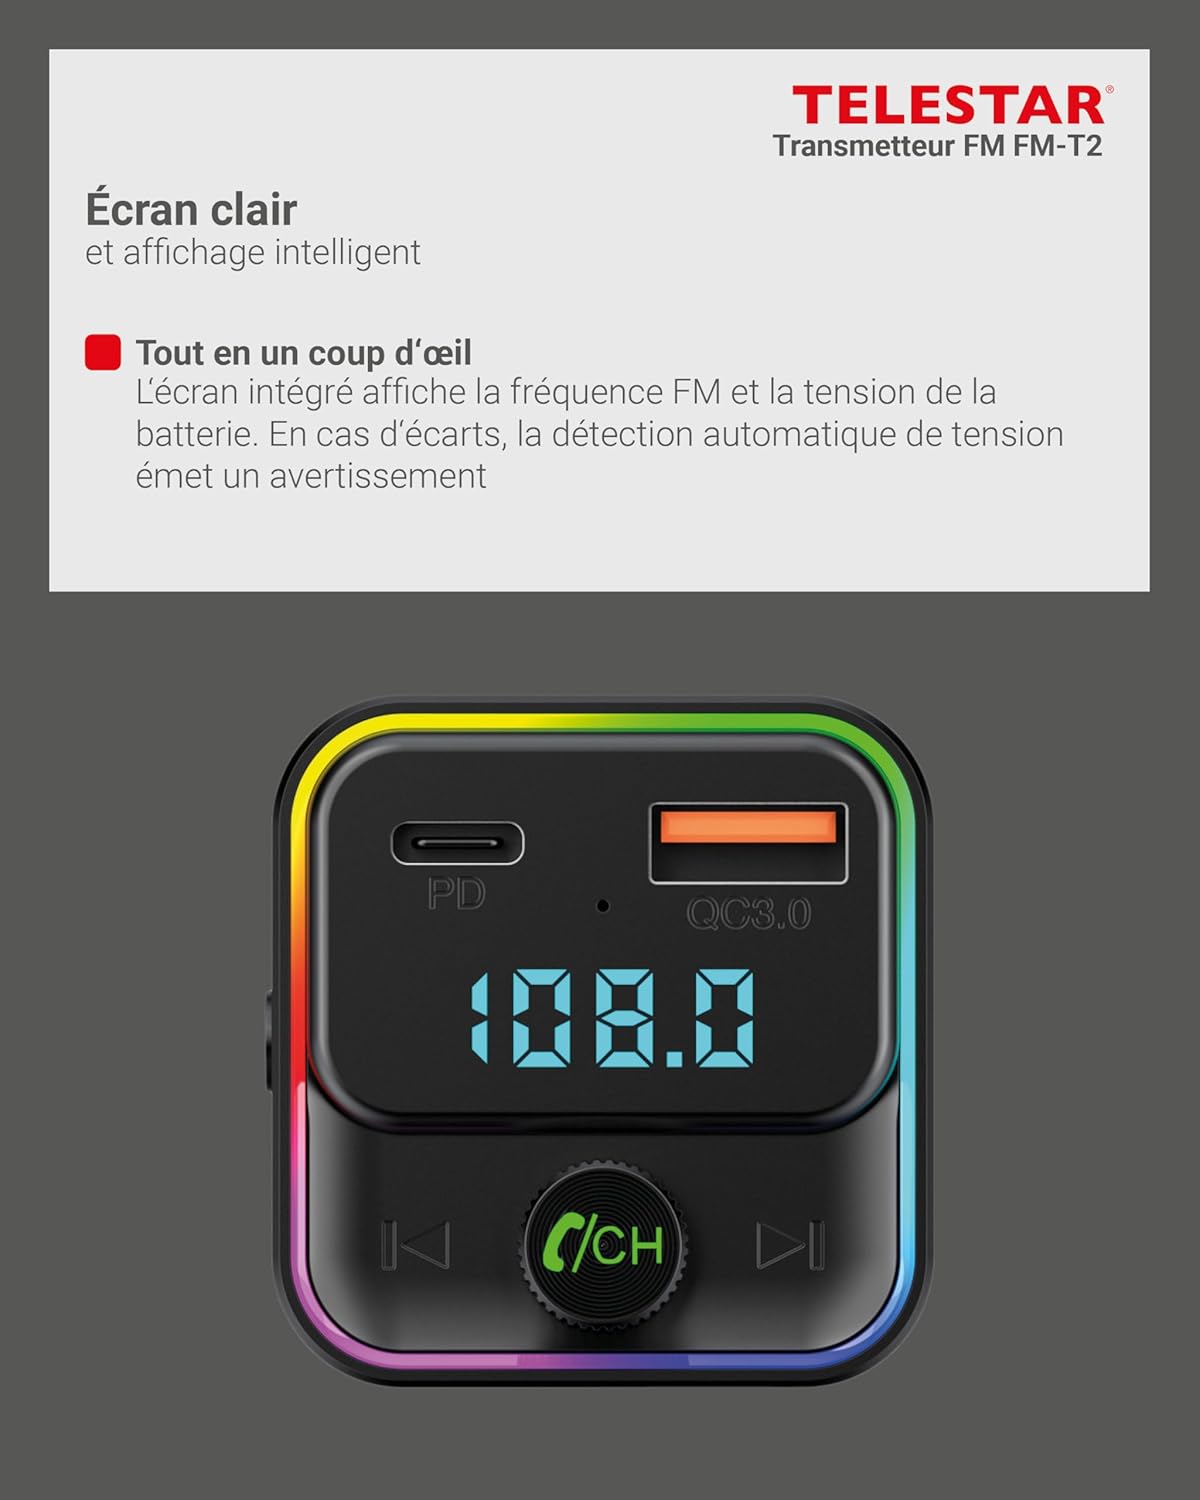
- USB-C (PD) Port: Power Delivery charging port.
- USB-A 3.0 (QC) Port: Quick Charge 3.0 charging port.
- LED Screen: Displays FM frequency and vehicle voltage.
- Multifunction Button: Used for frequency adjustment, volume control, and call management.
- Lighting Button: Controls LED ambient lighting modes.
- Microphone: For hands-free calls and voice assistant commands.
3. Setup
3.1 Initial Installation
- Insert the TELESTAR FM-T2 into your vehicle's 12V-24V cigarette lighter socket. The device will power on automatically, and the LED display will light up.
- The LED display will show the current vehicle voltage for a few seconds, then switch to the FM frequency.
3.2 Pairing with Your Device (Bluetooth)
- On your smartphone or other Bluetooth-enabled device, enable Bluetooth.
- Search for available Bluetooth devices and select "FM-T2" from the list.
- Once paired, the device will confirm the connection, and you can now stream audio wirelessly.
3.3 Setting the FM Frequency
- Tune your car radio to an unused FM frequency (one with static or no broadcast).
- On the FM-T2, press and hold the multifunction button until the FM frequency on the LED display starts flashing.
- Rotate the multifunction button left or right to adjust the FM frequency of the transmitter to match your car radio's frequency.
- Once matched, press the multifunction button again to confirm the frequency, or wait a few seconds for it to set automatically.
- For best audio quality, choose a frequency that is clear and free from interference.
4. Operating Instructions
4.1 Music Playback
- After successful Bluetooth pairing and FM frequency matching, open your music player on your smartphone.
- Music will be streamed wirelessly from your phone to your car radio via the selected FM frequency.
- Play/Pause: Short press the multifunction button.
- Next Track: Short press the "Next" button (right arrow).
- Previous Track: Short press the "Previous" button (left arrow).
- Volume Adjustment: Rotate the multifunction button clockwise to increase volume, counter-clockwise to decrease volume. (Note: Adjust car radio volume first for optimal sound.)
4.2 Hands-Free Calling
The FM-T2 allows for safe hands-free communication while driving.

- Answer Call: Short press the multifunction button when an incoming call rings.
- End Call: Short press the multifunction button during a call.
- Reject Call: Press and hold the multifunction button for 2 seconds when an incoming call rings.
- Redial Last Number: Double-press the multifunction button.
- Switch to Private Mode: During a call, press and hold the multifunction button for 2 seconds to switch the call to your phone's speaker, and vice-versa.
4.3 Voice Assistant Activation
The FM-T2 supports voice assistants like Siri, Google Assistant, and Bixby.
- Activate Voice Assistant: Short press the "Lighting" button (next to the microphone icon) to activate your phone's voice assistant.
- You can then issue commands through the FM-T2's microphone.
4.4 Charging Devices
The FM-T2 features two fast-charging ports:
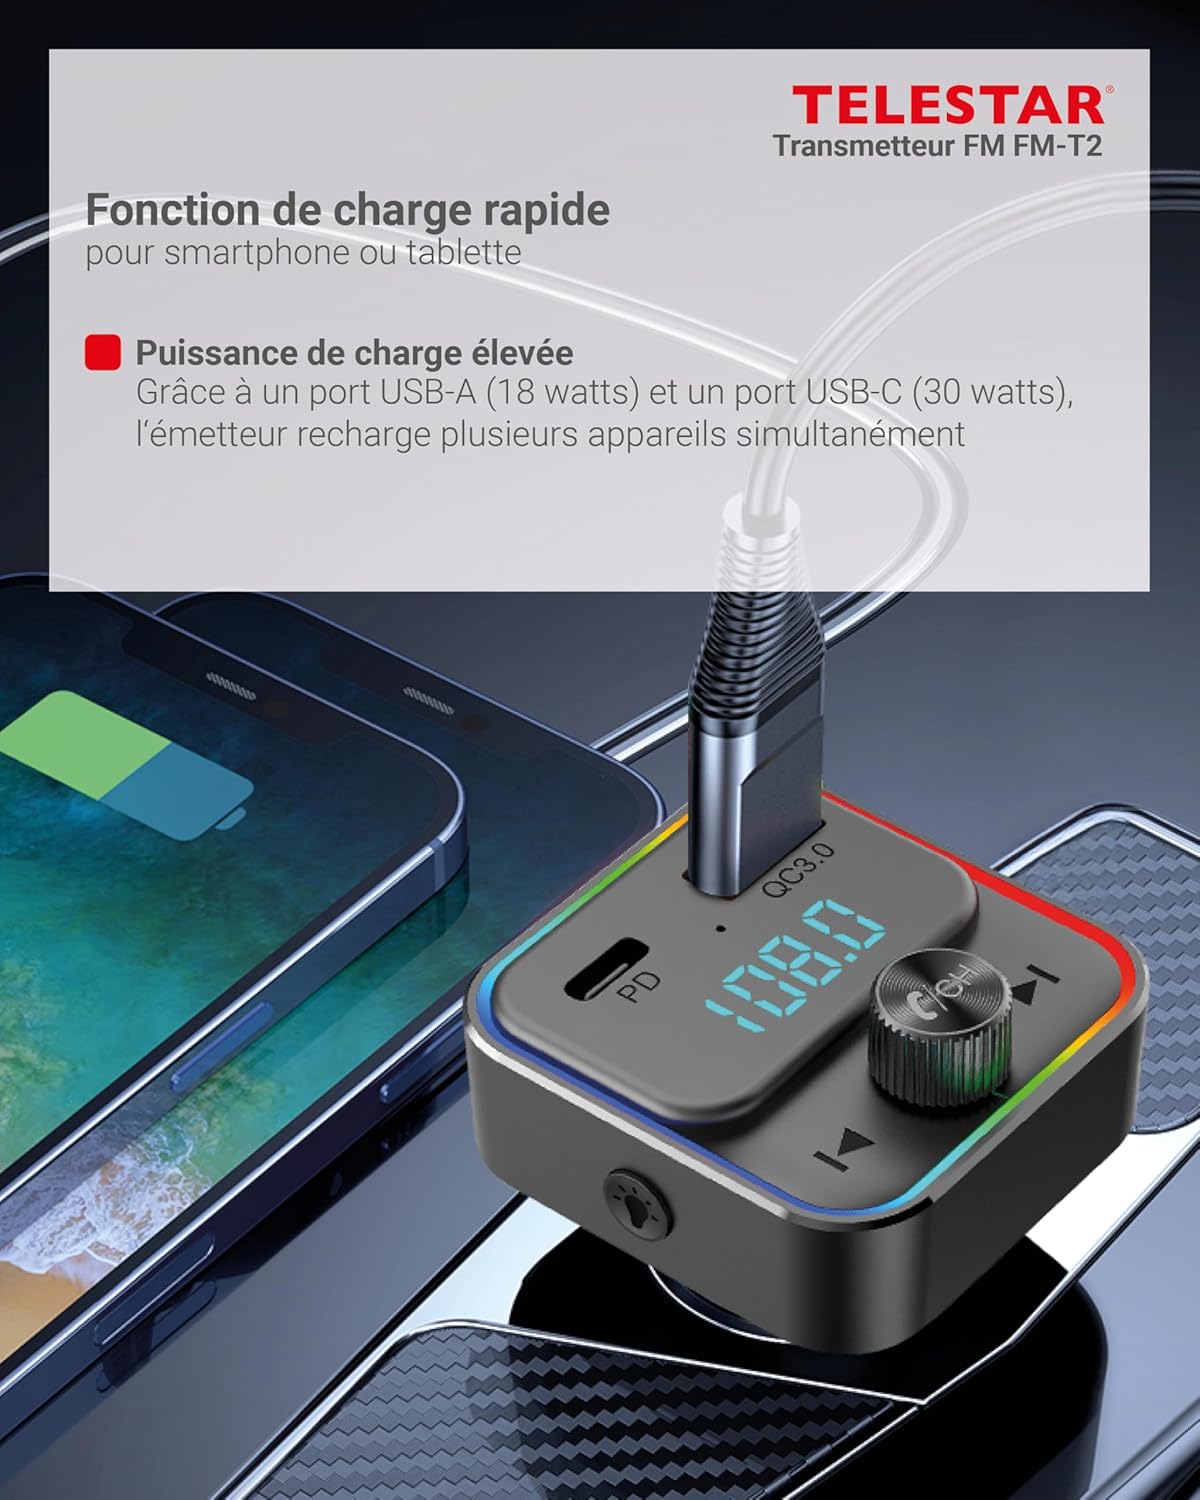
- USB-A 3.0 (QC) Port: Provides up to 18W output for Quick Charge compatible devices.
- USB-C (PD) Port: Provides up to 30W output for Power Delivery compatible devices.
- Connect your device's charging cable to the appropriate port on the FM-T2 to begin charging.
4.5 LED Ambient Lighting
The FM-T2 features adjustable LED lighting.
- Change Lighting Mode: Short press the "Lighting" button (next to the microphone icon) to cycle through different LED lighting modes (e.g., Rainbow, Breathing, static colors, off).
- The lighting can be adjusted to suit your preference or turned off.
5. Maintenance
- Keep the device dry. Moisture can damage the internal circuits.
- Do not expose the device to extreme temperatures.
- Do not drop, knock, or shake the device. Rough handling can break internal circuit boards.
- Clean the device with a soft, dry cloth. Do not use harsh chemicals or detergents.
- Ensure the cigarette lighter socket is clean and free of debris for optimal connection.
6. Troubleshooting
| Problem | Possible Cause | Solution |
|---|---|---|
| No power/Device not turning on. |
|
|
| Poor audio quality/Static. |
|
|
| Cannot pair via Bluetooth. |
|
|
| Charging is slow or not working. |
|
|
7. Specifications
| Brand | Telestar |
| Model Name | FM-T2 |
| Connectivity Technology | USB, Bluetooth |
| Wireless Communication Standard | Bluetooth |
| Bluetooth Version | 5.0 (based on Hardware Interface: Bluetooth 5) |
| Frequency Range | 87.5 – 108.0 MHz |
| Input Voltage | 12V – 24V |
| USB-A Output (QC 3.0) | 5V/3A, 9V/2A, 12V/1.5A (18W Max) |
| USB-C Output (PD) | 5V/3A, 9V/3A, 12V/2.5A (30W Max) |
| Material | Acrylonitrile Butadiene Styrene (ABS), Metal |
| Product Dimensions (L x W x H) | 44 x 43 x 78 mm |
| Item Weight | 37 Grams |
| Color | Black |
| Control Method | Push Button, Rotary Knob |
| Country of Origin | China |

8. Warranty and Support
8.1 Warranty Information
The TELESTAR FM-T2 comes with a 2-year legal warranty from the date of purchase. This warranty covers manufacturing defects and material faults under normal use. It does not cover damage caused by misuse, accidents, unauthorized modifications, or normal wear and tear.
Please retain your proof of purchase for warranty claims.
8.2 Customer Support
For technical support, warranty claims, or further inquiries, please contact your retailer or the TELESTAR customer service department. Refer to the contact information provided with your purchase or on the official TELESTAR website.