Introduction
Thank you for choosing the INSMART 921A Cold Press Juicer. This manual provides essential information for the safe and efficient operation, maintenance, and care of your new juicer. Please read these instructions thoroughly before first use and retain them for future reference.
Important Safety Instructions
When using electrical appliances, basic safety precautions should always be followed, including the following:
- Read all instructions before operating the juicer.
- Ensure the machine is correctly assembled before plugging it in or operating. The secure safety-lock arm ensures the machine operates only when all components are correctly assembled, preventing accidents.
- Do not immerse the motor base in water or other liquids.
- Keep hands and utensils out of the feed chute during operation to prevent injury. Use the food pusher provided.
- Unplug from the outlet when not in use, before assembling or disassembling parts, and before cleaning.
- Do not operate any appliance with a damaged cord or plug, or after the appliance malfunctions or has been damaged in any manner.
- All parts that come into contact with food are made from high-quality, BPA-free materials.
- This appliance is for household use only.

Figure 1: Safety-oriented design features.
Product Components
Familiarize yourself with the parts of your INSMART 921A Cold Press Juicer:
- Main Body: Contains the motor and control panel.
- Squeezer (Auger): The component that crushes and presses fruits and vegetables.
- Juicer Base: Supports the juicer container and collects juice.
- Juicer Container: Holds the auger and filter, where juicing occurs.
- Pusher: Used to guide ingredients into the feed chute.
- Brush: For cleaning the filter and other parts.
- 1.2L Cup: For collecting juice.
- 1.0L Cup: For collecting pulp.
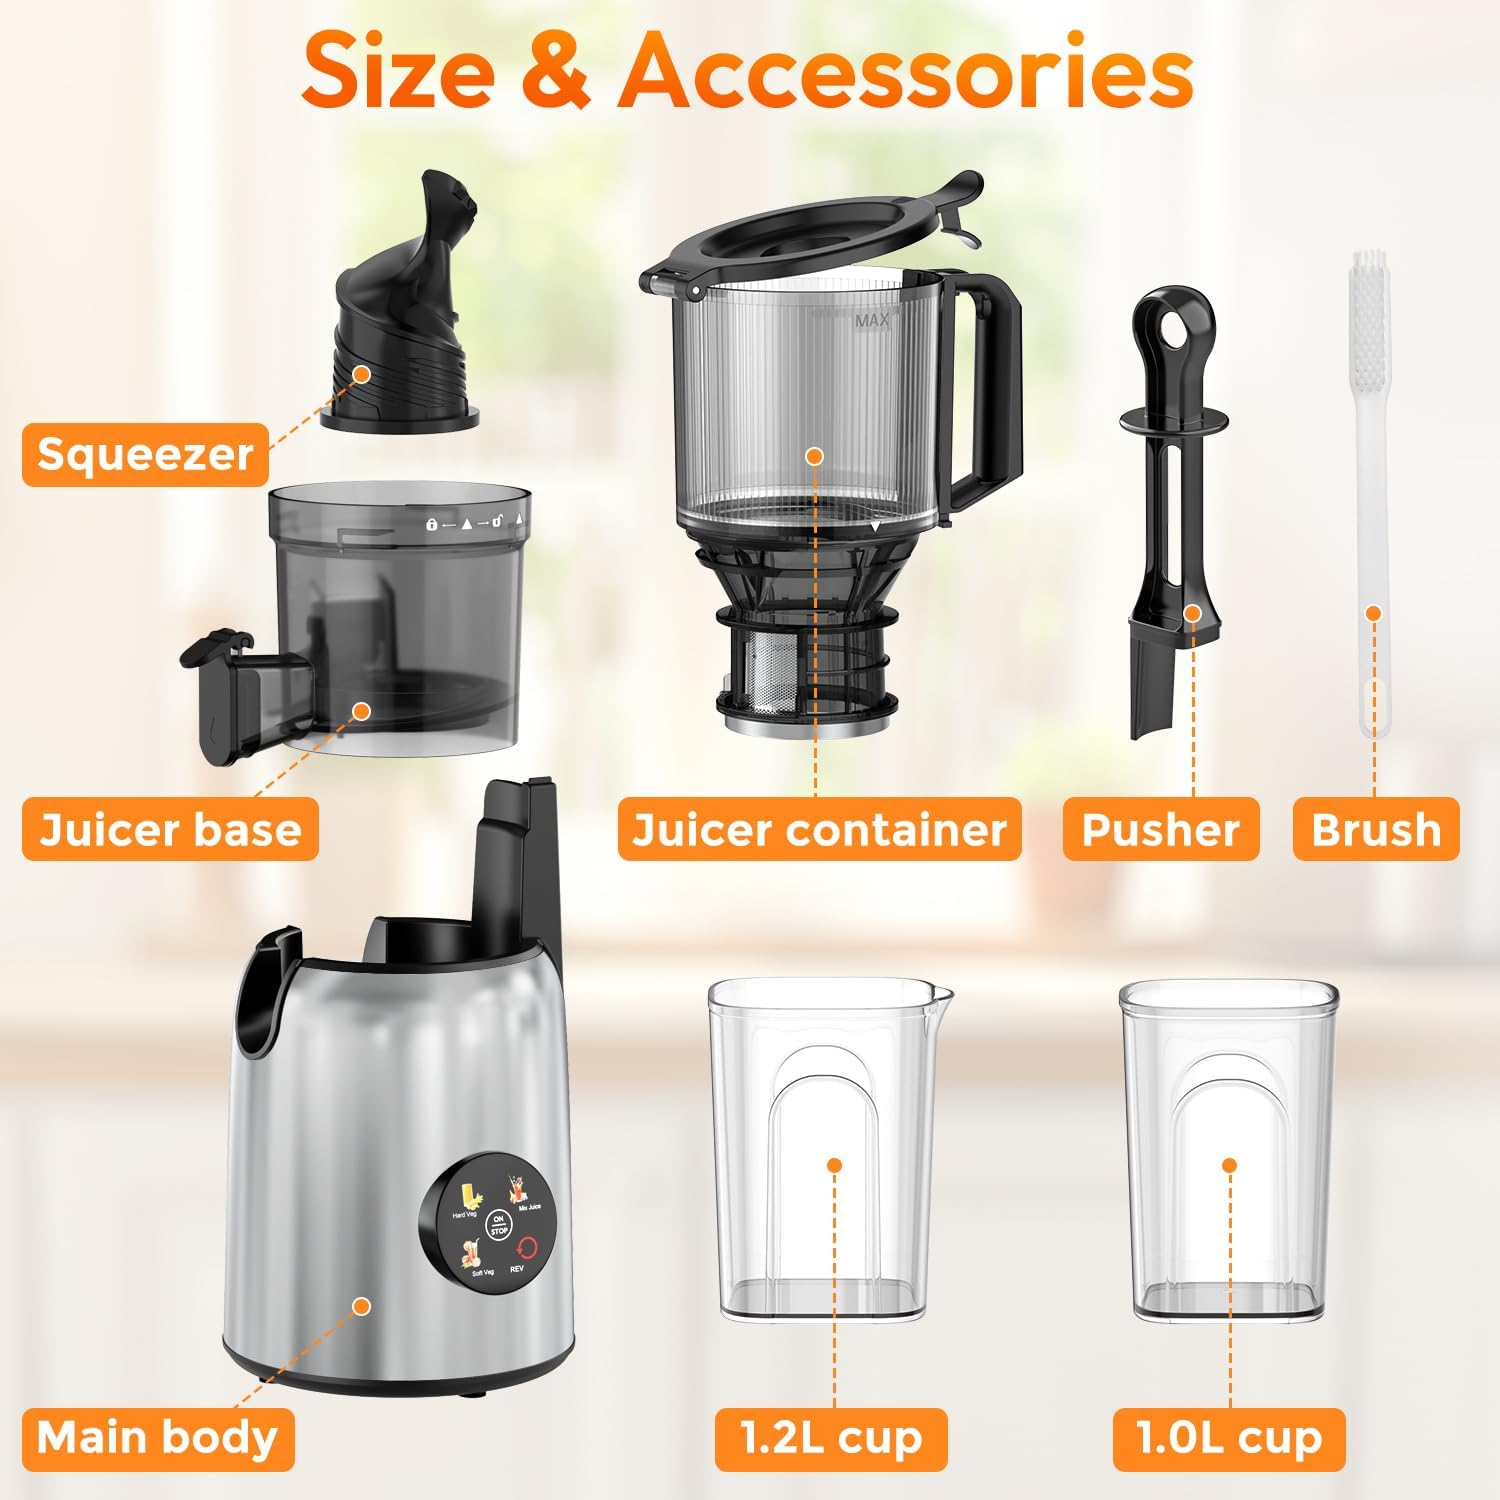
Figure 2: Overview of INSMART 921A Cold Press Juicer components.
Assembly Instructions
Follow these steps to assemble your juicer before first use:
- Place the main body on a stable, flat surface.
- Assemble the juicer base onto the main body, ensuring it clicks into place securely.
- Insert the squeezer (auger) into the juicer container.
- Install the juicer container assembly onto the juicer base, aligning the arrows and rotating until it locks.
- Place the pulp and juice collection cups under their respective outlets.

Figure 3: Visual guide for assembling the juicer.
Operating Instructions
The INSMART 921A Cold Press Juicer is designed for efficient juice extraction from various fruits and vegetables.
Preparing Ingredients
- Wash all fruits and vegetables thoroughly.
- The 5.3-inch extra-large feeding chute can accommodate whole fruits and vegetables like apples, carrots, and cucumbers, reducing pre-cutting time.
- For harder or fibrous ingredients, it is recommended to cut them into smaller pieces to prevent clogging and ensure optimal juice extraction.
- Remove large seeds, pits, or hard skins from fruits like peaches, mangoes, or citrus before juicing.

Figure 4: The large feed chute accommodates various whole ingredients.
Juicing Process
- Ensure the juicer is properly assembled and the juice and pulp cups are in place.
- Plug the power cord into a suitable electrical outlet.
- Turn on the juicer using the control panel. Select the appropriate speed setting for your ingredients (e.g., Soft Veg, Hard Veg, Mix Juice).
- Gradually feed prepared ingredients into the feed chute. Use the pusher to gently guide them down. Do not force ingredients.
- The juicer operates at a low speed (40-60 RPM) to minimize heat buildup and oxidation, which helps preserve nutrients. The juicer operates at approximately 50dB.
- Juice will flow into the juice cup, and pulp will be expelled into the pulp cup.
- If ingredients become jammed, use the "REV" (Reverse) function to clear the blockage. Then, resume normal operation.
- Once juicing is complete, turn off the juicer and unplug it from the outlet.

Figure 5: Control panel for selecting juicing modes.

Figure 6: Juicer in operation, demonstrating juice and pulp separation.

Figure 7: Juicer RPM settings for different ingredient types.
Care and Maintenance
Proper cleaning and maintenance will ensure the longevity and optimal performance of your juicer.
Disassembly for Cleaning
- Ensure the juicer is turned off and unplugged.
- Remove the juice and pulp collection cups.
- Rotate the juicer container counter-clockwise to unlock and lift it off the main body.
- Remove the squeezer (auger) and filter from the juicer container.
Cleaning Instructions
- Clean all detachable parts immediately after each use to prevent pulp from drying and becoming difficult to remove.
- Rinse all detachable parts under running water. Use the provided brush to clean the micro-sieve filter thoroughly.
- All detachable parts are dishwasher safe for ultimate convenience.
- Wipe the main body with a damp cloth. Do not immerse the main body in water.
- Ensure all parts are completely dry before reassembling or storing the juicer.
Figure 8: Disassembly and cleaning process.
Troubleshooting Guide
If you encounter issues with your juicer, refer to the following common problems and solutions:
| Problem | Possible Cause | Solution |
|---|---|---|
| Juicer does not turn on. | Not properly assembled or plugged in. | Ensure all parts are correctly assembled and locked. Check if the power cord is securely plugged into an outlet. |
| Motor stops during operation. | Overload or ingredient jam. | Press the "REV" button to clear the jam. If the motor overheats, it may automatically shut off. Unplug and let it cool for 30 minutes before restarting. |
| Low juice yield or wet pulp. | Ingredients too soft or fed too quickly. | Ensure ingredients are suitable for masticating juicers (avoid very soft or cooked fruits). Feed ingredients slowly and steadily. |
| Excessive vibration or noise. | Improper assembly or hard ingredients. | Check that all components are securely locked. Ensure ingredients are cut to appropriate sizes. |
Product Specifications
- Brand: INSMART
- Model: 921A
- Special Feature: 300W High Power & Low Noise Motor, 5.3-inch Feed Chute, Easy to Clean & Assemble, High Juice Yield, Self Feeding Cold Press
- Product Dimensions: 14"D x 12"W x 6"H
- Product Care Instructions: Dishwasher Safe, Hand Wash Only
- Included Components: Slow juicer (Main body, Squeezer, Juicer base, Juicer container, Pusher, Brush, 1.2L cup, 1.0L cup)
- Color: Black
Warranty and Customer Support
For warranty information or customer support, please refer to the contact details provided with your purchase or visit the official INSMART website. Keep your purchase receipt as proof of purchase for any warranty claims.