1. Introduction
Thank you for choosing the darkFlash C280 E-ATX Full-Tower PC Gaming Case. This manual provides essential information for the proper assembly, operation, and maintenance of your new PC case. The C280 is designed for high-performance builds, featuring panoramic tempered glass, extensive cooling support, and compatibility with various motherboard form factors, including reverse-connection designs.
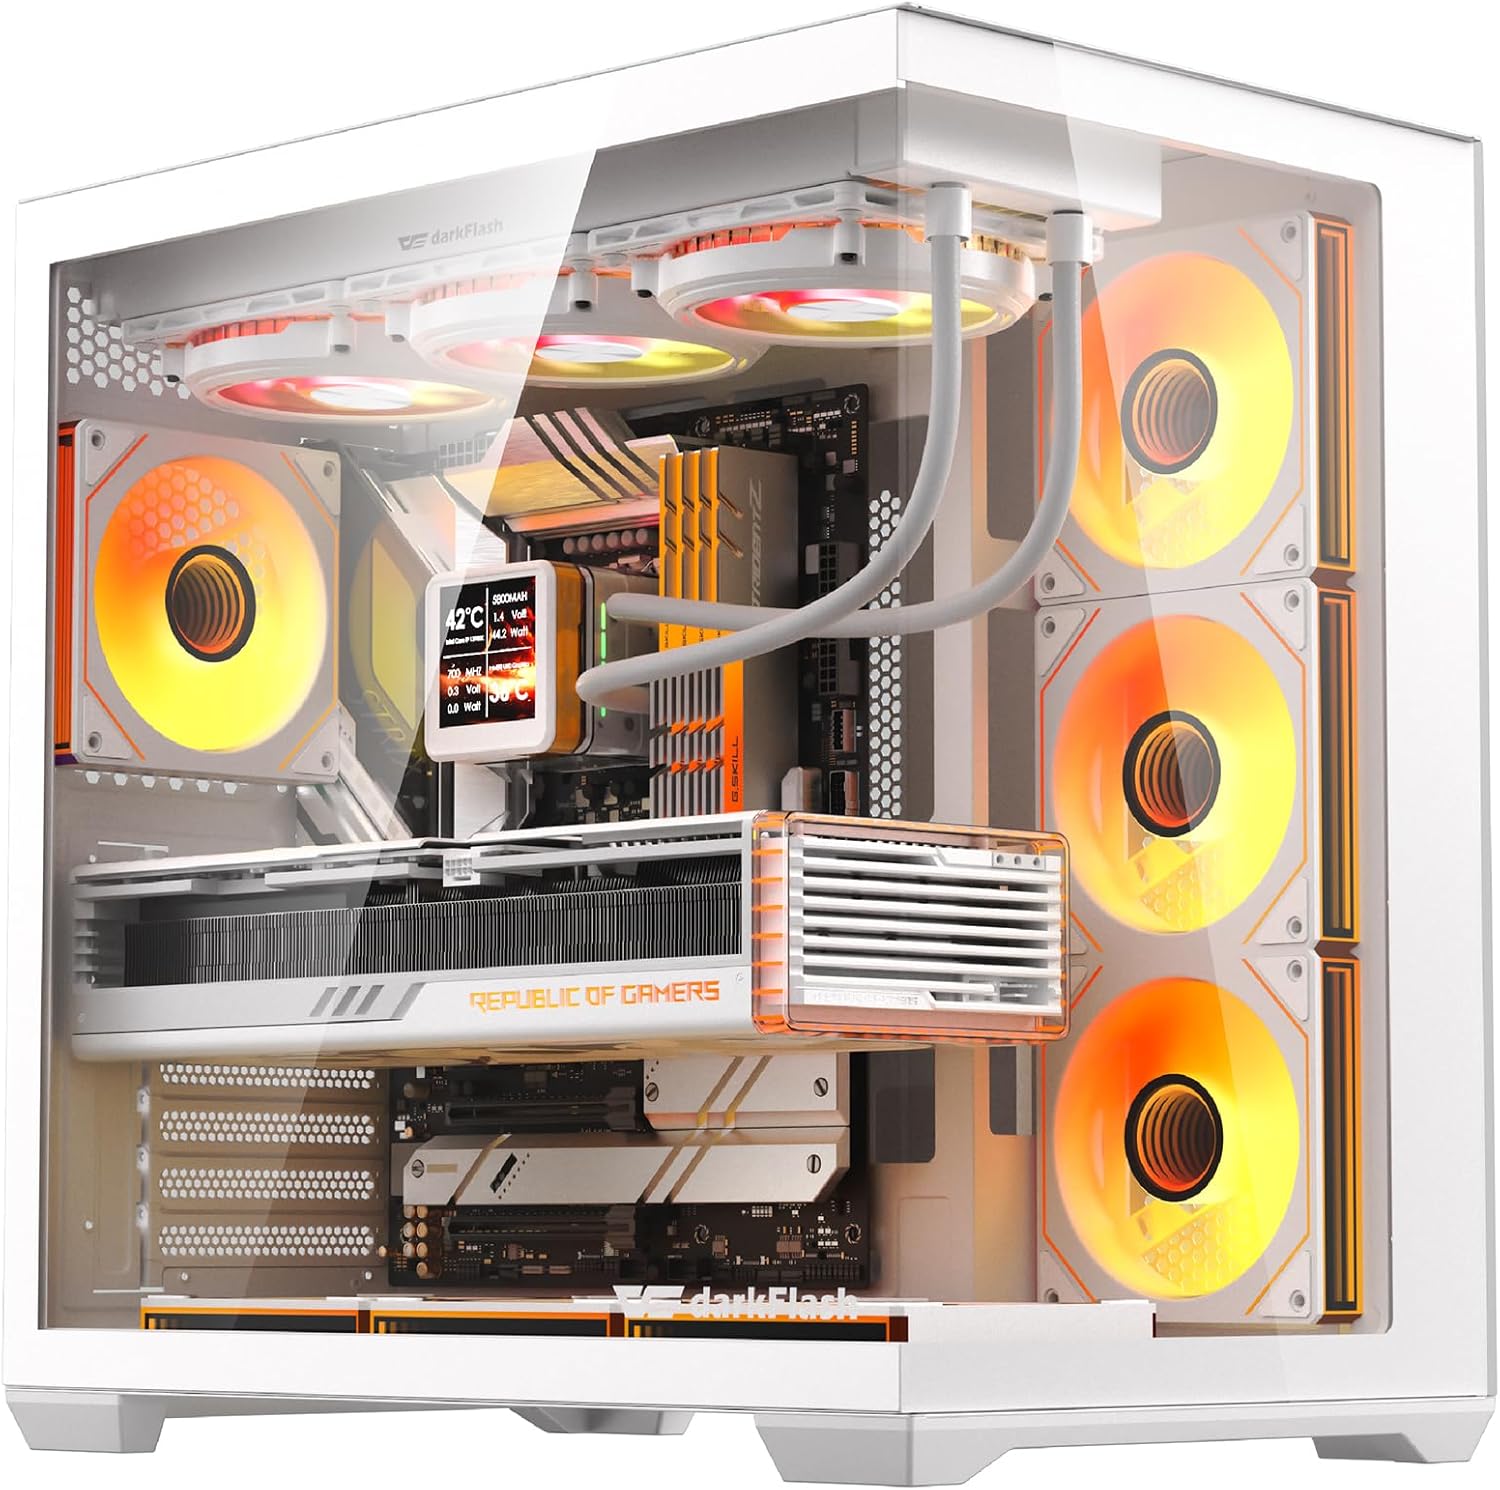
Figure 1: The darkFlash C280 E-ATX Full-Tower PC Gaming Case, showcasing its panoramic tempered glass and illuminated internal components.
2. Safety Information
- Always disconnect the power supply from the wall outlet before performing any installation or maintenance.
- Handle tempered glass panels with care to prevent breakage.
- Avoid touching internal components while the system is powered on.
- Ensure proper grounding to prevent electrostatic discharge (ESD) damage to components.
- Keep the case away from liquids and excessive humidity.
3. Package Contents
Verify that all items are present in the package:
- darkFlash C280 PC Case
- Accessory Box (screws, standoffs, cable ties, cleaning cloth)
- User Guide

Figure 2: The darkFlash C280 PC case and its packaging, illustrating the included accessories.
4. Specifications
| Feature | Specification |
|---|---|
| Brand | darkFlash |
| Model Name | C280 |
| Case Type | Full Tower |
| Motherboard Compatibility | E-ATX, ATX, Micro ATX, Mini ITX (including reverse/back-connect motherboards) |
| Material | Plastic, Tempered Glass (0.7mm SPCC steel construction) |
| Dimensions (D x W x H) | 17.44"D x 16.77"W x 10.91"H (443×277×426mm) |
| Max GPU Length | 420mm |
| Max CPU Cooler Height | 155mm |
| Max PSU Length | 240mm |
| Drive Bays | 3x 2.5" SSD + 2x 3.5" HDD |
| Fan Support | Up to 10x 120mm or 4x 140mm fans |
| Radiator Support | Up to 360mm |
| I/O Ports | 1x USB 3.0, 2x USB 2.0, HD Audio, Optional Type-C |
| Special Features | 270° Panoramic Tempered Glass, Dual Quick-Release Dust Filters, Tool-Free Access |
5. Setup and Installation
5.1. Panel Removal
The darkFlash C280 features tool-free tempered glass panels for easy access. The front and side tempered glass panels are secured by a lip on the bottom and can be removed by gently pulling them off. The rear metal panel is also easily removable.

Figure 3: Gently pull the tempered glass panel to detach it from the case.
The top panel, which includes a magnetic dust filter, can also be removed for fan/radiator installation. The front glass panel can be removed by unscrewing four screws, though this is generally not necessary for most builds.
Video 1: Official darkFlash C280 EATX PC Gaming Case overview, demonstrating panel removal and internal features.
5.2. Motherboard Installation
The C280 supports E-ATX, ATX, Micro ATX, and Mini ITX motherboards, including reverse/back-connect designs. Ensure you install the correct standoffs for your motherboard size. For ATX motherboards, additional standoffs may need to be installed from the accessory box.

Figure 4: Motherboard compatibility diagram for the darkFlash C280, showing support for various form factors.
When installing an ATX motherboard, note that it sits close to the bottom of the case, which might make plugging in some cables challenging. Consider routing cables through the front or using a Micro ATX board for easier access.
5.3. GPU Installation
The case accommodates GPUs up to 420mm in length and supports vertical GPU mounting for aesthetic presentation. Vertical GPU mounting may require a separate bracket depending on your setup.

Figure 5: Step-by-step guide for installing a GPU in a vertical orientation.
5.4. Storage Installation
The C280 includes mounts for 3x 2.5" SSDs and 2x 3.5" HDDs. A removable drive cage is located at the rear of the case for easy installation.

Figure 6: Multifunction bracket for installing SSDs and HDDs.
5.5. Power Supply Installation
The power supply mounts vertically in the back of the case, supporting PSUs up to 240mm. Ensure your power supply fits within these dimensions.
5.6. Cable Management
The case offers generous space behind the motherboard tray and includes three Velcro straps to assist with cable management, ensuring a clean and organized build.
Video 2: MUSETEX Y6 White PC case build guide, demonstrating cable management techniques applicable to similar cases.
5.7. Cooling Installation
The C280 supports extensive cooling configurations:
- Top: 3x 120mm fans or 2x 140mm fans; up to 360mm or 280mm radiator.
- Side: 2x 120mm fans; up to 240mm radiator (no 140mm fan support).
- Bottom: 3x 120mm fans or 2x 140mm fans. (Radiator installation on the bottom is not recommended as it may make the pump the highest part of the loop).
- Rear: 1x 120mm fan or 1x 140mm fan; 120mm or 140mm radiator.

Figure 7: Cooling options and fan/radiator placements within the darkFlash C280 case.
5.8. Front Panel Connectors
The top I/O panel includes 1x USB 3.0, 2x USB 2.0, HD Audio, and an optional Type-C port. Ensure these are correctly connected to your motherboard.
Video 3: MUSETEX K2 Black Computer Case overview, showing front panel connectors and internal layout.
6. Operating Instructions
6.1. Power On/Off
Press the power button located on the top I/O panel to turn your system on or off. A reset button is also available for system restarts.
6.2. RGB Lighting Control
The case includes 7x ARGB fans. Use the dedicated RGB button on the top I/O panel to cycle through various lighting modes and colors. The fans also feature a 3-pin 5V ARGB header, allowing synchronization with compatible motherboards or external ARGB controllers.
7. Maintenance
7.1. Dust Filters
The darkFlash C280 is equipped with dual quick-release dust filters on the top and bottom panels. Regularly remove and clean these filters to maintain optimal airflow and prevent dust buildup inside your system.

Figure 8: The quick-release dust filters on the top and bottom of the case.
8. Troubleshooting
8.1. Fans Not Lighting Up / Spinning
- Ensure the RGB controller board is correctly connected to a SATA power supply from your PSU.
- Verify that all fan power and ARGB data cables are securely connected to the controller.
- If connecting directly to the motherboard, ensure the 3-pin 5V ARGB header is correctly oriented and connected.
8.2. Difficulty Connecting Motherboard Cables
If using an ATX motherboard, the bottom edge may sit very close to the case floor. Consider routing cables through alternative cutouts or using a Micro ATX motherboard for more clearance.
8.3. Front Panel Connectors
The front panel connectors (Power SW, Reset SW, Power LED+, Power LED-) are individual wires. Refer to your motherboard manual for the correct pinout and connection order. This can be a fiddly process.
9. Warranty and Support
The darkFlash C280 PC Gaming Case comes with a 1-Year Manufacturer Warranty. For technical support or warranty claims, please contact darkFlash Official Store directly or refer to their official website for contact information.


