1. Product Overview
The Kewig M26S-1 Motorcycle Phone Mount is designed to securely hold smartphones on various vehicles, including motorcycles, scooters, ATVs, and bicycles. It features a built-in vibration dampener to protect your phone's camera and an anti-theft design for the mount itself. The mount offers 720-degree rotation for optimal viewing angles and is compatible with phones having screen diagonals between 5.4 and 6.9 inches.

Image 1: Overview of the Kewig M26S-1 Motorcycle Phone Mount.
2. Package Contents
- 1x Motorcycle Phone Mount Main Body
- 1x Double Socket Arm
- 1x U-Shape Mount Base (for handlebars 0.5'' to 1.26'' wide)
- Mounting Hardware (U-bolts, nuts, washers)
- Special Anti-Theft Wrench
3. Setup and Installation
Follow these steps to install your Kewig Motorcycle Phone Mount:
- Attach the U-Shape Mount Base:
Select the appropriate U-bolt for your handlebar diameter (0.5'' to 1.26'' / 12mm to 32mm). Place the U-shape base around the handlebar and secure it with the provided nuts and washers. Ensure the base is firmly tightened to prevent movement. - Connect the Double Socket Arm:
Attach one end of the double socket arm to the ball on the U-shape mount base. Loosen the knob on the socket arm, position it as desired, and then tighten the knob to secure it. - Attach the Phone Mount Main Body:
Connect the phone mount main body to the other end of the double socket arm. Ensure the ball on the phone mount body is properly seated in the socket arm. Tighten the knob on the socket arm to secure the phone mount in place. - Adjust Side Arms for Phone Fit:
The phone mount features adjustable side arms. Use a screwdriver to loosen the screws on the side arms, adjust them to fit your phone's width (up to 88mm / 3.46 inches), and then tighten the screws. It is recommended to allow a slight amount of play for the vibration dampening system to function effectively. - Secure the Mount with Anti-Theft Wrench:
Use the special anti-theft wrench to tighten the main adjustment knob on the double socket arm. This helps prevent unauthorized removal of the mount. Keep the wrench handy for future adjustments or removal.

Image 2: The phone mount installed on an ATV handlebar, showing the U-bolt base and adjustable arms.

Image 3: Detail of the anti-theft key mechanism for securing the mount.
Video 1: Official product video demonstrating the installation and features of the Kewig Motorcycle Phone Mount.
4. Operating Instructions
Using your Kewig phone mount is straightforward:
- Inserting Your Phone:
Gently pull up the spring-loaded top arm of the phone mount. Place your phone into the cradle, ensuring it rests securely on the bottom supports. Release the top arm to allow it to clamp down on your phone. The 8-claw design with soft silicone provides a secure, scratch-free grip. - Removing Your Phone:
To remove your phone, simply pull up the spring-loaded top arm and lift your phone out of the cradle. This can be done with one hand for quick access. - Adjusting Viewing Angle:
The mount allows for 720-degree rotation. Loosen the knob on the double socket arm slightly, adjust your phone to the desired horizontal or vertical orientation, and then tighten the knob to lock it in place.

Image 4: Demonstrating one-handed phone insertion into the mount.
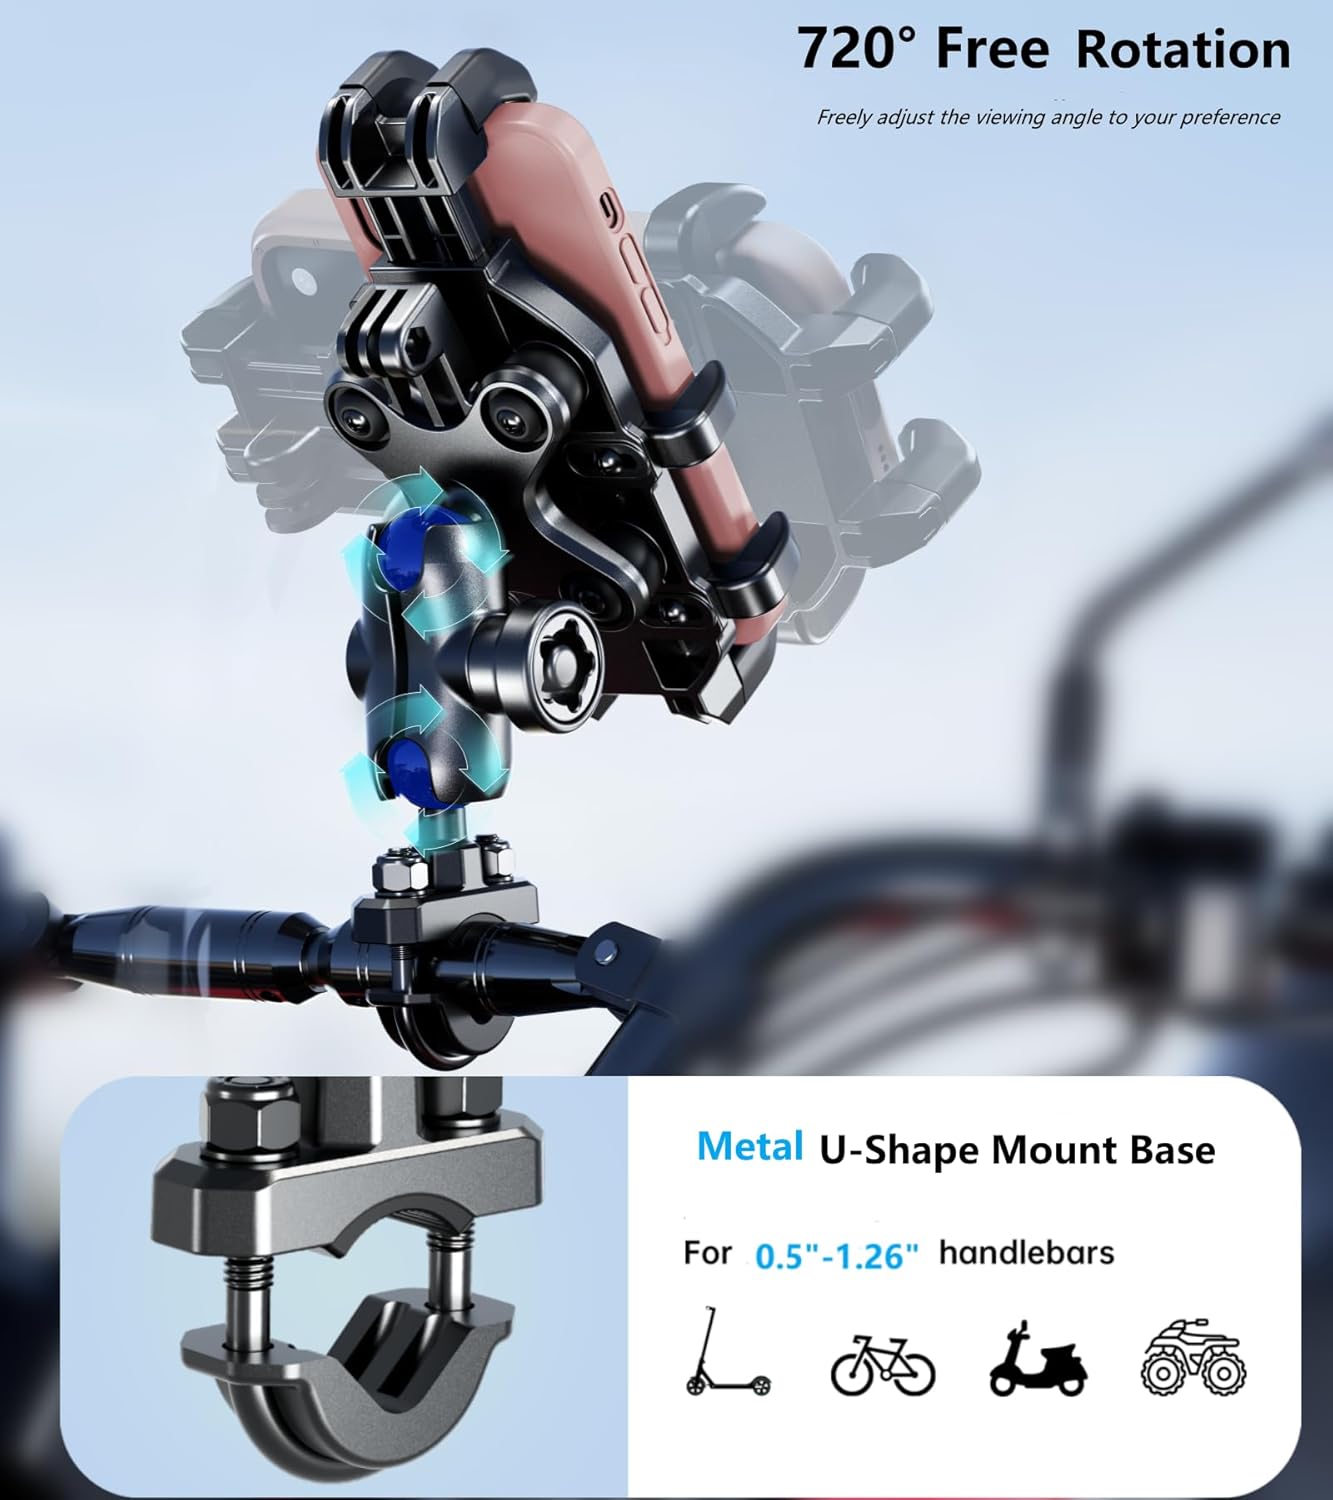
Image 5: Illustrating the 720-degree rotation feature for flexible viewing angles.
5. Vibration Dampening and Camera Protection
The Kewig M26S-1 mount incorporates a vibration dampener designed to absorb high-frequency vibrations from the vehicle's handlebars. This feature helps protect your smartphone's internal camera stabilizers from potential damage during rides on uneven terrain or at high speeds. The non-contact camera design ensures no direct pressure or scraping on your phone's camera lens.

Image 6: Diagram showing the built-in vibration dampener and its function.

Image 7: Visual representation of the non-contact camera design, preventing squeezing or scraping.
6. Maintenance
To ensure the longevity and optimal performance of your phone mount:
- Regularly inspect all screws and bolts for tightness. Re-tighten as necessary using appropriate tools.
- Clean the mount with a damp cloth and mild soap. Avoid harsh chemicals that may damage the materials.
- Check the silicone pads and rubber components for wear and tear. Replace if damaged to maintain grip and vibration dampening effectiveness.
7. Troubleshooting
- Phone does not fit:
Ensure your phone's dimensions (width max 88mm/3.46", length max 175mm/6.9", thickness max 16mm/0.63") are within the compatible range. If using a thick phone case (e.g., Otterbox), measure your phone with the case to confirm compatibility. Adjust the side arms as described in the setup section. - Mount feels loose or unstable:
Check all connection points, including the U-bolt base, the double socket arm, and the phone mount body. Ensure all knobs and nuts are securely tightened. Use the special anti-theft wrench for the main adjustment knob. - Vibrations still affecting phone:
While the mount has a vibration dampener, extreme vibrations may still occur on very rough terrain. Ensure the phone is seated correctly and the side arms are adjusted with a slight allowance for movement to allow the dampener to work.
8. Specifications
| Brand | Kewig |
| Model Name | M26S-1 |
| Color | Black |
| Compatible Devices | Smartphones |
| Compatible Phone Dimensions | Width: Max 88mm (3.46"), Length: Max 175mm (6.9"), Thickness: Max 16mm (0.63"). Works with 5.4–6.9 inch screen diagonals. |
| Mounting Type | Handlebars, round rails (0.5'' to 1.26'' / 12mm to 32mm) |
| Material | High-strength composite materials, Metal U-shaped base clamps |
| Special Features | Vibration Dampener, 8-Claws for Anti-Slip, Anti-Theft Design, 720-degree Rotation, Adjustable Length/Width |
9. Warranty Information
This Kewig Motorcycle Phone Mount M26S-1 comes with a 1-year warranty from the date of purchase. This warranty covers manufacturing defects and material flaws under normal use. Please retain your proof of purchase for warranty claims. The warranty does not cover damage caused by misuse, accidents, unauthorized modifications, or normal wear and tear.
10. Customer Support
For any questions, technical assistance, or warranty inquiries regarding your Kewig Motorcycle Phone Mount, please contact Kewig customer support through the retailer's platform or the official Kewig website. Please have your model number (M26S-1) and purchase details ready when contacting support.


