1. Introduction
The VolenGo E1000 Heat Shrink Label Maker is a versatile handheld device designed for creating durable labels for various applications, particularly in industrial and electrical environments. It supports both heat shrink tube tapes and flexible cable tapes, offering solutions for cable identification, asset management, and general organization. This manual provides detailed instructions for setting up, operating, and maintaining your E1000 label maker.
2. What's in the Box
- 1 x E1000 Label Maker
- 2 x 12mm x 8m Wire Label Tapes (White)
- 2 x 12mm x 1.5m Heat Shrink Tapes (White)
- 1 x USB Type-C Cable
- 1 x Replacement Cutter Holder
- 1 x Instruction Manual (this document)
- 1 x Service Contact Card

Figure 2.1: Package Contents
Video 2.1: Unboxing the E1000 Label Maker Machine with 4 Tapes. This video demonstrates the contents of the package and initial handling of the device.
3. Setup
3.1 Powering the Device
The E1000 label maker can be powered by either 6 AAA dry cells (not included) or via the included USB-C cable. For optimal printing performance, especially when using batteries, it is recommended to use brand new AAA alkaline batteries.
- Battery Installation: Open the battery compartment on the back of the device and insert 6 AAA batteries, ensuring correct polarity.
- USB-C Power: Connect the provided USB-C cable to the label maker and a compatible USB power adapter (not included). It is recommended to use a charger block with an output voltage below or equal to 5V.

Figure 3.1: Powering Options for the E1000 Label Maker
3.2 Tape Cartridge Installation
The E1000 label maker uses 12mm tape cartridges. To install a tape cartridge:
- Open the tape compartment cover on the back of the label maker.
- Insert the tape cartridge firmly into the compartment, ensuring it clicks into place.
- Close the tape compartment cover.

Figure 3.2: Tape Cartridge Installation
4. Operating Instructions
4.1 Basic Label Printing
To print a basic label:
- Turn on the label maker by pressing the power button.
- Use the QWERTY keyboard to type your desired text.
- Press the 'Print' button to generate the label.
- Use the built-in cutter to cut the label.

Figure 4.1: E1000 Label Maker Interface
4.2 Cable Modes
The E1000 features three dedicated cable modes for efficient cable management:
- Cable Flag: Creates labels that flag out from the cable.
- Cable Wrap: Creates labels that wrap around the cable.
- Faceplate: Creates labels suitable for faceplates or flat surfaces.
Access these modes using the one-touch keys on the device. For heat shrink tube tapes, ensure the 'Mirror' function is turned on for correct printing orientation.

Figure 4.2: Three Cable Modes in Use
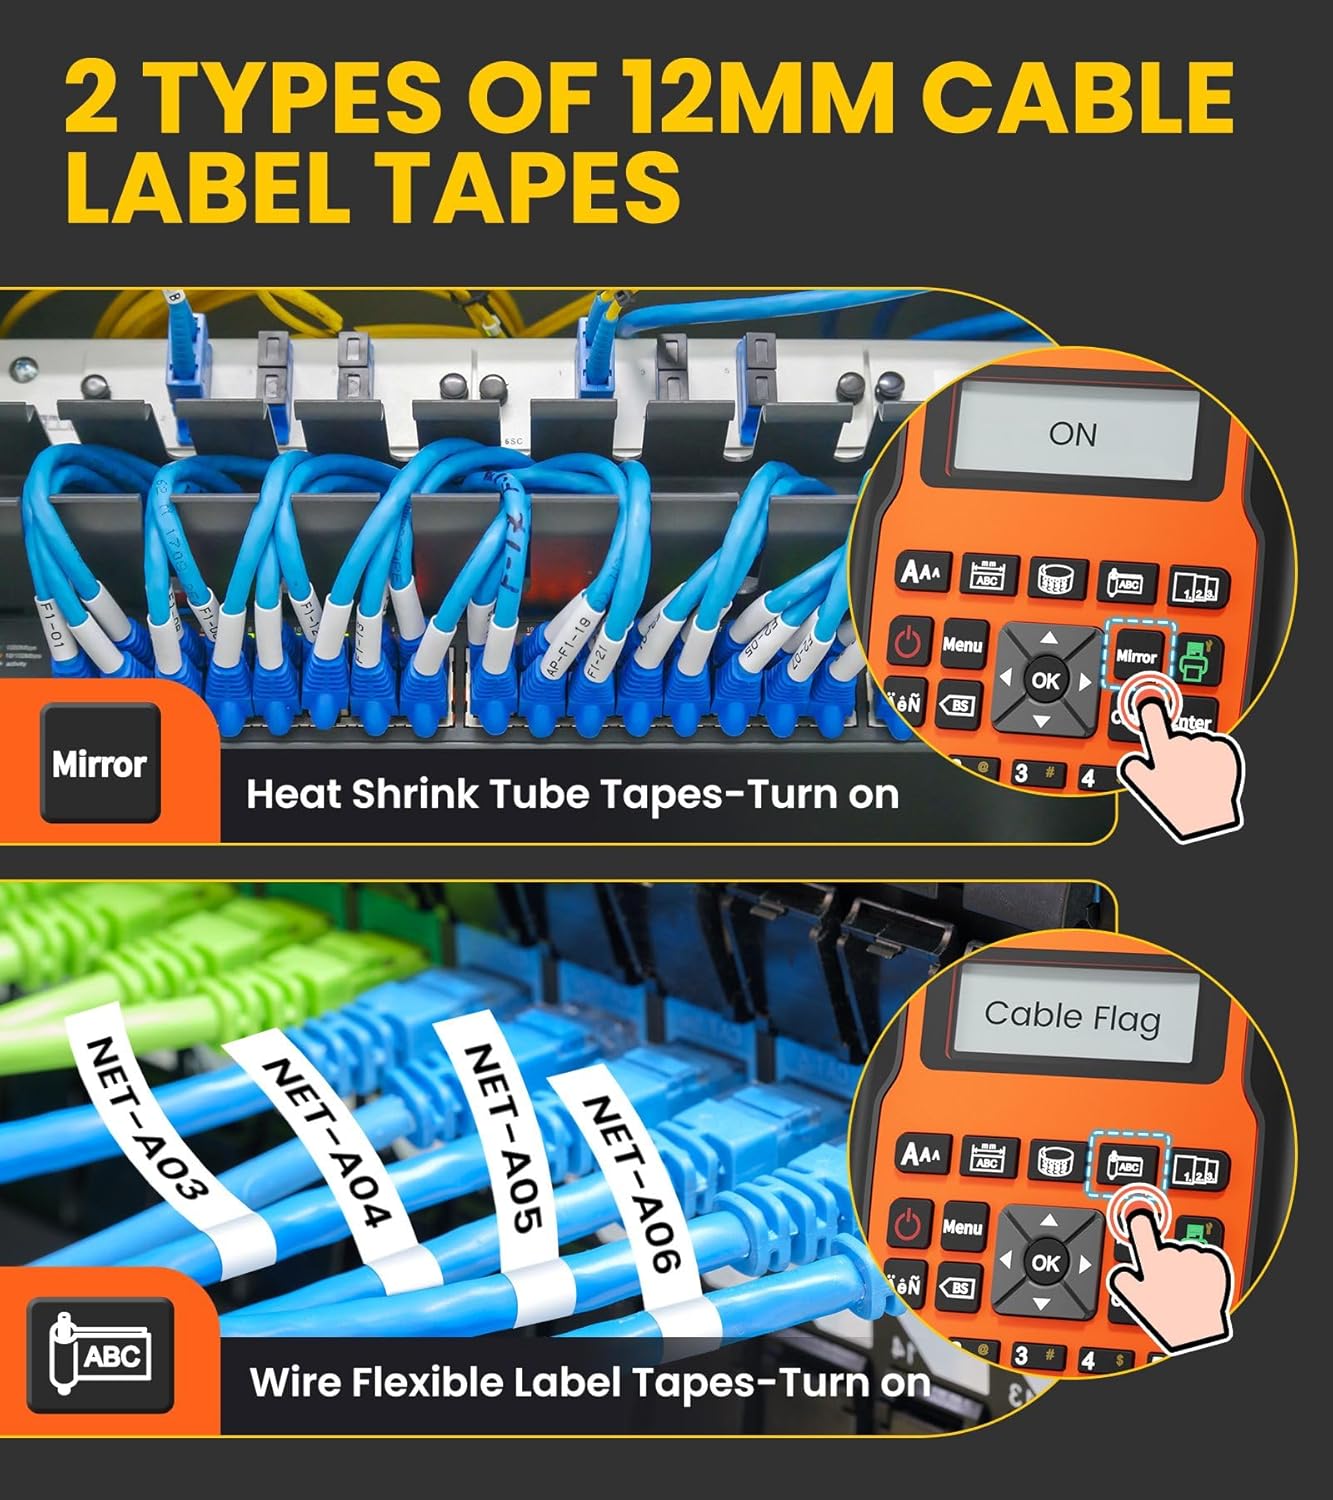
Figure 4.3: Using Wire Label Tapes and Heat Shrink Tube Tapes
4.3 Reducing Tape Waste
The E1000 label maker includes features to minimize tape waste:
- Multi-Edit: Print up to 20 labels at a time to save tape.
- Narrow Margin Settings: Adjust margins (Full, Half, Narrow) to reduce waste by up to 42 millimeters per label.

Figure 4.4: Multi-Edit for Tape Waste Reduction

Figure 4.5: Adjustable Margin Settings
4.4 Two-Line Printing
The E1000 supports printing two lines of text on a single label. To do this, type the first line of text, press 'Enter', then type the second line of text before printing.

Figure 4.6: Two-Line Text Printing
5. Maintenance
- Cleaning: Regularly clean the print head and cutter blade with a soft, dry cloth to ensure optimal performance and prevent tape jams.
- Storage: Store the label maker and tape cartridges in a cool, dry place away from direct sunlight and extreme temperatures.
- Cutter Holder: The package includes a replacement cutter holder. Replace the existing cutter holder if the blade becomes dull or damaged.
6. Troubleshooting
- No Power: Ensure batteries are correctly installed or the USB-C cable is properly connected to a power source.
- Poor Print Quality: Clean the print head. Ensure the tape cartridge is installed correctly and is not damaged. Replace batteries if they are low.
- Tape Jams: Turn off the device, open the tape compartment, and carefully remove any jammed tape. Ensure the tape is properly threaded when reinstalling.
- Blank Space at Start of Label: A 1-inch blank space at the start of labels is normal due to the laminate technology requirement, as there is a 1-inch distance between the print head and the exit port.

Figure 6.1: Understanding Initial Blank Space on Labels
7. Specifications
| Feature | Specification |
|---|---|
| Brand | VolenGo |
| Model Name | E1000 |
| Connectivity Technology | USB |
| Printing Technology | QWERTY Keyboard (Thermal Transfer Inkless) |
| Printer Output | Monochrome |
| Maximum Print Speed | 10 ppm |
| Maximum Print Resolution | 180 DPI |
| Product Dimensions (D x W x H) | 2.42" x 4.59" x 8.38" |
| Maximum Media Size | 0.47 inch (12mm) |
| Supported Tape Sizes | 3.5, 6, 9, 12 Millimeters |
| Power Modes | 6 AAA dry cells (not included) or USB C cable (included) |
| Special Features | 12mm Wire Cable Label Maker, One-Touch Keys, 3 Cable Modes, 19 Styles, 100 Frames, 22 Languages, 410 Symbols |

Figure 7.1: Heat Shrink Tube Tape Specifications

Figure 7.2: Heat Shrink Tape Application

Figure 7.3: Flexible ID Tape Application
8. Warranty and Support
The product information indicates "Warranty Description: no". For any support inquiries or issues not covered in this manual, please refer to the included Service Contact Card or visit the official VolenGo website for assistance.


