1. Introduction
Thank you for choosing the AOPUTTRIVER AP-5000N Pinless Moisture Meter. This device is designed for non-destructive measurement of moisture content in various materials such as lumber, drywall, firewood, and masonry. Its advanced sensing technology provides accurate readings without damaging the surface of the material. This manual provides detailed instructions for proper setup, operation, and maintenance to ensure optimal performance and longevity of your device.

Image 1.1: The AP-5000N moisture meter is versatile, suitable for measuring moisture in walls, wood floors, raw wood, and other building materials.
2. Safety Information
- Read all instructions carefully before using the device.
- Do not attempt to disassemble or modify the meter. This may cause damage and void the warranty.
- Keep the device away from water and high humidity environments to prevent damage.
- Store the meter in a dry, cool place when not in use.
- Dispose of batteries according to local regulations.
3. Package Contents
Verify that all items are present in the package:
- AP-5000N Pinless Moisture Meter
- Operating Instructions Manual
- Type-C Data Cable
- Small Screwdriver (for battery compartment, if applicable)
- Storage Pouch

Image 3.1: Contents of the AP-5000N package, including the meter, storage pouch, Type-C cable, and screwdriver.
4. Product Overview
Familiarize yourself with the components and controls of your AP-5000N moisture meter:

Image 4.1: Front view of the AP-5000N meter with key features labeled.
- LED Indicator Light: Displays Dry, Mid, or Wet status.
- Dry Indicator: Green light for low moisture.
- Flashlight Indicator: Indicates flashlight is active.
- Wall Mode: Setting for wall materials.
- Softwood Mode: Setting for softwood materials.
- Measurement Reading Display: Digital percentage readout.
- Power On/Off Button: To turn the device on or off.
- Reading Hold Button: Freezes the current reading on the display.
- MID Indicator: Yellow light for medium moisture.
- Wet Indicator: Red light for high moisture.
- Masonry Mode: Setting for masonry materials.
- Hardwood Mode: Setting for hardwood materials.
- Measurement Reading Analog Display: Bar graph for visual moisture level.
- Mode Select Button: Cycles through material modes.
- Flashlight On/Off Button: Activates the built-in flashlight.
5. Setup
5.1. Battery Installation
The AP-5000N typically uses AAA batteries (not always included). Locate the battery compartment on the back of the device. Use the provided small screwdriver to open the compartment, insert the batteries according to the polarity indicators, and then securely close the compartment.
5.2. Initial Power On
Press the Power On/Off Button to turn on the device. The LCD display will illuminate, and the meter will perform a brief self-test before entering measurement mode.
6. Operating Instructions
6.1. Power On/Off
- To turn on: Press the Power On/Off Button.
- To turn off: Press and hold the Power On/Off Button for a few seconds, or the device will automatically power off after a period of inactivity to conserve battery life.
6.2. Mode Selection
The meter offers different modes for various materials to ensure accurate readings. To select a mode:
- Press the Mode Select Button repeatedly.
- The LCD display will show the name of the currently selected material (e.g., WALL, MASONRY, SOFTWOOD, HARDWOOD).
- Choose the mode that best matches the material you are testing.
6.3. Taking Measurements
The AP-5000N uses non-destructive sensing technology, allowing measurements up to 20mm (0.75 inches) deep without damaging the surface.
- Ensure the correct material mode is selected.
- Gently press the sensing area on the back of the hygrometer flat against the surface of the material you wish to measure.
- The moisture reading will be displayed on the LCD screen.

Image 6.1: The meter can detect moisture up to 19mm (0.75 inches) deep into materials.
6.4. Understanding Readings
The meter provides moisture readings through a digital LCD display, a tri-color LED bar graph, and an audible alarm.
- LCD Display: Shows the exact moisture percentage.
- Tri-color LED Bar Graph:
- Green (DRY): Indicates low moisture levels.
- Yellow (MID): Indicates medium moisture levels.
- Red (WET): Indicates high moisture levels.
- Audible Alarm: The meter will beep and the LED bar will turn red when the humidity exceeds the system's preset wet threshold for the selected material.
- Hold Function: Press the Reading Hold Button to freeze the current reading on the display for easier recording. Press it again to release the hold.
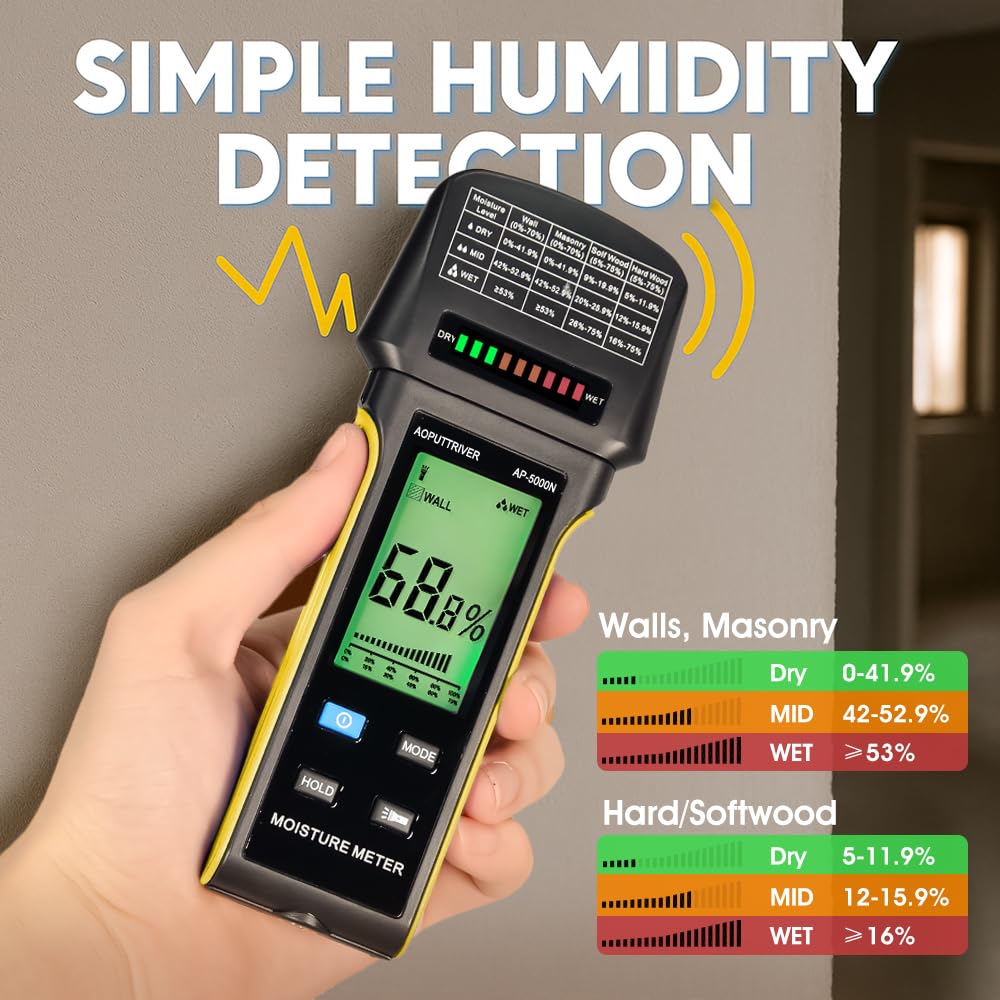
Image 6.2: The display shows digital readings and a color-coded bar graph for quick moisture assessment. Reference the table on the meter for specific ranges.
6.5. Flashlight Function
The meter includes a built-in flashlight for use in dimly lit areas.
- To turn on the flashlight: Press the Flashlight On/Off Button.
- To turn off the flashlight: Press the Flashlight On/Off Button again.

Image 6.3: The integrated flashlight assists in reading the display and inspecting surfaces in low-light conditions.
7. Maintenance
- Cleaning: Wipe the device with a soft, dry cloth. Do not use abrasive cleaners or solvents.
- Storage: When not in use for extended periods, remove the batteries to prevent leakage. Store the meter in its protective pouch in a cool, dry place, away from direct sunlight and extreme temperatures.
8. Troubleshooting
- Device does not power on: Check battery installation and ensure batteries are not depleted. Replace if necessary.
- Inaccurate readings: Ensure the correct material mode is selected. Make sure the sensing area is flat against the surface and free from dirt or obstructions.
- Display is dim or flickering: Batteries may be low. Replace them.
- No reading: Ensure the device is properly pressed against the material. The material might be too thin or outside the measurement range.
9. Specifications
- Model: AP-5000N
- Measurement Principle: Pinless, Non-Destructive Electromagnetic Sensing
- Detection Depth: Up to 20mm (0.75 inches)
- Display: Large Backlit LCD with Tri-color LED Bar Graph
- Measurement Modes: Wall, Masonry, Hardwood, Softwood
- Features: Audible Alarm, Low Battery Alarm, Auto Power Off, Hold Function, Flashlight
- Power Source: (Typically AAA batteries, user to confirm from device)
- Brand: AOPUTTRIVER
10. Warranty and Support
For any questions regarding your AOPUTTRIVER AP-5000N Pinless Moisture Meter, please refer to the contact information provided with your purchase or visit the official AOPUTTRIVER website for support. Please retain your proof of purchase for warranty claims.