
1. Introduction
This manual provides detailed instructions for the installation, operation, and maintenance of your Oskkude 7-inch car radio. This double-DIN car stereo head unit is designed for GMC Envoy models from 2002 to 2009, offering advanced features such as wireless CarPlay, Android Auto, GPS navigation, Bluetooth, Wi-Fi, FM/RDS radio, steering wheel control (SWC), and support for a backup camera. Please read this manual thoroughly before installation and use to ensure proper functionality and safety.
2. Product Overview
The Oskkude car radio features a 7-inch IPS touch screen with an Android 14.0 operating system, 2GB RAM, and 32GB ROM, powered by a 4-core processor for smooth performance. Key functionalities include:
- Wireless CarPlay & Android Auto: Seamless integration with iOS and Android smartphones for navigation, calls, messages, and music.
- GPS Navigation: Supports both online and offline map applications (e.g., Google Maps, Waze).
- Bluetooth Connectivity: For hands-free calling and audio streaming.
- Wi-Fi Module: Enables internet access and app downloads.
- FM/RDS Radio: Automatic and manual station searching with Radio Data System support.
- Steering Wheel Control (SWC): Compatible with vehicle's existing steering wheel controls for convenience.
- Backup Camera Input: Supports AHD waterproof night vision cameras for parking assistance.
- Split Screen Function: Allows simultaneous display of two applications.
- USB/SD/AUX Input: For media playback from external storage devices.
3. Package Contents
Verify that all items listed below are included in your package. If any items are missing or damaged, please contact customer support.
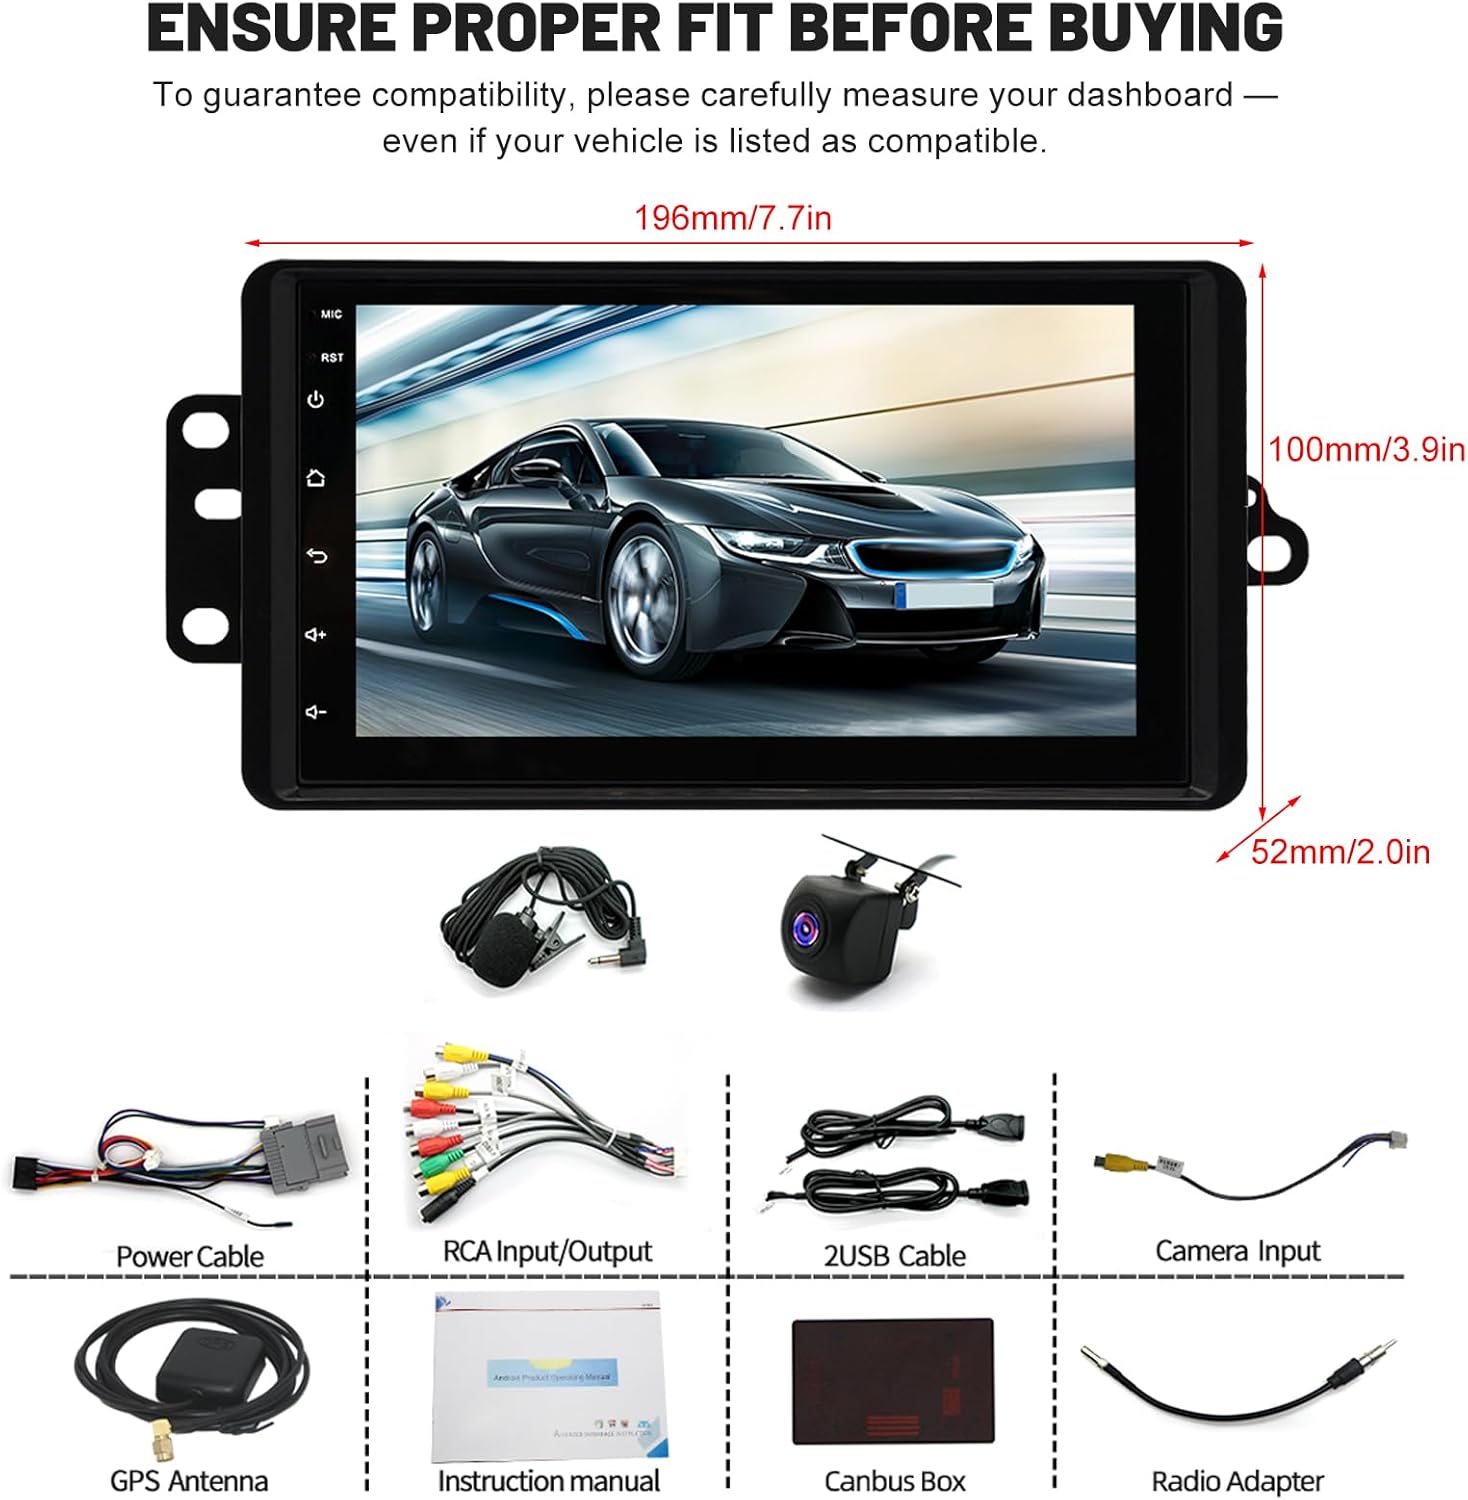
Image 3.1: Product dimensions and included accessories. The image displays the 7-inch car radio with dimensions (196mm/7.7in width, 100mm/3.9in height, 52mm/2.0in depth) and various components: Power Cable, RCA Input/Output cables, 2 USB Cables, Camera Input cable, GPS Antenna, Instruction Manual, Canbus Box, and Radio Adapter.
- Oskkude 7-Inch Car Radio Head Unit
- Power Cable Harness
- RCA Input/Output Cables
- USB Cables (x2)
- Camera Input Cable
- GPS Antenna
- Canbus Box (if applicable for your vehicle model)
- Radio Antenna Adapter
- User Instruction Manual (this document)
- Backup Camera (optional, if included in your purchase)
4. Installation
Professional installation is recommended for this car radio. Incorrect installation can lead to damage to the unit or your vehicle's electrical system. Always disconnect the vehicle's battery before beginning installation.
4.1. Pre-Installation Check
- Ensure the car radio dimensions (196mm x 100mm) fit your GMC Envoy's dashboard opening.
- Confirm all necessary wiring harnesses and adapters are present.
4.2. Wiring Diagram
Refer to the wiring diagram below for proper connections. Each cable is typically labeled for easy identification.

Image 4.1: Rear view of the car radio showing the various wiring harnesses and connectors for power, speakers, RCA inputs/outputs, USB, GPS antenna, and camera input.
4.3. General Installation Steps
- Remove the existing car stereo and dashboard trim.
- Connect the main power harness, speaker wires, and other essential connections according to the wiring diagram.
- Install the GPS antenna in a location with a clear view of the sky (e.g., on the dashboard).
- Route the backup camera cable (if installing) from the rear of the vehicle to the head unit.
- Connect the USB cables and route them to a convenient location (e.g., glove compartment).
- Test all functions before fully reassembling the dashboard.
- Secure the head unit in the dashboard opening and reattach the trim.
5. Initial Setup
5.1. Power On
After installation, turn on your vehicle's ignition. The car radio should power on automatically. If not, check the power connections.
5.2. Wi-Fi Connection
- Go to Settings > Network & Internet > Wi-Fi.
- Turn on Wi-Fi and select your desired network.
- Enter the password if prompted and connect.
5.3. Date and Time
Ensure the date and time are set correctly. This can usually be synchronized automatically via Wi-Fi or GPS.
6. Operating Instructions
6.1. Wireless CarPlay and Android Auto
This unit supports both wireless CarPlay for iOS devices and wireless Android Auto for Android devices, allowing you to access phone functions safely while driving.

Image 6.1: Display of Wireless CarPlay and Android Auto interfaces. CarPlay shows navigation, music, and messaging apps with Siri voice control. Android Auto shows similar apps with Google Assistant voice control.
6.1.1. Connection Steps:
- Ensure Bluetooth and Wi-Fi are enabled on your smartphone.
- On the car radio, open the 'CarPlay' or 'Android Auto' application.
- Search for the car radio's Bluetooth name on your phone and pair.
- Confirm the pairing code on both devices.
- Once paired via Bluetooth, the system will automatically establish a Wi-Fi connection for CarPlay/Android Auto.
6.1.2. Using Voice Control:
Activate Siri (for CarPlay) or Google Assistant (for Android Auto) by saying the wake phrase or pressing the voice command button on your steering wheel (if configured). You can then issue commands for navigation, calls, messages, and music playback.
6.2. GPS Navigation
The unit supports both online and offline navigation. For offline maps, download them via Wi-Fi from the app store.

Image 6.2: Top section illustrates support for various online and offline navigation apps like Google Maps, Waze, and Here Maps. The bottom section shows the Bluetooth interface for phone calls and music playback.
6.2.1. Online Navigation:
Ensure the unit is connected to Wi-Fi (via hotspot or vehicle's Wi-Fi). Open your preferred navigation app (e.g., Google Maps) and enter your destination.
6.2.2. Offline Navigation:
Download map data for your region when connected to Wi-Fi. Once downloaded, you can use navigation without an internet connection.
6.3. Bluetooth Functionality
Connect your smartphone via Bluetooth for hands-free calling and audio streaming.
6.3.1. Pairing a Device:
- On the car radio, open the Bluetooth application.
- Enable Bluetooth on your smartphone and search for available devices.
- Select the car radio's Bluetooth name (e.g., 'Oskkude CarBT') from your phone's list.
- Confirm the pairing code on both devices.
6.3.2. Hands-Free Calling:
Once paired, you can make and receive calls directly from the car radio's interface. Your phone's contact list can be synchronized.
6.3.3. Audio Streaming:
Play music from your phone through the car's speakers via Bluetooth Audio (A2DP).
6.4. Steering Wheel Control (SWC)
The unit supports learning your vehicle's steering wheel controls for convenient operation.

Image 6.3: Top section displays the Steering Wheel Control learning interface, allowing users to assign functions to physical buttons. Bottom section illustrates the automatic display of the backup camera feed when reversing.
6.4.1. Setting Up SWC:
- Go to Settings > Steering Wheel Control.
- Follow the on-screen instructions to assign functions (e.g., volume up/down, track skip, mode) to your steering wheel buttons.
6.5. Backup Camera
When a compatible backup camera is connected, the display will automatically switch to the camera view when the vehicle is put into reverse gear.
6.5.1. Functionality:
The unit supports AHD waterproof night vision cameras, providing a clear image for parking assistance, even in low-light conditions.
6.6. Split Screen Function
The split-screen feature allows you to run two applications simultaneously on the display.

Image 6.4: Top section demonstrates the split-screen feature, showing a navigation app on one side and a music player on the other. Bottom section displays the FM radio interface with frequency tuning and RDS information.
6.6.1. How to Use:
While an app is open, long-press the recent apps button or drag an app to one side of the screen (depending on the Android version) to activate split-screen mode. Then select another app to fill the other half.
6.7. FM/RDS Radio
Access your favorite radio stations with automatic or manual tuning.
6.7.1. Tuning:
Open the FM Radio app. Use the on-screen controls to scan for stations automatically or manually tune to a specific frequency. RDS (Radio Data System) will display station information where available.
7. Maintenance
- Cleaning the Screen: Use a soft, lint-free cloth to clean the touch screen. Do not use abrasive cleaners or solvents.
- Software Updates: Periodically check for software updates via Wi-Fi in the system settings to ensure optimal performance and access to new features.
- Avoid Extreme Temperatures: Do not expose the unit to extreme heat or cold, as this can affect its performance and lifespan.
8. Troubleshooting
| Problem | Possible Cause | Solution |
|---|---|---|
| Unit does not power on. | Incorrect wiring; Blown fuse; Vehicle battery issue. | Check power connections and fuses. Ensure vehicle battery is charged. |
| No sound. | Speaker wires disconnected; Volume too low; Mute activated. | Check speaker wiring. Increase volume. Deactivate mute function. |
| GPS signal weak or lost. | GPS antenna improperly installed or obstructed. | Ensure GPS antenna has a clear view of the sky. Check antenna connection. |
| CarPlay/Android Auto not connecting. | Bluetooth/Wi-Fi off on phone; Incorrect pairing; Software glitch. | Ensure phone's Bluetooth/Wi-Fi is on. Re-pair the device. Restart both phone and car radio. |
| Steering Wheel Controls not working. | SWC not configured; Wiring issue. | Go to SWC settings and re-learn the buttons. Check SWC wiring. |
| Backup camera not displaying. | Camera not connected; Reverse trigger wire not connected. | Check camera input and reverse trigger wire connections. |
9. Specifications
| Feature | Specification |
|---|---|
| Model Number | TISU-11-DYY-250750X-020 |
| Operating System | Android 14.0 |
| RAM | 2GB |
| ROM | 32GB |
| Processor | 4-Core |
| Screen Size | 7 Inch |
| Display Type | IPS Touchscreen |
| Connectivity | Wireless CarPlay, Wireless Android Auto, Bluetooth, Wi-Fi, GPS |
| Radio Tuner | FM/RDS |
| Inputs | USB, SD, AUX, AV IN, RCA, RLV (Reverse Camera) |
| Special Features | Steering Wheel Control, Split Screen, AHD Backup Camera Support |
| Compatibility | GMC Envoy 2002-2009 |
10. Warranty and Support
This Oskkude product comes with a standard manufacturer's warranty. Please refer to the warranty card included in your package for specific terms and conditions. For technical support, troubleshooting assistance, or warranty claims, please contact Oskkude customer service through the retailer where the product was purchased.
Keep your purchase receipt as proof of purchase for warranty purposes.