Introduction
Thank you for choosing the CLOUDY BAY Battery Operated Wall Sconces. This manual provides essential information for the safe and efficient installation, operation, and maintenance of your new lighting fixtures. Please read these instructions thoroughly before use and retain them for future reference.
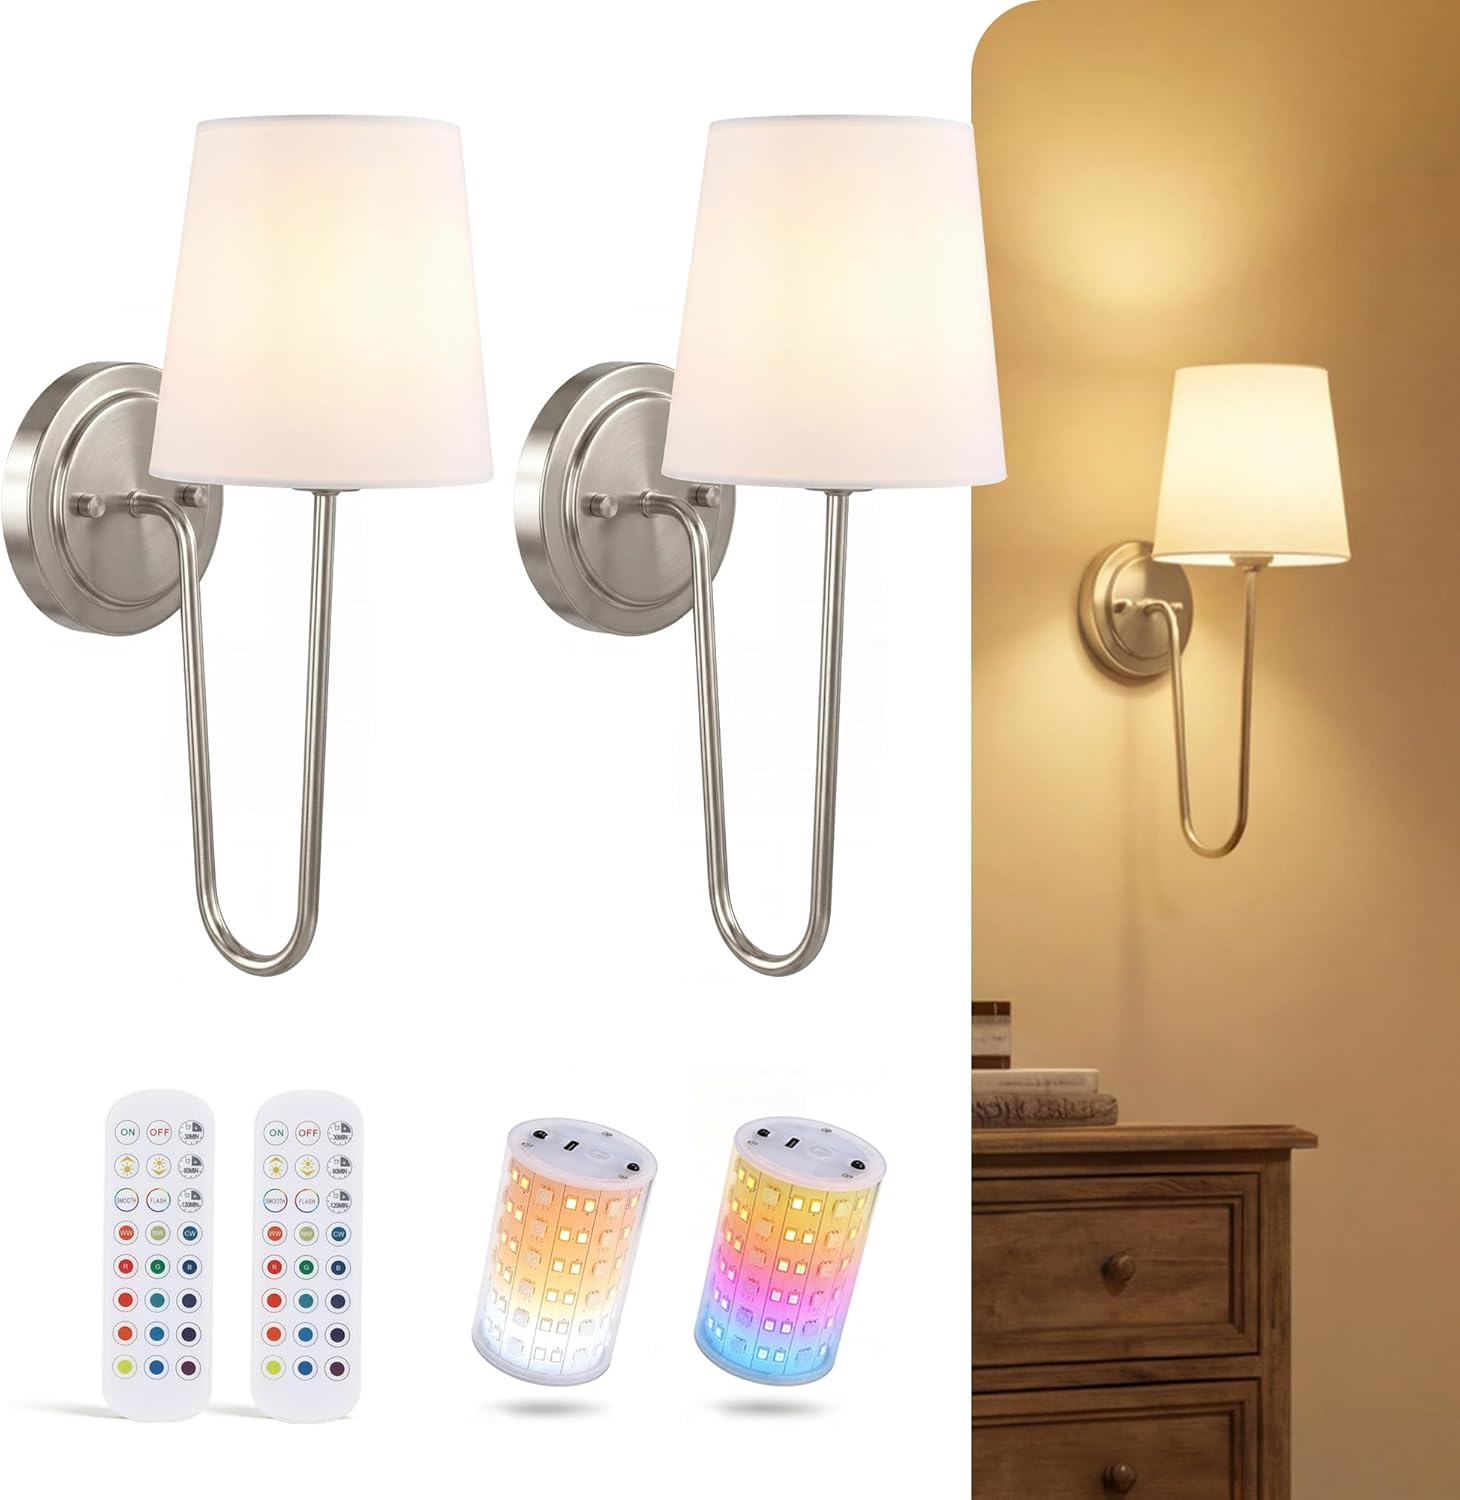
Image: Two CLOUDY BAY wall sconces with white fabric shades and brushed nickel finish, installed on a wall.
Key Features:
- Extended Runtime: Equipped with a 10,000mAh rechargeable battery, providing up to 100 hours of light at the lowest brightness setting or 25 hours at full brightness on a single charge.
- Uniform Illumination: Features 360° omnidirectional LED technology for zero dark spots and a natural linen shade for soft, flicker-free light.
- Magnetic Detachable Bulb: The magnetic bulb easily detaches for convenient USB-C charging, making installation and recharging simple without damaging walls.
- Versatile Ambiance: Offers 12 RGB colors and 3 color temperatures (3000K Warm White, 4000K Natural White, 6000K Daylight) to customize your lighting environment.
- Smart Control: Includes remote control functionality for dimming (10%-100%), color selection, and a smart timer with 30, 60, and 120-minute settings. Supports group control for multiple units.
- Premium Design: Crafted with an architectural brushed nickel finish and linen+cotton shade for a durable and elegant aesthetic.
Setup and Installation
The CLOUDY BAY wall sconces are designed for easy, cordless installation. No electrical wiring is required.
Package Contents:
- 2 x Wall Sconce Fixtures (Brushed Nickel)
- 2 x 10,000mAh Rechargeable Magnetic LED Bulbs
- 2 x Remote Controls
- Mounting Hardware (screws, anchors)
- 2 x USB-C Charging Cables (adapter not included)
Assembly Steps:
- Attach the Sconce Arm: Secure the curved sconce arm to the wall plate using the provided screws.
- Install the Shade: Place the fabric shade onto the sconce arm and secure it with the retaining ring or screw.
- Insert Magnetic Bulb: The LED bulb is magnetic. Simply place it into the designated socket within the shade. It will snap into place.

Image: A person assembling the sconce, showing the attachment of the arm to the base and the shade to the arm.

Image: A hand demonstrating the magnetic attachment of the LED bulb into the sconce fixture.
Wall Mounting:
- Choose Location: Select a desired location on your wall. Ensure the surface is suitable for mounting.
- Mark Holes: Use the wall plate as a template to mark the drilling points on the wall.
- Drill and Insert Anchors: Drill pilot holes and insert the provided wall anchors if necessary.
- Secure Wall Plate: Attach the wall plate to the wall using the mounting screws.
- Mount Sconce: Secure the assembled sconce fixture to the wall plate.
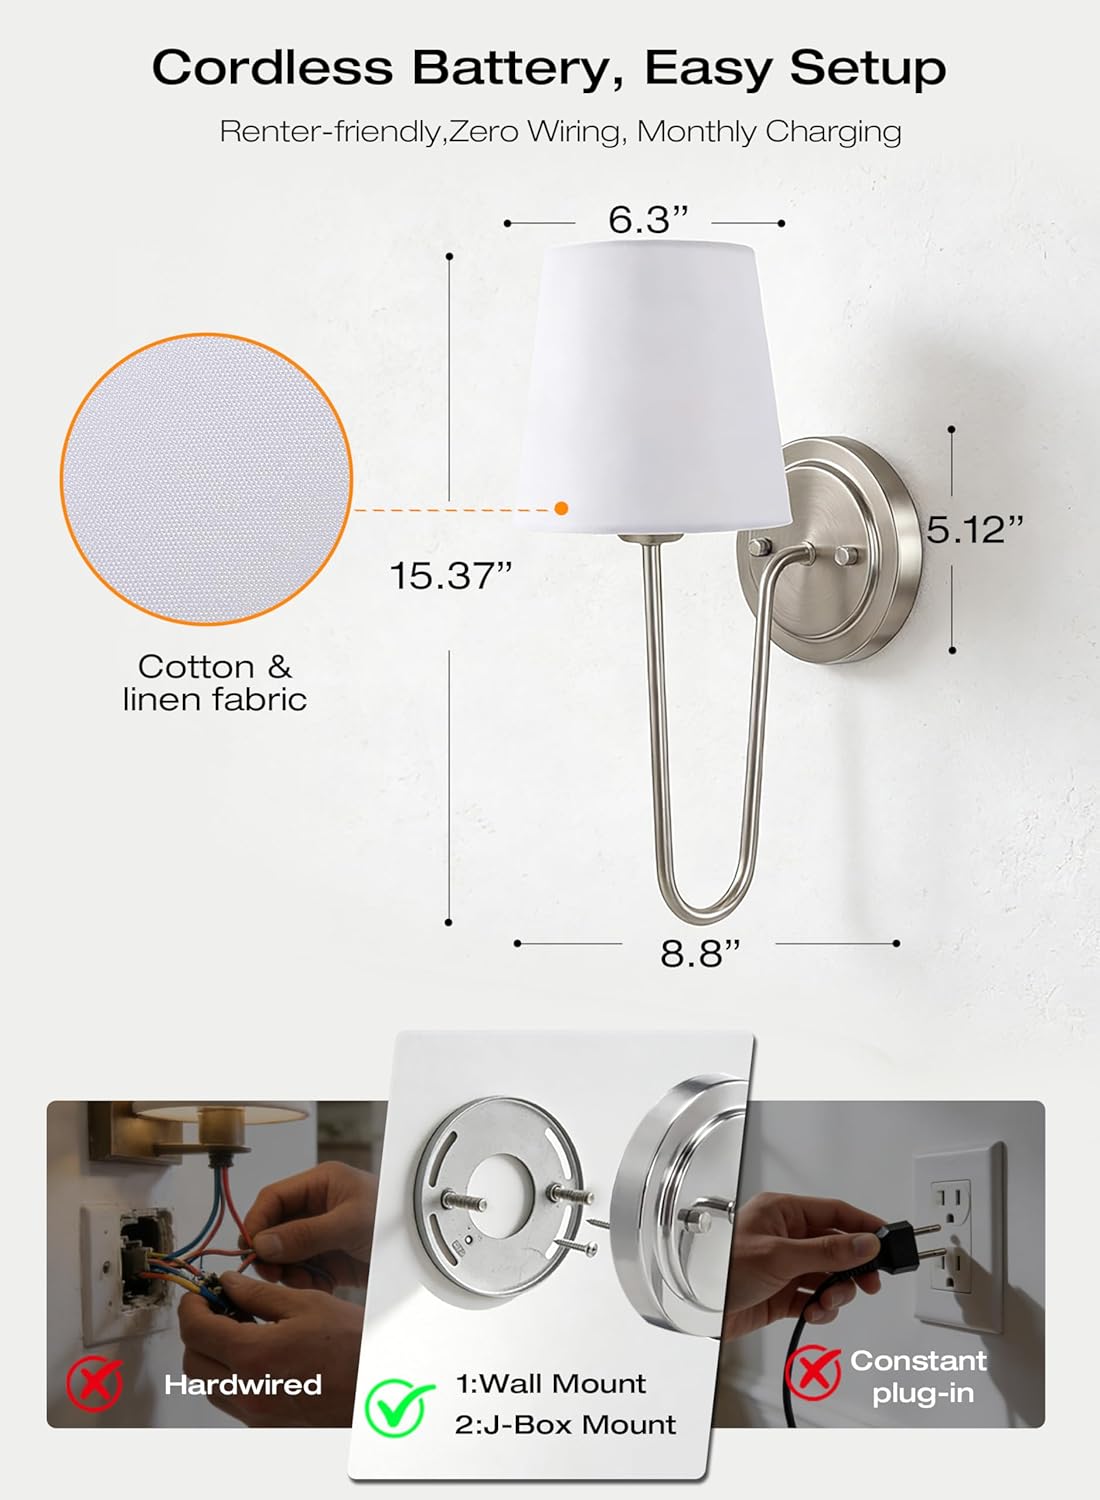
Image: A diagram illustrating the dimensions of the sconce (8.8"L x 6.3"W x 15.4"H) and showing wall mount and J-box mount options, contrasting with hardwired and constant plug-in methods.
Initial Charging:
Before first use, fully charge the LED bulbs. Detach the magnetic bulb from the sconce. Connect the USB-C charging cable to the bulb and a compatible USB power adapter (not included). The indicator light on the bulb will show charging status (e.g., red for charging, green for fully charged).
Video: An official product video demonstrating the assembly, installation, and features of the CLOUDY BAY Battery Operated Wall Sconces. It shows how to attach the sconce arm, install the shade, insert the magnetic bulb, and mount the fixture to a wall. The video also highlights the remote control functions and various lighting options.
Operating Instructions
Your CLOUDY BAY wall sconces are controlled via the included remote control.
Remote Control Functions:
- Power On/Off: Press the ON or OFF button to turn the light on or off.
- Brightness Adjustment: Use the + and - buttons to adjust brightness from 10% to 100%.
- Color Temperature Selection (3CCT): Press the dedicated buttons for 3000K (Warm White), 4000K (Natural White), or 6000K (Daylight) to change the white light tone.
- RGB Color Selection: Choose from 12 vibrant RGB colors using the color buttons on the remote.
- Dynamic Modes: Activate Flash Mode or Smooth Mode for dynamic color transitions.
- Smart Timer: Set the light to automatically turn off after 30, 60, or 120 minutes using the timer buttons.
- Group Control: One remote can control multiple sconces simultaneously. Point the remote towards the desired sconces.

Image: A living room scene with two wall sconces demonstrating the three selectable color temperatures: 3000K Warm White, 4000K Cool White, and 6000K Daylight.
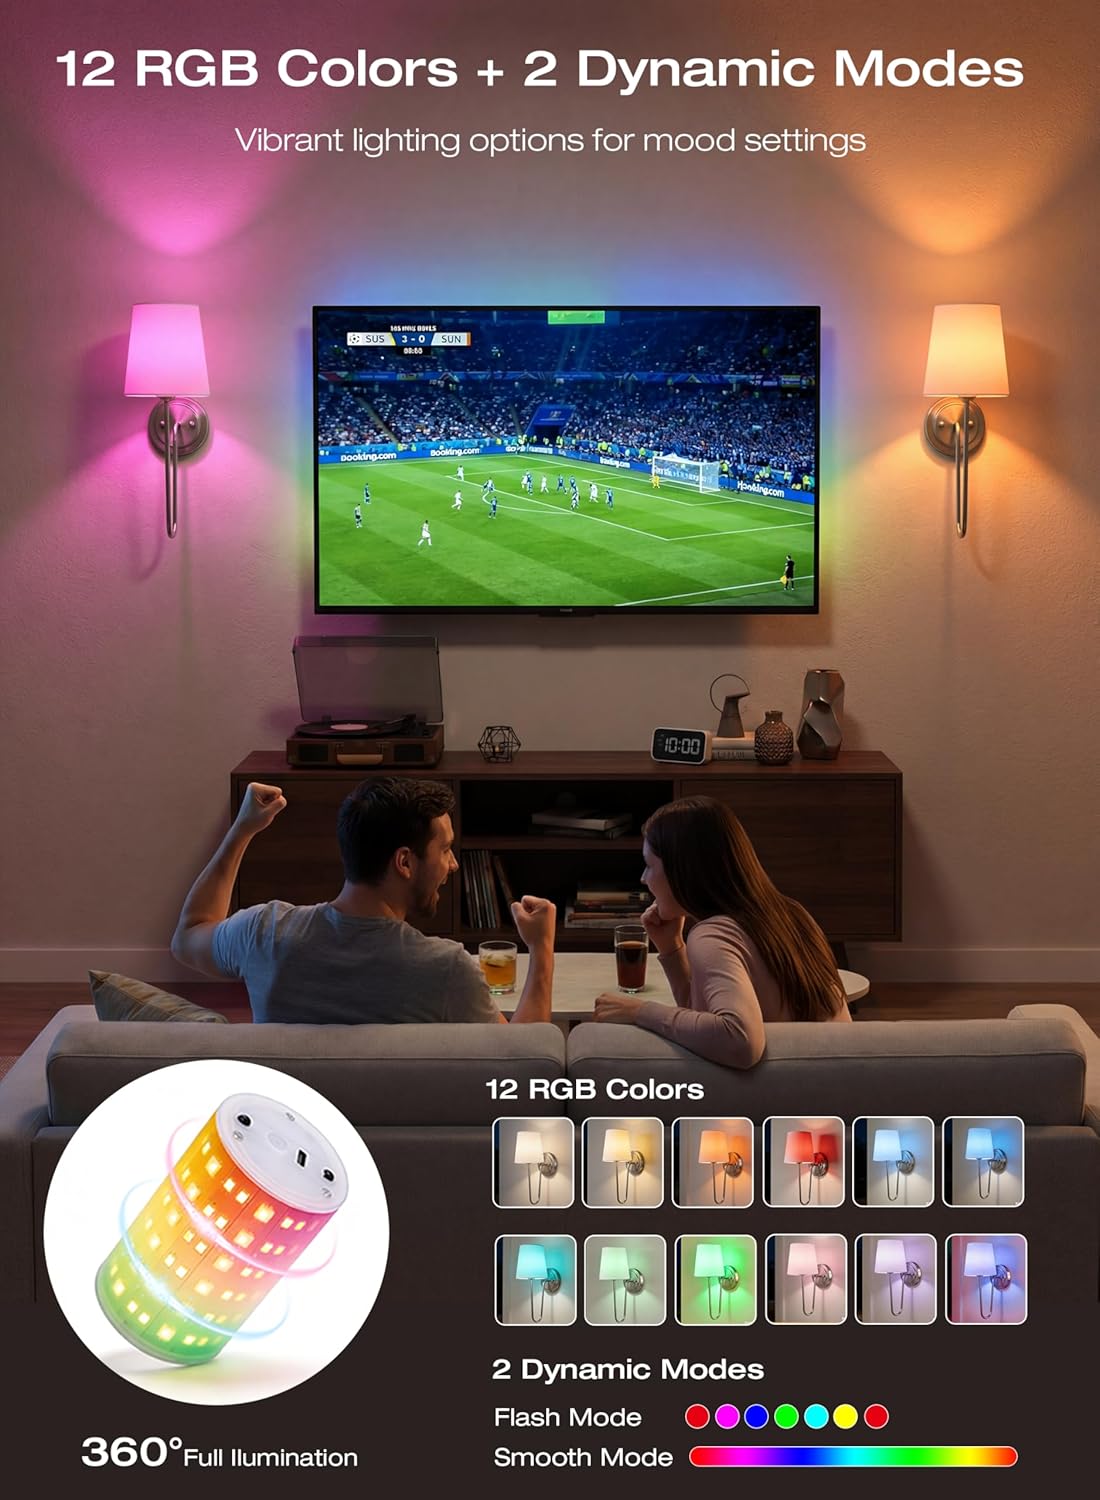
Image: A living room scene with two wall sconces illuminated in various RGB colors, showcasing the 12 color options and two dynamic modes (Flash and Smooth).

Image: A hand holding the remote control, with an overlay showing the auto timer settings (30, 60, 120 minutes) and brightness dimmable from 10% to 100%.
Maintenance
Charging the LED Bulb:
When the light output diminishes, it's time to recharge the bulb. Simply detach the magnetic bulb from the sconce fixture. Connect the provided USB-C cable to the bulb and a standard USB power adapter (e.g., phone charger, computer USB port). A full charge typically takes approximately 7 hours. The indicator light on the bulb will change from red (charging) to green (fully charged).
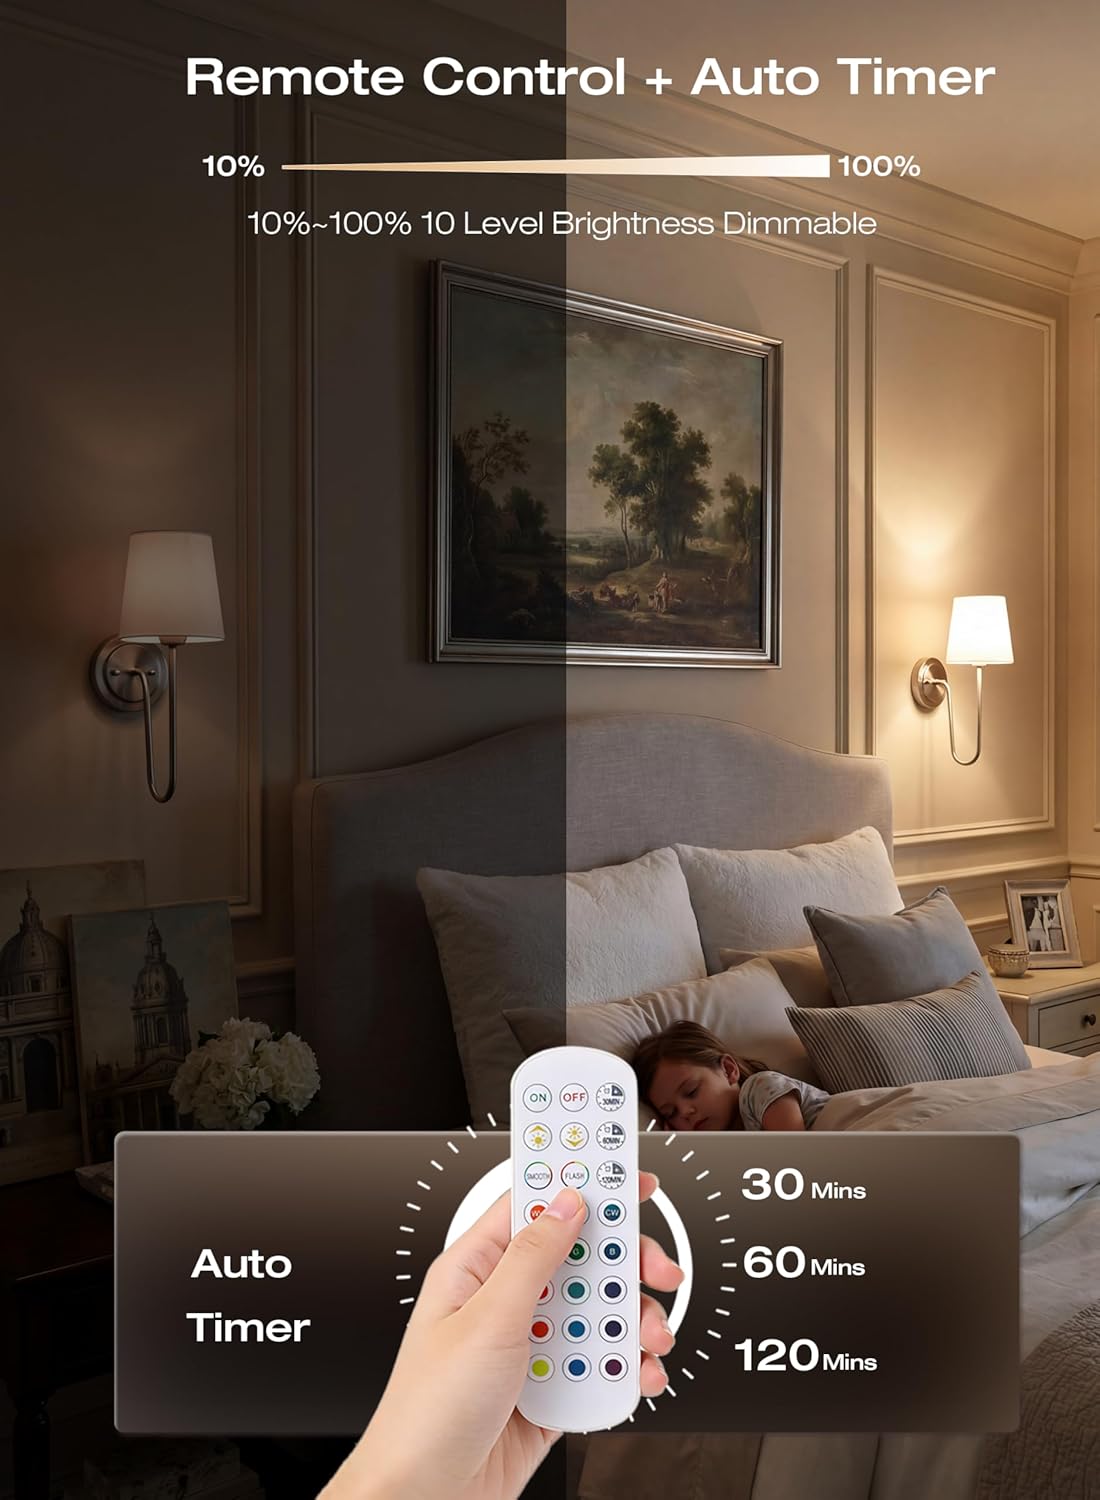
Image: A magnetic LED bulb connected to a USB-C charging cable and plugged into a wall adapter, with indicators for 'Charging' (red) and 'Fully Charged' (green).
Cleaning:
To clean the sconce fixture, wipe it with a soft, dry cloth. For the fabric shade, gently dust with a soft brush or cloth. Do not use abrasive cleaners or solvents, as these may damage the finish or fabric.
Troubleshooting
| Problem | Possible Cause | Solution |
|---|---|---|
| Light does not turn on. | Battery is depleted. | Recharge the LED bulb. |
| Bulb not properly seated. | Ensure the magnetic bulb is securely attached within the sconce. | |
| Remote control not working. | Remote battery is depleted. | Replace the remote control battery (CR2025, not included). |
| Obstruction between remote and sconce. | Ensure a clear line of sight between the remote and the sconce. | |
| Short battery life. | Frequent use at high brightness or RGB modes. | Battery life varies with brightness and color settings. Lower brightness and white light modes consume less power. Ensure the bulb is fully charged. |
Specifications
| Feature | Detail |
|---|---|
| Brand | CLOUDY BAY |
| Model Number | CBCWL001-BN-2PK |
| Color | Brushed Nickel |
| Material | Aluminum, Linen+Cotton |
| Power Source | Battery Powered (10,000mAh rechargeable) |
| Light Source | LED |
| Light Color | RGB (12 colors) + 3 White shades (3000K, 4000K, 6000K) |
| Brightness | 500 Lumens (Max) |
| Wattage | 5 watts |
| Runtime (Low Brightness) | Up to 100 hours |
| Runtime (Full Brightness) | Up to 25 hours |
| Controller Type | Remote Control, Push Button |
| Special Features | Timer, Dimmable, Magnetic Bulb, Smart Home Compatible |
| Dimensions (L x W x H) | 8.8" x 6.3" x 15.4" |
| Installation Type | Wall Mount |
Warranty Information
This CLOUDY BAY product is covered by a 1-year manufacturer's warranty from the date of purchase. This warranty covers defects in materials and workmanship under normal use. Please retain your proof of purchase for warranty claims.
Customer Support
If you have any questions, require assistance with installation, or encounter any issues with your CLOUDY BAY Battery Operated Wall Sconces, please contact our customer support team. Refer to your product packaging or the retailer's website for the most current contact information.
Manufacturer: Cloudybay Lighting Supply