Introduction
This manual provides detailed instructions for the installation, operation, and maintenance of your MekedeTech Android Car Radio. This 13-inch touchscreen unit is designed to upgrade your vehicle's infotainment system with advanced features like wireless CarPlay, Android Auto, 4G LTE connectivity, and GPS navigation. Please read this manual thoroughly before installation and use to ensure proper function and longevity of your device.
Applicable Vehicle Models
This Android car radio is specifically designed for the following vehicle models:
- Mercedes Benz Sprinter Freightliner W907 VS30 MK3 (2019-2023)
Important: If your vehicle is a low-end model with an OEM navigation touch screen, you may need an extra wiring harness. Please contact support for clarification before installation.

Image: The MekedeTech Android Car Radio seamlessly integrated into the dashboard of a compatible Mercedes Benz Sprinter. The image also illustrates the appearance of the dashboard before and after the installation of the unit, highlighting the upgrade.
Features Overview
- Operating System: Android OS
- Processor: 8-Core A53 1.8GHz CPU
- Memory: 8GB RAM, 128GB ROM
- Display: 13-inch IPS Touch Screen (1024*600 resolution)
- Connectivity: Built-in 4G LTE, WiFi, Bluetooth, USB
- Navigation: Built-in GPS navigation with worldwide map support
- Smartphone Integration: Wireless CarPlay and Android Auto
- Audio: Built-in DSP sound system, AM/FM radio, 4*50W power output
- Control: Support for factory steering wheel controls, Touchscreen, App control
Setup and Installation
1. Pre-Installation Checks
Before beginning installation, ensure your vehicle's ignition is off and the battery is disconnected. Verify all included components against the packing list. For vehicles with OEM navigation touch screens, confirm if an additional wiring harness is required.
2. Physical Installation
The unit is designed for a plug-and-play installation for most compatible models. Carefully remove the factory radio and dashboard trim. Connect the provided wiring harness to the vehicle's existing connectors. Ensure all connections are secure before mounting the new head unit.
3. Cooling Fan Setup
The unit includes a cooling fan to manage internal temperatures, especially during prolonged use or in hot climates. Proper setup of the cooling fan is crucial for optimal performance and longevity.
- Connect the cooling fan cable to the designated port on the main unit.
- Access the device settings on the car radio.
- Navigate to "Device" -> "Sound" -> "AMP ON" to activate the amplifier.
- The cooling fan will automatically start operating when needed.

Image: An illustration detailing the internal architecture of the car radio, including the 8-core CPU, 8GB RAM, and 128GB ROM. The image also visually demonstrates the effectiveness of the cooling fan in maintaining optimal operating temperatures compared to units without one, alongside a step-by-step guide for enabling the cooling fan feature.
4. Initial Power On
Reconnect the vehicle battery. Turn on the ignition. The unit should power on automatically. Follow any on-screen prompts for initial setup, such as language selection and time zone.
Operating Instructions
1. Touch Screen and Basic Navigation
The 13-inch IPS touch screen allows for intuitive control. Swipe left/right to navigate between home screens, tap icons to open applications, and use pinch-to-zoom gestures in maps or image viewers.
2. Steering Wheel Controls
The unit supports your vehicle's factory steering wheel controls. This allows you to adjust volume, change tracks, and answer calls without taking your hands off the wheel. Configuration may be required in the settings menu under "Steering Wheel Control" or similar.
3. Wireless CarPlay and Android Auto
Connect your smartphone wirelessly to access CarPlay (for iOS devices) or Android Auto (for Android devices). This feature allows you to use navigation, make calls, send messages, and listen to music directly from your phone's interface displayed on the car radio screen.
Connection Steps:
- Ensure Bluetooth is enabled on your smartphone and the car radio.
- On the car radio, go to the "CarPlay" or "Android Auto" application.
- Select "Connect BT" and pair your phone via Bluetooth.
- Once paired, select "Car Link" and wait for the connection to establish.
- Note: A USB cable connection can also be used for initial setup or if wireless connection issues occur.
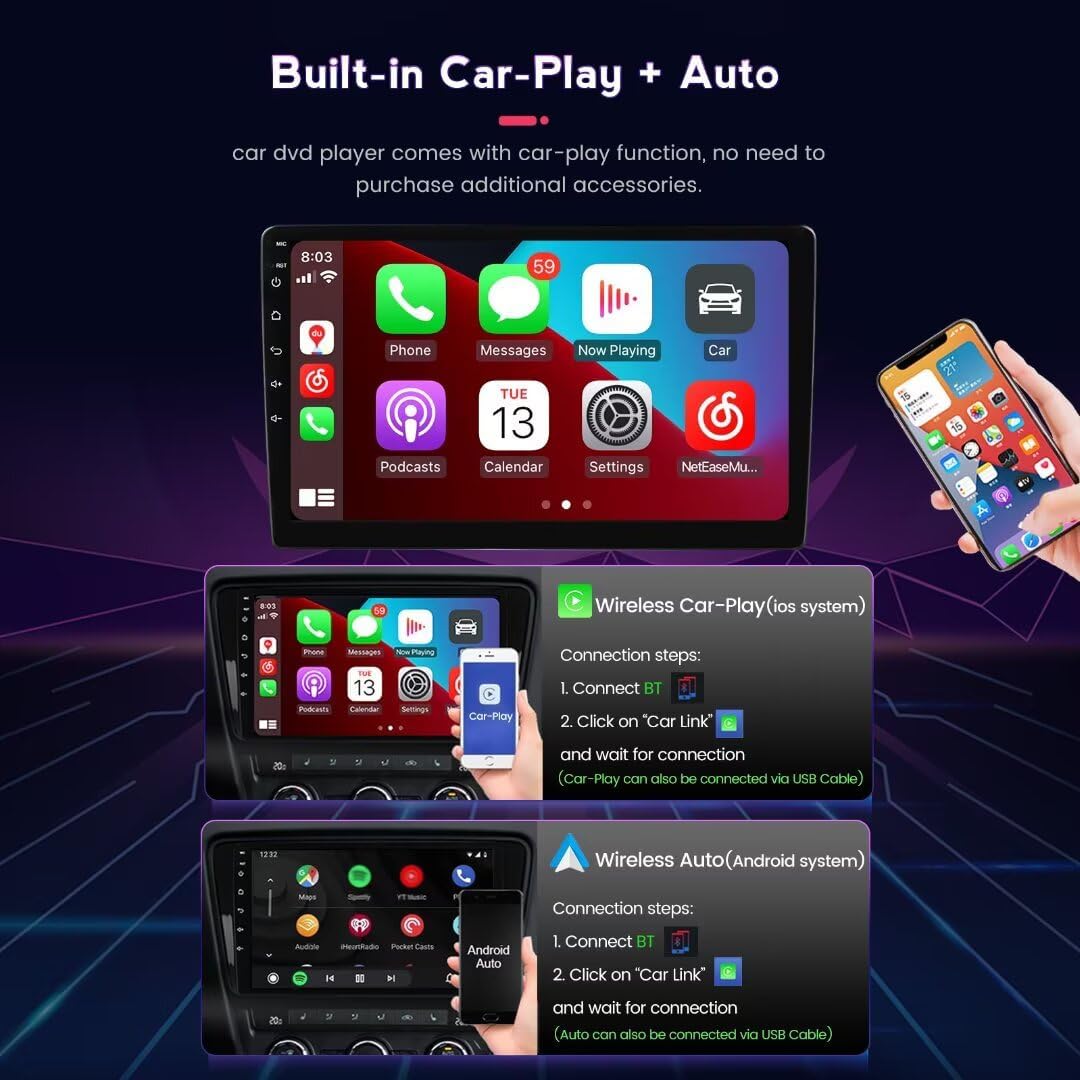
Image: Visual representation of the Wireless CarPlay and Android Auto functionalities on the car radio's 13-inch screen. The image details the user interface for both systems and provides a guide for connecting a smartphone wirelessly.
4. 4G LTE and WiFi Connectivity
The unit features built-in 4G LTE and WiFi modules for internet access. You can insert a SIM card into the dedicated slot for 4G data or connect to a WiFi hotspot.
4G LTE Setup:
- Locate the 4G SIM card slot (one on the back of the main unit, one on the RCA cable).
- Insert a compatible 4G SIM card.
- Access network settings on the device to configure APN settings if necessary.
WiFi Setup:
- Go to "Settings" -> "Network & Internet" -> "Wi-Fi".
- Turn on Wi-Fi and select your desired network.
- Enter the password if prompted.

Image: A detailed view of the unit's 4G LTE module, including the SIM card slot for cellular data access. Additionally, an illustration of the Digital Sound Processor (DSP) is provided, indicating its role in delivering high-quality audio.
5. GPS Navigation
The built-in GPS module provides accurate navigation. Pre-installed maps are available, and you can download additional navigation apps from the Google Play Store once connected to the internet.
6. Audio and Video Playback
The unit supports various audio (APE, FLAC, WAV, MP3, WMA) and video (MKV, RMVB, AVI, MP4, MDV) formats. Play media from USB drives, internal storage, or streaming apps. The built-in DSP sound system enhances audio quality, offering multi-dimensional surround sound effects.
7. App Downloads
With internet connectivity, you can download and install various applications from the Google Play Store, expanding the functionality of your car radio.
Maintenance
- Screen Cleaning: Use a soft, lint-free cloth slightly dampened with water or a screen cleaner. Avoid harsh chemicals or abrasive materials.
- Software Updates: Periodically check for software updates in the system settings to ensure optimal performance and access to new features.
- General Care: Avoid exposing the unit to extreme temperatures, direct sunlight for extended periods, or excessive moisture.
Troubleshooting
| Problem | Possible Cause | Solution |
|---|---|---|
| Unit does not power on. | Incorrect wiring, blown fuse, vehicle battery disconnected. | Check all wiring connections. Inspect vehicle fuses. Ensure battery is connected and charged. |
| No sound. | Volume too low, incorrect audio source, speaker wiring issues, amplifier off. | Increase volume. Select correct audio source. Check speaker connections. Ensure AMP is enabled in settings. |
| Wireless CarPlay/Android Auto not connecting. | Bluetooth not paired, "Car Link" not selected, phone compatibility. | Ensure Bluetooth is paired. Re-attempt "Car Link" connection. Try connecting via USB cable. Check phone compatibility. |
| GPS signal weak or inaccurate. | Antenna obstruction, poor satellite reception. | Ensure GPS antenna has a clear view of the sky. Move to an open area. |
| Unit is slow or unresponsive. | Too many apps running, low memory, software glitch. | Close unnecessary applications. Restart the unit. Check for software updates. |
| Installation difficulties (as per customer review). | Complex wiring, specific vehicle requirements. | Refer to the detailed wiring diagram provided with the product. Contact MekedeTech support for specific vehicle wiring guidance. Consider professional installation if unsure. |
Specifications
| Brand | MekedeTech |
| Model | 8-Core 8+128G |
| Operating System | Android OS |
| CPU | 8-Core A53 1.8GHz |
| RAM | 8GB |
| ROM | 128GB |
| Screen Size | 13 Inches |
| Screen Resolution | 1024*600 IPS |
| Power Output | 4*50W |
| Connectivity | 4G LTE, WiFi, Bluetooth, USB |
| Navigation | Built-in GPS (Worldwide Map Type) |
| Smartphone Integration | Wireless CarPlay, Wireless Android Auto |
| Audio Format Support | APE/FLAC/WAV/MP3/WMA etc. |
| Video Format Support | MKV/RMVB/AVI/MP4/MDV etc. |
| Special Features | Built-in DSP, Steering Wheel Control Support, App Download |
Warranty Information
This MekedeTech Android Car Radio comes with a 1-Year Warranty from the date of purchase. This warranty covers manufacturing defects and malfunctions under normal use. It does not cover damage caused by improper installation, misuse, accidents, or unauthorized modifications. Please retain your proof of purchase for warranty claims.
Customer Support
For technical assistance, troubleshooting, or warranty inquiries, please contact MekedeTech customer support. Refer to the contact information provided with your product packaging or visit the official MekedeTech website for support resources.
Online Resources: MekedeTech Amazon Store