Product Overview
This product consists of high-quality wheel nut caps designed to protect your vehicle's wheel nuts from rust and enhance their appearance. Made from durable plastic, these caps offer stable performance and are resistant to climate variations, ensuring no distortion under extreme temperatures. The set includes 20 wheel nut caps and a specialized removal tool, providing a complete solution for most car wheels.
The caps are available in 17mm, 19mm, and 21mm inner diameters to fit corresponding wheel bolts or nuts. They are designed for easy installation and removal, securely fitting over bolts without easily falling off. These caps provide dustproof protection and contribute to a clean, finished look for your vehicle's wheels.

Specifications
| Feature | Detail |
|---|---|
| Material | High-quality plastic |
| Available Sizes (Inner Diameter) | 17mm, 19mm, 21mm |
| Color Options | Black, Silver, Grey |
| Compatibility | Suitable for 17mm, 19mm, or 21mm car wheel screws/bolts |
| Package Contents | 20 x Wheel Nut Caps, 1 x Removal Tool |
| Brand | Generic |
| Model Number | iZWGogjQHGypAaZS |

Installation Instructions
Follow these steps to properly install the wheel nut hub screw covers on your vehicle. Ensure your vehicle is parked on a level surface and the engine is off before beginning.
- Identify Correct Size: Before installation, verify that the wheel nut covers match the size of your vehicle's wheel bolts (17mm, 19mm, or 21mm).
- Clean Wheel Nuts: Ensure the existing wheel nuts are clean and free from dirt, rust, or debris. This will ensure a secure fit.
- Position the Cap: Take one wheel nut cover and align it directly over a wheel bolt.
- Press to Install: Firmly press the cap straight onto the wheel bolt until it clicks into place. Do not twist or force the cap at an angle.
- Verify Fit: Gently tug on the installed cap to ensure it is securely seated and does not easily come off.
- Repeat: Install the remaining caps on all wheel bolts.
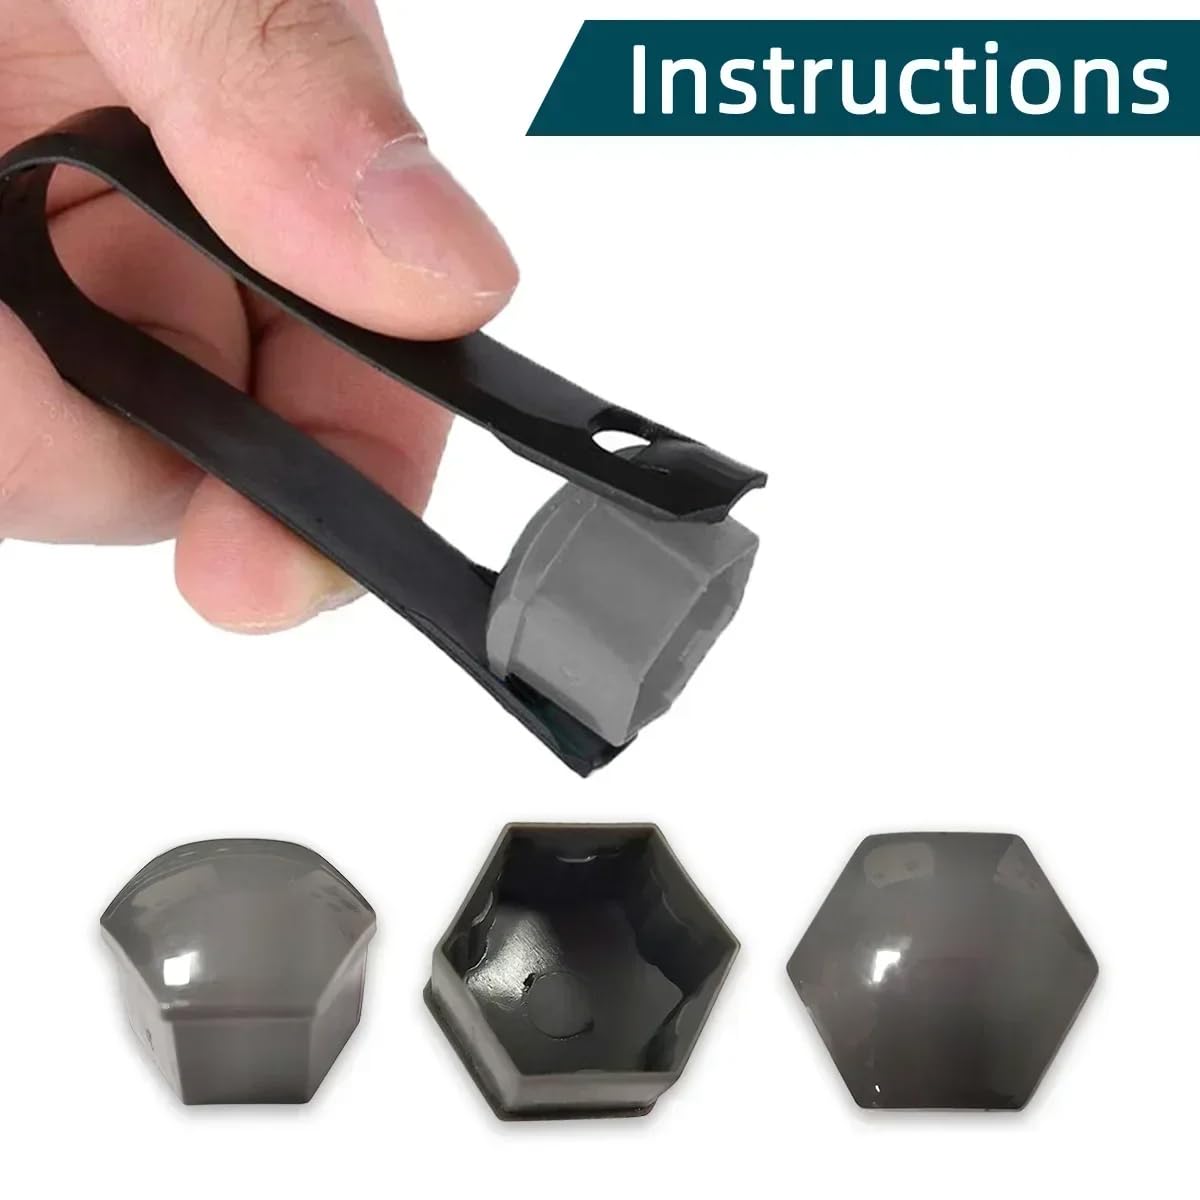
- Removal: To remove a cap, use the provided removal tool. Hook the tool under the edge of the cap and gently pry it off.


Maintenance
These wheel nut covers require minimal maintenance due to their durable plastic construction. To keep them looking their best:
- Cleaning: Regularly wipe the caps with a soft cloth and mild soap and water to remove dirt and road grime. Avoid abrasive cleaners or harsh chemicals that could damage the plastic finish.
- Inspection: Periodically check the caps to ensure they are still securely attached to the wheel bolts. If any cap appears loose, remove and re-install it firmly.
- Climate Resistance: The material is designed to withstand various climate conditions without distortion or degradation.
Troubleshooting
- Cap Does Not Fit: Ensure you have selected the correct size (17mm, 19mm, or 21mm) for your vehicle's wheel bolts. Measure your wheel bolts if unsure.
- Cap Falls Off: Ensure the cap was pressed firmly and straight onto the bolt until it clicked into place. The bolt surface should be clean and free of obstructions.
- Difficulty Removing Cap: Use the provided removal tool as instructed. Do not use excessive force or sharp objects that could damage the cap or wheel.
Safety Information
When working with vehicle wheels and components, always prioritize safety:
- Ensure the vehicle is parked on a stable, level surface and the parking brake is engaged.
- Never attempt to install or remove wheel components while the vehicle is in motion or running.
- If you are unsure about any installation step, consult a professional mechanic.
- Keep small parts, including the caps and tool, out of reach of children.
Warranty and Support
This product typically comes with a standard return policy, allowing for refunds or replacements within 30 days of purchase. For specific warranty details, product support, or to report any issues, please contact the seller directly through your purchase platform. Provide your order details and a clear description of the issue for prompt assistance.