1. Introduction
Welcome to the COROS PACE 4 Running and Sports Watch user manual. This guide provides essential information for setting up, operating, maintaining, and troubleshooting your new device. The COROS PACE 4 is designed to enhance your training and daily activities with its advanced features, including an AMOLED display, high-precision GPS, and extensive activity tracking capabilities.

Figure 1: COROS PACE 4 Running and Sports Watch
2. Product Overview and Features
The COROS PACE 4 is equipped with a range of features to support your athletic performance and daily well-being:
-
AMOLED Display: The 1.2-inch AMOLED touchscreen delivers vibrant colors and sharp visuals. Brightness automatically adjusts to ambient light, ensuring high visibility in any environment. A new action button has been added, allowing for quick information checks and smooth operations during training via touch.

Figure 2: AMOLED Display Quality
-
Long Battery Life: Despite featuring an AMOLED display, a large-capacity battery and superior algorithms provide up to 19 days of normal use and up to 31 hours in dual-frequency all-system GPS mode, extending battery life by 16 hours compared to COROS PACE 3. Use it without battery concerns during long training sessions or expeditions.

Figure 3: Extended Battery Performance
-
Ultralight Technology: Achieves an astonishingly light weight of just 32g when worn with the nylon band. Provides a fit so comfortable you'll forget it's there, even during long wear or intense training. The sophisticated 11.8mm thin design looks stylish not only in sports but also in all daily situations.

Figure 4: Ultralight Design
-
Built-in Microphone: Using the COROS PACE 4's voice recording tool, you can record training sessions by voice at the end of an activity, which can then be transcribed in the app, allowing you to accurately recall session details. The voice pin feature allows you to save locations, sights, and emotions from moments during your training.

Figure 5: Voice Recording Functionality
-
High-Precision GPS & Route Navigation: With all-system and dual-frequency satellite modes, accurate location information can be obtained instantly in any environment. Easily create custom routes by setting destinations on the COROS app's route page and quickly sync them to your COROS PACE 4. Utilize the navigation function to run with your companions without getting lost!

Figure 6: High-Precision GPS and Route Navigation
-
Extensive Activity Modes: Supports a wide range of activity modes. In addition to running, cycling, swimming, and strength training, it includes over 30 sports modes such as trail running and skiing.
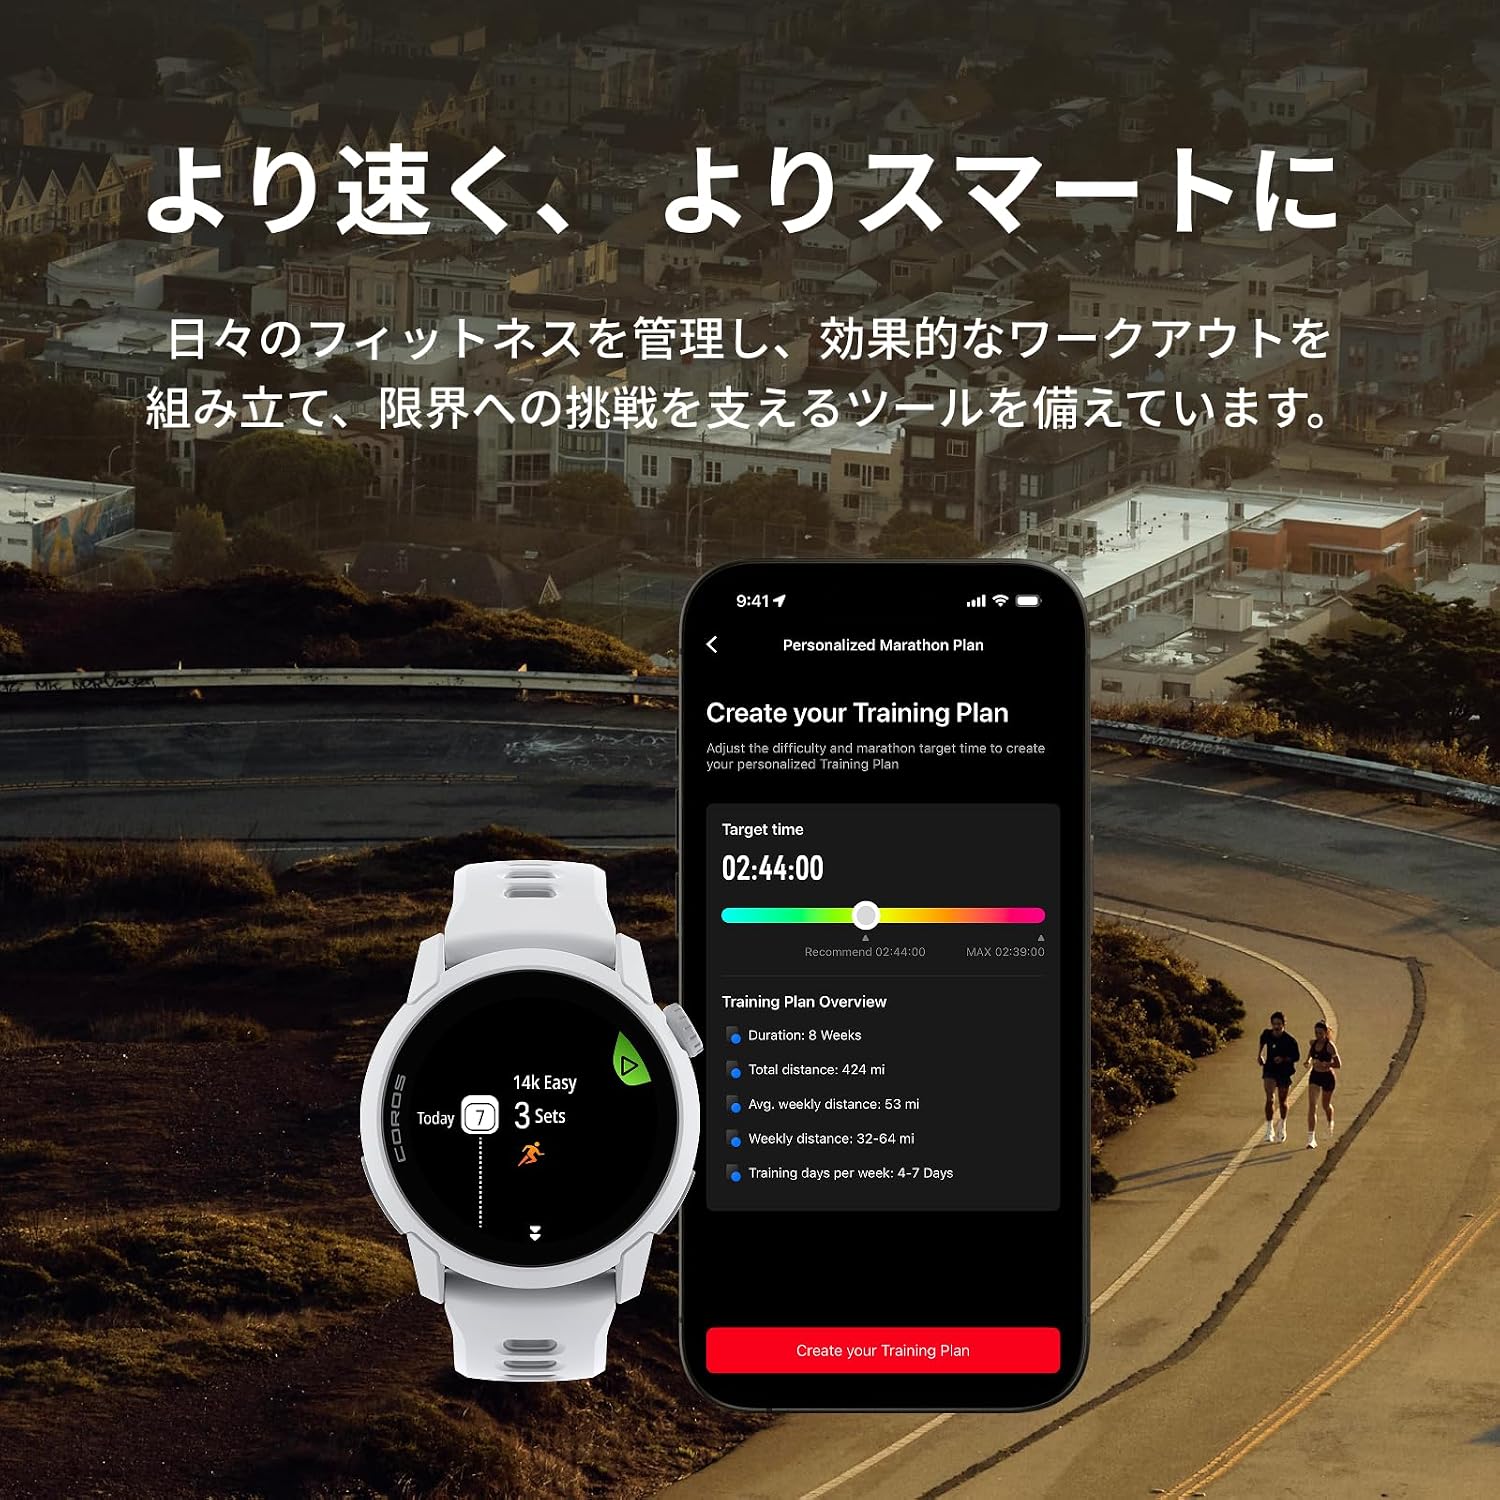
Figure 7: Training Plan and Activity Modes
-
USB Type-C Charging Supported: The COROS PACE 4 features an improved charging port, allowing charging with a USB Type-C cable via the included keychain adapter. This offers compatibility with other gadgets and smartphones, helping to reduce your luggage. Note: A Type-C charging cable is not included. Original COROS charging cables are not compatible with COROS PACE 4. Compatible charging cable standard: USB Type-C 2.0/3.0 charging cable. USB Type-C 1.1 charging cables are not compatible.

Figure 8: Box Contents with USB Type-C Adapter
3. Setup
3.1 Initial Charging
Before first use, fully charge your COROS PACE 4. Connect the included keychain adapter to a USB Type-C 2.0/3.0 charging cable (not included) and then to a power source. Attach the adapter to the charging port on the back of your watch. A full charge typically takes approximately 2 hours.
3.2 Pairing with Your Smartphone
- Download the COROS app from your smartphone's app store (iOS or Android).
- Open the COROS app and create an account or log in.
- Turn on your COROS PACE 4 by pressing and holding the power button.
- In the COROS app, navigate to the 'Device' tab and select 'Add New Device'.
- Follow the on-screen instructions to pair your watch. This usually involves confirming a code displayed on both your watch and phone.
3.3 Basic Watch Setup
After pairing, the app will guide you through initial settings such as language, time format, and personal profile information. Ensure all settings are accurate for optimal performance tracking.
4. Operating Instructions
4.1 Navigation
- Touchscreen: Swipe up, down, left, or right to navigate through menus and widgets. Tap to select items.
- Digital Dial: Rotate the digital dial to scroll through lists and adjust settings. Press the dial to confirm selections or return to the previous screen.
- Action Button: The dedicated action button provides quick access to frequently used functions or can be customized for specific actions during workouts.
4.2 Activity Tracking
The COROS PACE 4 supports over 30 sports modes. To start an activity:
- From the watch face, press the digital dial to access the main menu.
- Scroll to and select 'Activity'.
- Choose your desired sport mode (e.g., Run, Bike, Swim, Trail Run).
- Wait for GPS signal acquisition (if applicable).
- Press the digital dial or action button to start the activity.
4.3 GPS and Route Navigation
The watch utilizes dual-frequency GPS for high accuracy. You can create and sync routes from the COROS app to your watch for guided navigation during activities. During a navigation activity, the watch will display your path and provide turn-by-turn directions.
4.4 Voice Recording and Music
Use the built-in microphone to record voice notes during or after activities. These recordings can be transcribed in the COROS app. The watch also supports music playback, allowing you to store and listen to music directly from your device via Bluetooth headphones.
4.5 Health Monitoring
The COROS PACE 4 continuously monitors various health metrics, including heart rate, sleep stages, and recovery status. Access these insights through the watch widgets or the COROS app to track your progress and optimize your training.

Figure 9: Recovery and Health Tracking
5. Maintenance
5.1 Cleaning Your Watch
- Regularly clean your watch and band with a soft, damp cloth.
- Avoid using harsh chemicals or abrasive materials, as these can damage the device.
- Rinse the watch with fresh water after exposure to sweat, saltwater, or chlorine.
- Ensure the charging port is dry before charging.
5.2 Battery Care
- To prolong battery life, avoid fully discharging the watch frequently.
- Store the watch in a cool, dry place when not in use for extended periods.
- Avoid exposing the watch to extreme temperatures.
6. Troubleshooting
6.1 Watch Not Turning On
- Ensure the watch is fully charged. Connect it to the charger for at least 30 minutes.
- Perform a soft reset by pressing and holding the digital dial for 15 seconds.
6.2 GPS Signal Issues
- Ensure you are in an open outdoor area with a clear view of the sky.
- Update the watch firmware via the COROS app to ensure the latest GPS satellite data.
- Wait a few minutes for the watch to acquire a stable GPS signal before starting an activity.
6.3 Pairing Problems
- Ensure Bluetooth is enabled on your smartphone.
- Restart both your watch and smartphone.
- Try unpairing and re-pairing the device through the COROS app.
For further troubleshooting, please refer to the official COROS support website or contact customer service.
7. Specifications
| Feature | Specification |
|---|---|
| Model Number | W335 |
| Display Type | AMOLED |
| Screen Size | 1.2 inches |
| Product Weight | 32 grams |
| Band Width | 22 millimeters |
| Memory Storage Capacity | 4 GB |
| Connectivity Technology | Bluetooth |
| Supported Satellite Systems | GLONASS, GPS, Galileo, BeiDou |
| Average Battery Life (Normal Use) | 19 days |
| Average Battery Life (Dual-Frequency GPS) | 31 hours |
| Charging Port | USB Type-C (2.0/3.0 compatible) |
| Features | Voice pin function, Route navigation supported, Touchscreen |
| UPC | 810005784993 |
8. Warranty and Support
For detailed warranty information, please refer to the warranty card included with your product or visit the official COROS website. COROS provides customer support for product inquiries, technical assistance, and warranty claims.
Official COROS Website: www.coros.com
Please ensure you have your product model and serial number ready when contacting support.