
Introduction
Thank you for purchasing the Pyniro Android Car Radio. This manual provides detailed instructions for the installation, operation, and maintenance of your new car stereo system. This unit is specifically designed for Chevrolet Camaro models from 2011 to 2015 and includes features such as Android 13, 2GB RAM, 64GB storage, wireless CarPlay, wireless Android Auto, Bluetooth, and support for a backup camera.
Please read this manual thoroughly before installation and use to ensure proper function and to avoid damage to the unit or your vehicle. Keep this manual for future reference.
Package Contents
Before proceeding with installation, please ensure all components listed below are present in your package. If any items are missing or damaged, contact customer support.

Image: This image displays the various components you should find in your package. Please verify all items are present before beginning installation.
- Car Radio Head Unit
- RCA Cable
- Power Cable
- GPS Module
- OEM Rear Camera Cable
- Speaker (likely external, or for specific function)
- Can Bus Decoder
- Crowbar (plastic trim removal tool)
- Reversing Line (trigger wire for backup camera)
- Antenna Adapter
- Screwdriver
- Original USB Adapter
- USB Cable (x2)
- Microphone
- Dash Kit (for seamless integration)
Installation Guide
Warning: Incorrect installation can cause damage to the unit or your vehicle's electrical system. If you are unsure about any steps, it is highly recommended to seek professional installation.

Image: This image illustrates the visual transformation of your Camaro's dashboard from the original radio to the new Pyniro Android Car Radio. Professional installation is recommended.
Preparation:
- Park your vehicle on a level surface and engage the parking brake.
- Turn off the engine and remove the key from the ignition.
- Disconnect the negative terminal of your car battery to prevent electrical shorts.
- Gather all necessary tools, including the provided crowbar and screwdriver.
Removal of Original Radio:
- Carefully use the plastic crowbar to pry off the trim panels surrounding the original radio.
- Unscrew any retaining screws holding the original radio in place.
- Gently pull out the original radio and disconnect all wiring harnesses and antenna cables.
Installation of Pyniro Car Radio:
- Connect the provided power cable, RCA cables, GPS module, and OEM rear camera cable to the corresponding ports on the new Pyniro head unit.
- Ensure the Can Bus decoder is correctly connected. The image "STEERING WHEEL CONTROL" mentions "Please first check whether the Canbus and the 8P line of the Canbus are connected to the device."
- Connect the antenna adapter to your vehicle's antenna cable and then to the head unit.
- If installing a backup camera (not included), connect its video output to the "CAM IN" or "REVERSE IN" port on the head unit and its power/trigger wire to the vehicle's reverse light circuit and the head unit's reverse trigger wire.
- Carefully slide the new head unit into the dashboard opening.
- Secure the head unit with screws and reattach the trim panels.
- Reconnect the negative terminal of your car battery.
Initial Setup
- First Power On: After installation, turn on your vehicle's ignition. The unit should power on automatically.
- Language and Time Settings: Follow the on-screen prompts to select your preferred language, time zone, and date.
- Wi-Fi Connection: Navigate to Settings > Network & Internet > Wi-Fi. Connect to an available Wi-Fi network to enable online features, app downloads, and system updates.
- Google Account: Sign in with your Google account to access the Google Play Store and synchronize data.
- System Updates: Check for system updates in Settings > About device > System update to ensure you have the latest software and features.
Operating Instructions
1. General Interface and Navigation
The Pyniro car radio runs on Android 13, providing a familiar smartphone-like interface. Navigate through applications by swiping, tapping, and using the physical buttons on the unit.

Image: This image displays the main user interface of the Android 13 system, highlighting key features like Wi-Fi, CarPlay/Android Auto, Maps, Bluetooth, Split-screen, and Steering Wheel Control.
- Home Screen: Access frequently used apps and widgets.
- App Drawer: Swipe up or tap the app icon to view all installed applications.
- Settings: Access system configurations for network, display, sound, and more.
- Split-Screen: Some applications support split-screen mode, allowing two apps to run simultaneously.
2. Bluetooth Music & Calls
Connect your smartphone via Bluetooth for hands-free calling and wireless audio streaming.
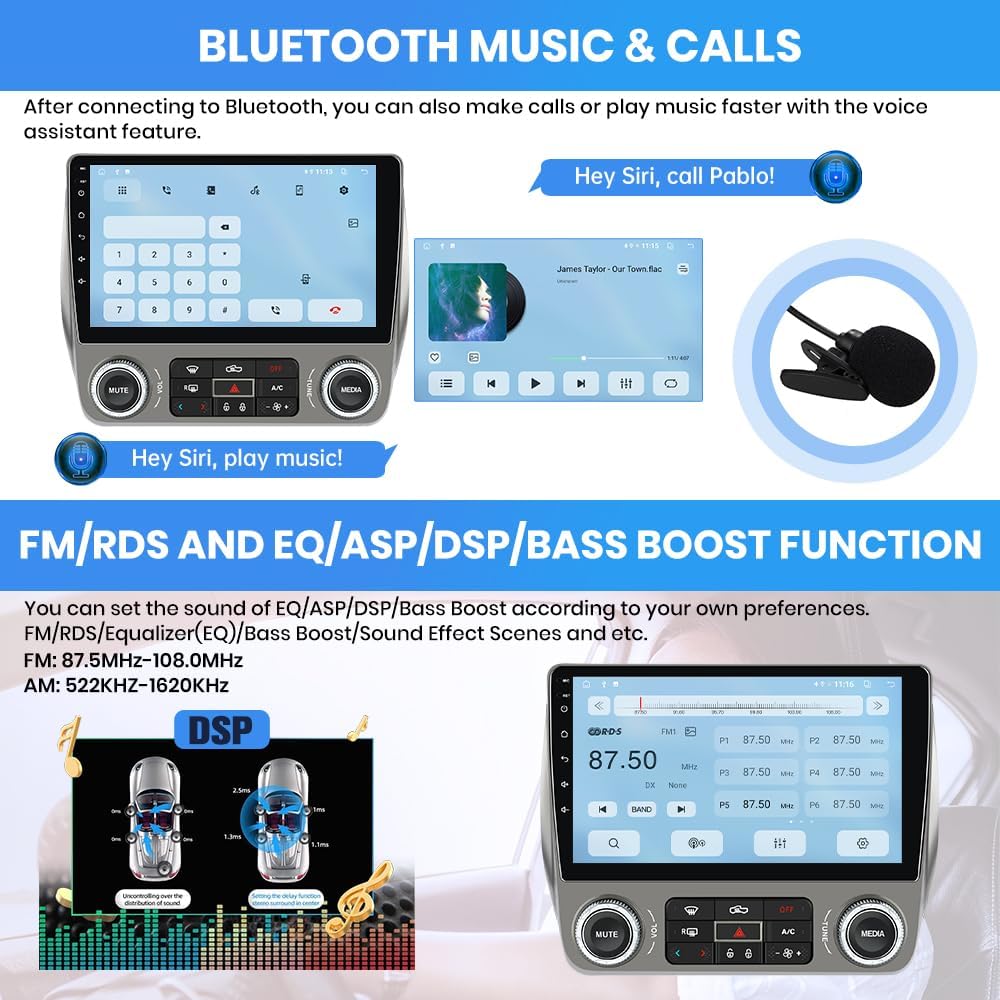
Image: This image illustrates the Bluetooth functionality, allowing for wireless music streaming and hands-free calls, often with voice assistant integration.
- Pairing:
- Go to Settings > Bluetooth on the car radio.
- Enable Bluetooth on your smartphone and search for available devices.
- Select "Pyniro Car Radio" (or similar name) from the list on your phone and confirm the pairing code.
- Making/Receiving Calls: Use the on-screen dialer or your phone's contact list displayed on the radio.
- Music Streaming: Play audio from your phone's music app, and it will stream through the car speakers.
- Voice Assistant: Utilize your phone's voice assistant (e.g., Siri, Google Assistant) through the car radio for commands like "Hey Siri, call Pablo!" or "Hey Google, play music!"
3. Wireless CarPlay and Android Auto
Integrate your smartphone seamlessly for navigation, music, messages, and more.

Image: This image shows the user interfaces for both wireless Apple CarPlay and Android Auto, demonstrating how smartphone apps are mirrored and controlled on the car radio display, including voice command examples.
Requirements:
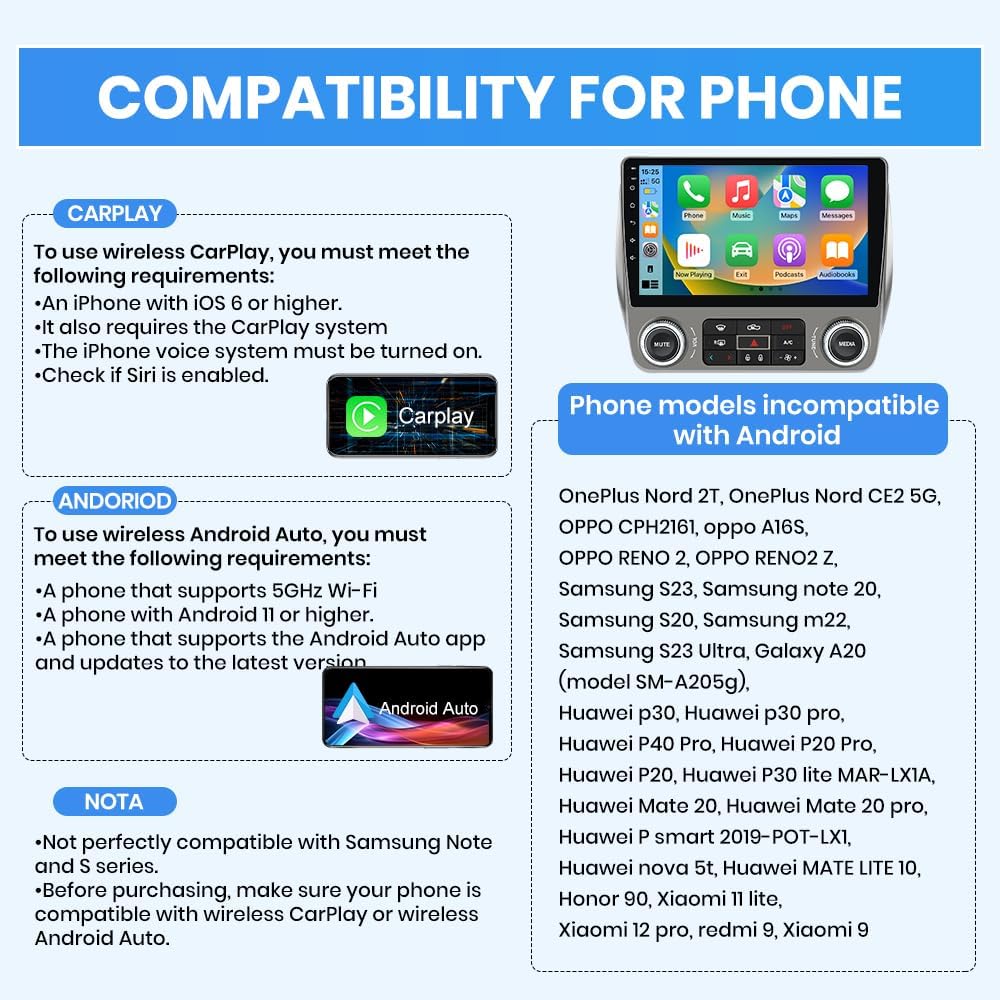
Image: This chart outlines the specific requirements for using wireless CarPlay (iOS 6+, Siri enabled) and Android Auto (5GHz Wi-Fi, Android 11+, updated app), and lists several Android phone models known to be incompatible.
- For Wireless CarPlay:
- iPhone with iOS 6 or higher.
- CarPlay system enabled on iPhone.
- iPhone voice system (Siri) must be turned on.
- For Wireless Android Auto:
- Phone that supports 5GHz Wi-Fi.
- Phone with Android 11 or higher.
- Phone that supports the Android Auto app and updates to the latest version.
- Note: Some Android phones may not be perfectly compatible. If you encounter issues, contact your phone brand operator.
Connection Steps:
- Wireless Connection: Turn on Bluetooth and Wi-Fi on your mobile phone. On the car radio, open the "T-LINK" application and follow the on-screen instructions to connect.
- Wired Connection: Use an original USB cable to connect your phone to the car radio's USB port. Open the "T-LINK" application.
4. FM/RDS and EQ/ASP/DSP/Bass Boost Function
Tune into your favorite radio stations and customize your audio experience.

Image: This image displays the FM radio tuning interface and the Digital Sound Processor (DSP) settings, allowing users to customize audio output with EQ, ASP, and Bass Boost functions.
- FM/AM Radio: Access the radio application to scan for stations.
- FM Frequency Range: 87.5MHz-108.0MHz
- AM Frequency Range: 522KHz-1620KHz
- RDS (Radio Data System): Displays station information (if available).
- Sound Customization: Navigate to the sound settings (often labeled EQ, DSP, or Sound Effects) to adjust:
- Equalizer (EQ): Adjust frequency bands to tailor the sound.
- Audio Sound Processor (ASP)/Digital Sound Processor (DSP): Advanced sound processing for optimal audio quality and sound field adjustments.
- Bass Boost: Enhance low-frequency output.
- Sound Effect Scenes: Select from preset sound profiles (e.g., Pop, Rock, Jazz).
5. Steering Wheel Control (SWC)
Retain the convenience of your vehicle's steering wheel buttons to control the car radio.
Image: This image demonstrates the steering wheel control configuration screen, allowing users to map vehicle steering wheel buttons to radio functions. It also notes the importance of correct Canbus connection for this feature.
- Canbus Connection: Ensure the Canbus decoder and its 8P line are correctly connected to the device during installation. This is crucial for retaining most original steering wheel button functions.
- Configuration: Access the "Steering Wheel Control" settings in the unit's menu. Follow the on-screen instructions to program each button (e.g., Volume Up, Volume Down, Next Track, Previous Track, Mute).
6. Rear Camera Support
The unit supports an aftermarket rearview camera (not included) for enhanced safety when reversing.
Image: This image illustrates the display of a rearview camera feed on the car radio screen, complete with dynamic parking guidelines, enhancing safety during reversing maneuvers. Note that the camera itself is not included.
- Connection: Connect the rearview camera's video output to the designated "CAM IN" or "REVERSE IN" port on the head unit. Ensure the camera's power and trigger wire are correctly connected to the vehicle's reverse light circuit and the head unit's reverse trigger wire.
- Automatic Display: When the vehicle is shifted into reverse, the car radio will automatically switch to the rearview camera display.
- Parking Guidelines: The unit may display dynamic parking guidelines to assist with parking.
Maintenance
- Screen Cleaning: Use a soft, lint-free cloth slightly dampened with water or a screen cleaner specifically designed for electronics. Do not use abrasive cleaners or solvents.
- Software Updates: Regularly check for and install system updates to ensure optimal performance and access to new features. Connect to Wi-Fi and navigate to Settings > About device > System update.
- Avoid Extreme Temperatures: Do not expose the unit to extreme heat or cold, as this can affect its lifespan and performance.
- Cable Connections: Periodically check all cable connections to ensure they are secure and free from corrosion.
Troubleshooting
| Problem | Possible Cause | Solution |
|---|---|---|
| Unit does not power on. |
|
|
| No sound from speakers. |
|
|
| Backup camera shows "No Signal" or black screen. |
|
|
| Bluetooth connection issues. |
|
|
| CarPlay/Android Auto not connecting. |
|
|
Specifications
| Feature | Detail |
|---|---|
| Model Number | B0FZZN71P9 |
| Operating System | Android 13 |
| RAM | 2GB |
| Internal Storage | 64GB |
| Compatible Vehicles | Chevrolet Camaro 2011-2015 |
| Connectivity | Bluetooth, Wi-Fi (5GHz support for Android Auto), USB, ISO Connector |
| Special Features | Wireless CarPlay, Wireless Android Auto, FM/AM Radio, RDS, EQ/ASP/DSP, Bass Boost, Steering Wheel Control (SWC), Backup Camera Support |
| Audio Output Mode | Stereo |
| Audio Output Type | Speakers |
| Controller Type | Touch Screen, SWC, Physical Buttons |
| Media Format | 4K (Video Playback) |
| Parcel Dimensions | 32.59 x 30 x 22.2 cm |
| Item Weight | 2.29 kg |
Warranty and Customer Support
Pyniro products are covered by a standard manufacturer's warranty against defects in materials and workmanship. Please refer to the warranty card included in your package for specific terms and conditions, including the warranty period.
For technical assistance, troubleshooting not covered in this manual, or warranty claims, please contact Pyniro customer support through the retailer where you purchased the product or visit the official Pyniro website for contact information.
When contacting support, please have your product model number (B0FZZN71P9) and purchase date ready.