LinkSun G-425-3
LinkSun G-425-3 Blood Glucose Monitor Kit User Manual
Model: G-425-3A
1. Introduction
This manual provides essential instructions for the safe and effective use of your LinkSun G-425-3 Blood Glucose Monitor Kit. This device is designed for self-testing blood glucose levels and offers accurate, reliable results with a no-coding design for ease of use. The monitor complies with the ISO 15197:2013 standard for accuracy.

Image: LinkSun G-425-3 Blood Glucose Monitor, emphasizing accuracy and reliability.
The LinkSun G-425-3 Blood Glucose Monitor features a large display for clear readability and provides results in just 5 seconds. It is intended for home use to assist in managing diabetes.

Image: Overview of LinkSun Blood Glucose Monitoring System features.
2. Safety Information
Please read all instructions carefully before using the LinkSun G-425-3 Blood Glucose Monitor Kit. This device is for in vitro diagnostic use only. Do not use for the diagnosis of diabetes mellitus or for screening newborns.
- Important: If the product seal is broken upon receipt, do not use the product. Contact customer service for a replacement.
- Always wash and dry your hands thoroughly before testing.
- Lancets and test strips are for single use only. Dispose of them properly after each use.
- Keep the device and all components out of reach of children.
- Consult your healthcare professional for medical diagnosis or treatment decisions based on your blood glucose results.

Image: Blood Glucose Indicator Card for reference. Always consult your doctor for specific guidance.
3. Package Contents
Your LinkSun G-425-3 Blood Glucose Monitor Kit includes the following items:
- 1 Blood Glucose Monitor
- 1 Lancing Device
- 100 Test Strips (50pcs x 2 vials)
- 100 Lancets (50pcs x 2 vials)
- 1 Control Solution (for quality control checks)
- User Guide
- Carrying Case
- Batteries (pre-installed or included separately)

Image: Contents of the LinkSun G-425-3 Blood Glucose Monitor Kit.
4. Setup
4.1. Battery Installation
The monitor typically comes with batteries included. After installing the batteries, the screen will be off. Simply insert a test strip to wake the meter; no need to press any buttons.
4.2. Lancing Device Assembly
Follow these steps to prepare your lancing device:
- Unscrew the lancing device cap counterclockwise.
- Remove the pen tip.
- Insert a new lancet firmly into the lancing device.
- Carefully twist off the protective cap of the lancet (do not touch the needle).
- Replace the lancing device cap by twisting clockwise until secure.
- Adjust the lancing depth by rotating the tip. There are 5 levels; choose a depth suitable for your skin type.
- Pull the tail of the lancing device until it clicks, indicating it is ready to use.
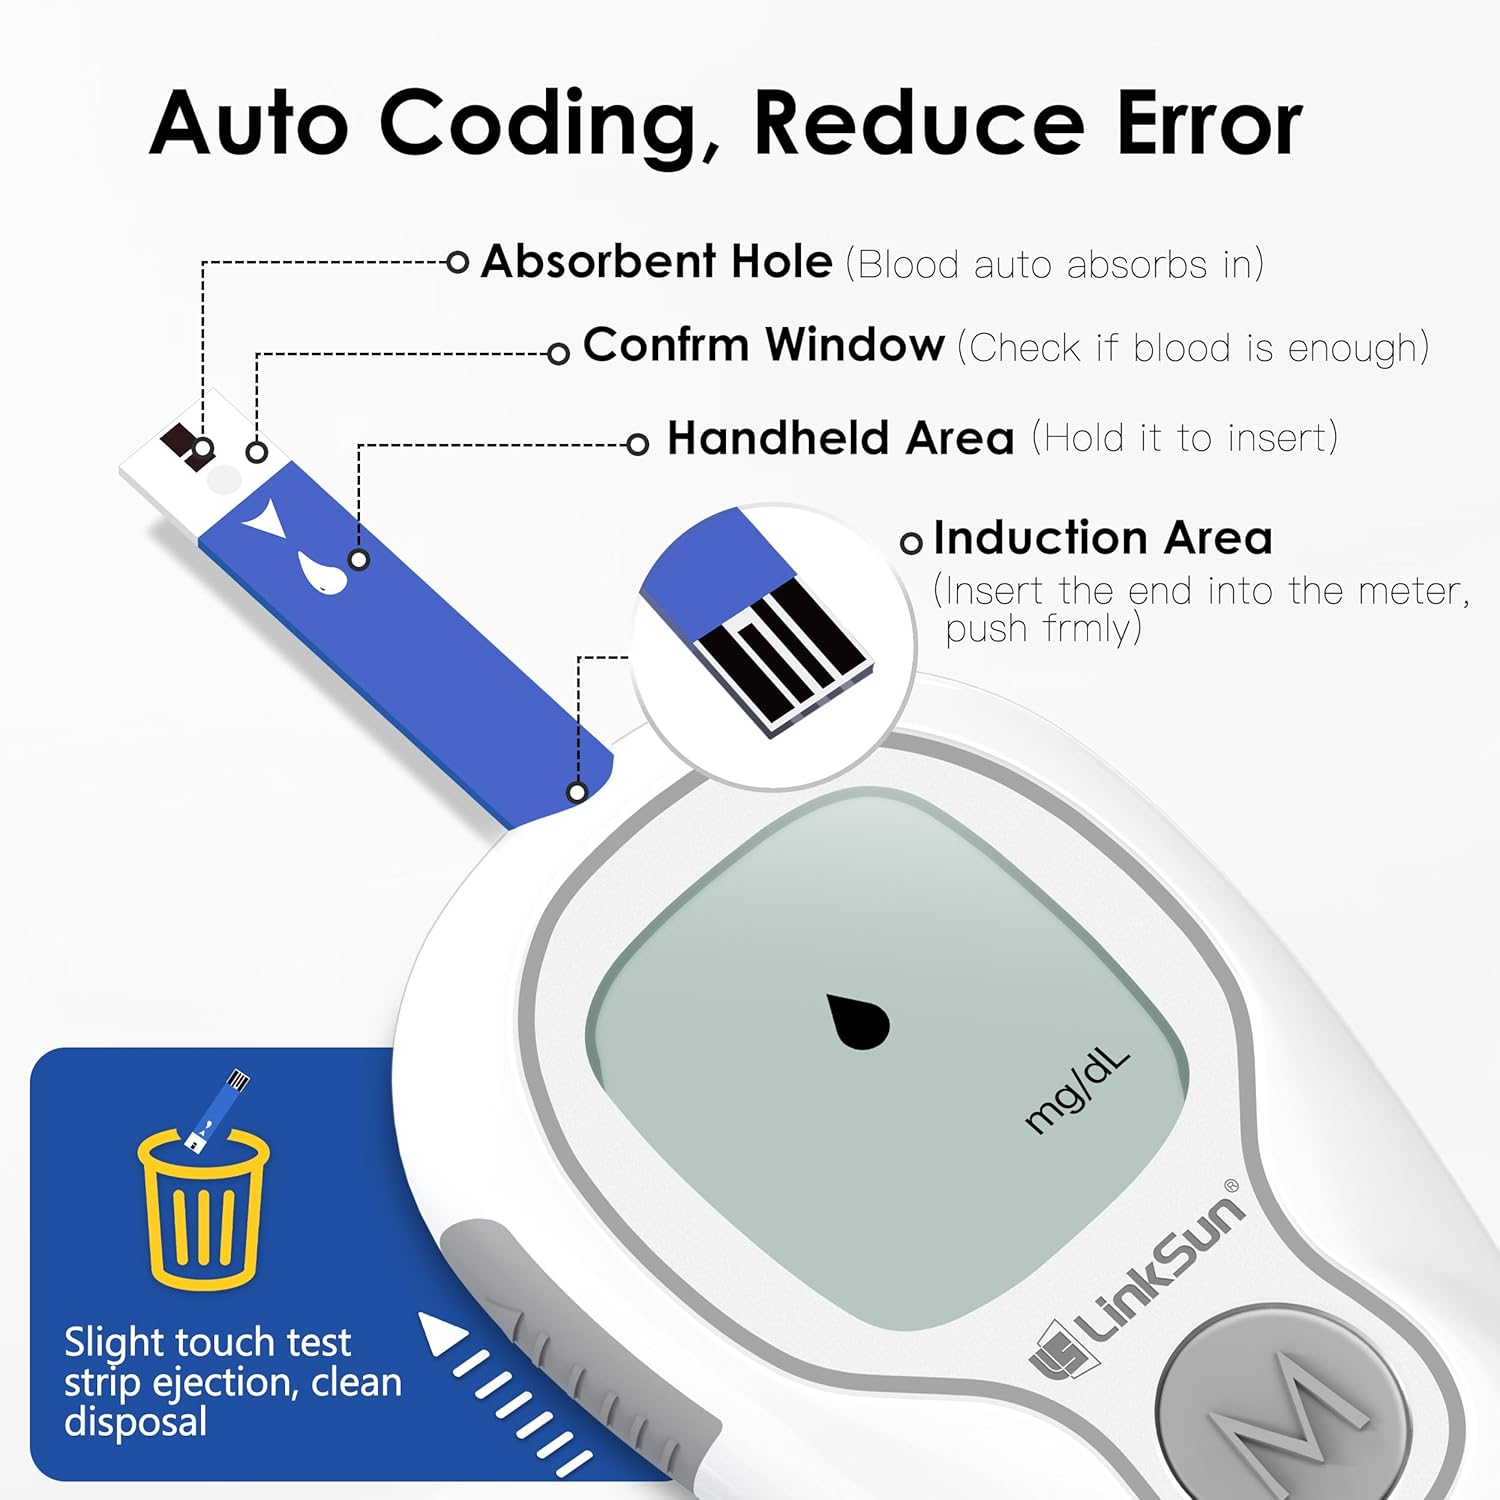
Image: Detailed guide for lancet installation and depth adjustment.
4.3. Quick Setup Guide (Time Setting & Unit Switch)
To set the time and switch units:
- Time Setting: Press and hold the 'M' button to enter setting mode. Adjust Year, Month, Day, Hour, and Minute using short presses of 'M' to change values and long presses to confirm and move to the next setting.
- Unit Switch: After the time is set, the unit screen will appear. Short press 'M' to switch between mmol/L and mg/dL. Long press 'M' to confirm your selection.

Image: Quick Setup Guide for time, unit, and memory deletion.
5. Operating Instructions
5.1. Performing a Blood Glucose Test
Follow these 6 simple steps for an accurate blood glucose reading:
- Clean and dry your hands thoroughly.
- Install a new lancet into the lancing device (refer to Section 4.2).
- Insert a fresh test strip into the monitor. The monitor will automatically turn on.
- Use the lancing device to collect a blood sample from your fingertip.
- Apply the blood sample to the absorbent hole of the test strip. The monitor uses automatic siphoning technology to draw in the precise amount of blood (0.7 µL).
- Wait 5 seconds for the result to display.

Image: Six simple steps for performing a blood glucose test.
5.2. Control Solution Testing (CTL Mode)
Always switch to CTL Mode before using control solution to ensure correct results. Testing without CTL Mode may give incorrect results.
- After inserting the test strip, press and hold the 'M' button until 'CTL' appears on the screen. CTL Mode is now activated.
- Apply the control solution to the test strip.
- After testing, long-press the 'M' button again to return to blood measurement mode.

Image: Instructions for using Control Solution Mode.
5.3. Automatic Siphoning Technology
The monitor utilizes drip-free technology. Simply touch the target area of the test strip to a tiny blood drop (0.7 µL, approximately half a rice-sized drop). It fills instantly with the precise amount needed for highly accurate results.

Image: Demonstration of automatic siphoning technology.
5.4. Auto-Standby Mode
The LinkSun G-425-3 monitor features an auto-standby mode for convenience. After installing batteries and while the screen is off, simply insert a test strip to activate the meter. No button press is needed to turn it on.

Image: Auto-Standby Mode operation.
5.5. Tracking Records
The monitor stores up to 500 readings. To review past results:
- Press the 'M' button briefly while the monitor is powered off to display the first memory record.
- After 1 second, it will automatically switch to show the latest test result.
- Press the 'M' button once more to view the next most recent test result. Continue pressing 'M' to cycle through records.
- Long press the 'M' button to turn off the meter.

Image: Steps for tracking blood glucose records.
6. Maintenance
6.1. Cleaning the Monitor
To clean the monitor, wipe the exterior with a soft, damp cloth. Do not immerse the monitor in water or use harsh cleaning agents. Ensure no liquid enters the test strip port.
6.2. Storage
Store the monitor, test strips, and lancets in their original containers in a cool, dry place, away from direct sunlight and extreme temperatures. Keep the carrying case provided for organized storage and protection.
7. Troubleshooting
7.1. Why do results vary between brands?
Each brand of blood glucose monitor uses unique algorithms and strip technologies. All ISO 15197 certified devices meet clinical accuracy (±15%). Differences within this range are considered normal.

Image: Explanation of blood glucose result variations between brands.
7.2. Why do home and hospital results differ?
A standard range of ±15% difference is normal per ISO standards. Home tests typically use finger capillary whole blood, while hospital tests often use venous plasma. These different sample types can lead to variations in results.

Image: Comparison of home and hospital blood glucose testing methods.
7.3. What is control solution for?
Control solution checks if your meter and test strips are working properly by simulating a blood test. It contains a known amount of glucose that reacts with the test strips. Compare the result with the range printed on the test strip vial. If the result is out of range, the strips or meter may be faulty, or the control solution may be expired.

Image: Explanation of control solution usage.
8. Specifications
| Feature | Specification |
|---|---|
| Brand | LinkSun |
| Model Name | G-425-3A |
| Battery Cell Composition | Alkaline |
| Operating Time (Result) | 5 Seconds |
| UPC | 774113015069 |
| Included Components | Blood glucose monitor, test strips, lancets, lancing device, control solution, user guide, carrying case |
| Manufacturer | Bioland |
| Accuracy | ±12% (Complies with ISO 15197:2013) |
| Display | Large Screen Display |
9. Warranty and Support
For any issues with your LinkSun G-425-3 Blood Glucose Monitor Kit, including a broken product seal upon arrival, please contact customer service for assistance. The manufacturer is committed to providing reliable products and support.
For additional information and products, visit the LinkSun Store.
Video: Unboxing and Quick Demo
Video: A user demonstrates unboxing the LinkSun G-425-3 Blood Glucose Monitor Kit, highlighting the tamper-evident seal, included user manuals, carrying case, and the ease of use for the monitor and lancing device. The video shows the monitor turning on by inserting a test strip and displaying a blood sugar reading in 5 seconds.
Ask a question about this manual
Ask about setup, troubleshooting, compatibility, parts, safety, or missing instructions. Manuals+ will review the question and use this page’s manual context to help answer it.