Introduction
Thank you for choosing the AVID POWER 20V Brushless Power Drill Set. This manual provides essential information for the safe operation, maintenance, and troubleshooting of your new drill. Please read this manual thoroughly before first use and keep it for future reference.
General Safety Instructions
Always follow basic safety precautions to reduce the risk of fire, electric shock, and personal injury.
- Work Area Safety: Keep your work area clean and well-lit. Cluttered or dark areas invite accidents. Do not operate power tools in explosive atmospheres, such as in the presence of flammable liquids, gases, or dust.
- Electrical Safety: Power tool plugs must match the outlet. Never modify the plug in any way. Avoid body contact with earthed or grounded surfaces such as pipes, radiators, ranges, and refrigerators.
- Personal Safety: Always wear eye protection. Use hearing protection when operating the drill for extended periods. Dress properly; avoid loose clothing or jewelry. Secure long hair.
- Tool Use and Care: Do not force the power tool. Use the correct power tool for your application. Disconnect the plug from the power source and/or remove the battery pack before making any adjustments, changing accessories, or storing power tools.
- Battery Pack Use and Care: Recharge only with the charger specified by the manufacturer. Do not use battery packs with any other power tools. When the battery pack is not in use, keep it away from other metal objects.
Product Overview
The AVID POWER 20V Brushless Power Drill Set includes the drill, a 2.0Ah lithium-ion battery, a charger, 10 drill bits, 10 screwdriver bits, a flexible shaft, and an extension bar.

Image: Overview of the AVID POWER 20V Brushless Power Drill Set, showing the drill, battery, charger, and various accessories.
Key Features
- Brushless Motor: Delivers up to 355 In-lbs (40 Nm) of torque, offering extended runtime, reduced heat, and longer tool life.
- Metal Chuck: Ensures durability, superior grip, and precise bit retention for heavy-duty drilling.
- 2-Speed Gearbox: Allows seamless switching between 0-400 RPM for screwdriving and 0-1400 RPM for drilling.
- 25+1 Clutch Settings: Provides exact torque control to prevent stripping screws or damaging surfaces.
- Flexible Shaft: Enables access to hard-to-reach areas.
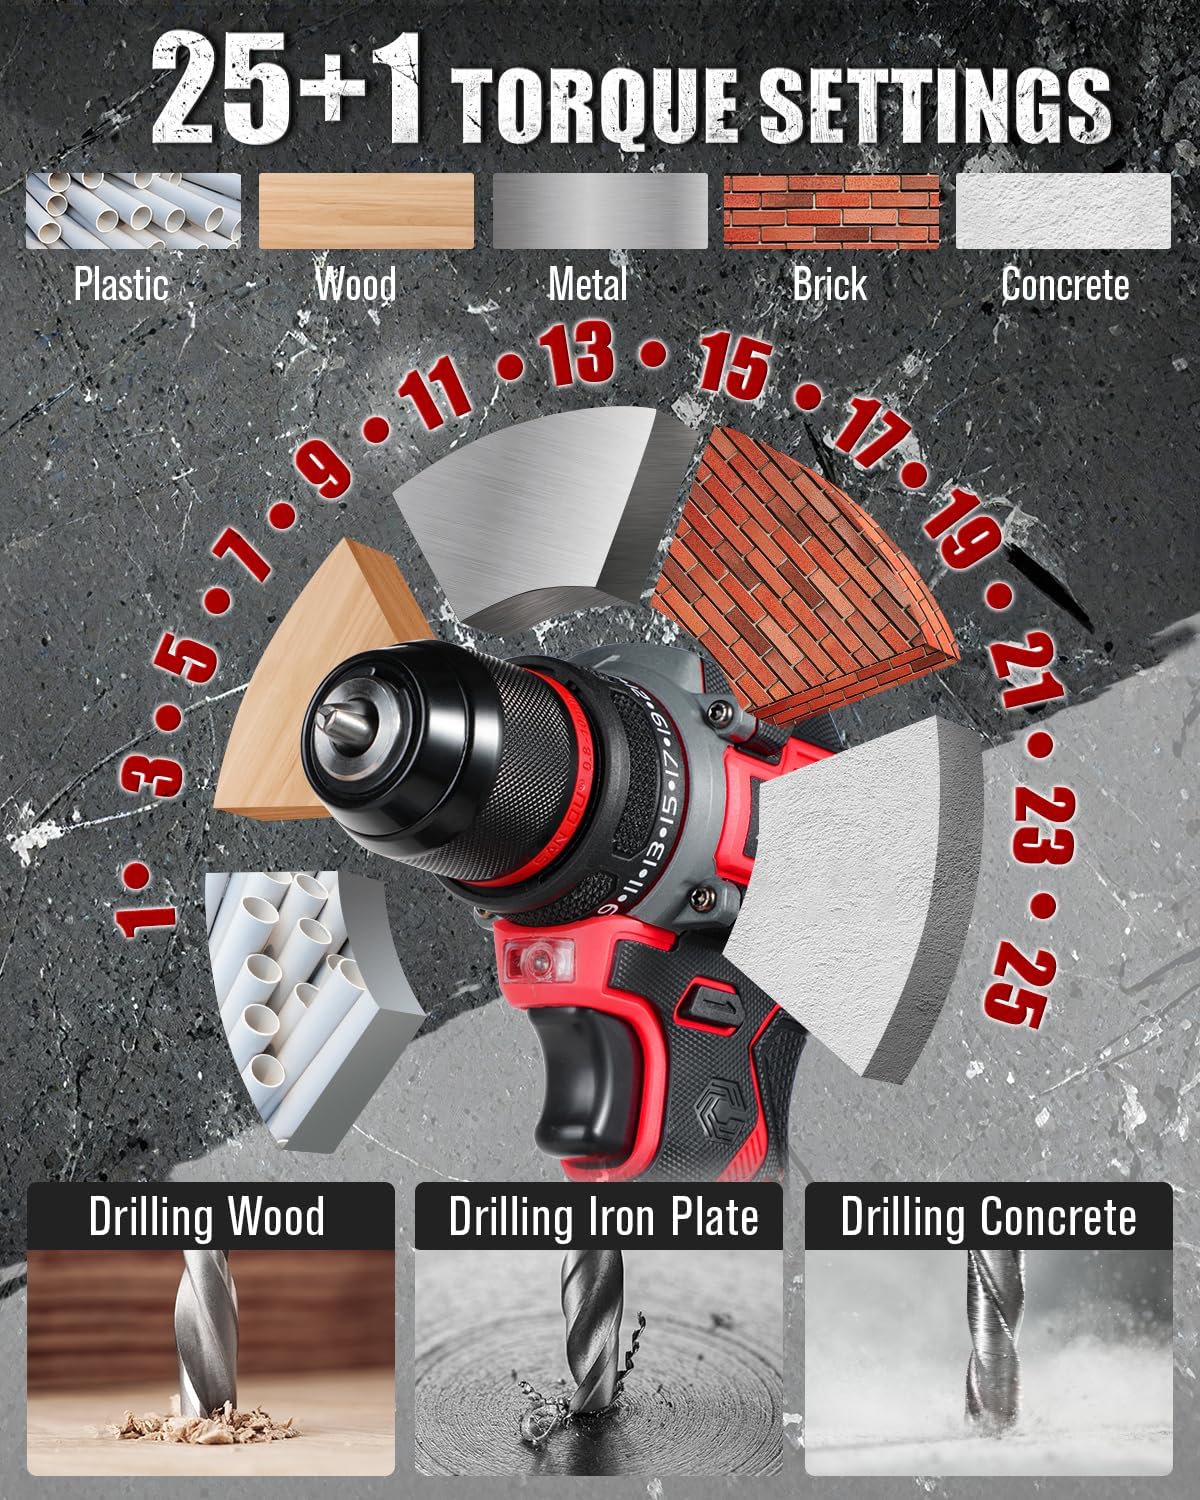
Image: Illustration of the brushless motor, highlighting its benefits including 40 N.M max torque, 1400 RPM max speed, and improved lifetime, power, reduced spark, and noise.
Setup
1. Charging the Battery
- Connect the charger to a standard home power supply.
- Insert the 20V MAX Lithium-Ion battery into the charger. The charger's LED indicator will turn red, indicating charging is in progress.
- When the battery is fully charged, the LED indicator will turn green. Charging typically takes 3-5 hours.

Image: The battery charger connected to a power strip with the battery inserted, showing the charging process and various protection features like over-charger, over-heating, over-discharge, short circuit, over-current, and over-voltage protection.

Image: Close-up of the charger's LED indicator, showing red for 'Charging' and green for 'Fully Charged or No Load'.
2. Installing/Removing the Battery
- To Install: Align the battery pack with the base of the drill handle and slide it in until it clicks securely into place.
- To Remove: Press the battery release button (usually located on the sides of the battery pack) and slide the battery out.
3. Installing/Removing Drill Bits
- Ensure the drill is off and the battery is removed for safety.
- Rotate the chuck counter-clockwise to open the jaws.
- Insert the desired drill bit or screwdriver bit into the chuck, ensuring it is centered.
- Rotate the chuck clockwise to tighten the jaws firmly around the bit. Ensure the bit is secure before operation.
- To remove, rotate the chuck counter-clockwise to loosen the jaws and pull the bit out.
Operating Instructions
1. Powering On/Off
Press the trigger switch to turn the drill on. Release the trigger switch to turn it off.
2. Speed Adjustment
The drill features a 2-speed gearbox for versatile applications.
- Low Speed (0-400 RPM): Ideal for controlled screwdriving and applications requiring higher torque.
- High Speed (0-1400 RPM): Suitable for fast drilling into various materials.
Use the speed selector switch, located on top of the drill, to switch between low and high speeds.

Image: The drill demonstrating its 2-speed adjustment feature, showing the low speed (0-400 RPM) and high speed (0-1400 RPM) settings.
3. Torque Adjustment (25+1 Clutch Settings)
The torque adjustment ring allows you to select the appropriate torque setting for your task, preventing over-driving screws or damaging materials.
- Rotate the torque adjustment ring to select one of the 25 torque settings. Lower numbers are for smaller screws and softer materials; higher numbers are for larger screws and harder materials.
- The drill icon setting (marked as '+1') is for drilling applications, providing maximum torque.

Image: The drill's 25+1 torque settings dial, illustrating appropriate settings for different materials such as plastic, wood, metal, brick, and concrete, along with examples of drilling into wood, iron plate, and concrete.
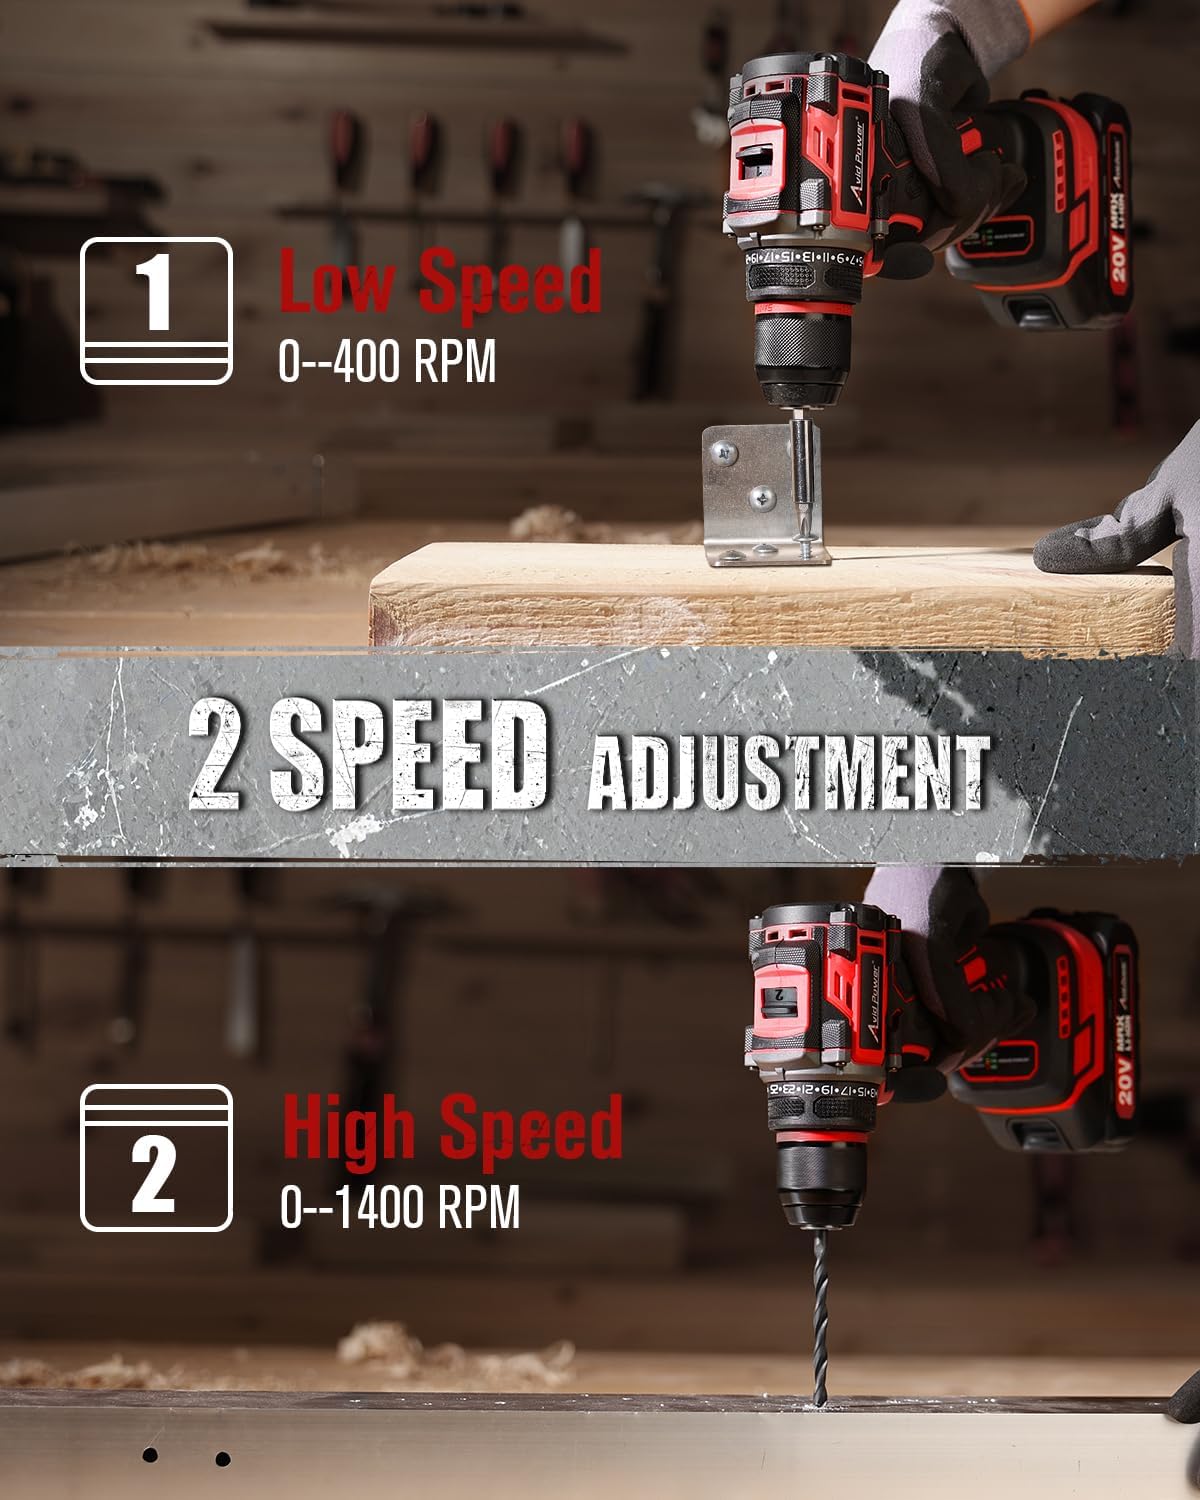
Image: The drill being used to drill into a concrete-like surface, demonstrating its 355 in-lbs (40 N.M) max torque capability.
4. Using the Flexible Shaft
The included flexible shaft is designed for reaching fasteners in tight or awkward spaces.
- Insert the flexible shaft into the drill chuck as you would a regular bit. Tighten the chuck securely.
- Insert the desired screwdriver bit into the end of the flexible shaft.
- Maneuver the flexible shaft to access the desired screw or fastener.

Image: A user operating the drill with the flexible shaft attached, reaching into a confined space to drive a screw, demonstrating its utility for hard-to-reach areas.
5. Battery Power Display
The battery pack features an integrated power display to indicate the remaining charge level.
- Press the button on the battery pack to activate the LED indicators.
- Multiple illuminated LEDs indicate a higher charge level (e.g., 3 LEDs for 100%, 2 LEDs for 70%, 1 LED for 30%).
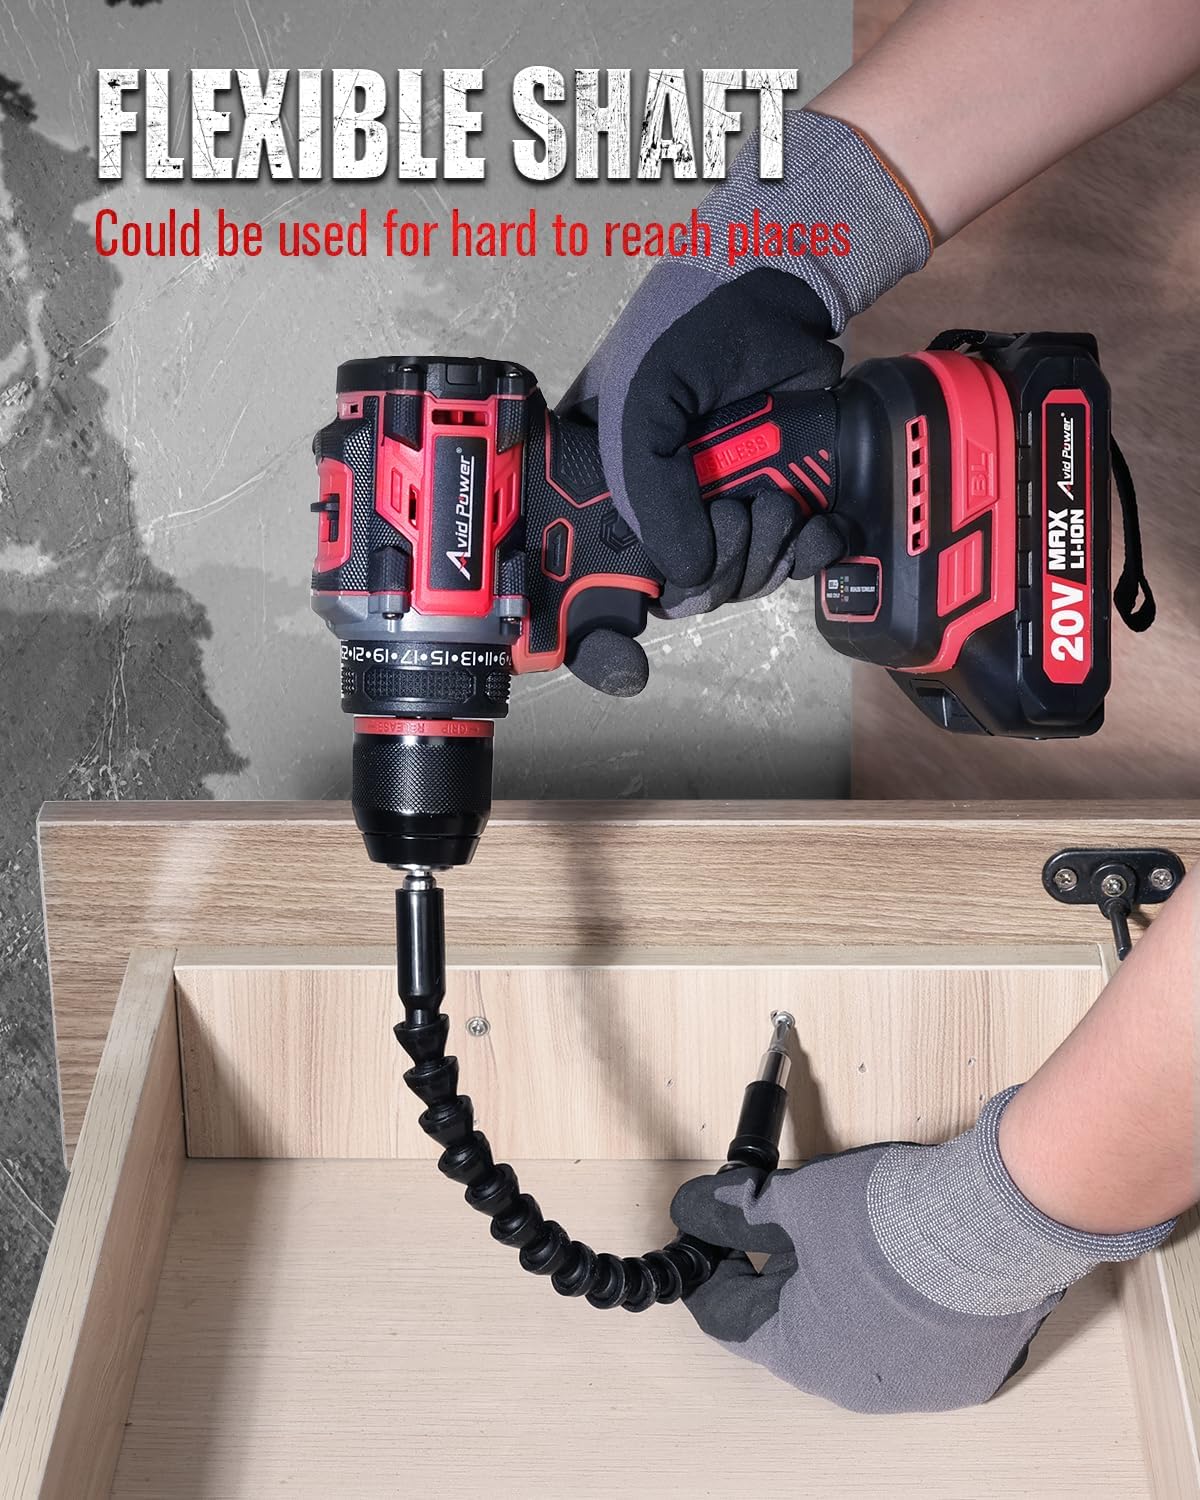
Image: The 20V MAX Li-ion battery pack with its power display, showing different charge levels (30%, 70%, 100%) indicated by the number of illuminated LED segments.
Maintenance
- Cleaning: Regularly clean the ventilation openings of the drill to prevent dust accumulation. Use a soft, damp cloth. Do not use harsh chemicals or abrasive cleaners.
- Storage: Store the drill, battery, and charger in a cool, dry place, away from direct sunlight and moisture. Ensure the battery is partially charged before long-term storage.
- Battery Care: Do not store the battery in a discharged state. Recharge it periodically if not used for extended periods.
Troubleshooting
| Problem | Possible Cause | Solution |
|---|---|---|
| Drill does not start | Battery not charged or improperly installed | Charge the battery fully. Ensure the battery is securely clicked into place. |
| Reduced power or speed | Low battery charge | Recharge the battery. |
| Bit slips in chuck | Chuck not tightened sufficiently or bit shank is dirty | Ensure the chuck is tightened firmly. Clean the bit shank before insertion. |
| Charger LED remains red or off | Charger or battery fault, or no power supply | Check power outlet. Ensure battery is correctly inserted. If problem persists, contact support. |
Specifications
- Model: ACD138
- Voltage: 20V MAX
- Motor Type: Brushless
- Max Torque: 355 In-lbs (40 Nm)
- No-Load Speed:
- Low: 0-400 RPM
- High: 0-1400 RPM
- Clutch Settings: 25+1
- Chuck Type: All-metal
- Battery Capacity: 2.0Ah Lithium-Ion
- Charging Time: 3-5 Hours
Warranty and Support
For warranty information or technical support, please refer to the documentation included with your purchase or visit the official AVID POWER website. Keep your purchase receipt as proof of purchase for any warranty claims.
For further assistance, you may contact AVID POWER customer service via their official website: AVID POWER Store on Amazon.