
Introduction
This manual provides detailed instructions for the assembly, operation, and maintenance of your Dystler RGB Display Cabinet Model 80001. Please read this guide thoroughly before beginning assembly or use to ensure proper function and safety. Keep this manual for future reference.
Safety Information
- Tempered Glass: The cabinet features tempered glass for enhanced safety. While durable, avoid striking the glass with hard objects.
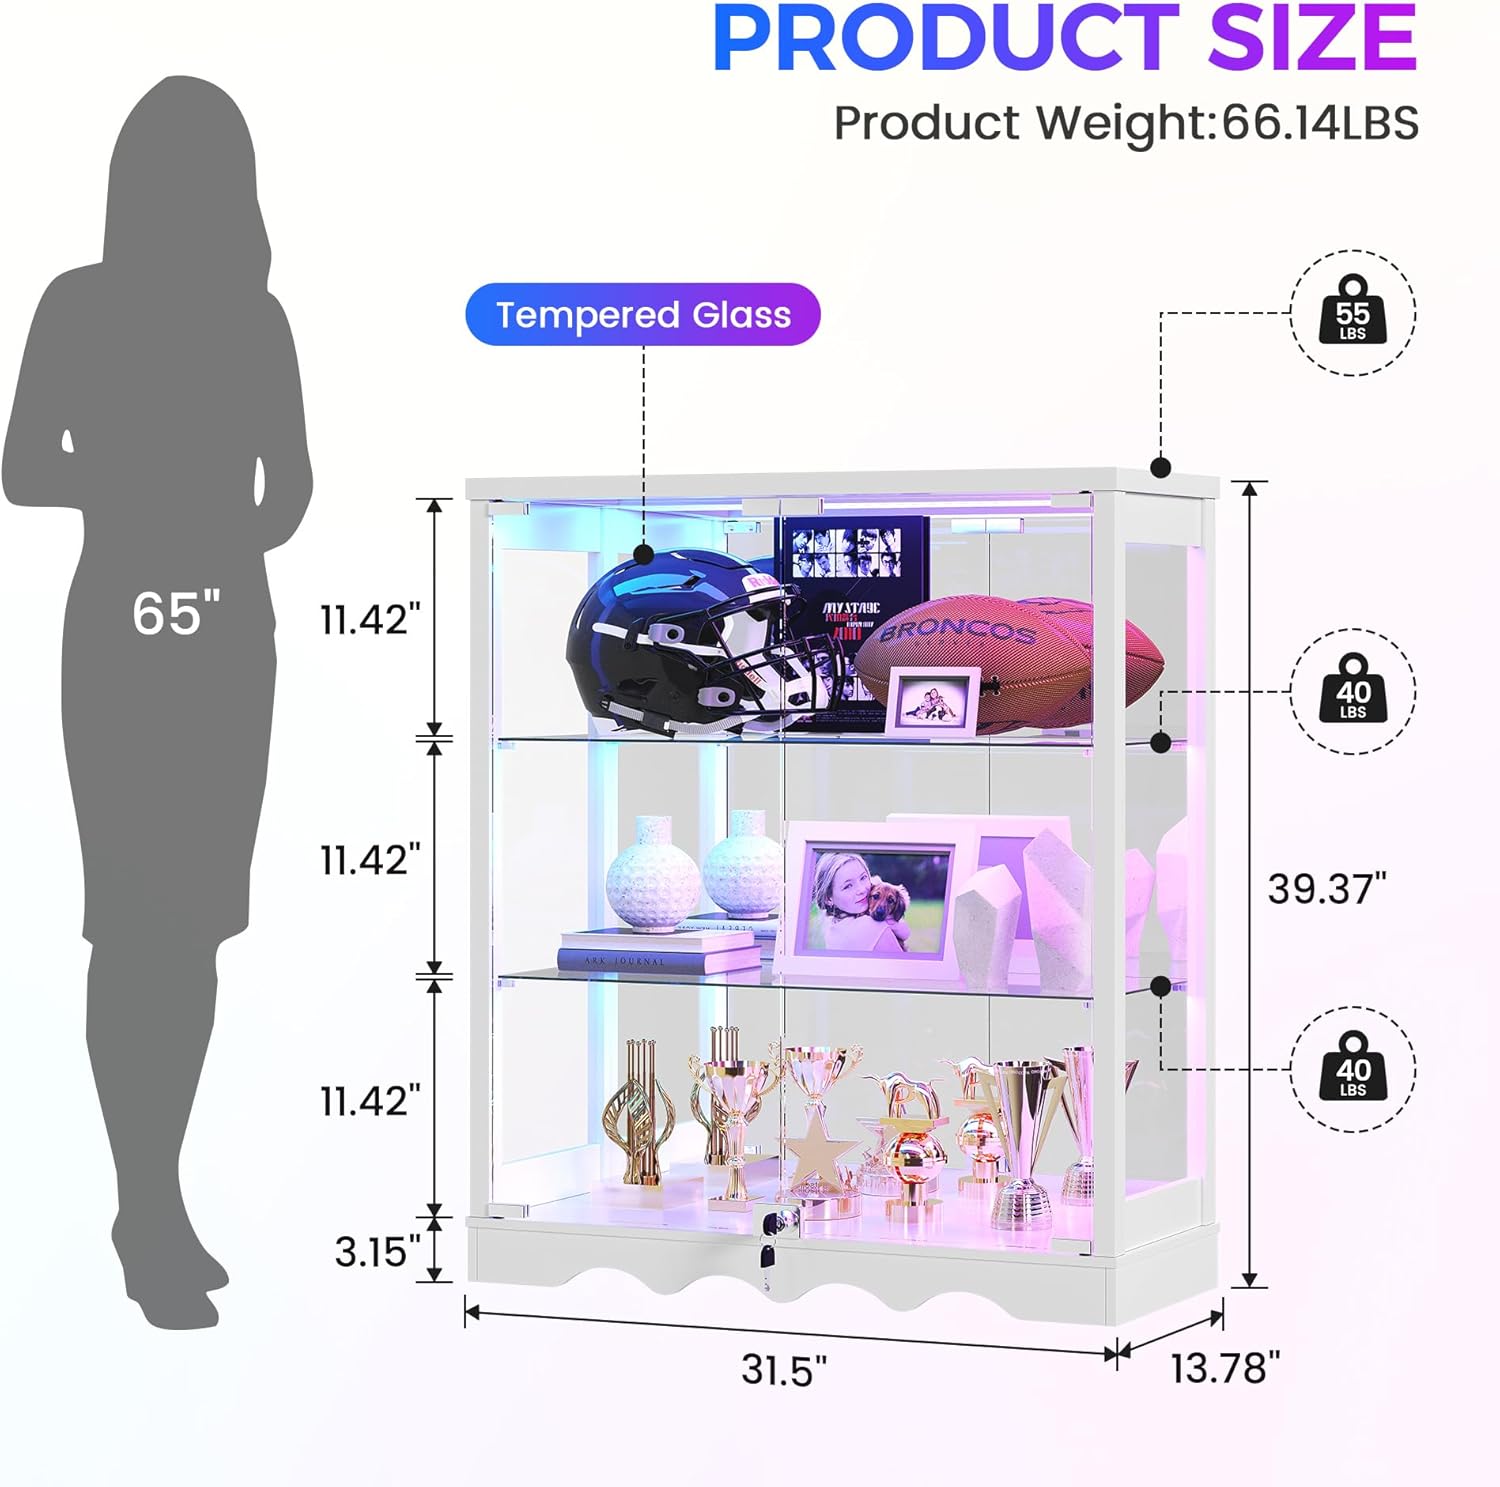
- Weight Capacity: Do not exceed the maximum weight capacity of 55 pounds for the entire cabinet. Distribute weight evenly across shelves.
- Anti-Tip Device: Always install the included anti-tip device to prevent accidental tipping, especially in households with children or pets.
- Electrical Safety: Ensure the charging station and RGB lighting are connected to a suitable power source. Do not overload the charging ports. Keep liquids away from electrical components.
- Assembly: Assembly requires careful attention. It is recommended to have two people for assembly. Use appropriate tools as suggested in the assembly section.
- Locking Mechanism: The cabinet includes a key lock for secure storage. Keep keys in a safe place away from children.
Package Contents
Before assembly, verify that all components are present and undamaged. If any parts are missing or damaged, please contact customer support.
- Glass Display Cabinet (main frame components)
- Tempered Glass Panels (doors, shelves)
- RGB Lighting Module with Motion Sensor
- Built-in Type-C and USB Charging Ports
- Key Lock Mechanism
- Installation Kit (screws, dowels, shelf pins, anti-tip device)
- User Manual
Setup and Assembly
Assembly is required for this product. It is recommended to have two people for assembly. Power tools may expedite the process. Follow the steps below carefully.
Assembly Video Guide
This video provides a step-by-step visual guide for assembling your Dystler RGB Display Cabinet. It demonstrates the process of connecting components and installing glass panels.
General Assembly Steps
- Unpack and Identify Parts: Lay out all components and hardware. Refer to the included parts list to ensure everything is present.
- Assemble Base Frame: Connect the base panels using the provided hardware. Ensure all connections are secure.
- Attach Side Panels: Secure the side panels to the base frame.
- Install Back Panel: Slide or attach the back panel into the designated grooves or positions.
- Install Top Panel: Secure the top panel to the assembled frame.
- Install Glass Shelves: Insert the shelf pins into the desired height positions. Carefully place the tempered glass shelves onto the pins. The cabinet offers 6 different height positions for the 2 adjustable shelves.
- Attach Glass Doors: Mount the tempered glass doors using the provided hinges. The doors feature a press-to-open design for smooth access.
- Install Lock: Secure the key lock mechanism to the bottom of the glass doors for added security.
- Install Anti-Tip Device: Attach the anti-tip device to the top rear of the cabinet and secure it to a wall stud according to the instructions.
- Connect RGB Lighting and Charging Station: Follow the specific instructions for connecting the RGB light module and the integrated Type-C and USB charging ports to a power source.

The fully assembled Dystler RGB Display Cabinet, ready for use.
Operating Instructions
RGB Lighting and Motion Sensor
The Dystler RGB Display Cabinet features customizable RGB lighting with a motion sensor for convenience.
- Control: The RGB lights can be controlled via a smart module or a dedicated mobile application. Refer to the specific instructions provided with the lighting kit for pairing and control.
- Color and Effects: Choose from 7 static colors and 5 dynamic lighting effects to match your ambiance.
- Motion Sensor: The integrated human motion sensor automatically turns on the lights when movement is detected within approximately 1 meter and turns them off after 30 seconds of no activity. The lights will resume your last selected color or effect. To disable the motion sensor, long-press the motion button on the control module for 3+ seconds.

The RGB lighting illuminates displayed items, enhancing their visual appeal.
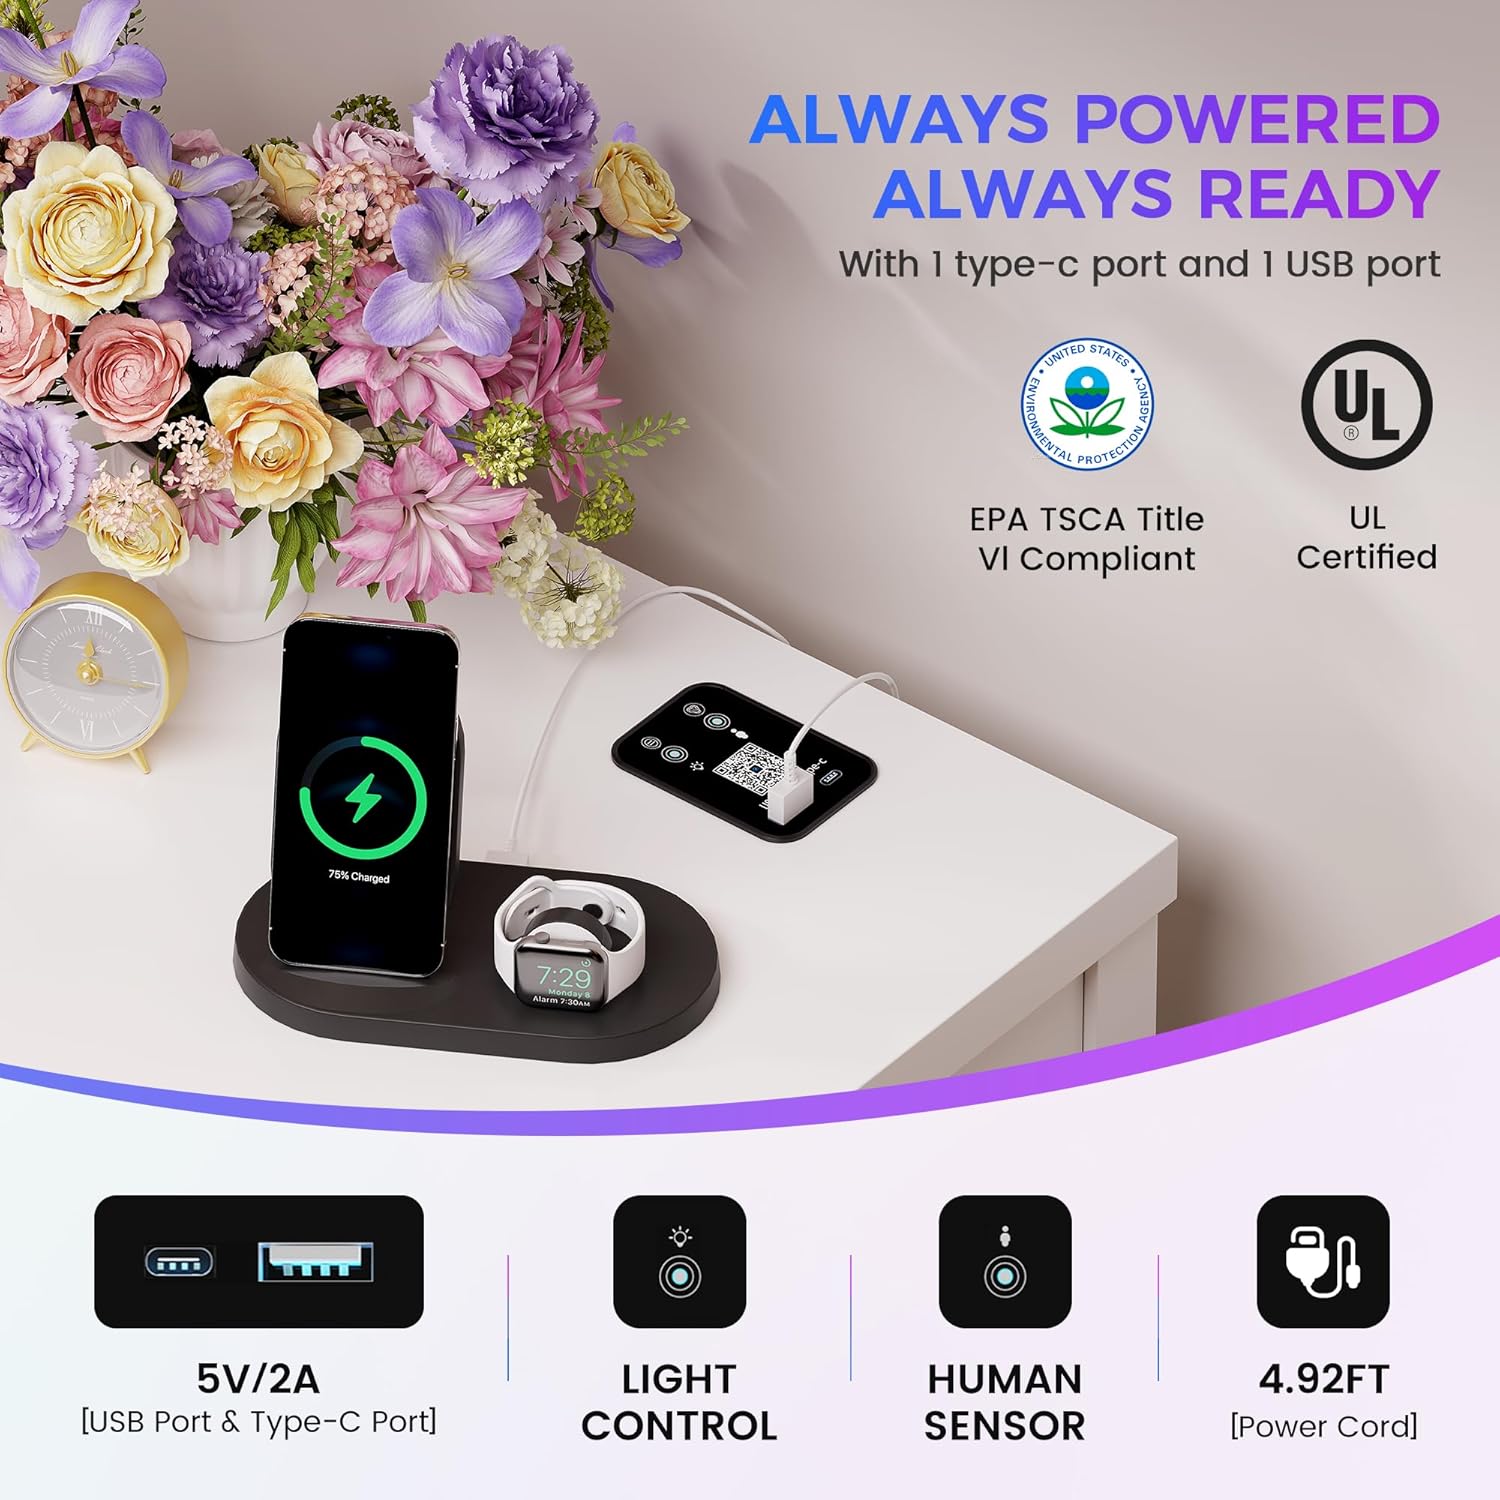
2-in-1 Charging Station
The cabinet includes a convenient charging station on the top surface.
- Ports: Utilize the built-in Type-C and USB ports to charge your electronic devices such as phones, tablets, or gaming controllers.
- Power: Ensure the cabinet's power cable is connected to a functional wall outlet for the charging station to operate.
The integrated charging station provides convenient power for your devices.
Adjustable Shelves
The cabinet features two adjustable glass shelves to accommodate items of various heights.
- Adjustment: To adjust a shelf, carefully remove the items, lift the glass shelf, remove the shelf pins from their current holes, and reinsert them into the desired new height positions. Then, gently place the glass shelf back onto the pins.
- Positions: There are 6 different height positions available for each adjustable shelf.

Adjustable shelves allow for flexible display arrangements.
Lockable Glass Doors
The cabinet's glass doors are equipped with a key lock for securing your valuable items.
- Operation: Use the provided key to lock and unlock the cabinet doors.
- Door Opening: The doors feature a handle-free, press-to-open design. Gently press the door to release the latch and open.
The key lock provides security for displayed items.
Maintenance
- Cleaning Glass: Use a soft, lint-free cloth and a glass cleaner to wipe glass surfaces. Avoid abrasive cleaners that may scratch the glass.
- Cleaning Frame: Wipe the MDF frame with a soft, damp cloth. Avoid harsh chemicals.
- Dusting: Regularly dust the interior and exterior of the cabinet to maintain clarity and appearance.
- Electrical Components: Ensure all electrical connections are dry and free from dust. Do not attempt to clean the charging ports or light module with liquids.
Troubleshooting
- RGB Lights Not Working or Changing Randomly:
- Check all power connections to the RGB light module. Ensure the module is properly connected to the power source. If using the app, try restarting the app or reinstalling it. Consider performing a factory reset on the light module if issues persist (refer to the lighting kit's specific instructions for reset procedures).
- Charging Station Not Functioning:
- Verify that the cabinet's main power cable is securely plugged into a working wall outlet. Test the charging ports with different cables and devices to rule out cable or device issues.
- Glass Doors Not Closing/Opening Smoothly:
- Inspect hinges for any obstructions or loose screws. Ensure the cabinet is on a level surface. The press-to-open mechanism may require a firm but gentle push to engage/disengage.
- Cabinet Wobbles:
- Ensure all assembly screws are tightened. Verify the cabinet is placed on a flat, level surface. If necessary, adjust any leveling feet if present. Confirm the anti-tip device is correctly installed and secured to the wall.
Specifications
| Feature | Detail |
|---|---|
| Brand | Dystler |
| Model Number | 80001 |
| Color | White-new |
| Material | Engineered Wood, Tempered Glass |
| Product Dimensions (D x W x H) | 13.8"D x 31.5"W x 39.4"H |
| Item Weight | 60.6 Pounds |
| Maximum Weight Capacity | 55 Pounds |
| Number of Shelves | 3 (2 adjustable) |
| Adjustable Shelf Positions | 6 |
| Lighting Type | RGB LED with Motion Sensor |
| Charging Ports | 1x Type-C, 1x USB |
| Lock Type | Key Lock |
| Assembly Required | Yes |
| Installation Type | Freestanding |
Warranty and Support
Your Dystler RGB Display Cabinet is covered by a standard return policy. For specific warranty details, please refer to your purchase documentation or contact the seller directly.
- Returns: This product is eligible for 30-day easy returns.
- Customer Support: For any questions, missing parts, or technical assistance, please contact Dystler-US customer support through the platform where you purchased the product.