1. Product Overview
The AlgoLaser RR2 Rotary Roller is a Y-axis rotary module designed to enable precise 360° engraving on cylindrical objects. It is compatible with most GRBL-based engraving machines, including those utilizing LightBurn, LaserGRBL, and AlgoLaser software. This module expands the capabilities of your laser engraver, allowing for detailed work on items such as mugs, bottles, and glasses.
The RR2 Rotary Roller supports object diameters ranging from 5 mm to 150 mm, offering versatility for various projects. Its design emphasizes ease of use, durability, and stable performance.

Figure 1.1: The AlgoLaser RR2 Rotary Roller in operation, demonstrating its use with different cylindrical items.
2. Package Contents
Verify that all items listed below are present in your package. If any components are missing or damaged, please contact customer support.

Figure 2.1: Contents of the AlgoLaser RR2 Rotary Roller package.
- RR2 Rotating Roller × 1
- Side Bracket × 1
- User Manual × 1 (This document)
- Certificates × 3 (CE, RoHS, FCC)
- After-sale Cards × 1
- 2.0mm L-shaped hexagonal wrench × 1
- RR2-Delta connection wire (length 650mm) × 1
- RR2-Alpha/DIY KIT/+ connection wire (length 650mm) × 1
- RR2-/+ connection wire (length 650mm) × 1
- Customizable connection wire (length 650mm) × 1
- Customizable connection wire 6 pin connector × 1
3. Setup Instructions
The AlgoLaser RR2 Rotary Roller is designed for quick and easy setup, arriving pre-assembled for a plug-and-play experience.
3.1 Initial Assembly
- No complex assembly is required. The main rotary roller unit comes ready for use.
- If using the side bracket for irregular or extra-long items, attach it to the main unit using the provided screws and hexagonal wrench.
3.2 Connecting to Your Engraver
- Locate the Y-axis motor port on your laser engraving machine.
- Select the appropriate connection wire from the package (e.g., RR2-Delta, RR2-Alpha/DIY KIT/+, RR2-/+, or customizable wire) that matches your engraver's port.
- Connect one end of the wire to the RR2 Rotary Roller and the other end to the Y-axis port of your engraving machine.
- Ensure the connection is secure.
3.3 Adjusting Roller Width
The active roller features 7 gears for adjusting the width to accommodate various object diameters. Adjust the roller width to securely hold your cylindrical item.
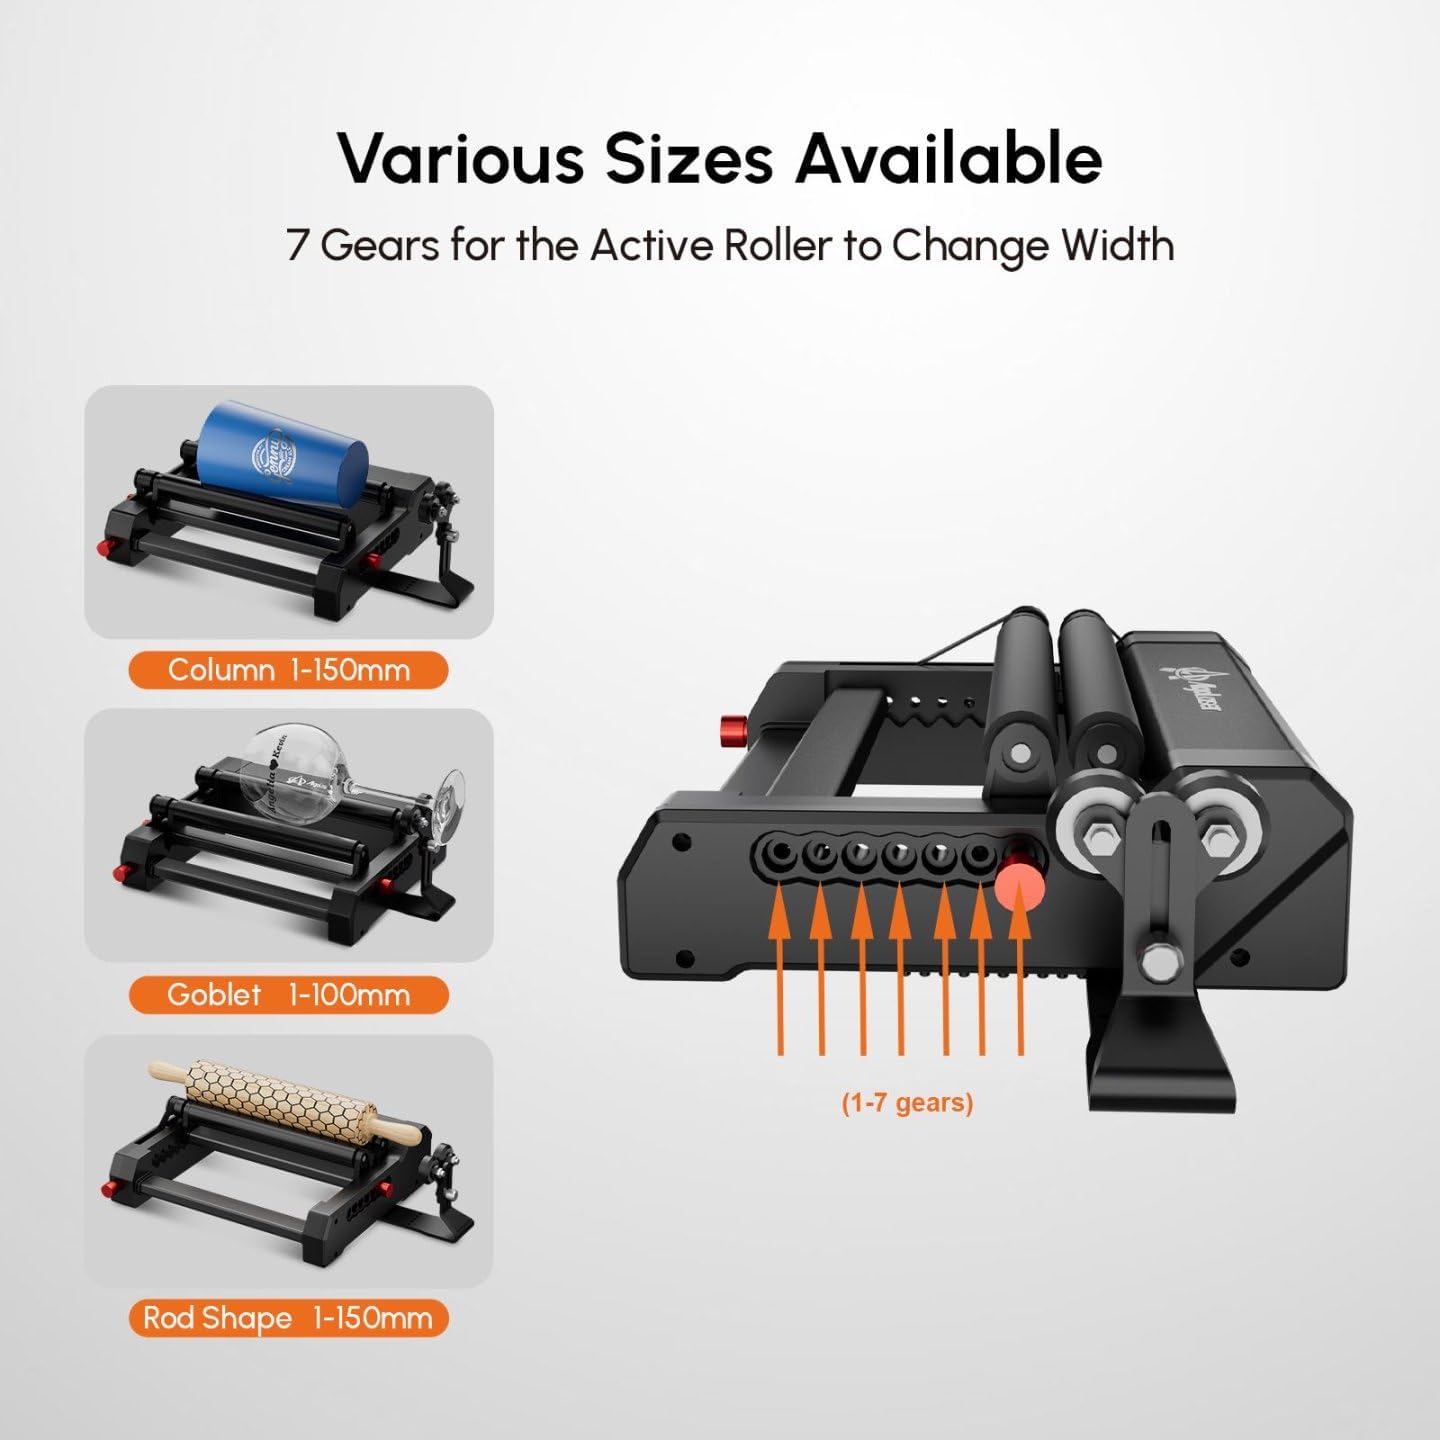
Figure 3.1: Adjusting the active roller width using the 7 gear positions.
- Column (Cylindrical objects): 1-150mm diameter.
- Goblet (Wine glasses, irregular shapes): 1-100mm diameter.
- Rod Shape (Long, thin objects): 1-150mm diameter.
3.4 Height Adjustment
The RR2 features a two-stage height adjustment mechanism (10–60 mm) to ensure optimal positioning for different object sizes and laser focal lengths. The side bracket can also be adjusted for stability.

Figure 3.2: Height adjustment for the rotary roller and side bracket for stability.
4. Operating Instructions
Once the RR2 Rotary Roller is connected and your object is secured, you can proceed with engraving using your preferred software.
4.1 Software Configuration
- Open your laser engraving software (LightBurn, LaserGRBL, AlgoLaser software).
- Access the machine settings or device settings.
- Configure the software to recognize and utilize the Y-axis as a rotary axis. Specific settings may vary by software, but generally involve enabling rotary engraving mode and inputting the correct steps per rotation for the RR2. Refer to your laser engraver's software manual for detailed rotary setup instructions.
4.2 Placing the Object
- Place the cylindrical object securely on the rubber rollers.
- Adjust the roller width and height as described in Section 3 to ensure the object is stable and rotates smoothly without slipping.
- For objects with handles or irregular shapes, utilize the adjustable side bracket to provide additional support and maintain a horizontal position.
4.3 Engraving Process
- Load your design into the software.
- Position the laser head correctly over the object.
- Perform a test run or frame to verify the engraving area and object rotation.
- Initiate the engraving process. The RR2 will rotate the object precisely for 360° engraving.

Figure 4.1: Examples of items that can be engraved using the RR2 Rotary Roller.
4.4 Inverted Engraving
The RR2 can be inverted to engrave longer items, extending the engraving length up to 135 centimeters. This configuration is useful for objects that exceed the standard engraving area when placed horizontally.

Figure 4.2: Inverted setup of the RR2 for engraving extended items.
5. Maintenance
Proper maintenance ensures the longevity and optimal performance of your AlgoLaser RR2 Rotary Roller.
- Cleaning: Regularly clean the rubber rollers and the main body to remove dust, debris, and engraving residue. Use a soft, dry cloth. For stubborn residue, a slightly damp cloth can be used, ensuring the unit is completely dry before next use.
- Roller Inspection: Periodically inspect the rubber rollers for wear, damage, or loss of grip. Worn rollers may affect engraving precision.
- Connection Check: Ensure all electrical connections remain secure and free from corrosion.
- Storage: When not in use, store the rotary roller in a clean, dry environment away from direct sunlight and extreme temperatures.
6. Troubleshooting
If you encounter issues with your AlgoLaser RR2 Rotary Roller, refer to the following common troubleshooting steps.
- Object Slipping:
- Ensure the roller width is adjusted correctly for the object's diameter.
- Verify the object is clean and free of oils or debris that could reduce friction.
- Check if the rubber rollers are clean and not excessively worn.
- Adjust the height to ensure proper contact pressure.
- Inaccurate Rotation/Engraving:
- Confirm the RR2 is securely connected to the Y-axis port of your engraver.
- Check software settings for rotary engraving, including steps per rotation and diameter calibration.
- Ensure the object is placed centrally and stably on the rollers.
- Verify that the laser engraver's Y-axis motor is functioning correctly.
- No Movement:
- Check all cable connections between the RR2 and the laser engraver.
- Ensure the laser engraver is powered on and the software is sending commands to the Y-axis.
- Verify that the correct connection wire is used for your specific engraver model.
If problems persist, consult your laser engraver's manual or contact AlgoLaser customer support.
7. Specifications
| Feature | Specification |
|---|---|
| Model Number | RR2 |
| Product Dimensions | 10.24 x 9.06 x 2.36 inches |
| Item Weight | 3.54 pounds |
| Engraving Diameter Range | 5–150 mm (Cylindrical), 1-100mm (Goblet), 1-150mm (Rod Shape) |
| Height Adjustment | 10–60 mm (Two-stage) |
| Compatibility | Most GRBL-based engraving machines (LightBurn, LaserGRBL, AlgoLaser software) |
| Materials | Durable Base (Aluminum and ABS), Aluminum Body, Silicone Rollers |

Figure 7.1: Key specifications and dimensions of the RR2 Rotary Roller.
Figure 7.2: Construction features contributing to durability and stability.
8. Warranty and Support
The AlgoLaser RR2 Rotary Roller comes with a 1-year warranty from the date of purchase. This warranty covers manufacturing defects and ensures reliable operation under normal use conditions.
AlgoLaser provides dedicated after-sales support. Our engineering team is available to assist with setup, technical questions, and any issues you may encounter. For fast and reliable assistance, please contact us via Amazon email.
- Warranty Period: 1 Year
- Support Availability: 24/7 expert service
- Contact Method: Amazon email