1. Introduction
Thank you for choosing the KOORUI 27E6QCA 27-inch WQHD Curved Gaming Monitor. This manual provides essential information for setting up, operating, and maintaining your monitor. Please read it thoroughly before use to ensure optimal performance and safety.

Image 1.1: KOORUI 27E6QCA Gaming Monitor with key features highlighted.
Key Features:
- 27-inch WQHD (2560x1440) Curved Display: Experience immersive visuals with a 1500R curvature.
- 180Hz Refresh Rate & 1ms (GTG) Response Time: Enjoy smooth, fluid motion and minimal ghosting for competitive gaming.
- Adaptive Sync Technology: Compatible with FreeSync and G-Sync for tear-free gameplay.
- HDR10 Support: Enhanced contrast and color for a more dynamic viewing experience.
- Wide Color Gamut: 100% sRGB and 90% DCI-P3 coverage with 10-bit color depth (8Bit+FRC).
- Eye Care Features: Blue light reduction to minimize eye strain during extended use.
- Versatile Connectivity: Includes 2x HDMI 2.0, 1x DisplayPort 1.4, and Audio Out.
- Ergonomic Design: Tilt adjustment (-5° to 15°) and VESA mount compatibility (100x100mm).
2. Safety Information
Please observe the following safety precautions to prevent damage to the monitor and ensure your safety.
- Do not expose the monitor to rain or moisture to avoid fire or electric shock.
- Do not open the monitor casing. There are no user-serviceable parts inside. Refer all servicing to qualified personnel.
- Place the monitor on a stable, flat surface to prevent it from falling.
- Ensure proper ventilation around the monitor. Do not block ventilation openings.
- Use only the power adapter supplied with the monitor.
- Disconnect the power plug from the wall outlet if the monitor will not be used for a long period.
3. Package Contents
Verify that all items are present in your package:
- KOORUI 27E6QCA Monitor Unit
- Monitor Stand (Base and Neck)
- Power Adapter
- HDMI 2.0 Cable
- User Manual (this document)
- Screws for Stand Assembly
4. Setup
4.1 Assembling the Stand
- Carefully remove the monitor from its packaging, keeping the screen protected.
- Attach the stand neck to the back of the monitor using the provided screws.
- Attach the stand base to the stand neck, securing it with the designated screw.
- Place the assembled monitor on a stable, flat surface.
4.2 VESA Mount Installation (Optional)
The monitor supports VESA 100x100mm mounting. If using a VESA mount, remove the stand and attach the monitor to your VESA-compatible arm or wall mount using appropriate screws (not included).

Image 4.1: Rear view of the monitor showing VESA mounting points and port locations.
4.3 Connecting to Devices
Connect your computer or gaming console to the monitor using the appropriate cables.
- HDMI: Connect an HDMI cable from your device to one of the monitor's HDMI 2.0 ports.
- DisplayPort: Connect a DisplayPort cable from your device to the monitor's DisplayPort 1.4.
- Audio Out: Connect headphones or external speakers to the 3.5mm audio output jack.
- Power: Connect the power adapter to the monitor's DC input, then plug it into a power outlet.

Image 4.2: Diagram illustrating the monitor's input and output ports.
5. Operating Instructions
5.1 Power On/Off
Press the power button (usually integrated with the joystick) to turn the monitor on or off.
5.2 OSD Menu Navigation
The monitor features a joystick control for navigating the On-Screen Display (OSD) menu. Press the joystick to open the menu, then move it up/down/left/right to select and adjust settings.

Image 5.1: OSD menu interface and joystick control for settings adjustment.
5.3 Display Settings
- Resolution: Set your device's resolution to 2560x1440 for optimal WQHD display.
- Refresh Rate: Configure your device's display settings to 180Hz for the smoothest experience.
- HDR: Enable HDR10 in your device's display settings and on the monitor's OSD for enhanced dynamic range.
- Color Settings: Adjust brightness, contrast, and color temperature via the OSD menu. The monitor supports 10-bit color (8Bit+FRC) for rich visuals.

Image 5.2: Visual comparison of WQHD (2560x1440) versus Full HD (1920x1080) resolution.

Image 5.3: Demonstration of 180Hz refresh rate and the effect of Adaptive Sync on motion clarity.

Image 5.4: Visual representation of HDR10 and 4000:1 contrast ratio benefits.
5.4 Gaming Features
- Adaptive Sync: Ensure Adaptive Sync is enabled in the OSD menu and on your graphics card settings to eliminate screen tearing and stuttering.
- Game Modes: The OSD offers preset game modes (FPS, RCG, RPG) optimized for different game genres. Select the appropriate mode for your current game.
- Crosshair Function: Activate the on-screen crosshair via the OSD menu for improved aiming in compatible games.

Image 5.5: Example of the on-screen crosshair feature in a first-person shooter game.
5.5 Eye Care
The monitor includes a blue light reduction feature to help minimize eye strain during prolonged use. This can be enabled or adjusted through the OSD menu.

Image 5.6: User utilizing the monitor with blue light reduction enabled for eye comfort.
6. Maintenance
6.1 Cleaning the Monitor
- Always unplug the monitor before cleaning.
- Use a soft, lint-free cloth lightly dampened with water or a mild, non-abrasive screen cleaner.
- Do not spray cleaner directly onto the screen.
- Avoid using harsh chemicals or abrasive materials, as they can damage the screen or casing.
6.2 Storage
If storing the monitor for an extended period, ensure it is powered off, unplugged, and stored in a cool, dry place away from direct sunlight and extreme temperatures. Use original packaging if available for best protection.
7. Troubleshooting
If you encounter issues with your monitor, refer to the following common problems and solutions:
| Problem | Possible Cause | Solution |
|---|---|---|
| No image on screen | No power, incorrect input selected, loose cable connection. | Check power cable, press power button, select correct input via OSD, re-connect video cable. |
| Image flickering or tearing | Adaptive Sync not enabled, refresh rate mismatch. | Enable Adaptive Sync in OSD and graphics card settings. Ensure refresh rate is set to 180Hz. |
| Colors appear incorrect | Incorrect color settings, HDR not configured. | Adjust color settings in OSD. Ensure HDR is enabled on both monitor and device if desired. |
| No sound from audio out | Audio cable loose, volume too low, incorrect audio output selected on device. | Check audio cable, increase volume, select monitor as audio output on your device. |
8. Specifications
| Feature | Specification |
|---|---|
| Brand | KOORUI |
| Model | 27E6QCA |
| Screen Size | 27 inches |
| Panel Type | VA |
| Curvature | 1500R |
| Resolution | 2560 x 1440 (WQHD) |
| Aspect Ratio | 16:9 |
| Refresh Rate | 180 Hz |
| Response Time | 1ms (GTG) |
| Contrast Ratio | 4000:1 |
| Brightness | 300 cd/m² |
| Color Gamut | 100% sRGB, 90% DCI-P3 |
| Color Depth | 10-bit (8Bit+FRC) |
| Viewing Angle | 178° (H/V) |
| HDR Support | HDR10 |
| Adaptive Sync | FreeSync, G-Sync Compatible |
| Connectivity | 2x HDMI 2.0, 1x DisplayPort 1.4, 1x Audio Out |
| VESA Mount | 100x100mm |
| Tilt Adjustment | -5° to 15° |
| Power Consumption | 49 Watts |
| Product Dimensions (D x W x H) | 13.9 x 68.2 x 44.6 cm |
| Product Weight | 4.22 kg |
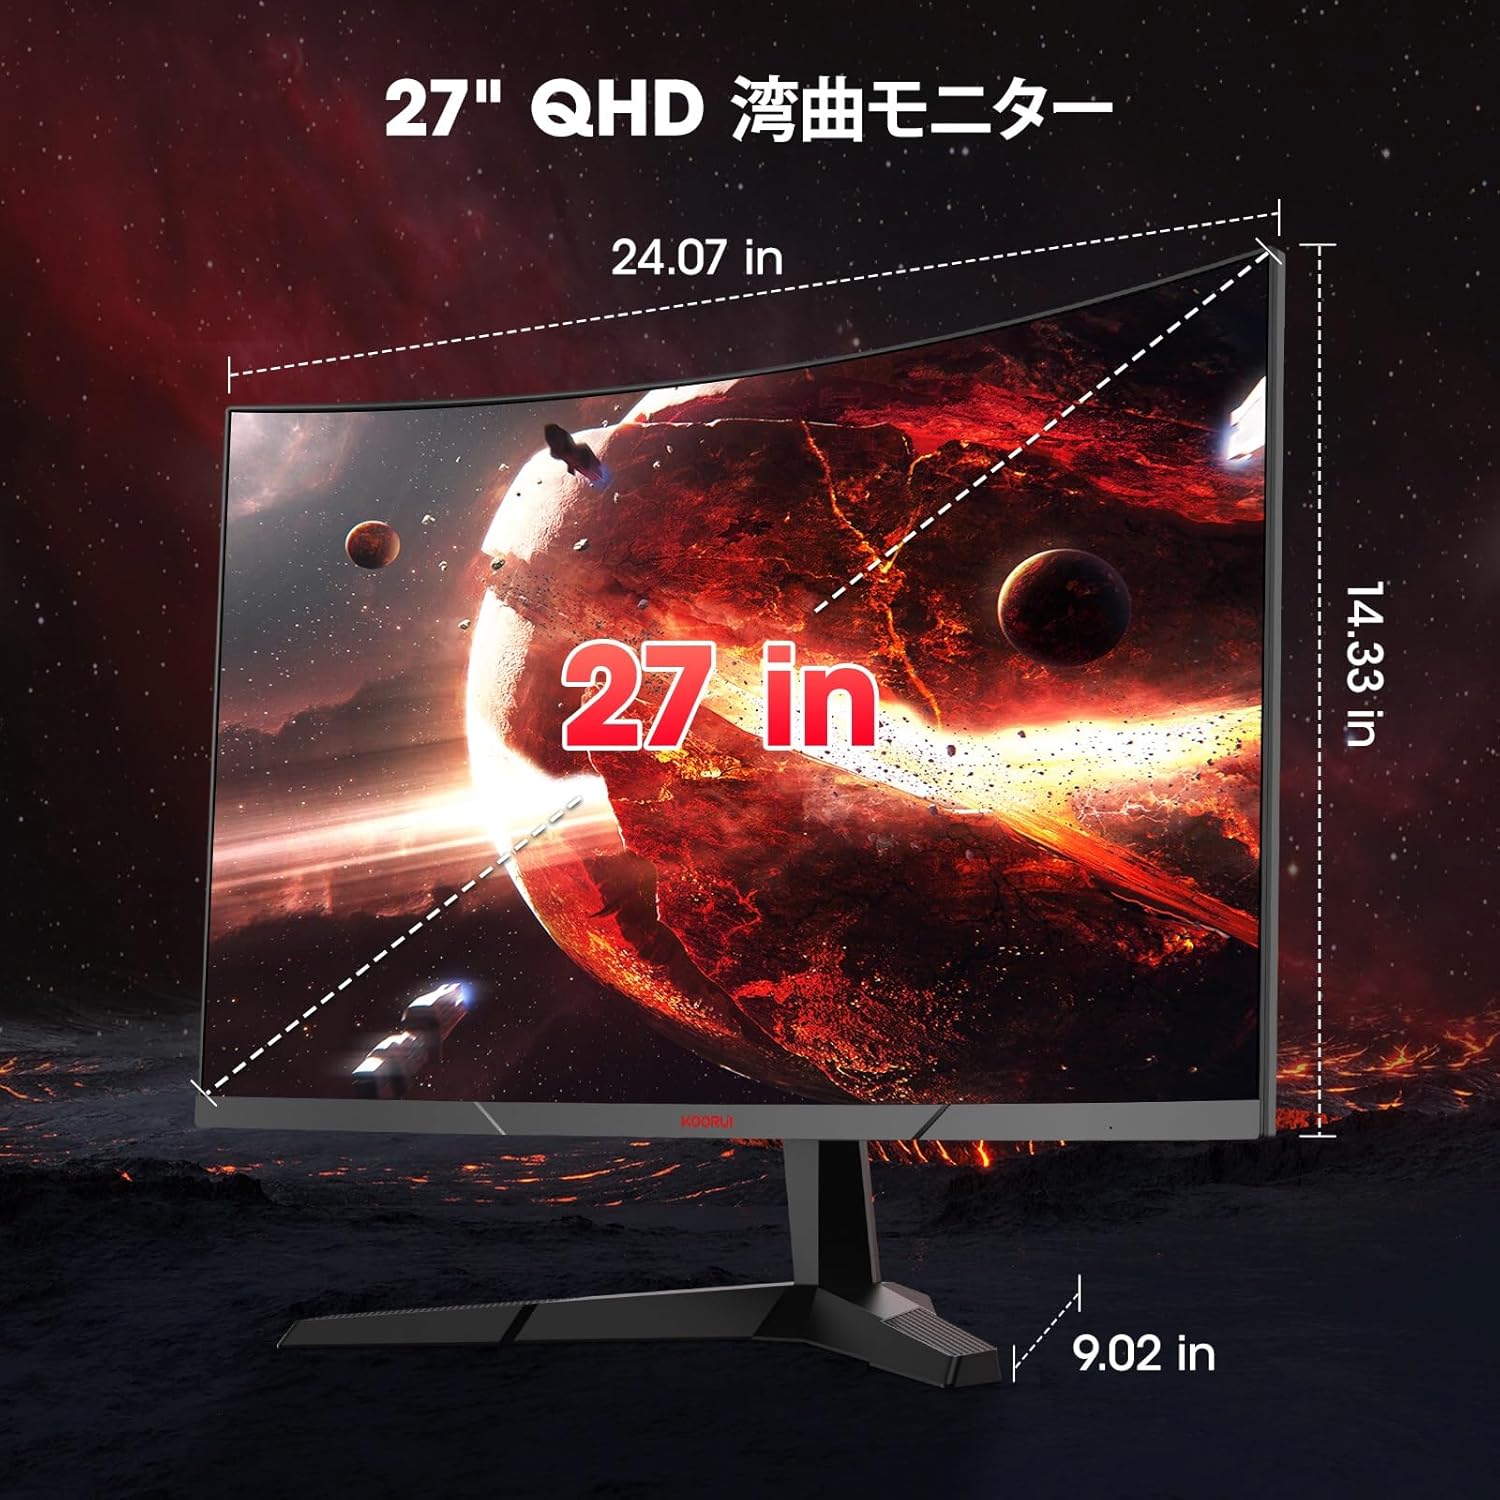
Image 8.1: Diagram showing the physical dimensions of the 27-inch monitor.

Image 8.2: Illustration of the monitor's tilt adjustment range and 178-degree viewing angle.
9. Warranty and Support
9.1 Warranty Information
KOORUI provides a 3-year manufacturer's warranty for this product. The monitor screen is covered for 1 year, while other accessories are covered for 3 years. Please retain your proof of purchase for warranty claims.
9.2 Customer Support
For technical assistance, warranty service, or product inquiries, please contact KOORUI customer support through the official website or the retailer where you purchased the product. Please have your model number (27E6QCA) and purchase details ready.