Introduction
This manual provides instructions for the assembly, operation, and maintenance of your Tangkula 3-Tier Indoor Cat Enclosure. Designed to offer a safe and stimulating environment for cats and other small animals, this enclosure features multiple levels for resting, playing, and feeding. Please read these instructions carefully before assembly and retain for future reference.

Image: The Tangkula 3-Tier Indoor Cat Enclosure, showcasing its multi-level design with a cat resting on the bottom tier, positioned in a home setting.
Safety Information
- Ensure all connectors are securely fastened during assembly to prevent instability.
- Place the enclosure on a flat, stable surface.
- Regularly inspect the enclosure for any loose parts or damage. Do not use if damaged.
- This product is intended for indoor use only.
- Keep small children away from the assembly area.
- The narrow wire mesh spacing (0.6 inches) is designed to prevent pets from getting stuck.
Package Contents
Verify that all components are present before beginning assembly:
- Metal Wire Panels
- PP Panels (for solid surfaces/privacy)
- Connectors
- Zip Ties
- Ladders (2 units)
- Doors (3 units)
- Hammer (for assembly)
- User Manual (this document)
Setup and Assembly
The Tangkula Cat Enclosure features a DIY design, allowing for customizable configurations. Follow these general steps for assembly:
- Unpack Components: Carefully remove all parts from the packaging and lay them out on a clean, flat surface. Verify against the package contents list.
- Connect Panels: Use the provided connectors to join the metal wire panels and PP panels. Ensure each panel corner is fully inserted into the connector slots. The hammer can be used to gently tap and secure connections.
- Form Tiers: Begin by constructing the base tier, then add subsequent tiers. The design allows for a 3-tier structure as shown in the product images.
- Install Doors: Attach the three doors to the desired openings using the connectors. Doors can be flexibly assembled on the front or back of the enclosure.
- Add Ladders: Place the two crawling ladders to connect different tiers, facilitating movement for your pet. Secure them as needed.
- Secure with Zip Ties: For enhanced stability, use the included zip ties to further secure panel connections, especially at critical joints.
- Final Check: Once assembled, gently shake the enclosure to ensure all parts are stable and secure.

Image: Visual guide illustrating the assembly components: joint connections, zip ties for secure fastening, and the included hammer for ease of assembly.
Operating Instructions
The 3-tier design provides distinct areas for your pet's daily needs:
- Rest Area: The top tier, often with fully enclosed panels, offers a private space for your pet to rest and sleep.
- Play Area: The middle tier is suitable for playful activities, with space for toys and climbing. The ladders allow easy access between levels.
- Feeding/Toilet Area: The bottom tier is ideal for placing food and water bowls, or a litter box, providing convenient access.

Image: A visual breakdown of the enclosure's multi-level functionality, designating specific areas for rest, play, and feeding/toilet use.
The three opening doors allow for easy access to your pet and simplify cleaning. The two crawling ladders enhance your pet's playtime by providing vertical movement options.

Image: Detailed view showing the three accessible doors and the two internal ladders, designed for pet interaction and movement between levels.
This enclosure is suitable for various small animals, including cats, ferrets, rabbits, dogs, and squirrels, providing a secure environment for their activities.

Image: An illustration demonstrating the suitability of the enclosure for a range of small animals, including cats, ferrets, rabbits, dogs, and squirrels.
Maintenance
- Cleaning: Wipe down panels and wire mesh with a damp cloth and mild, pet-safe cleaner. Ensure all surfaces are dry before allowing pets back into the enclosure.
- Inspection: Periodically check all connectors and zip ties for tightness. Re-secure or replace any loose or damaged components.
- Door Latches: Ensure door latches are functioning correctly to prevent accidental escapes.
Troubleshooting
| Problem | Possible Cause | Solution |
|---|---|---|
| Enclosure feels unstable. | Connectors not fully engaged or zip ties not applied. | Press connectors firmly until panels click into place. Use the hammer to tap if needed. Apply all provided zip ties to reinforce connections. |
| Doors do not close securely. | Door panels or latches are misaligned or damaged. | Check door panel alignment. Ensure latches are properly installed and not obstructed. Replace damaged parts if necessary. |
| Pet cannot easily move between tiers. | Ladders are not installed or are improperly positioned. | Install both ladders between tiers. Adjust their position to provide easy access for your pet. |
Specifications
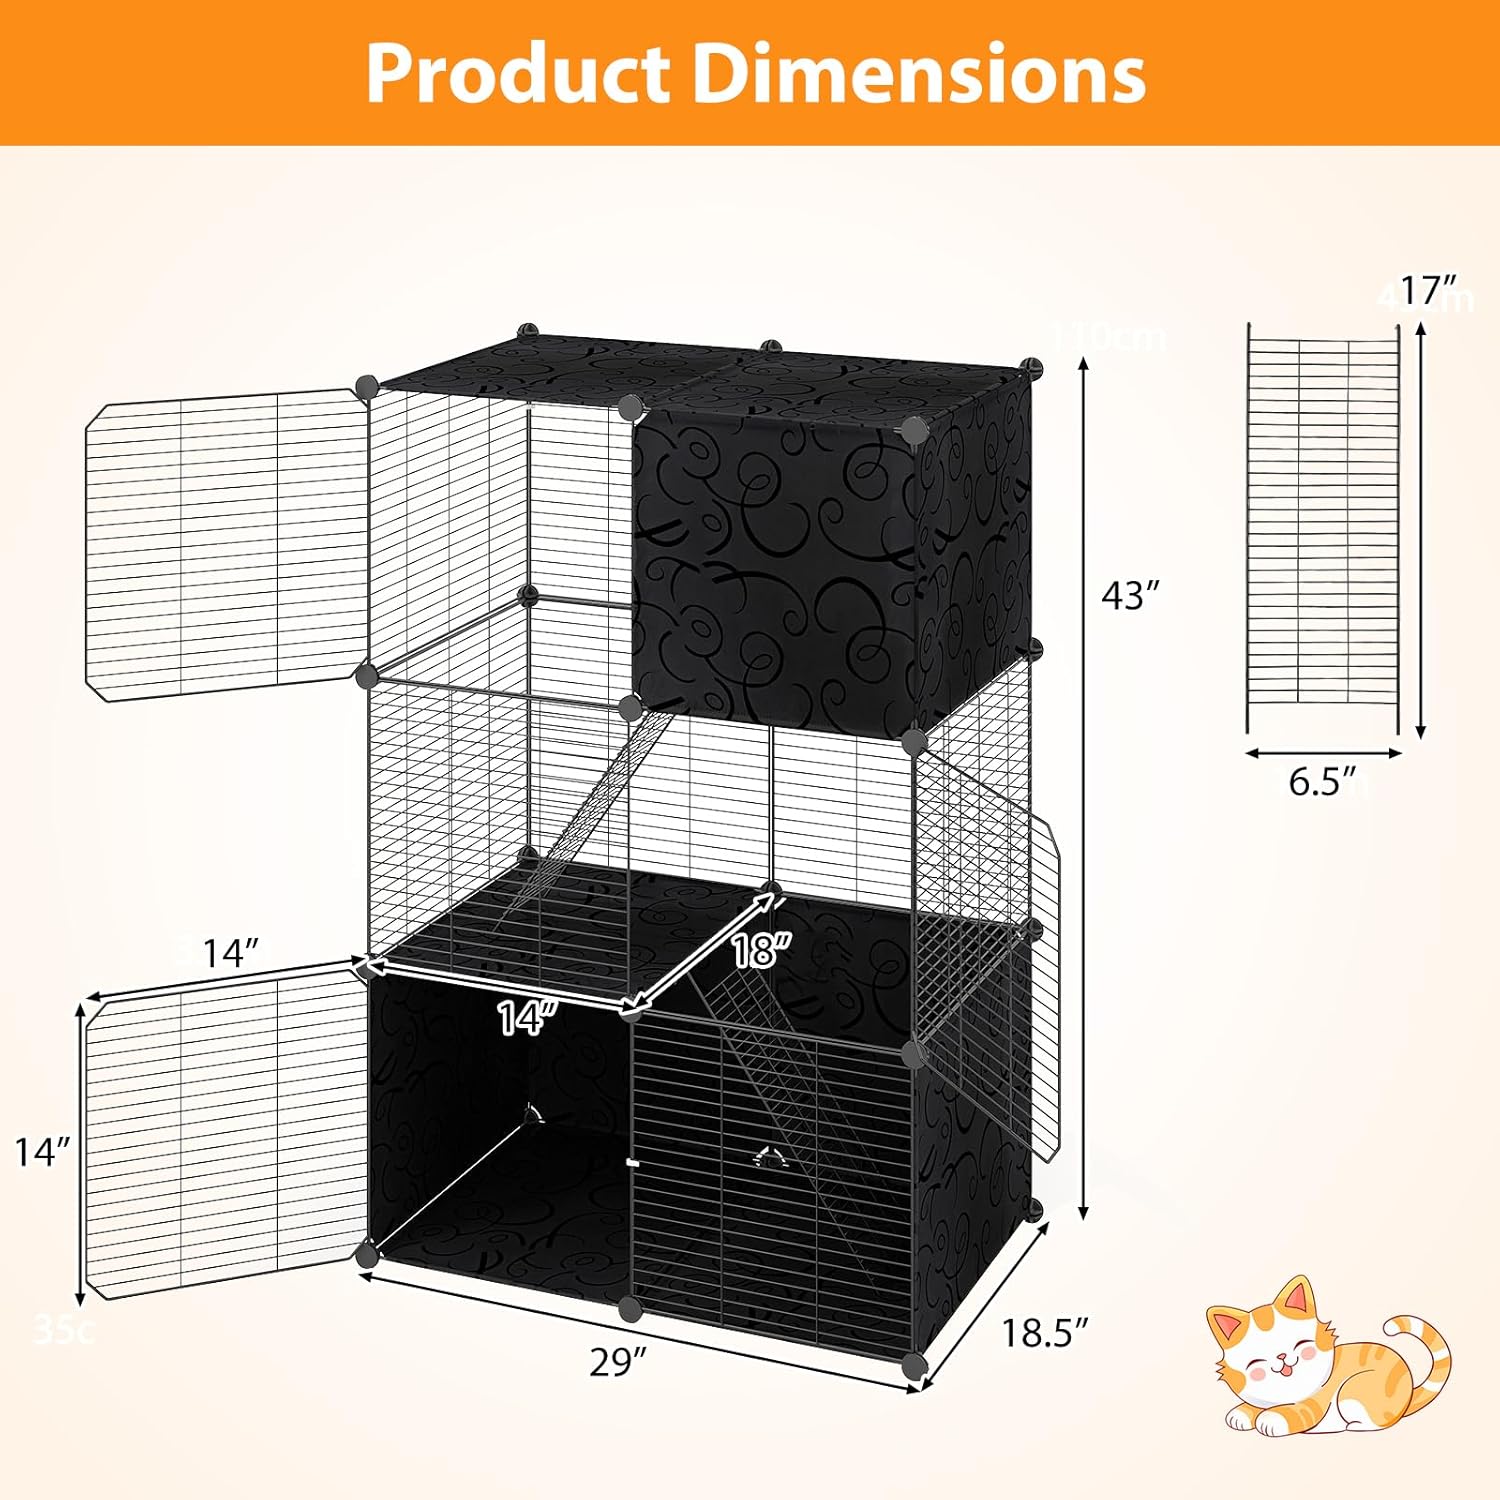
Image: A detailed diagram outlining the product's overall dimensions, including length, width, height, and specific measurements for doors and ladders.
| Feature | Detail |
|---|---|
| Model Number | 10328BK-VP |
| Color | Black |
| Material | Metal, Polypropylene (PP) |
| Product Dimensions (L x W x H) | 29" x 18.5" x 43" |
| Resting Platform Size (L x W) | 18" x 14" |
| Door Size (L x W) | 14" x 14" |
| Ladder Size (L x W) | 17" x 6.5" |
| Wire Mesh Spacing Size | 0.6" |
| Weight Capacity of Each Layer | 22 lbs |
| Net Weight | 14.5 lbs |
Warranty and Support
For any questions regarding assembly, missing parts, or product functionality, please refer to the retailer's customer service or the manufacturer's official support channels. Please retain your purchase receipt for warranty claims, if applicable.


