The WIZMAKER Artsian 01 CNC Router Machine is a high-precision desktop engraving and cutting tool designed for makers and professionals. It features a robust build, advanced control systems, and a versatile range of capabilities for various materials.
Key features include:
Intelligent 4-Axis Controller: Powered by Wizmaker 4-Axis Intelligent Controller V1.0, compatible with LaserGRBL, Candle, and other GRBL-based software. Features real-time precision compensation and software limit protection.
High-Strength Motion System: MGH12 linear guides on X and Z axes with T8 dual-nut lead screws, and a 16mm high-strength linear shaft with T12 dual-nut lead screw on the Y axis for precision and rigidity.
Multi-Material Versatility: The 12000 RPM high-torque spindle handles wood, acrylic, PVC, aluminum, brass, and PCB materials.
Rigid Frame: Industrial-grade aluminum and steel components ensure vibration-free operation and consistent ±0.1 mm machining accuracy.
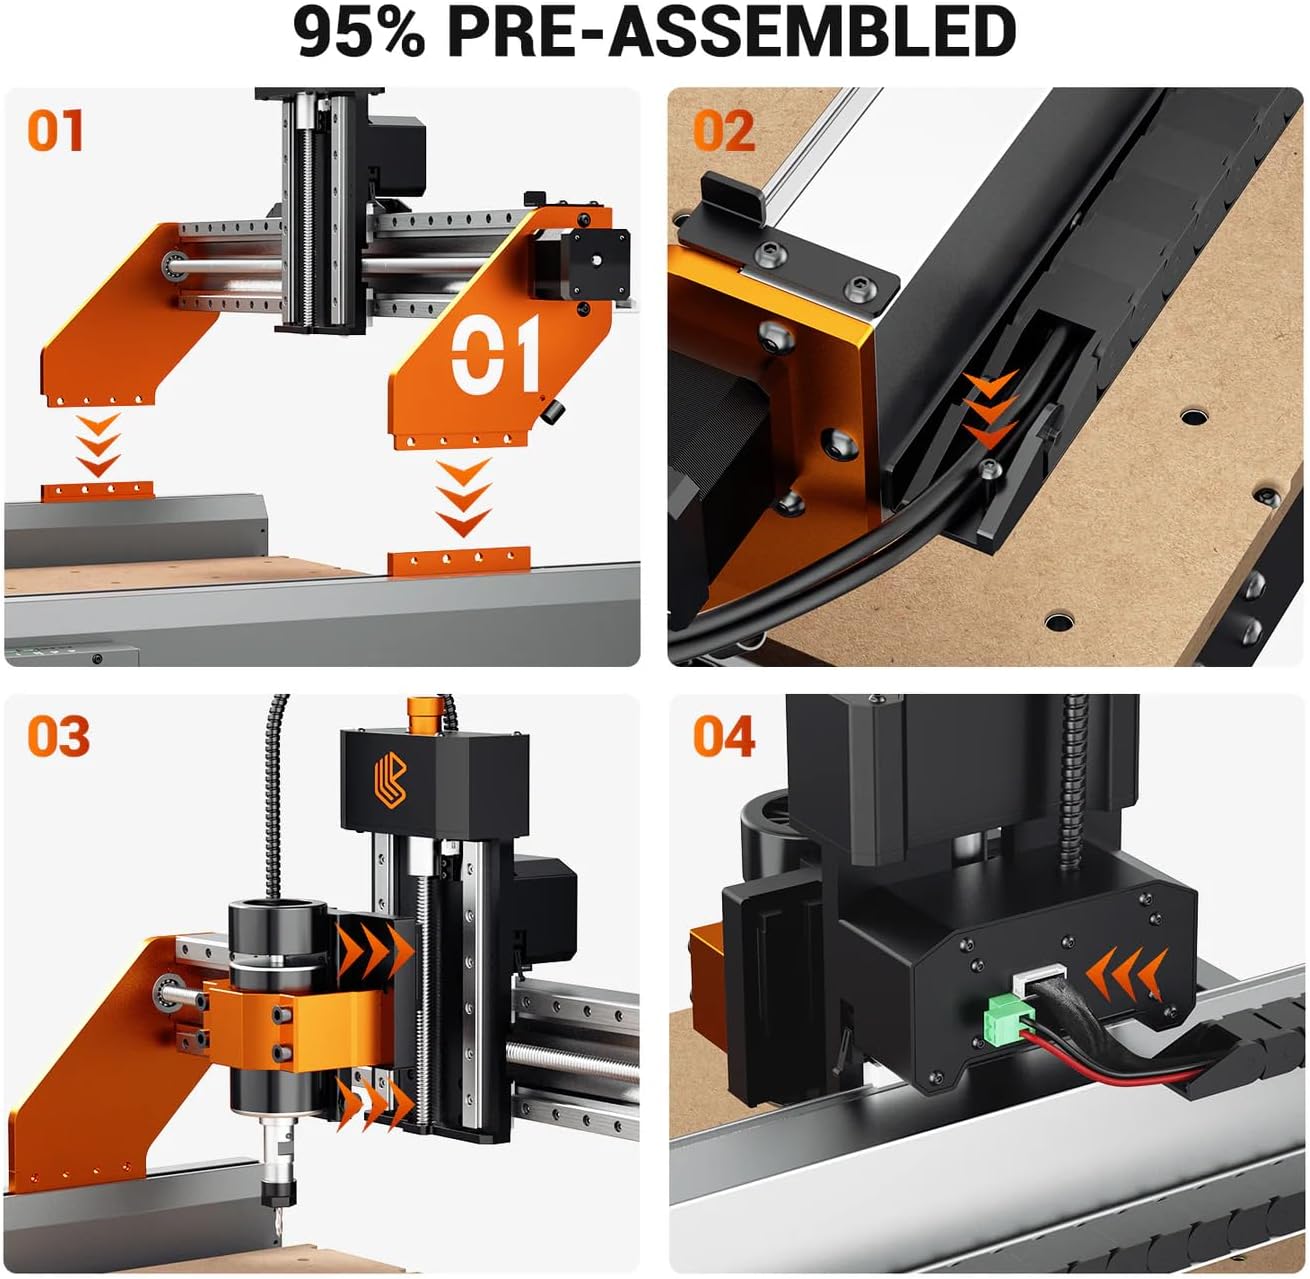
98% Pre-Assembled: Quick assembly in under ten minutes.
Figure 1: Overview of the WIZMAKER Artsian 01 CNC Router Machine, highlighting its robust construction and key components.
Product Details
Figure 2: Detailed view of the WIZMAKER Artsian 01 CNC Router Machine, showing trapezoidal lead screws, fixed linear guide rails, and movable lighting.
The machine features a solid aluminum frame, heavy, rigid, and designed for stability. Each axis operates on linear rails with precision bearings, ensuring smooth motion and accuracy. The dual-nut design on the lead screws eliminates backlash, resulting in perfectly aligned cuts even during high-speed operations.
Included Accessories
Figure 3: Display of accessories included with the WIZMAKER Artsian 01, such as the 52mm spindle clamp, adapter, power cord, Z-axis tool setting instrument, CNC offline controller, engraving tool set, and One-to-two Type C cable.
2. Setup and Assembly
The WIZMAKER Artsian 01 CNC machine arrives 98% pre-assembled, allowing for quick setup. Follow these steps to complete the assembly and prepare for operation.
2.1 Initial Assembly
The main frame and gantry are largely pre-assembled. Ensure all connections are secure before proceeding.
Figure 4: Illustration of the 98% pre-assembled state of the CNC machine, showing the modular components ready for quick setup.
2.2 Connecting the Manual Controller
The wired manual controller allows for direct machine control without a computer. Connect it to the main control box.
Video 1: Demonstrates connecting the manual controller to the CNC machine's control box. The controller features dials for movement distance and speed, and allows for homing and running jobs offline. It has a magnetic backing for convenient placement. (Relevant segment: 00:02:20 - 00:02:43)
2.3 Attaching the Spindle
Carefully insert the spindle into its bracket and secure it by tightening the two bolts.
Video 2: Shows the process of attaching the spindle to the machine by inserting it into the bracket and tightening the securing bolts. (Relevant segment: 00:04:48 - 00:05:08)
2.4 Connecting Spindle Wiring
Connect the spindle's wiring to the control box. Ensure the plug is correctly oriented as it can only be inserted in one direction.
Video 3: Illustrates connecting the spindle wiring to the control box, emphasizing the correct plug orientation. (Relevant segment: 00:05:11 - 00:05:27)
3. Operating Instructions
3.1 Workpiece Setup (Tape and Super Glue Method)
For secure workpiece mounting, the masking tape and super glue method is effective. Apply masking tape to both the workpiece and the wasteboard, then apply super glue between the tape layers to create a strong, temporary bond.
Video 4: Demonstrates the masking tape and super glue method for securely attaching a workpiece to the CNC bed. (Relevant segment: 00:08:59 - 00:09:39)
3.2 Z-Probe Setup
The Z-probe is used to accurately set the Z-axis zero point on your material. Place the probe puck on the material, connect the alligator clip to the bit, and plug the probe into the control box.
Video 5: Shows the setup of the Z-probe, including placing the puck on the material, connecting the alligator clip to the bit, and plugging the probe into the control box. (Relevant segment: 00:09:43 - 00:10:07)
3.3 Sample Engraving Process
Once the workpiece and Z-probe are set, you can begin the engraving process. The machine will precisely carve the design into the material.
Video 6: Displays the CNC machine engraving an eagle design onto a piece of pine using a 30-degree V bit and Candle software. (Relevant segment: 00:10:08 - 00:12:45)
3.4 Engraving Results
The WIZMAKER Artsian 01 produces detailed and precise engravings. The example shows an eagle design with significant detail.
Video 7: Close-up of the engraved eagle design, showcasing the detail and precision achieved by the WIZMAKER Artsian 01. (Relevant segment: 00:12:46 - 00:13:14)
4. Optional Accessories
4.1 500W Spindle Upgrade
For enhanced cutting power, an optional 500W spindle is available. This upgrade includes a control board and an ER11 collet, operating at 12,000 RPM. All necessary wiring is provided for easy connection.
Video 8: Compares the 300W and 500W spindles and shows the components of the 500W spindle upgrade kit, including the control board and wiring. (Relevant segment: 00:03:11 - 00:03:45)
4.2 Rotary Axis
The rotary axis is an exciting add-on that transforms the CNC into a full 4-axis machine, enabling engraving on cylindrical objects like tumblers, chair legs, or handles. It offers 0.1mm accuracy and speeds up to 2500mm/min. Setup involves plugging it into the control board and enabling the fourth axis in the software.
Video 9: Showcases the rotary axis add-on, demonstrating its components and how it enables 4-axis engraving for cylindrical objects. (Relevant segment: 00:05:29 - 00:06:14)Video 10: Provides a quick guide on assembling the rotary axis and attaching it to the Artisan wasteboard. (Relevant segment: 00:06:16 - 00:08:05)
4.3 Dust Collection System
To maintain a clean workspace and extend the machine's lifespan, an optional dust collection system is available. This system includes a shop vac, hoses, a cyclone, and a canister.
Video 11: Overview of the complete dust collection system, including the shop vac, hoses, cyclone, and canister. (Relevant segment: 00:08:09 - 00:08:30)
4.4 Magnetic Dust Shoe
The magnetic dust shoe easily attaches to the spindle mount. Its magnetic bottom allows for quick removal and replacement, facilitating easy tool changes.
Video 12: Demonstrates how to easily attach and remove the magnetic dust shoe for convenient tool changes. (Relevant segment: 00:08:33 - 00:08:56)
5. Maintenance
Regular maintenance ensures the longevity and optimal performance of your WIZMAKER Artsian 01 CNC Router Machine.
Cleaning: Regularly clean the machine, especially the linear rails and lead screws, to prevent dust and debris buildup. The optional dust collection system can significantly reduce this.
Lubrication: Apply appropriate lubricant to moving parts as recommended in the detailed product manual (not provided in this summary) to ensure smooth operation.
Connection Checks: Periodically inspect all electrical and mechanical connections to ensure they are secure.
6. Troubleshooting
If you encounter issues with your WIZMAKER Artsian 01, consider the following basic troubleshooting steps:
Connection Issues: Ensure all power cables, USB connections, and accessory cables are securely plugged in.
Software Compatibility: Verify that your GRBL-based software (e.g., LaserGRBL, Candle) is up-to-date and correctly configured for the machine.
Movement Problems: Check for any obstructions on the linear rails or lead screws. Ensure the manual control knobs are not inadvertently engaged.
Unusual Noises: Discontinue operation and inspect for loose components or debris.
For more complex issues, refer to the comprehensive troubleshooting guide in your product manual or contact customer support.