1. Introduction
The ECOWITT WS3820 Weather Station is a comprehensive system designed to monitor various environmental conditions. It includes a multi-sensor outdoor unit (WS69) and a 7.5-inch indoor color LCD display console. This manual provides detailed instructions for the setup, operation, maintenance, and troubleshooting of your weather station.
2. Product Overview
2.1 Components
The ECOWITT WS3820 Weather Station package includes the following main components:
- WS3820 Indoor Color LCD Display Console
- WS69 7-in-1 Outdoor Solar Sensor (integrates temperature, humidity, rain gauge, wind speed, wind direction, UV, and light sensors)
- Mounting Hardware
- Power Adapter for Console
- User Manual (this document)
2.2 System Diagram and Dimensions
The following image illustrates the overall dimensions of the outdoor sensor and the indoor display console.

Image: Overall dimensions of the WS69 outdoor sensor (40.6cm x 20.7cm) and the WS3820 indoor display console (19.16cm x 12.7cm).
2.3 Outdoor Sensor (WS69) Details
The WS69 outdoor sensor integrates multiple measurement devices into a single unit. Key components include:
- Wind Speed Sensor (anemometer)
- Wind Direction Sensor (wind vane)
- Rain Gauge (tipping bucket mechanism)
- UV/Light Sensor
- Solar Panel for power assistance
- Thermo-Hygrometer Sensor (for temperature and humidity)
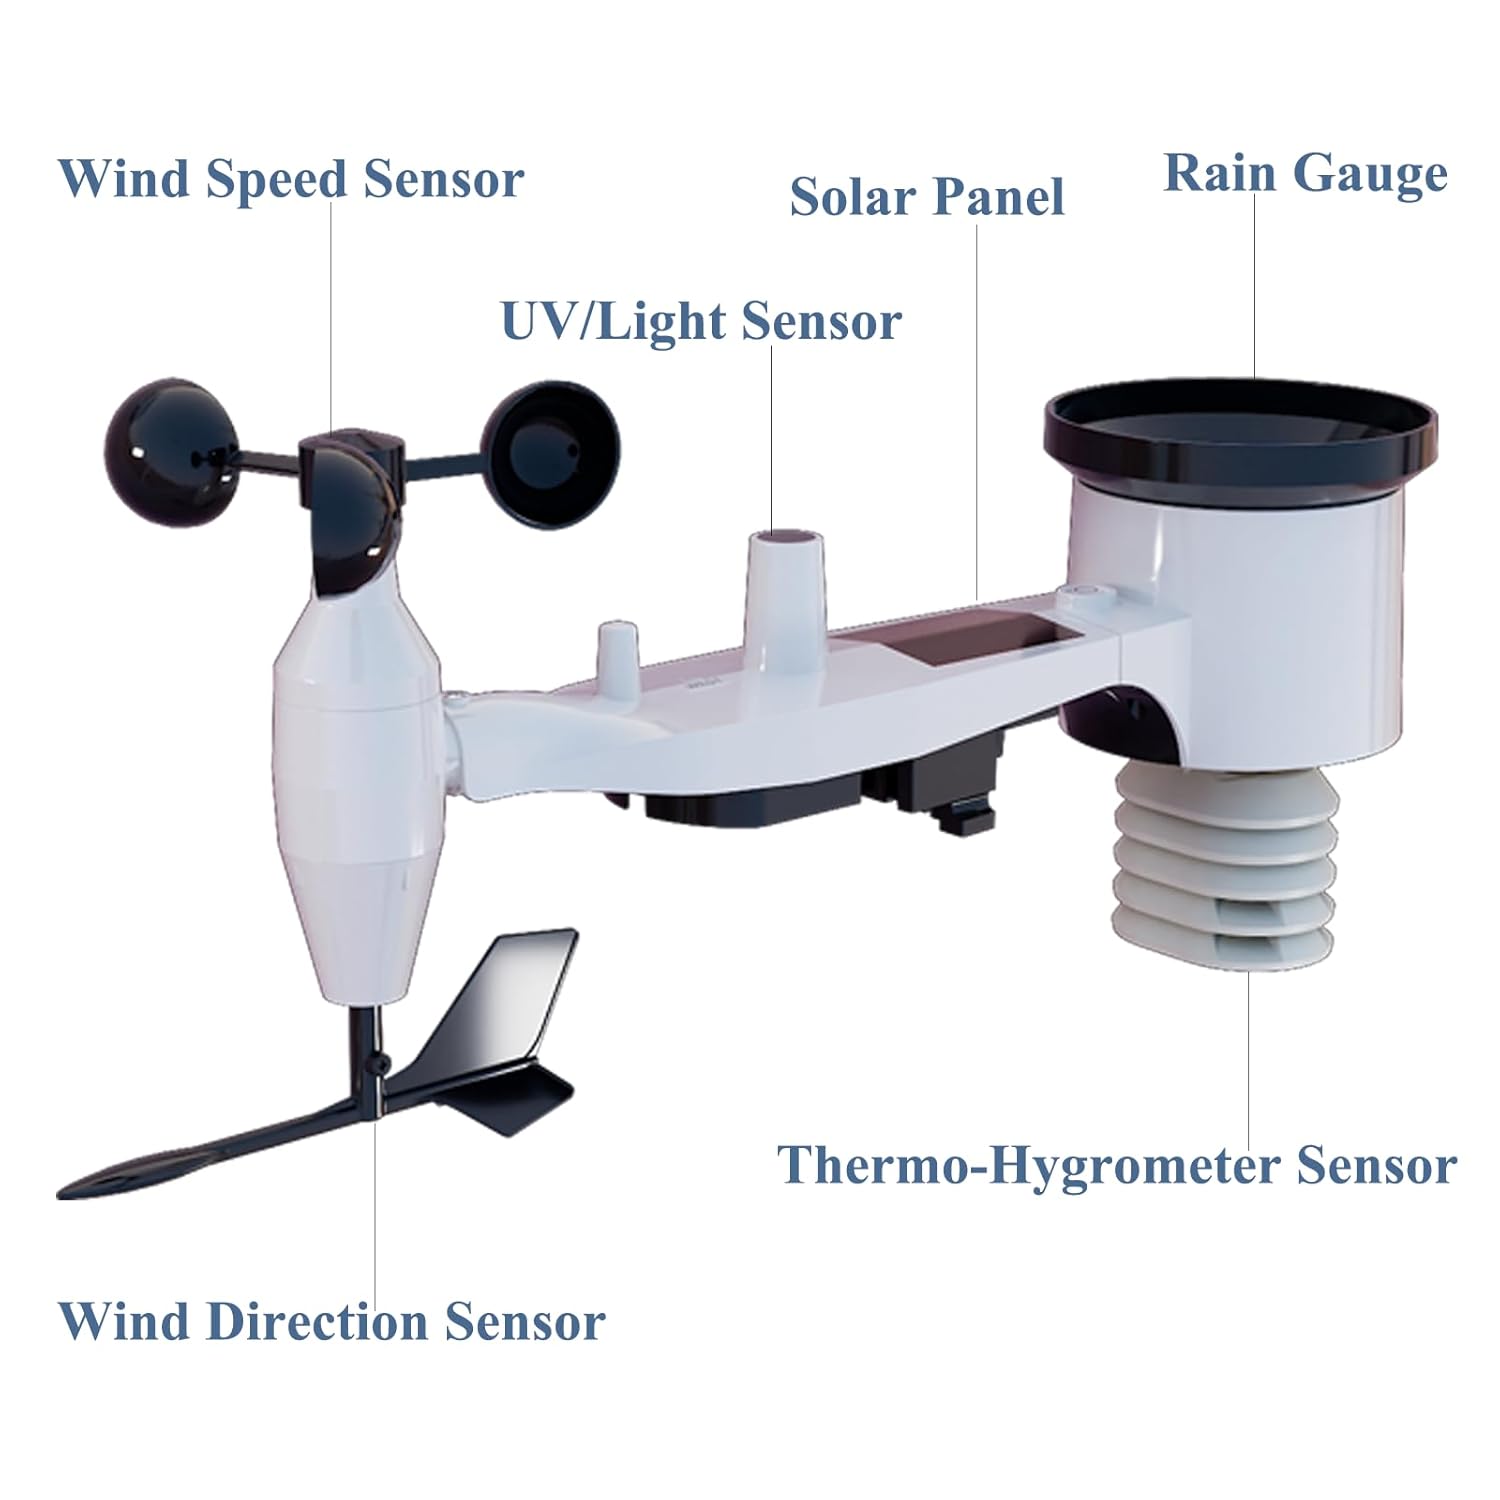
Image: Detailed view of the WS69 outdoor sensor with each component clearly labeled.
Video: An animated demonstration of the internal components and functionality of the ECOWITT WS69 outdoor sensor, including the wind cups, wind vane, rain gauge, and thermo-hygrometer.
2.4 Indoor Display Console (WS3820) Details
The WS3820 console features a 7.5-inch color LCD screen for displaying all collected weather data. It includes integrated temperature, humidity, and barometric pressure sensors for indoor readings.

Image: Various views of the WS3820 display console, highlighting its physical design and button layout.
3. Setup
3.1 Outdoor Sensor (WS69) Installation
Proper placement of the outdoor sensor is crucial for accurate readings. Consider the following:
- Location: Choose an open area, away from obstructions like buildings or trees, that could affect wind, rain, or sunlight.
- Mounting: The sensor can be mounted on a pole (not included) on a roof, in a garden, or any elevated position. Ensure it is level using the integrated bubble level.
- Orientation: The wind vane must be oriented correctly (usually facing North) for accurate wind direction readings.
- Power: The WS69 sensor is solar-powered with battery backup (2x AA batteries, not included). Install batteries before mounting.
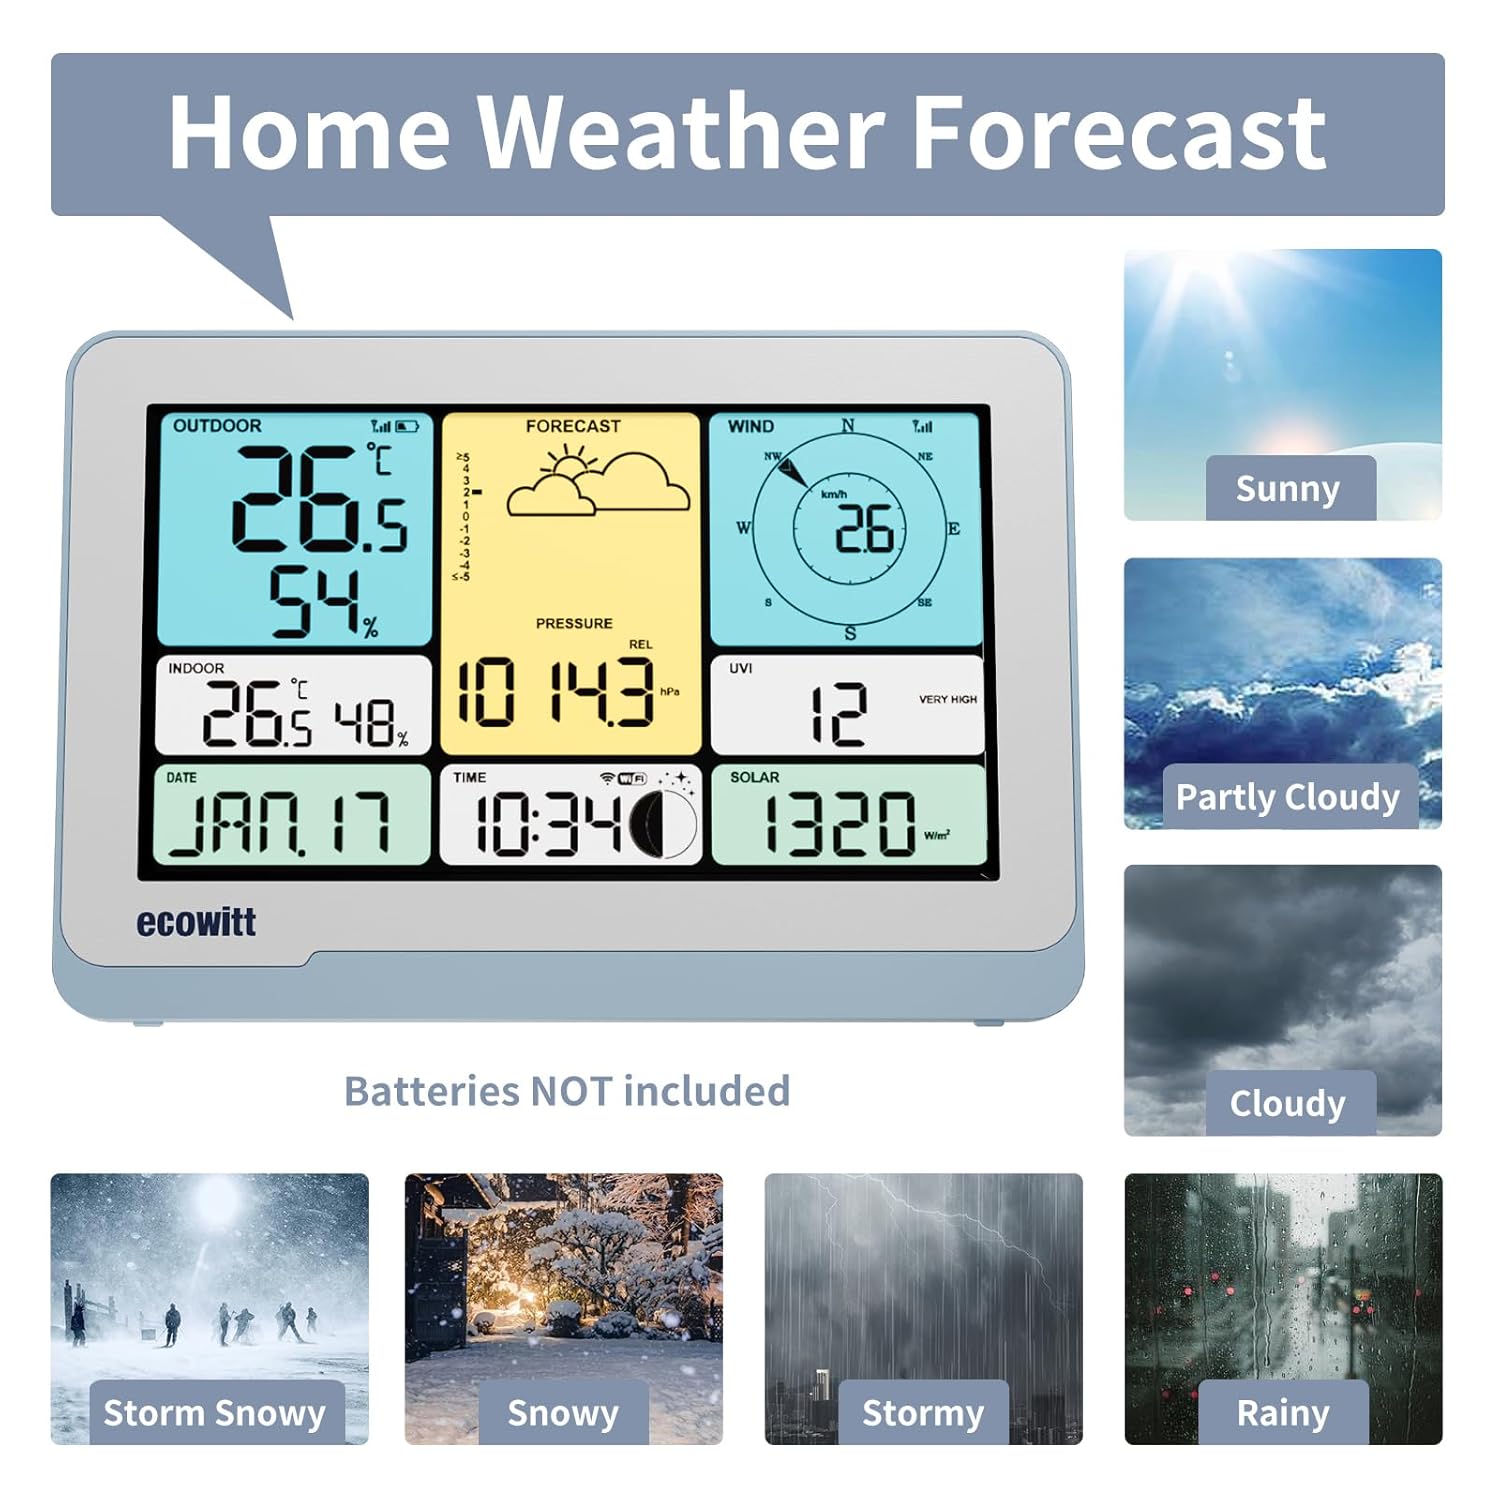
Image: Recommended installation locations for the outdoor sensor, such as on a roof or in an open garden area.

Image: Power supply requirements for both the outdoor sensor and the indoor console.
3.2 Indoor Display Console (WS3820) Setup
To set up your indoor console:
- Power: Power the console using the included DC adapter or 3x AAA batteries (not included). The DC adapter allows for backlight brightness adjustment.
- Placement: Place the console indoors, within 100 meters (328 feet) of the outdoor sensor for optimal wireless signal reception. Avoid placing it near large metal objects or electrical appliances that may cause interference.
- Initial Pairing: The console should automatically connect with the outdoor sensor upon power-up. If not, refer to the troubleshooting section.
3.3 WiFi Connection and Ecowitt Cloud Service
The WS3820 console can connect to your home WiFi network (2.4GHz only) to upload data to the Ecowitt Cloud service and other weather platforms.
- Connect to WiFi: Follow the on-screen instructions on the console to connect to your local 2.4GHz WiFi network.
- Ecowitt.net Registration: Create an account on Ecowitt.net to view your data online, configure advanced settings, and receive alerts.
- Firmware Updates: The console supports automatic or manual firmware updates via WiFi.

Image: Connectivity diagram showing the wireless transmission from the outdoor sensor to the console, and then via WiFi to online weather services.
4. Operating Instructions
4.1 Display Layout and Functions
The 7.5-inch color LCD displays various weather parameters. Refer to the image below for a detailed layout:
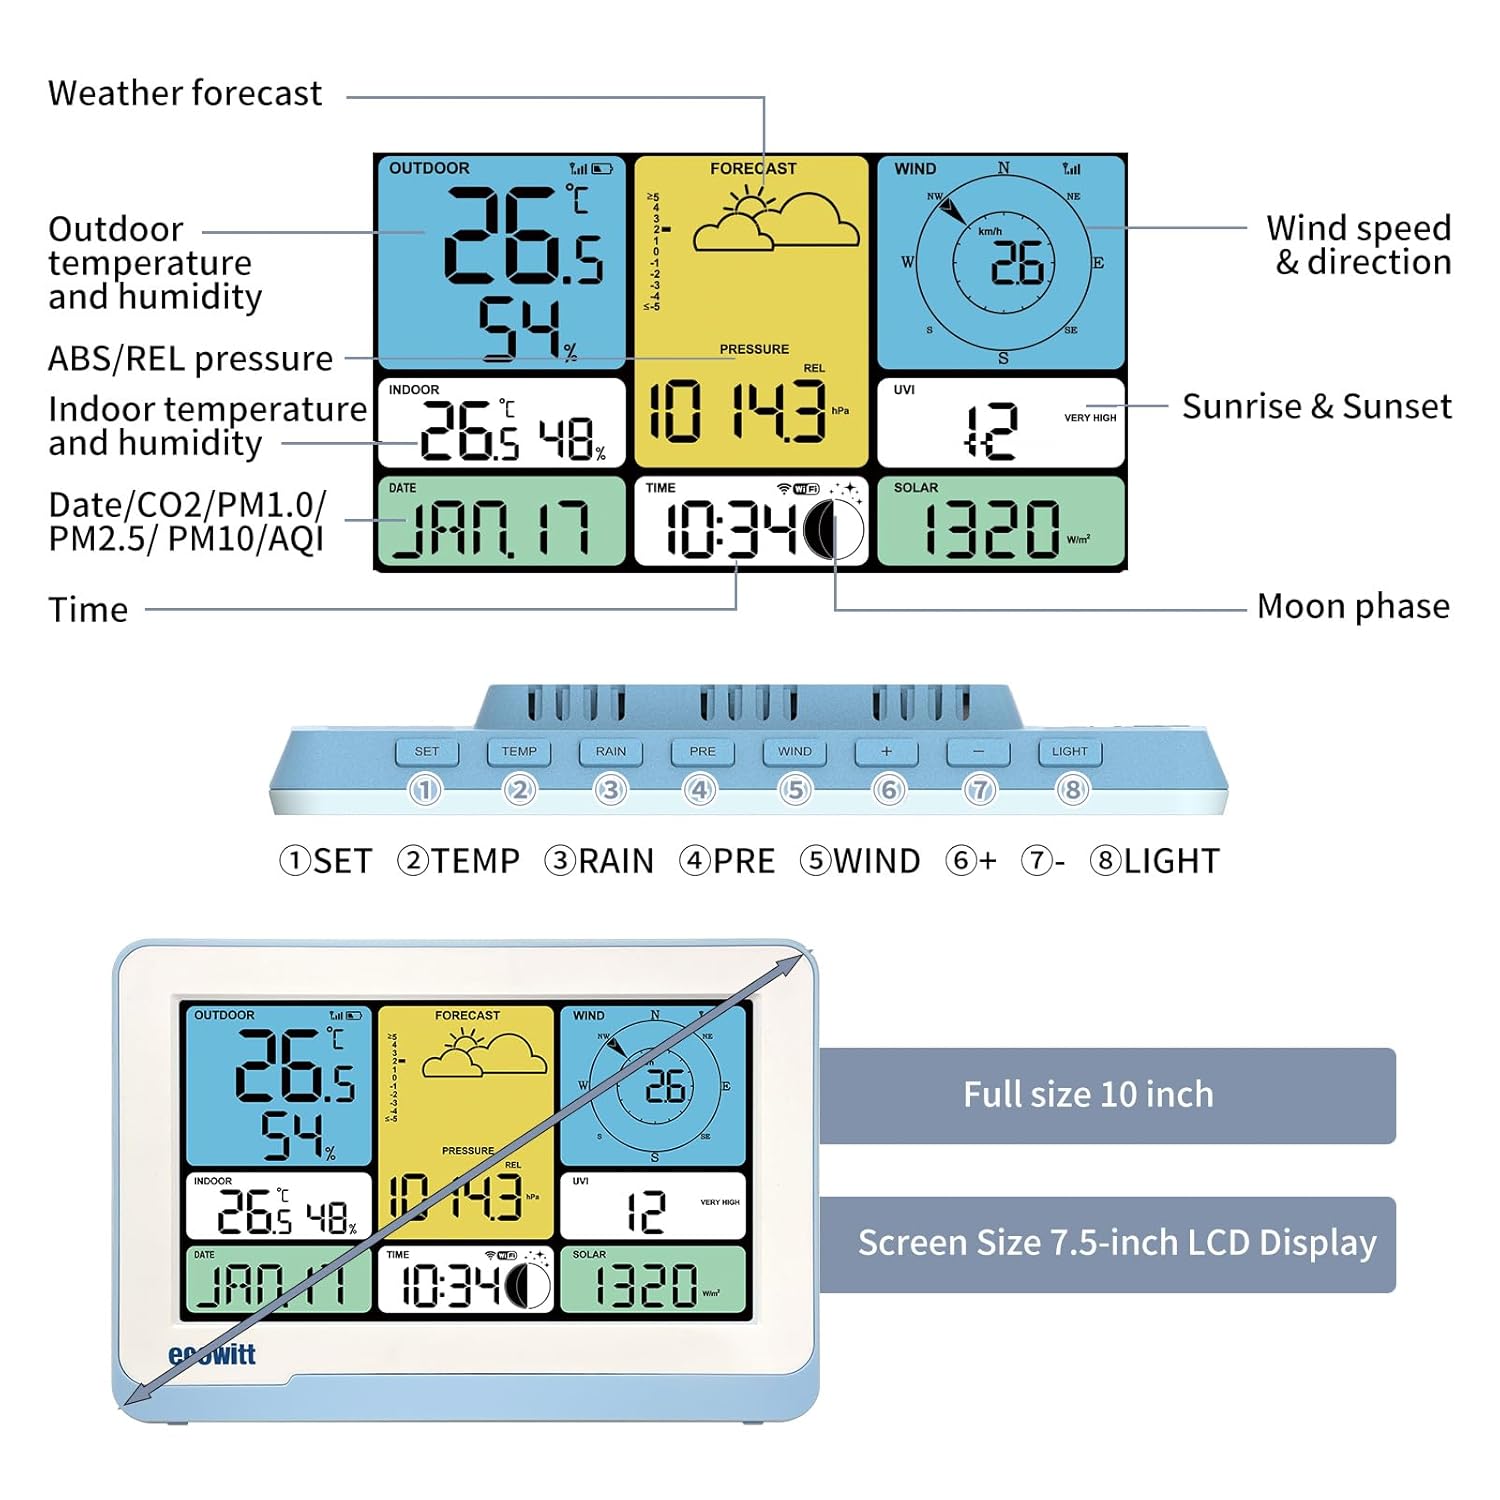
Image: Annotated display screen of the WS3820 console, indicating where each weather parameter is shown, along with the function of the 8 control buttons.
The console features 8 control buttons for navigation and settings:
- SET: Enter settings menu.
- TEMP: Cycle through temperature displays.
- RAIN: Cycle through rain data (hourly, daily, weekly, monthly, yearly).
- PRE: Cycle through pressure displays.
- WIND: Cycle through wind speed displays (average, gust).
- +: Increase value or navigate forward.
- -: Decrease value or navigate backward.
- LIGHT: Adjust backlight brightness.
4.2 Weather Alerts
The WS3820 allows you to set customizable high/low alarms for various weather parameters. When a set threshold is exceeded, the console will provide an alert.
- Parameters: Set alarms for indoor/outdoor temperature, humidity, barometric pressure, wind speed, wind gust, daily rain rate, dew point, and heat index.
- Setting Alarms: Access the alarm settings through the SET button and navigate using the +/- buttons.
4.3 Data Upload and Viewing
Once connected to WiFi, your weather station will automatically upload data to the Ecowitt Cloud. You can view historical data, graphs, and manage your station settings via the Ecowitt website or mobile application.
5. Maintenance
Regular maintenance ensures the longevity and accuracy of your weather station.
- Battery Replacement: Replace batteries in the outdoor sensor (2x AA) and indoor console (3x AAA) as needed. Low battery indicators will appear on the display.
- Cleaning the Outdoor Sensor: Periodically clean the rain gauge funnel, solar panel, and wind sensors to remove debris, dust, or insects that may affect readings. Use a soft, damp cloth.
- Rain Gauge Calibration: If rain readings appear inaccurate, the rain gauge may need calibration. Refer to the Ecowitt support resources for detailed instructions on calibration.
- Firmware: Ensure your console's firmware is up to date for optimal performance and new features.
6. Troubleshooting
If you encounter issues with your ECOWITT WS3820 Weather Station, refer to the following common problems and solutions:
| Problem | Possible Cause | Solution |
|---|---|---|
| No outdoor data on console | Low batteries in outdoor sensor; sensor out of range; interference. | Replace sensor batteries; move console closer to sensor; relocate away from interference sources. |
| Incorrect wind readings | Obstructions; incorrect orientation; debris in wind cups/vane. | Ensure clear path for wind; verify sensor orientation (West arrow); clean wind cups/vane. |
| Inaccurate rain readings | Debris in rain funnel; sensor not level. | Clean rain funnel; ensure sensor is level using the bubble level. |
| WiFi connection issues | Incorrect password; 5GHz network selected; router too far. | Re-enter password; ensure connection to 2.4GHz network; move console closer to router. |
For more detailed troubleshooting or specific issues, please visit the official ECOWITT support website or consult the online community forums.
7. Specifications
Key technical specifications for the ECOWITT WS3820 Weather Station:
| Feature | Detail |
|---|---|
| Brand | ECOWITT |
| Model | WS3820 (Console), WS69 (Outdoor Sensor) |
| Power Source (Console) | DC Adapter (included), 3x AAA Batteries (not included) |
| Power Source (Outdoor Sensor) | Solar Power, 2x AA Batteries (not included) |
| Display Type | 7.5-inch Color LCD |
| Connectivity Technology | Wi-Fi (2.4GHz), RF (433MHz for sensor to console) |
| Wireless Range | Up to 100 meters (328 feet) line of sight |
| Sensor Technology | Thermistor, Anemometer, Tipping Bucket, Photodiode, Capacitive/Piezoresistive |
| Temperature Accuracy | ±1 °C (±1.5 °C) |
| Material | Plastic, Glass |
| Special Features | 7-in-1 Outdoor Sensor, Customizable Weather Alerts, Ecowitt Cloud Upload |
8. Warranty and Support
ECOWITT products are designed for reliability and performance. For warranty information, technical support, or to access additional resources, please visit the official ECOWITT website:
Please retain your proof of purchase for warranty claims.