
Brightify SY2114-AB
Brightify Classic Antique Brass Front Door Lock Set User Manual
Model: SY2114-AB
Introduction
Thank you for choosing the Brightify Classic Antique Brass Front Door Lock Set. This manual provides detailed instructions for the proper installation, operation, and maintenance of your new door lock set. Please read all instructions carefully before beginning installation to ensure correct function and longevity of the product.
Package Contents
Before installation, verify that all components listed below are present in your package. If any parts are missing or damaged, please contact Brightify customer support.

Figure 1: Package Contents. This image displays all parts included with the Brightify Classic Antique Brass Front Door Lock Set, such as the exterior handle, interior handle, deadbolts, keys, and various screws.
- Exterior Handle
- Interior Handle
- Exterior Deadbolt
- Interior Deadbolt
- Entry Keys (3 pieces)
- Washer Cover
- Deadbolt Strike Plate
- 1-3/8" (35mm) Screw (1 piece)
- 1-3/5" (40mm) Screws (2 pieces)
- Deadbolt Latch Set (Adjustable)
- 3/4" (20mm) Screws (4 pieces)
- Small Parts Box (containing additional fasteners)
Setup and Installation
1. Pre-Installation Measurements
Accurate measurements are crucial for proper fit and function. Confirm your door's dimensions and existing bore holes before proceeding.

Figure 2: Fit Door Thickness and Dimensions. This diagram illustrates the required door thickness (1-3/8" to 1-3/4") and various lock component dimensions.
- Door Thickness: The lock set is designed for doors with a thickness of 1-3/8 inches to 1-3/4 inches (35mm-45mm).
- Adjustable Distance from Center Hole: The handleset accommodates an adjustable distance from the center hole, ranging from a minimum of 7-3/4 inches (196mm) to a maximum of 9-1/8 inches (232mm).
- Backset: The adjustable deadbolt latch supports backsets of 2-3/8 inches (60mm) or 2-3/4 inches (70mm).
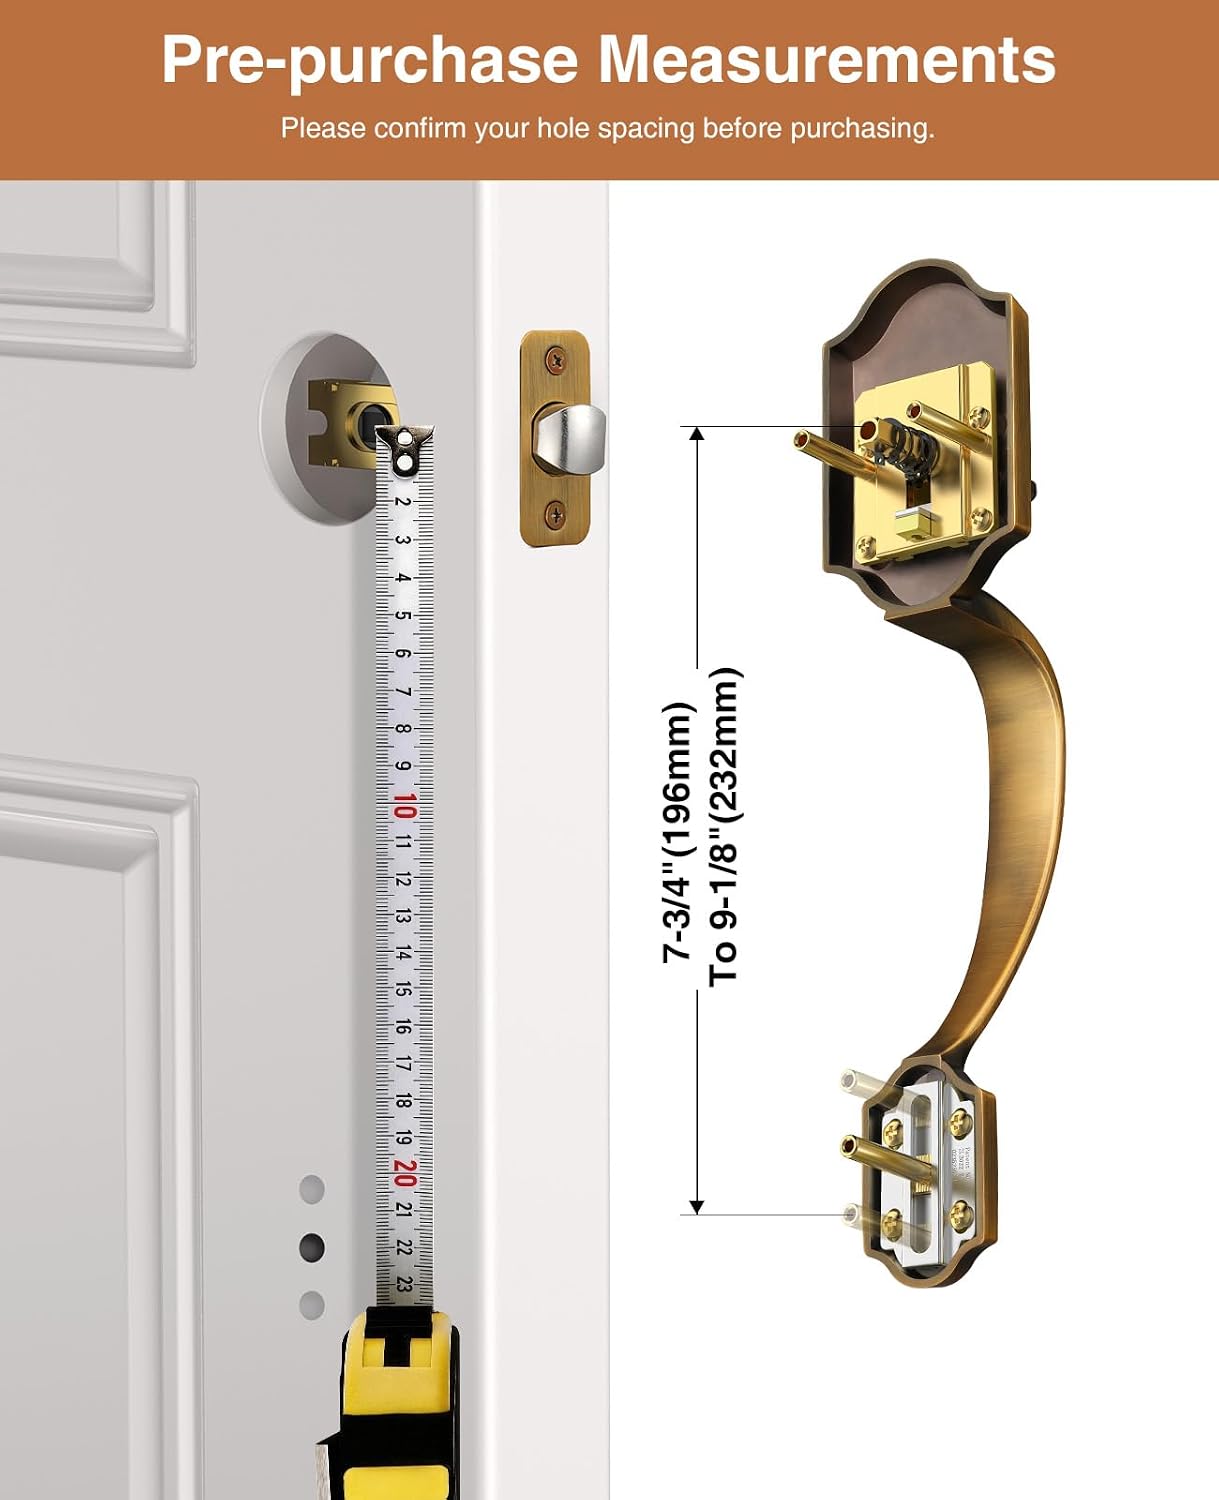
Figure 3: Measuring Hole Spacing. This image shows the correct method for measuring the hole spacing on your door to ensure compatibility with the handleset.
2. Installation Steps
Follow these general steps for installing your Brightify door lock set. Refer to the included hardware for specific screw types and lengths.
- Prepare the Door: Ensure the door has the correct bore holes and edge bore for the latch and deadbolt. If installing on a new door, use a template (not included) for drilling.
- Install Deadbolt Latch: Insert the adjustable deadbolt latch into the edge bore of the door. Ensure the correct backset (2-3/8" or 2-3/4") is selected by adjusting the latch mechanism as shown in Figure 4. Secure with the appropriate screws.
- Install Deadbolt Cylinders: Insert the exterior deadbolt cylinder through the top bore hole from the outside, and the interior deadbolt mechanism from the inside. Secure them together with the provided screws.
- Determine Handing: Identify if your door is right-handed or left-handed. This determines the orientation of the interior lever handle. Refer to Figure 5 for guidance.
- Install Exterior Handle: Position the exterior handle assembly, ensuring the spindle aligns with the latch mechanism.
- Install Interior Handle: Attach the interior handle assembly, aligning it with the exterior handle and securing it with the long through-bolts and screws. Ensure the floating spindle design (Figure 6) is correctly engaged for optimal performance.
- Install Strike Plates: Install the deadbolt strike plate and the latch strike plate on the door frame, aligning them with the latches. Secure with screws.
- Test Operation: Close the door and test the operation of both the deadbolt and the handle latch from both the interior and exterior using the keys. Ensure smooth engagement and disengagement.

Figure 4: Adjustable Latch. This image demonstrates how to adjust the deadbolt latch for different backset measurements (60mm or 70mm).

Figure 5: Right-Handed vs. Left-Handed. This image helps determine the correct handing for your door, which is essential for installing the interior lever handle correctly.

Figure 6: Floating Spindle Design. This image highlights the "New Generation" floating spindle design, which enhances internal stability for long-lasting, reliable door handle performance compared to older fixed spindle structures.
Operating Instructions
The Brightify Classic Antique Brass Front Door Lock Set provides secure entry and exit for your home.
- To Lock from Exterior: Insert the key into the deadbolt cylinder and turn it to extend the deadbolt. Remove the key. The handle below will also engage the latch when closed.
- To Unlock from Exterior: Insert the key into the deadbolt cylinder and turn it to retract the deadbolt. Turn the handle lever downwards to open the door.
- To Lock from Interior: Turn the thumb-turn on the interior deadbolt to extend the deadbolt. The interior handle lever will engage the latch when closed.
- To Unlock from Interior: Turn the thumb-turn on the interior deadbolt to retract the deadbolt. Turn the handle lever downwards to open the door.

Figure 7: Lock Set in Use. This image demonstrates the lock set installed on a door, highlighting its robust construction designed for frequent use.
Maintenance
Regular maintenance will ensure the longevity and smooth operation of your Brightify door lock set.
- Cleaning: Clean the exterior surfaces with a soft, damp cloth. Avoid using abrasive cleaners, solvents, or harsh chemicals, as these can damage the antique brass finish.
- Lubrication: Periodically apply a small amount of graphite lubricant (powdered graphite) into the keyway of the deadbolt cylinder. Do not use oil-based lubricants, as they can attract dirt and dust, leading to jamming.
- Tightening Screws: Over time, screws may loosen. Periodically check and tighten all visible mounting screws to ensure the lock set remains securely fastened to the door. Do not overtighten.
Troubleshooting
If you encounter issues with your lock set, refer to the following common problems and solutions:
| Problem | Possible Cause | Solution |
|---|---|---|
| Key sticks or is hard to turn. | Dirt in keyway, worn key, or lack of lubrication. | Apply graphite lubricant to the keyway. Clean the key. If the key is worn, consider having a new one cut. |
| Latch or deadbolt does not extend/retract smoothly. | Misalignment with strike plate, loose screws, or debris in latch mechanism. | Check strike plate alignment and adjust if necessary. Tighten all mounting screws. Clean any visible debris from the latch. |
| Handle feels loose or wobbly. | Mounting screws are loose. | Tighten the screws that secure the interior and exterior handle assemblies. |
| Door does not close properly. | Strike plate misalignment or door/frame swelling. | Adjust the strike plate position. Check for any obstructions or swelling in the door or frame. |
If these solutions do not resolve the issue, please contact Brightify customer support for further assistance.
Specifications
- Model Number: SY2114-AB
- Brand: Brightify
- Color: Antique Brass
- Style: Classic
- Product Dimensions: 2.54 x 5.08 x 5.08 cm; 1.59 kg (Product packaging dimensions)
- Item Dimensions (L x W): 25L x 51W millimeters (Handle dimensions)
- Handle Type: Lever
- Included Components: Installation Hardware, Lock And Key
- Unit Count: 1.0 Count
- Number of Items: 1
- Compatible Door Thickness: 1-3/8" to 1-3/4" (35mm-45mm)
- Adjustable Backset: 2-3/8" (60mm) or 2-3/4" (70mm)
Warranty and Support
Brightify products are manufactured to high-quality standards and are backed by a limited warranty against defects in materials and workmanship. For specific warranty details and duration, please refer to the warranty card included with your purchase or visit the official Brightify website.
For technical support, missing parts, or warranty claims, please contact Brightify customer service through the retailer where the product was purchased or via the contact information provided on the Brightify official website. Please have your model number (SY2114-AB) and proof of purchase ready when contacting support.
Ask a question about this manual
Ask about setup, troubleshooting, compatibility, parts, safety, or missing instructions. Manuals+ will review the question and use this page’s manual context to help answer it.