Introduction
This manual provides detailed instructions for the installation, operation, and maintenance of your FTVOGUE Smart Thermostat. Please read thoroughly before use to ensure proper functionality and safety. This thermostat offers smart programmable scheduling, multiple control modes, battery-powered convenience, accurate temperature management, and energy-efficient operation.
Setup and Installation
Package Contents
- 1 x FTVOGUE Smart Thermostat
- 2 x Screws
- 1 x User Manual
Tools Required (Not Included)
- Phillips head screwdriver
- Drill (if needed for mounting)
- 3 x AA Batteries
Installation Steps
- Turn Off Power: Before beginning any installation, ensure the power to your heating system is turned off at the main circuit breaker to prevent electrical shock.
- Remove Old Thermostat (if applicable): Carefully remove the cover of your old thermostat. Take a photo of the existing wiring connections for reference. Disconnect the wires and remove the old thermostat base from the wall.
- Mount the Thermostat Base: Position the new FTVOGUE thermostat base on the wall where you want to install it. Use the provided screws to secure the base. Ensure it is level for aesthetic purposes.
- Wiring Connections:
The FTVOGUE Smart Thermostat is designed to control wall-hung boilers, electric actuators (normally open NO, normally closed NC), or water pumps less than 600W. Important: Only one control type can be selected. If connecting water pumps, the boiler cannot be connected.
Refer to the diagram below and the labels on the back of your thermostat for precise wiring. The terminals are typically labeled as follows:
- L (Live) & N (Neutral): For AC 95-240V power input.
- 1 & 2: Motor wire 1 and Motor wire 2 (for controlling actuators/pumps).
- 3 & 4: Live and Neutral output for boiler/actuator control.
- 5 & 6: NTC sensor input (10K B3950).
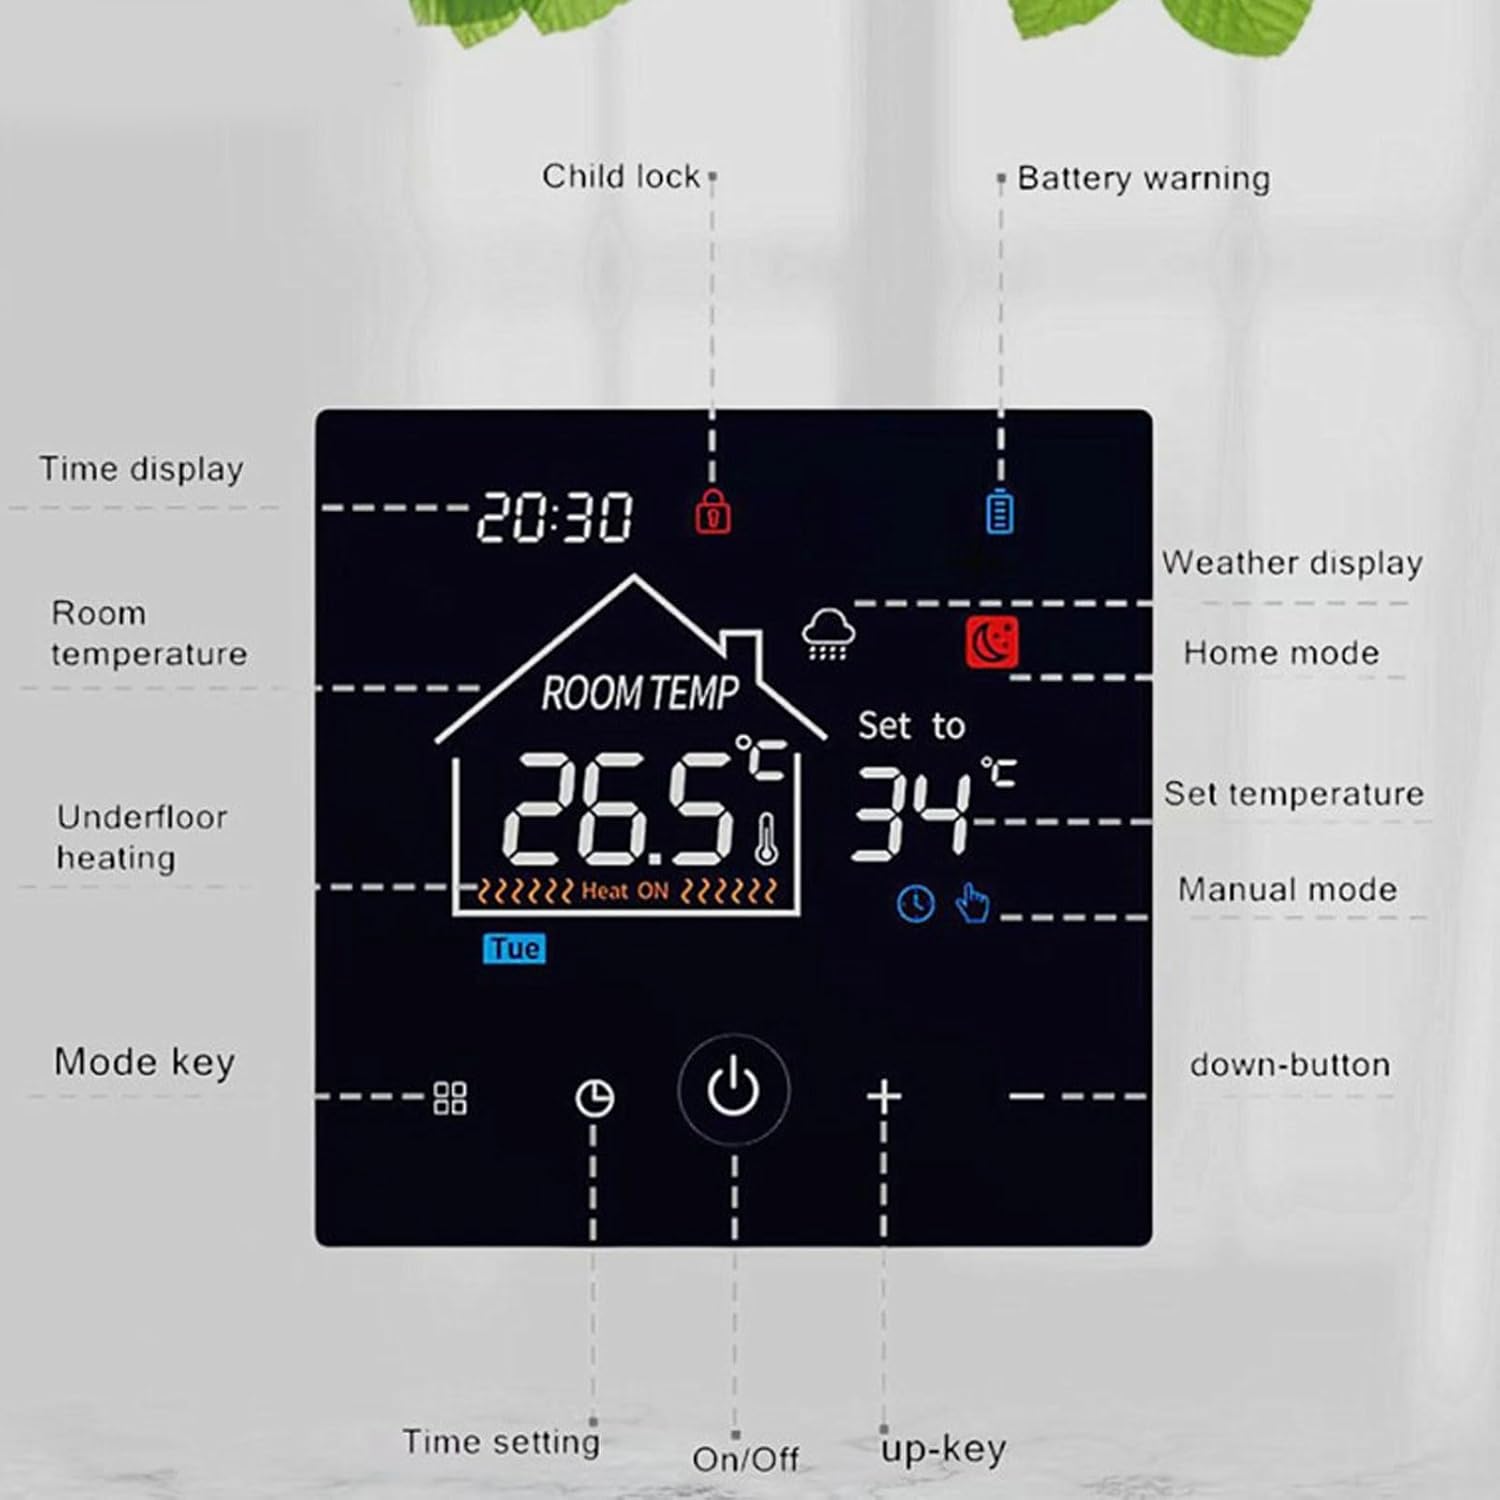
Figure 1: Thermostat Wiring Terminals
Connect your system's wires to the corresponding terminals on the thermostat base. Ensure all connections are secure.
- Insert Batteries: Insert 3 AA batteries (not included) into the battery compartment on the back of the thermostat unit. Ensure correct polarity.
- Attach Thermostat Unit: Carefully align the thermostat unit with the mounted base and push it firmly until it clicks into place.
- Restore Power: Turn the power back on at the main circuit breaker. The thermostat display should light up.
Operating Instructions
LCD Display Overview

Figure 2: LCD Display and Button Functions
The LCD screen displays current time, room temperature, set temperature, and various icons indicating the thermostat's status and active modes. Key icons include:
- Time Display: Shows the current time.
- Room Temperature: Displays the current ambient temperature.
- Set Temperature: Shows the desired temperature.
- Child Lock: Indicates if the child lock function is active.
- Battery Warning: Alerts when batteries are low.
- Weather Display: May show basic weather icons (if connected to a smart home system).
- Home Mode: Indicates the thermostat is in a standard operating mode.
- Manual Mode: Indicates manual temperature control is active.
- Underfloor Heating: Icon for underfloor heating (if applicable).
Basic Operation
- Power On/Off: Press the On/Off button (power icon) to turn the thermostat on or off.
- Adjust Temperature: Use the Up (+) and Down (-) buttons to increase or decrease the set temperature.
- Mode Selection: Press the Mode Key (square icon with dots) to cycle through available operating modes (e.g., Manual, Program, Vacation).
- Time Setting: Press the Time Setting button (clock icon) to adjust the current time.
- Celsius/Fahrenheit: The thermostat supports both Celsius and Fahrenheit display modes. This can typically be switched in the settings menu or by a specific button combination (refer to Figure 3).

Figure 3: Temperature Unit Selection
Programmable Scheduling
The thermostat features weekly programming with a 5+1+1 mode, allowing for six daily temperature intervals. This optimizes your heating schedule for energy efficiency and comfort.
- Access the programming menu via the Mode Key or a dedicated schedule button (if available).
- Set desired temperatures and times for each interval across weekdays (5 days), Saturday (1 day), and Sunday (1 day).
- Save your schedule. The thermostat will automatically adjust the temperature according to your programmed settings.
Vacation Mode
Activate Vacation Mode for extended absences. This mode maintains a lower, energy-saving temperature until you return, helping to reduce heating costs.
Maintenance
Battery Replacement
When the battery warning icon appears on the LCD display, it is time to replace the batteries. The thermostat requires 3 AA batteries. To replace:
- Gently detach the thermostat unit from its wall-mounted base.
- Remove the old AA batteries from the compartment.
- Insert new 3 AA batteries, ensuring correct polarity (+/-).
- Reattach the thermostat unit to its base.
Cleaning
To clean the thermostat, wipe the display and casing with a soft, dry cloth. Do not use abrasive cleaners, solvents, or spray directly onto the unit, as this may damage the electronics or finish.
Troubleshooting
- Thermostat not powering on: Check if the power to your heating system is on at the circuit breaker. Ensure batteries are correctly installed and not depleted. Verify all wiring connections are secure.
- Incorrect temperature readings: Ensure the thermostat is not exposed to direct sunlight, drafts, or heat sources that could affect its sensor.
- Heating/Cooling not responding: Check the operating mode (e.g., ensure it's not in 'Off' or 'Vacation' mode if you expect heating/cooling). Verify wiring connections to your heating system.
- Display issues: If the display is dim or flickering, replace the batteries.
If issues persist after checking these points, please contact customer support.
Specifications
| Item Type | Smart Thermostat |
| Material | ABS |
| Battery | 3 x AA Batteries (Not Included) |
| Size | Approx. 86 x 86 x 30mm / 3.39 x 3.39 x 1.18in |
| Power Consumption | <0.3W |
| Proof Grade | IP20 |
| Sensor | 3950, 10K |
| Display | LCD Screen |
| Temperature Control Accuracy | ±1°C/33.8°F |
| Weight | Approx. 195.00g / 6.88oz |
| Model Number | FTVOGUEzh3b4aydvp |
Figure 4: Product Dimensions
Warranty Information
This FTVOGUE Smart Thermostat is covered by the manufacturer's standard warranty. Please refer to the warranty card included in your product packaging or visit the official FTVOGUE website for detailed terms and conditions regarding warranty coverage, duration, and claims process.
Customer Support
For any questions, technical assistance, or troubleshooting not covered in this manual, please contact FTVOGUE customer support. Contact information can typically be found on the product packaging, the official FTVOGUE website, or through your retailer.