1. Product Overview
The Sanyipace 100FT/30M Self-Leveling Sewer Camera is a professional inspection system designed for examining pipelines, drains, sewers, ducts, and other hard-to-reach areas. It features a self-leveling camera head, a high-stiffness fiberglass push rod, a 1080P HD waterproof camera with adjustable LED lights, and a 10.1-inch IPS display with DVR functionality.
Key features include:
- Self-Leveling Camera: Automatically maintains upright footage orientation.
- Durable Push Rod: 5mm high-stiffness fiberglass cable for extended reach and resistance to kinking.
- High-Resolution Camera: 1080P HD, IP68 waterproof, sapphire glass lens, 12 adjustable LED lights.
- Optimized Probe Design: Cone-shaped tip with centering pulley and protective cover for smooth navigation.
- DVR Functionality: Records video and captures images to a 32GB TF card, with built-in microphone and speaker.
- Distance Counter: On-screen display of camera travel distance in feet or meters.
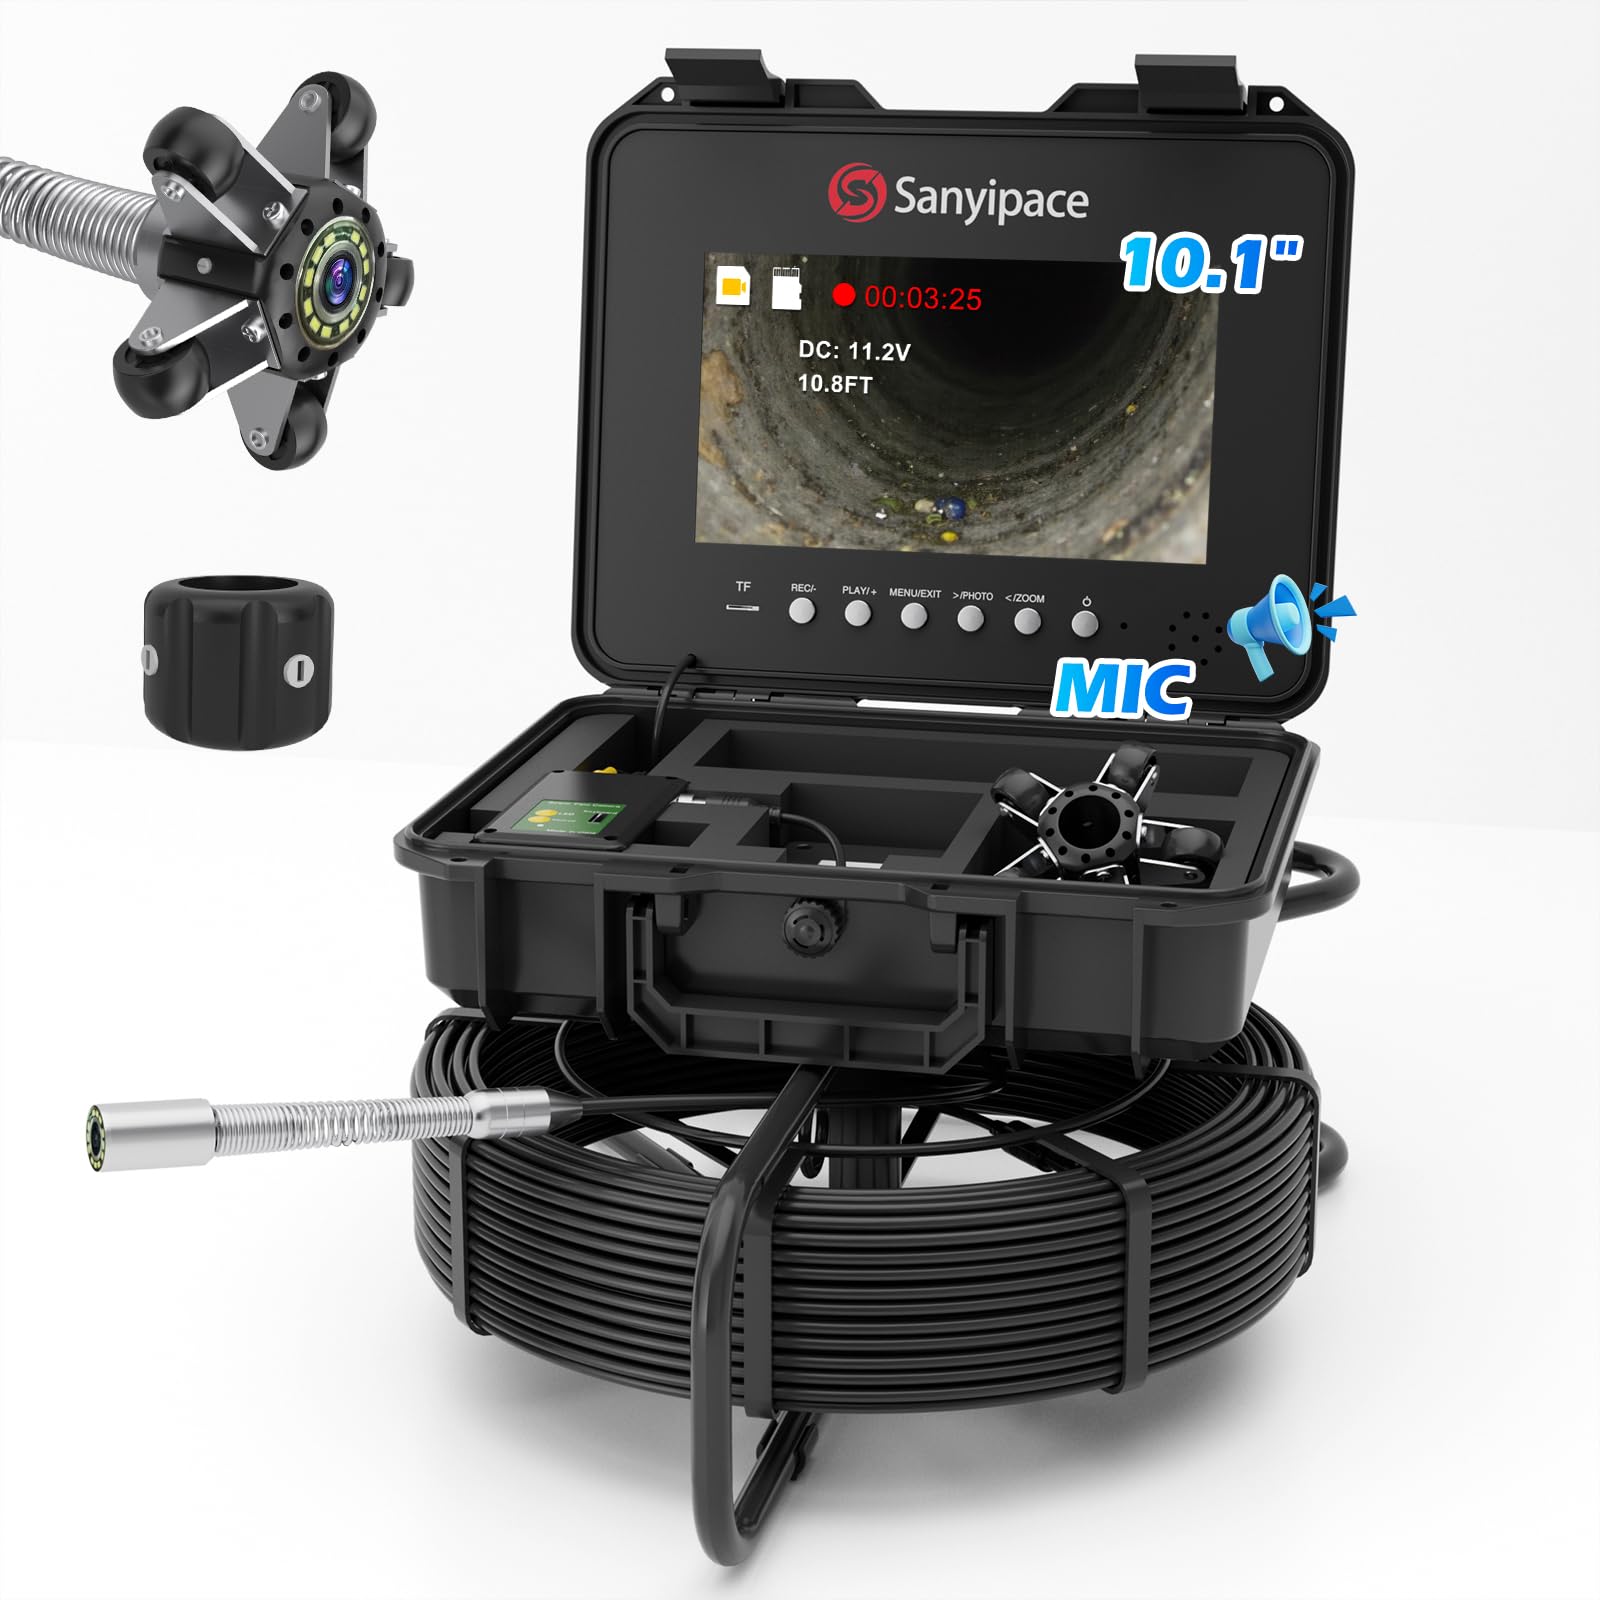
Figure 1: Sanyipace 100FT/30M Self-Leveling Sewer Camera system.

Figure 2: Key features of the Sanyipace Sewer Camera.
2. Safety Information
Please read and understand all safety instructions before operating the Sanyipace Sewer Camera. Failure to follow these instructions may result in electric shock, fire, or serious injury.
- Electrical Safety: Do not expose the monitor or power adapter to water or moisture. Ensure all connections are secure before powering on.
- Battery Safety: Use only the specified charging adapter. Do not disassemble, crush, or expose the battery to extreme temperatures.
- Cable Handling: Avoid sharp bends or kinks in the push rod. Do not force the camera through obstructions.
- Environmental Conditions: Operate the camera within specified temperature ranges. Avoid using in explosive atmospheres.
- Personal Protective Equipment (PPE): Always wear appropriate PPE, such as gloves and eye protection, when conducting inspections.
- Cleaning: Disconnect power before cleaning. Use a damp cloth; do not immerse the monitor unit in water.
3. Package Contents
Verify that all items listed below are included in your package:
- Sewer Camera System (with 100FT/30M cable and self-leveling camera head)
- 32GB TF Card
- 1.5-inch (38mm) Protective Cover
- 3.9-inch (99mm) Pipe Pulley
- DC Power Adapter
- Screwdriver
- Test Line
- User Manual

Figure 3: Package contents of the Sanyipace Sewer Camera.
4. Setup Instructions
- Charge the Battery: Connect the DC Power Adapter to the charging port on the monitor unit and plug it into a power outlet. Allow the unit to charge fully before first use (approximately 6-8 hours for the 4500mAh battery).
- Insert TF Card: Locate the TF card slot on the monitor unit. Gently insert the provided 32GB TF card until it clicks into place. Ensure the card is inserted correctly to enable recording and image capture.
- Attach Camera Accessories:
- For smaller pipes or general inspection, attach the 1.5-inch (38mm) Protective Cover to the camera head.
- For larger pipes (e.g., >3.9 inches / 99mm straight pipe), attach the 3.9-inch (99mm) Pipe Pulley to help center the camera and protect it during navigation.

Figure 5: Attaching the protective cover or pipe pulley to the camera head.
- Power On: Press and hold the power button on the monitor unit to turn on the system. The display will show the live camera feed.

Figure 4: TF card insertion and battery location.
5. Operating Instructions
5.1 Basic Operation
- Power On/Off: Press and hold the power button to turn the unit on or off.
- Live View: Upon powering on, the 10.1-inch IPS screen will display the live feed from the camera.
- LED Brightness Adjustment: Use the dedicated buttons on the control panel to adjust the brightness of the 12 LED lights on the camera head (5 levels available).

Figure 6: HD 1080P Sewer Camera with HDR Imaging and adjustable LED lights.
5.2 Self-Leveling Function
The camera head features an automatic self-leveling function. This ensures that the image displayed on the monitor always remains upright, regardless of the camera's rotation within the pipe. This provides a consistent and clear view for inspection.

Figure 7: Self-leveling camera head maintaining upright footage.
5.3 Video Recording and Image Capture
The system allows for recording video and capturing still images directly to the inserted 32GB TF card.
- Start/Stop Recording: Press the "REC" button to start video recording. Press it again to stop. A red indicator on the screen will show when recording is active.
- Capture Image: During live view or recording, press the "PHOTO" button to capture a still image.
- Playback: Use the "PLAY/+" button to enter playback mode. Navigate through recorded files using the directional buttons.
- Audio Recording: The built-in microphone records audio along with video, allowing for voice annotations during inspections. The integrated speaker allows for playback of recorded audio.

Figure 8: DVR functions including video recording, image capture, and audio playback.
5.4 Distance Counter
The integrated distance counter displays the length of cable pushed into the pipe on the screen. This helps in accurately pinpointing the location of issues.
- The distance is displayed in real-time on the monitor.
- Long-press the designated button (refer to the user manual for exact button) to toggle between feet and meters.

Figure 9: On-screen distance counter in operation.
5.5 Digital Zoom
The system supports up to 5X digital zoom, allowing for closer examination of details within the pipe.
- Use the zoom buttons (refer to the user manual for exact buttons) to adjust the magnification level.

Figure 10: Digital zoom functionality.
5.6 Navigating Pipes
Carefully push the fiberglass rod into the pipe. The semi-rigid design provides strong pushing force while resisting kinks. Use the protective cover or pipe pulley as appropriate for the pipe diameter to ensure smooth navigation and camera protection.

Figure 11: Using the semi-rigid fiberglass push rod for pipe inspection.

Figure 12: Pipe diameter compatibility with camera accessories.
6. Maintenance
- Cleaning the Camera Head: After each use, carefully clean the camera lens and housing with a soft, damp cloth. Do not use abrasive cleaners or solvents.
- Cleaning the Push Rod: Wipe down the fiberglass push rod with a damp cloth to remove any debris or residue.
- Monitor Unit: Clean the monitor screen and casing with a soft, dry cloth. Avoid getting liquids into the ports.
- Storage: Store the entire system in its original case in a cool, dry place, away from direct sunlight and extreme temperatures. Ensure the cable is neatly coiled to prevent damage.
- Battery Care: For long-term storage, charge the battery to approximately 50% every three months to prolong its lifespan.
7. Troubleshooting
| Problem | Possible Cause | Solution |
|---|---|---|
| No image on screen | Unit not powered on; camera cable disconnected; low battery. | Ensure unit is powered on. Check camera cable connection. Charge the battery. |
| Poor image quality (dark/blurry) | Insufficient LED brightness; dirty camera lens; water on lens. | Adjust LED brightness. Clean the camera lens. Ensure lens is dry. |
| Cannot record video/capture images | TF card not inserted; TF card full; TF card corrupted. | Insert TF card correctly. Delete old files or replace TF card. Format TF card (backup data first). |
| Camera stuck in pipe | Obstruction in pipe; incorrect accessory for pipe size. | Gently retract the camera. Do not force. Re-evaluate pipe diameter and use appropriate accessory (protective cover/pulley). |
| Distance counter inaccurate | Cable slippage; debris affecting sensor. | Ensure smooth cable feed. Clean the cable and counter mechanism. |
8. Specifications
| Feature | Detail |
|---|---|
| Model | B0DYDGXG2N |
| Cable Length | 100FT / 30M |
| Camera Head Diameter | 5mm / 0.2 inches (cable diameter, camera head is larger) |
| Camera Resolution | 1080P HD |
| Waterproof Rating | IP68 |
| Display Screen | 10.1-inch IPS |
| Storage | 32GB TF Card (included) |
| Battery | 4500mAh Lithium Ion (6-8 hours operation) |
| LED Lights | 12 ultra-bright LEDs with 5-level adjustable brightness |
| Product Dimensions | 14.76 x 20.67 x 11.43 inches |
| Item Weight | 17.86 pounds |
| Manufacturer | Sanyipace |
| Media Type | Micro SD Card |
9. Warranty and Support
Sanyipace products are designed for reliability and performance. For warranty information, technical support, or service inquiries, please contact Sanyipace customer service through the retailer where the product was purchased or visit the official Sanyipace website.
Please have your model number (B0DYDGXG2N) and purchase date available when contacting support.