Panana Heavy Duty Garden Tipping Cart (Model GPGC02) User Manual
Your guide to assembly, operation, and maintenance.
1. Introduction
Thank you for choosing the Panana Heavy Duty Garden Tipping Cart. This cart is designed to simplify your outdoor tasks, offering a robust solution for transporting various materials in your garden, yard, or farm. Its durable construction and efficient tipping mechanism make it an indispensable tool for heavy-duty work.
This manual provides essential information for the safe and effective use of your garden cart. Please read it thoroughly before assembly and operation, and retain it for future reference.
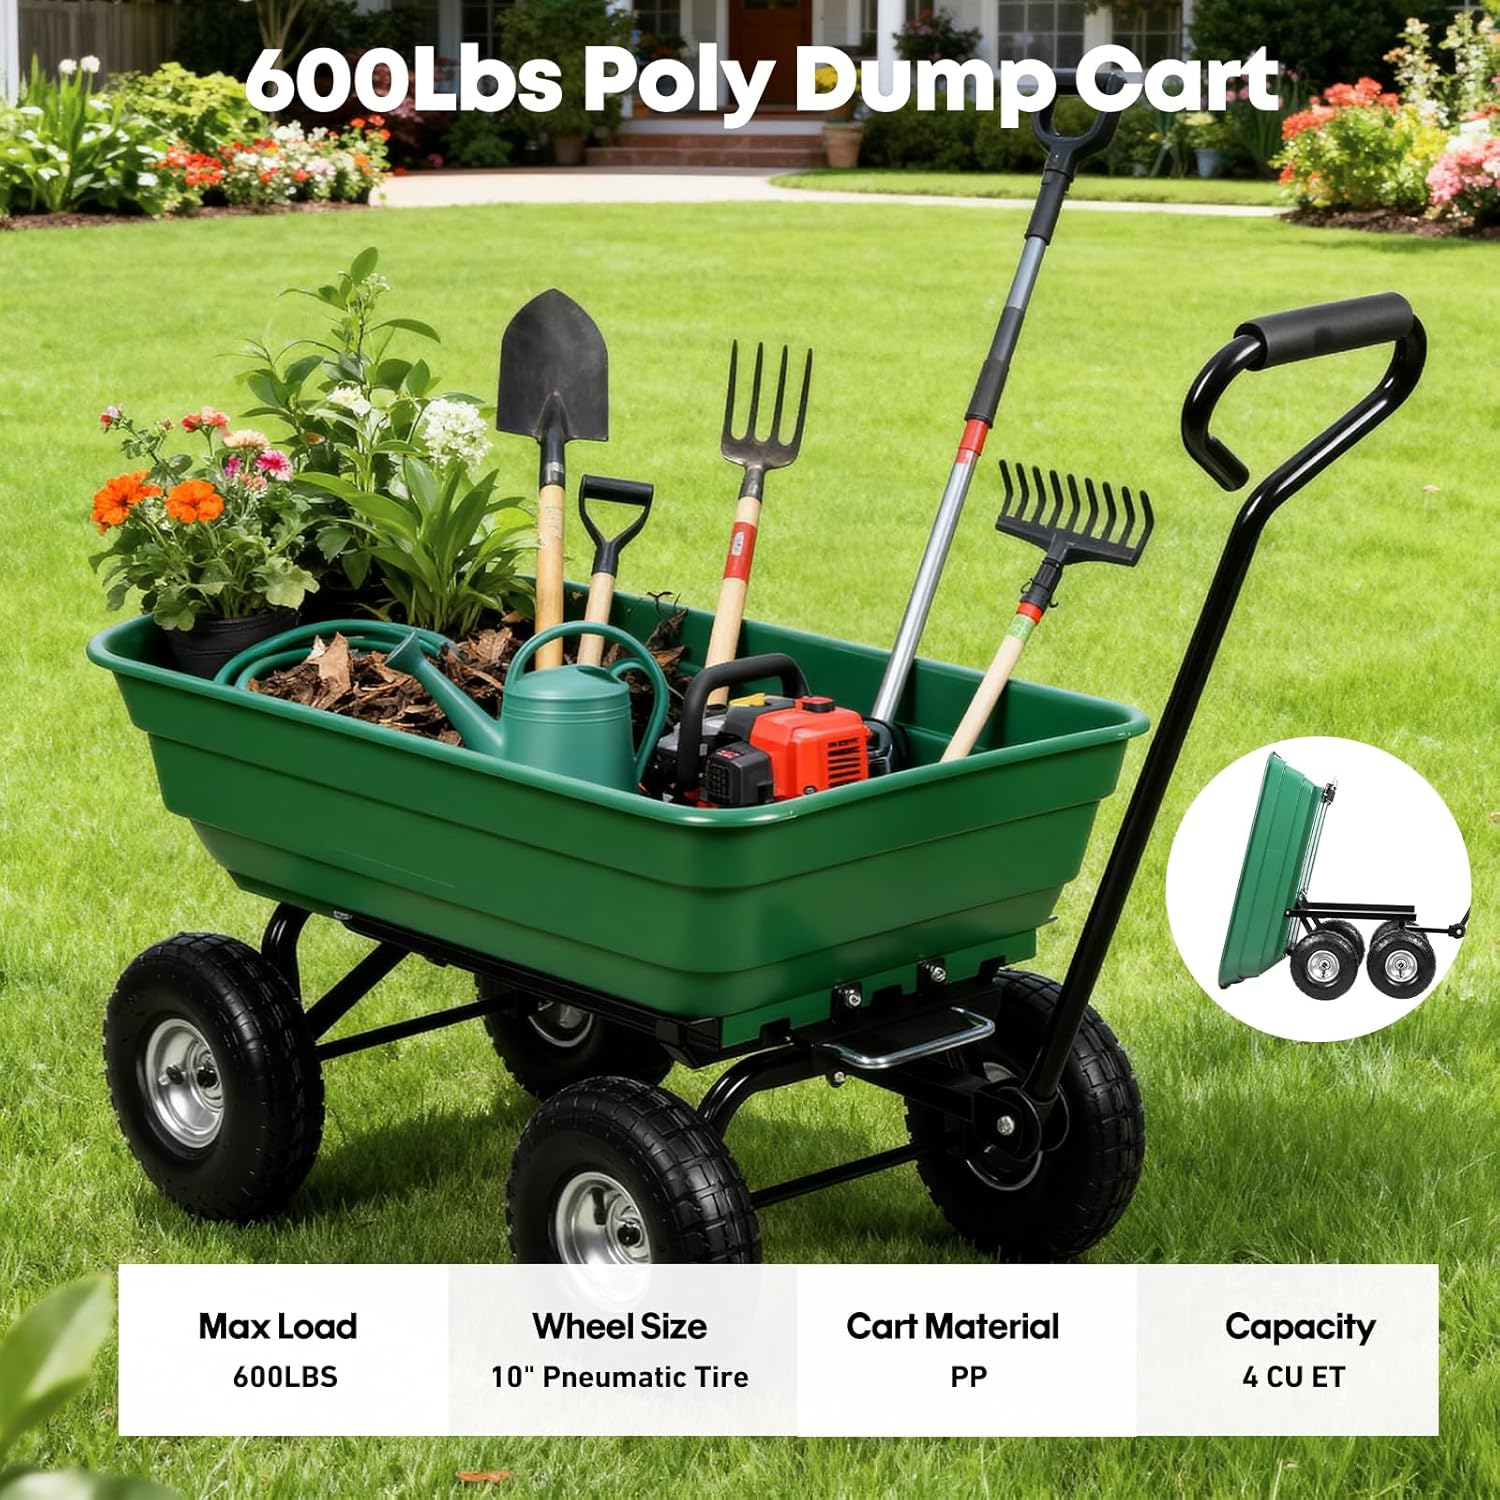
Image 1.1: Panana Heavy Duty Garden Tipping Cart in use, demonstrating its capacity for gardening tools and materials.
2. Safety Information
To ensure safe operation and prevent injury or damage, always adhere to the following safety guidelines:
- Do not overload the cart: The maximum load capacity is approximately 250 kg (600 lbs). Exceeding this limit can cause structural damage or tipping.
- Distribute load evenly: Unevenly distributed loads can affect stability and make the cart difficult to maneuver or prone to tipping.
- Wear appropriate footwear: Sturdy, closed-toe shoes are recommended when operating the cart.
- Be aware of your surroundings: Watch for obstacles, uneven terrain, and other people or animals.
- Keep children and pets away: Do not allow children or pets to ride in or play near the cart.
- Secure loads: For loose materials, ensure they are contained within the poly tub to prevent spillage during transport.
- Use on stable ground: Avoid operating the cart on steep inclines or unstable surfaces where it could tip over.
3. Package Contents
Before assembly, verify that all components are present and undamaged. If any parts are missing or damaged, contact customer support.
- Polypropylene (PP) Tub
- Powder-Coated Steel Frame (Base and Handle Frame)
- 4 Pneumatic Tyres (Wheels)
- Steel Handle with Soft Grip
- Metal Brackets and Hardware (bolts, nuts, washers, pins)
4. Setup and Assembly
Assembly is required for this product. While the manufacturer states "Assembly Required: No" in some specifications, this refers to specialized assembly. User assembly is necessary. It is recommended to have a helper for easier and quicker assembly. You will need spanners, screwdrivers, and an air pump for the tires.
- Secure the Handle to the Base Frame: Attach the handle frame to the main base frame using the provided hardware. Ensure all bolts are tightened securely.
- Install the Metal Bracket: Position and secure the metal bracket(s) that support the poly tub to the base frame.
- Install the Wheels: Attach the four pneumatic tires to the axles on the base frame. Ensure all pins or nuts are securely fastened. Inflate tires to the recommended pressure (check tire sidewall for details).
- Attach the Handle: Connect the main pulling handle to the front steering axle. Ensure it can pivot freely for steering.
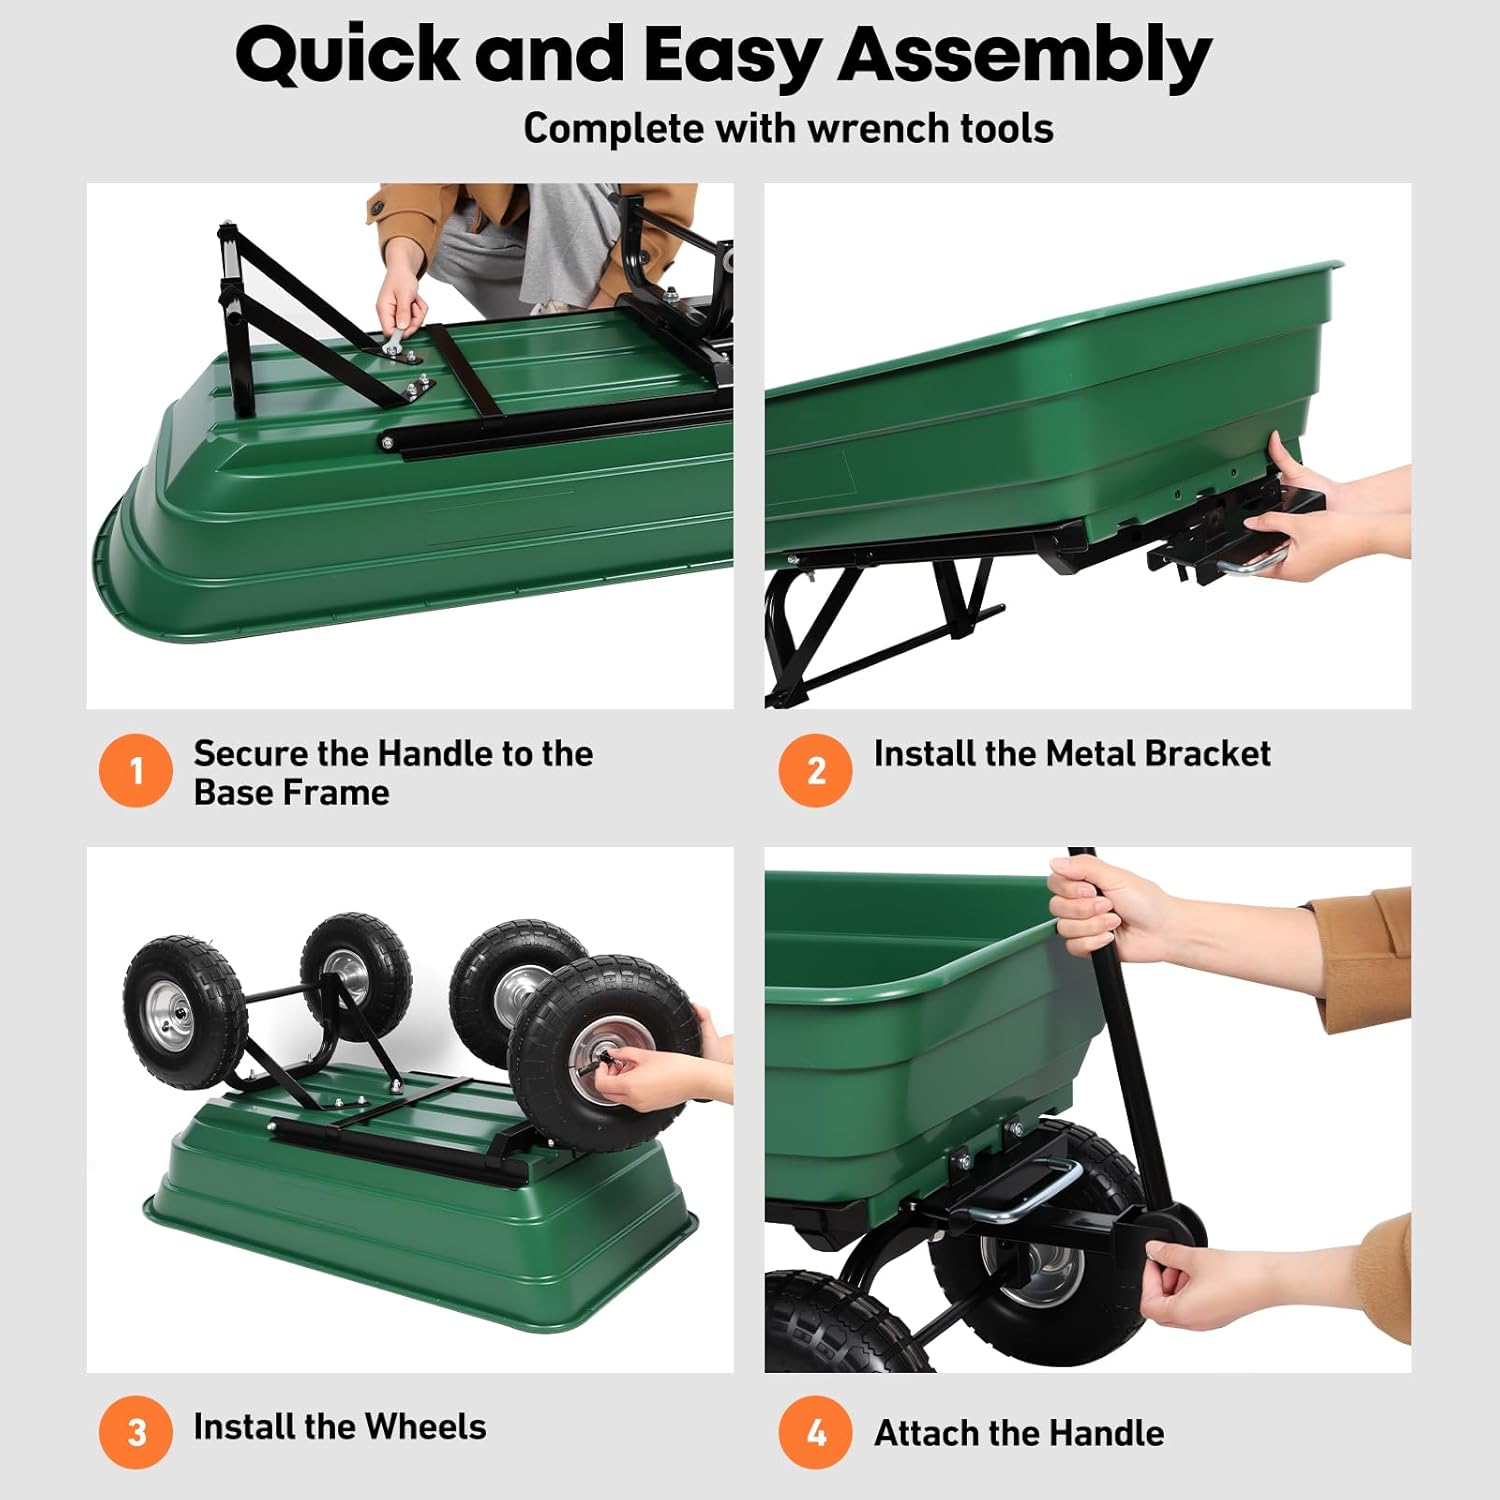
Image 4.1: Quick and Easy Assembly steps for the garden cart.
5. Operating Instructions
5.1 Loading the Cart
- Place materials evenly within the 75-liter poly tub.
- Do not exceed the maximum load capacity of 250 kg (600 lbs).
- Avoid sharp objects that could damage the poly tub.
5.2 Maneuvering and Steering
- The ergonomic handle provides a comfortable grip.
- The 180° adjustable handle allows for flexible positioning and control.
- The front steering axle enables easy turning, even when the cart is fully loaded.
- The 10-inch pneumatic tires ensure smooth movement across various terrains, including grass, gravel, and uneven ground.
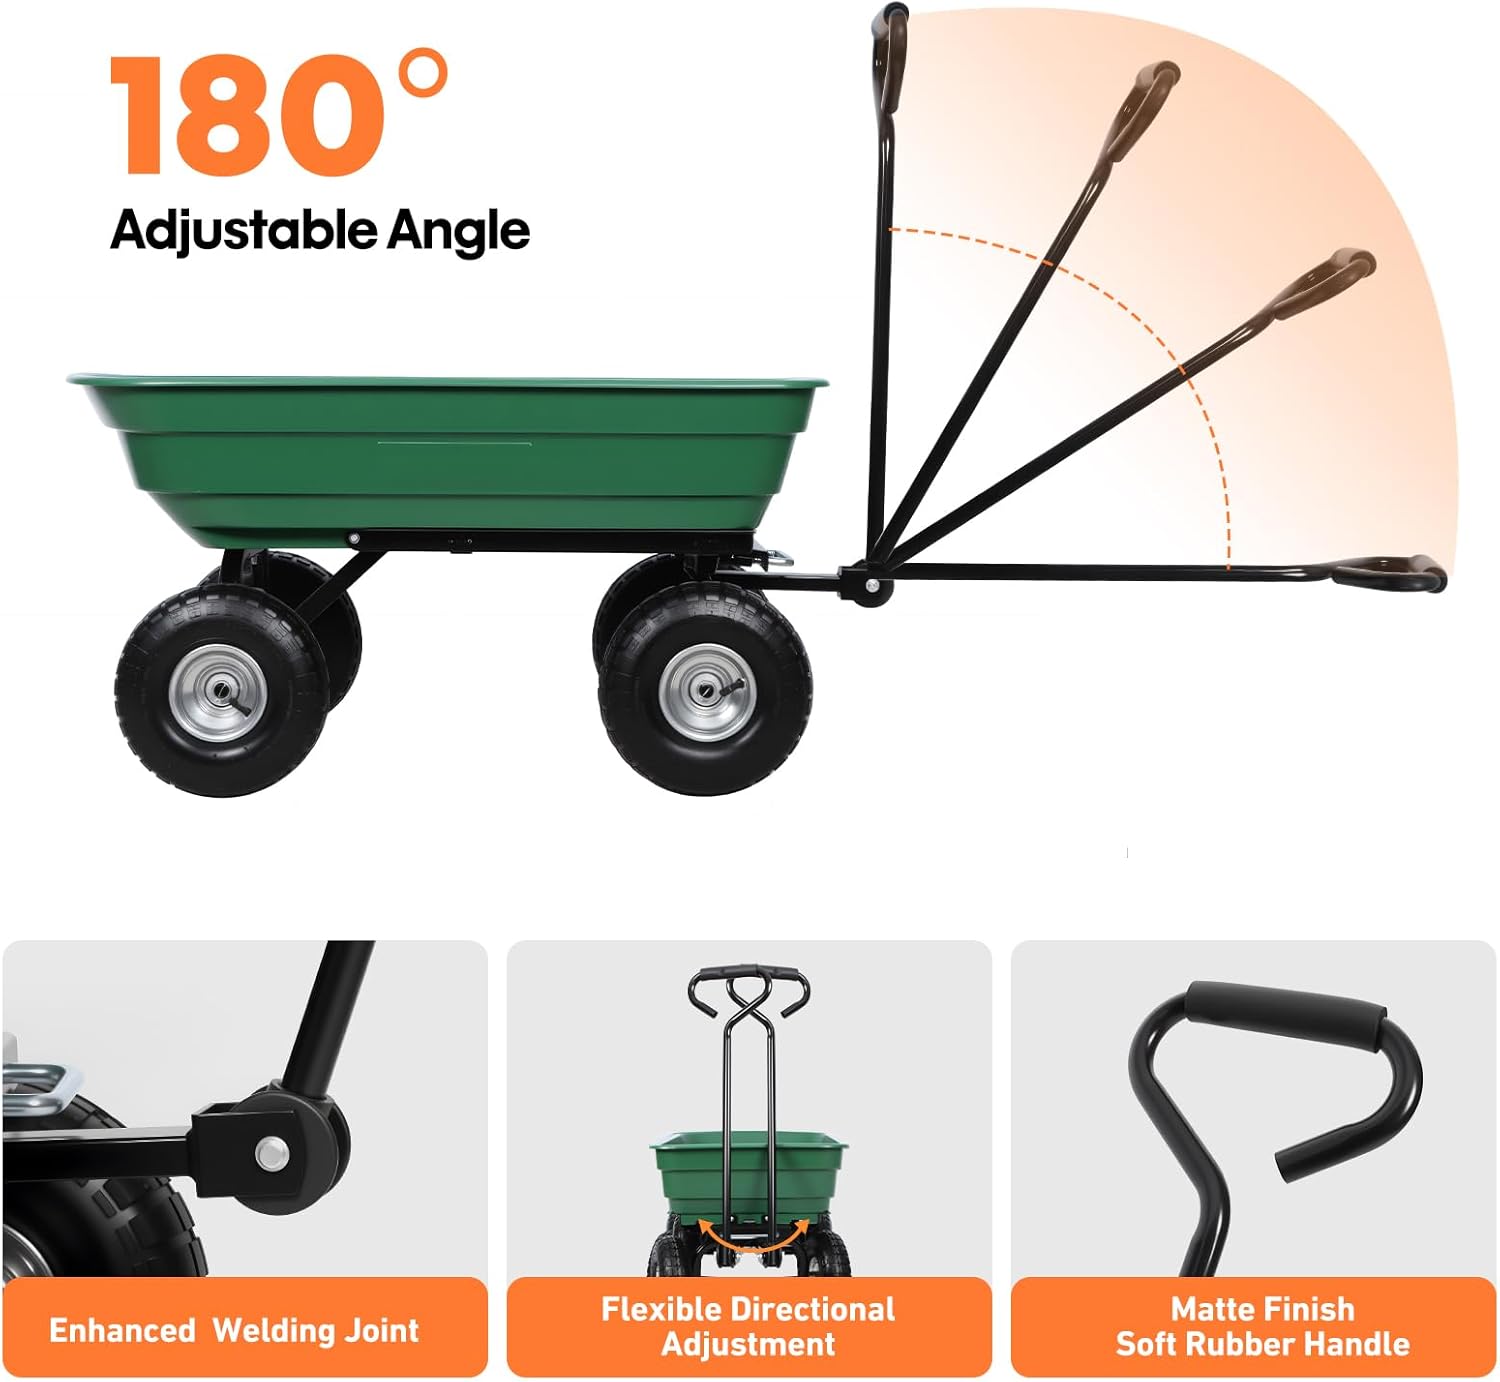
Image 5.1: Features of the adjustable handle and robust construction.
5.3 Tipping Mechanism
The cart features a quick-release tipping system for effortless unloading.
- Ensure the cart is on level ground and stable before tipping.
- Locate the manual release lever, typically near the front handle.
- Disengage the locking mechanism by operating the lever.
- Lift the handle upwards and forward to tip the poly tub, allowing the contents to dump out.
- Once unloaded, return the tub to its horizontal position and ensure the locking mechanism re-engages.

Image 5.2: Illustration of the cart's tipping function.
6. Maintenance
Regular maintenance will extend the life and performance of your garden cart.
- Cleaning: After each use, clean the poly tub with water to remove dirt, debris, or corrosive materials. The polypropylene material is rustproof.
- Tire Pressure: Periodically check the air pressure in the pneumatic tires. Maintain the recommended pressure as indicated on the tire sidewall. Under-inflated tires can affect maneuverability and load capacity.
- Lubrication: Grease all moving parts, especially axle points and the tipping mechanism, to ensure smooth operation and prevent rust or seizing over time.
- Hardware Check: Regularly inspect all bolts, nuts, and pins to ensure they are tight and secure. Tighten any loose fasteners.
- Storage: Store the cart in a dry, sheltered area when not in use to protect it from extreme weather conditions.

Image 6.1: The 10-inch pneumatic tires are designed for various terrains, requiring proper inflation for optimal performance.
7. Troubleshooting
- Difficulty during assembly: Some users have reported misaligned holes or difficulty with bolts. Ensure you have the correct tools (spanners, screwdrivers) and consider having a second person assist with holding parts in place.
- Cart tips to one side when loaded: This usually indicates an uneven load distribution. Always try to balance the weight of items within the poly tub, especially for heavier materials.
- Tires lose air or leak: Pneumatic tires may require periodic inflation. If a tire consistently loses air, check for punctures or valve issues. Replacement inner tubes or wheels may be necessary if leaks persist.
- Stiff tipping mechanism: Ensure all moving parts are clean and adequately lubricated. Check for any obstructions or bent components.
8. Specifications
| Feature | Specification |
|---|---|
| Product Dimensions (L x W x H) | 93 cm x 51 cm x 21 cm (36.61" x 20.08" x 8.27") |
| Overall Height (with handle) | 95 cm (37.4") |
| Brand | Panana |
| Model Number | GPGC02 |
| Material | Polypropylene (PP) Tub, Alloy Steel Frame |
| Color | Green |
| Capacity | 75 Litres (approx. 4 CU FT) |
| Maximum Load | Approx. 250 kg (600 lbs) |
| Item Weight | 13 Kilograms (28.6 pounds) |
| Number of Wheels | 4 |
| Wheel Type | 10-inch Pneumatic Tyres |
| Special Features | Durable, Ergonomic Handle, Heavy Duty, Sturdy, Tipping Mechanism |
| Recommended Uses | Outdoor (Garden, Yard, Farm, Allotment) |
| UPC | 710917625110 |

Image 8.1: Detailed product dimensions and parameters.
9. Warranty and Support
For warranty information, technical support, or to inquire about replacement parts, please contact Panana customer service through the retailer where you purchased the product or visit the official Panana website. Please have your model number (GPGC02) and purchase date available when contacting support.